![]()
USER MANUAL USER MANUAL
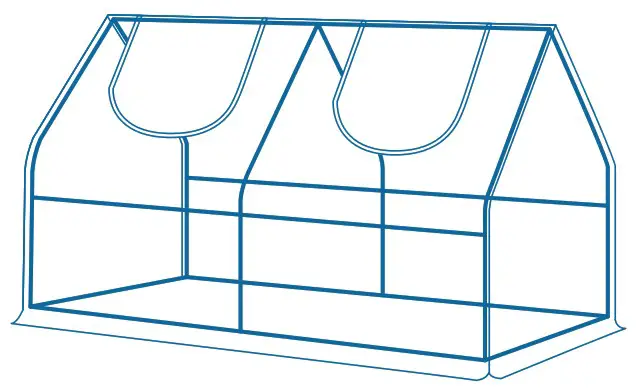
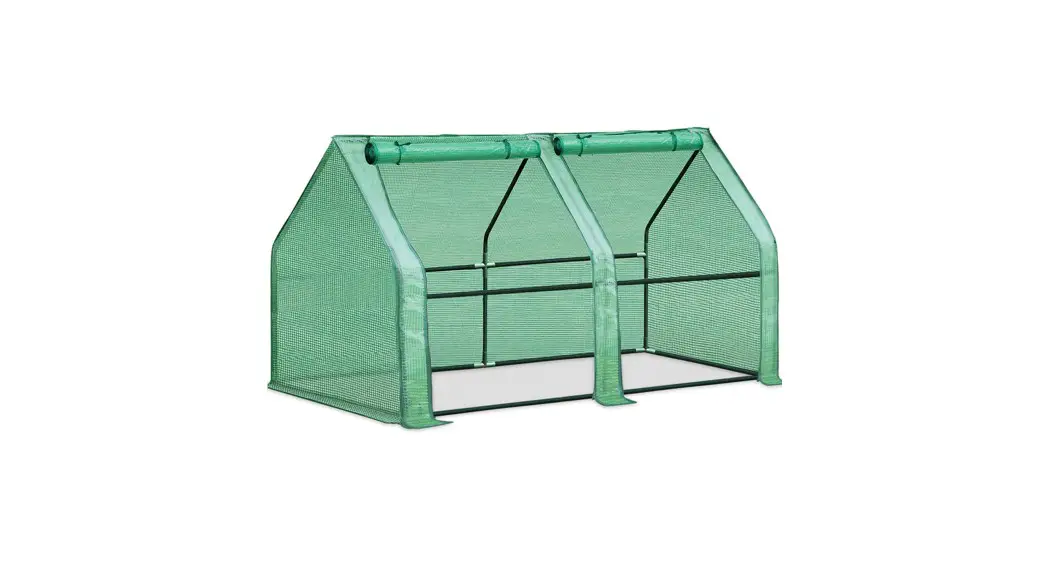
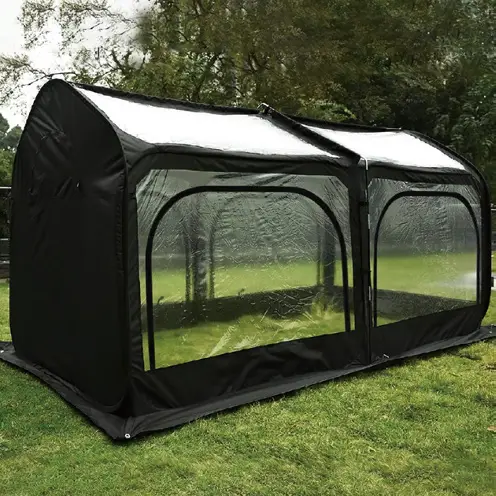
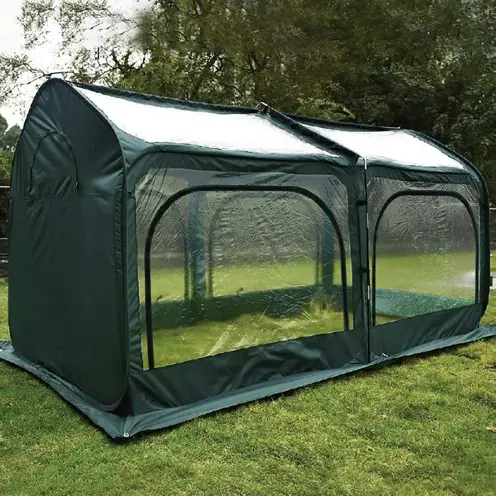
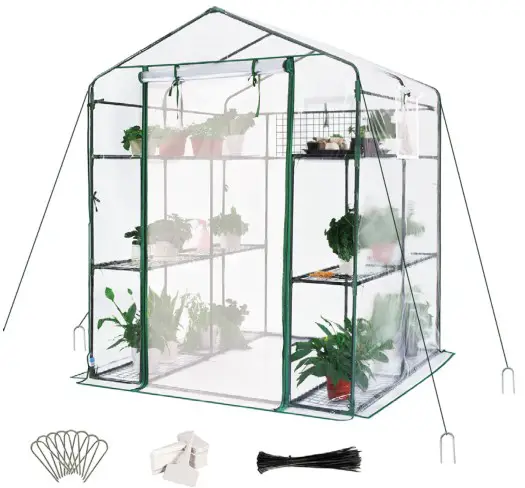
71 Inch x 36 Inch x 36 Inch Portable and Walk-In Greenhouse
Please read, understand, and practice guidelines in this user manual before use, and keep it for future reference.
| 71″ x 36″ x 36″ 95″ x 36″ x 36″ | 56″ x 29″ x 77″ 56” x 56” x 77” |
* Use indoors or in a sheltered place.
IMPORTANT
We’d love to hear from our customers. If you have any questions about the manual, would like us to help in any way, or have any suggestions and comments, please feel free to contact the support team. We will reply in 12 hours (business days).
Other Greenhouses from Quictent
 | Size: 10′ x 9′ x 8′ Model #1302 |
 | Size: 12′ x 7′ x 7′ Model #1303 |
 | Size: 20′ x 10′ x 7′ Model #1306 |
  | Size: 20′ x 10′ x 7′ Model #1306G Upgraded version of Model #1306 Available in 2 colors: Green and White |
  | Size: 98″ x 49″ x 53″ Model #0163 Available in 2 colors: Dark and Green |
This user manual applies to Quictent mini greenhouses. It will help you to get to know your Quictent mini greenhouse. Please read the guidelines in this manual and keep the manual for future reference.
We may update the manual without notice in advance. You can always search “Quictent Instructions” online for the latest version.
About Quictent
Founded in the early 21st century, Quictent has grown into a popular brand with reliable products and excellent customer service during the past decades. We started with pop up canopies, and then expanded to other more categories of shelters and the like including party tents, carports, greenhouses, garden beds, grow tents, shade sails, patio umbrellas and RV covers. Driven by the vision to create unique spaces to meet every specific need and become a part of America’s landscape, we at Quictent would spare no effort to keep innovating.
Our Vision
To create unique spaces to meet every specific need, and become a part of America’s landscape.
Our Mission
To keep innovating and provide a wide range of reliable shelters and shades at consumer-grade prices with customer-first service.
Our Service
The customer-centric service is what we at Quictent take great pride in. In addition to the hassle-free warranty covering all Quictent products, an industrial-leading support team is standing behind at all times. Whenever you need help or have any suggestions and comments, do not hesitate to contact us. You’re sure to get a to-the-point reply in 12 hours.
71″ x 36″ x 36″
IMPORTANT!
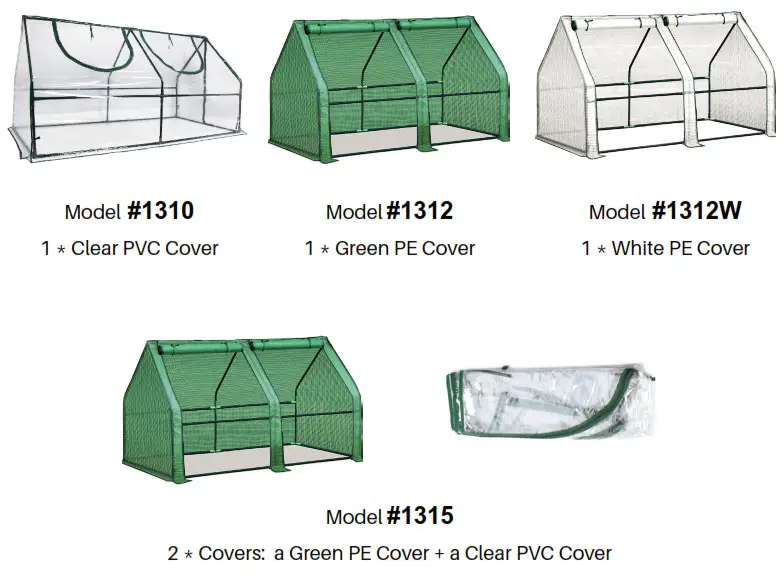
- Apply to Model #1310, Model #1312, Model #1312W, and Model #1315.
- All the models in this size have the SAME frame (both the structure and materials) with the parts numbered from #1 – #D in the Parts List.
- You can tell the model from each other according to the COVER (part #4 in the
Parts List) you received.
Parts List
Please refer to this chapter if you’re owning a Quictent mini greenhouse in 71″ x 36″ x 36″. All parts come in one (1) box only. Please pay particular attention to make sure all parts are numbered and graphically indexed, so does the quantity for each part as per the Parts List below. If you need any help, please EMAIL the support team at your earliest convenience with the order number, required part(s), quantity for each part, and photos (or video clips, if applicable), we’ll get back soon to help out.
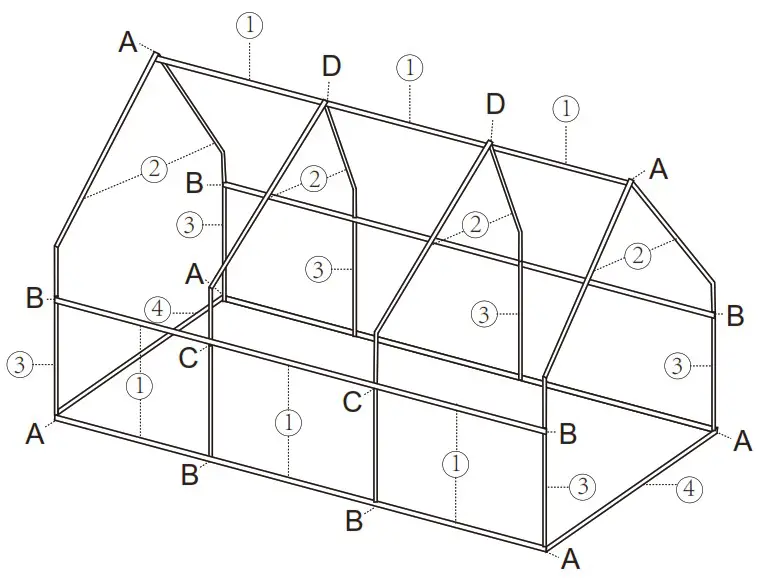
| Part Number | Diagram | Description | Quantity (PCS) |
| #1 | Long Pole (30.3″) | 12 | |
| #2 |  | Pole with Curved End | 6 |
| #3 | Short Pole (12.8″) | 8 | |
| #A | 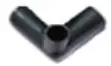 | 3-Way Connector | 6 |
| #B |  | T-Shaped 3-Way Connector | 6 |
| #C |  | X-Shaped 4-Way Connector | 2 |
| #D |  | 4-Way Connector | 1 |
| #E |  | 1 * Clear PVC Cover for Model #1310 1 * Green PE Cover for Model #1312 1 * White PE Cover for Model #1312W 2 * Covers (A Clear PVC Cover + A Green PE Cover) for Model #1315 | |
Assembly
Read Before the Assembly
√ Check to make sure that you have all parts listed on the Parts Lists.
√ Before moving to the next step, please make sure the end of the poles are aligned with the bottom of the connectors, which indicates that the poles are fully seated inside the connectors.
Step 1 Connect the poles (#1) with the connectors (#A & #B). You’ll use:
| 4 x Part #1 2 x Part #4 4 x Part #A 2 x Part #B | 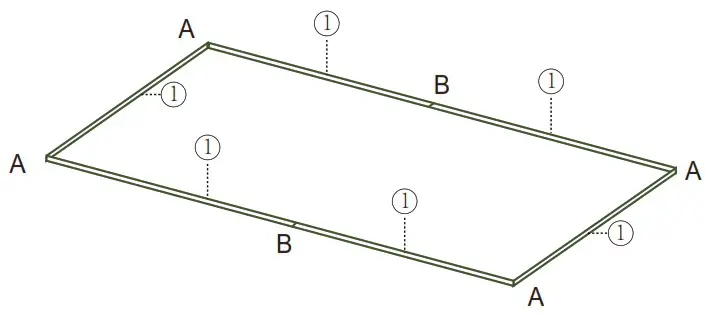 |
Step 2 Insert the poles (#3) into the connectors (#A & #B), then put the connectors (#B & #C) on the top of each pole. You’ll use:
| 6 x Part #3 4 x Part #B 2 x Part #C | 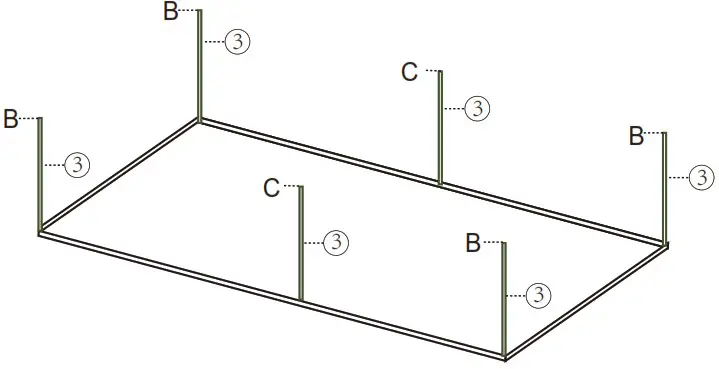 |
Step 3 Connect the poles (#1 & #2) with the assembled connectors (#B & #C). You’ll use:
| 4 x Part #1 6 x Part #2 | 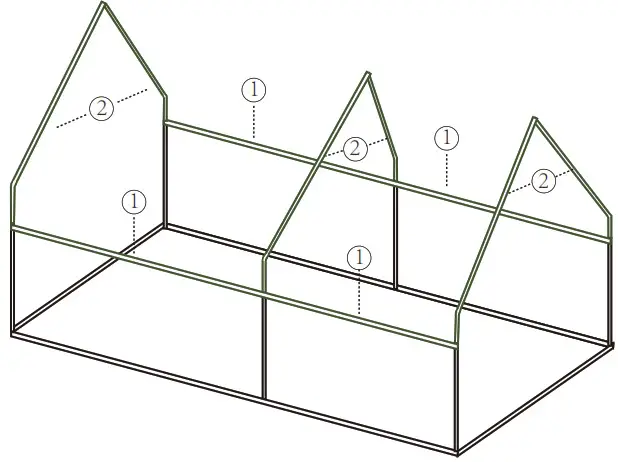 |
Step 4 Connect the poles (#1) with the connectors (#A & #D). You’ll use:
| 2 x Part #1 2 x Part #A 1 x Part #D | 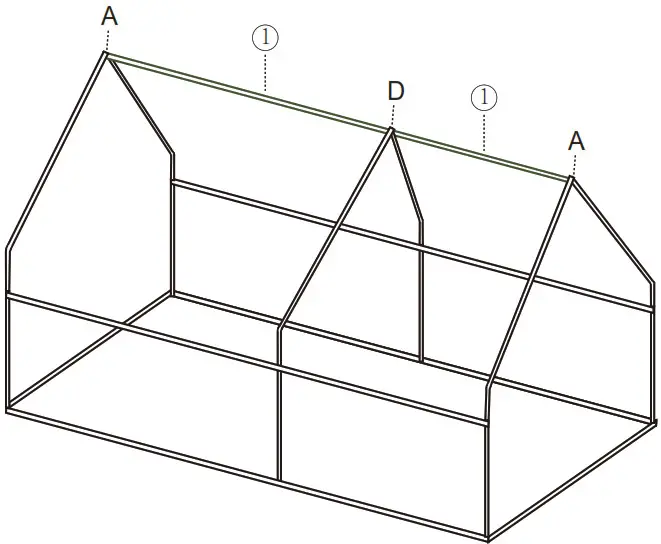 |
Step 5 Put on the cover.
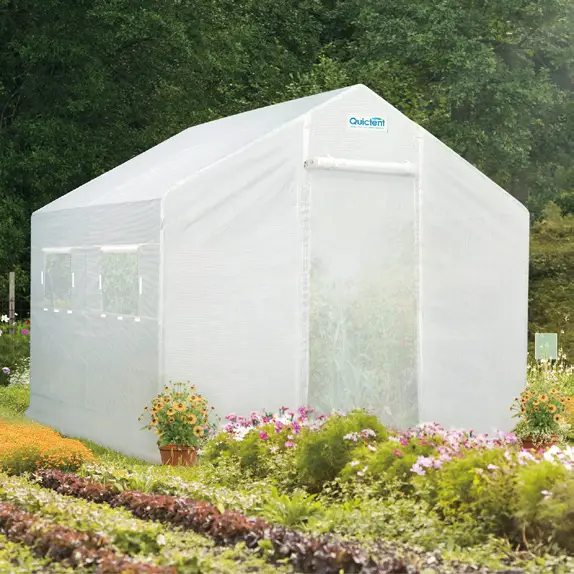
95″ x 36″ x 36″
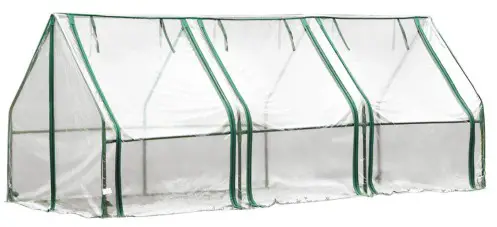 | 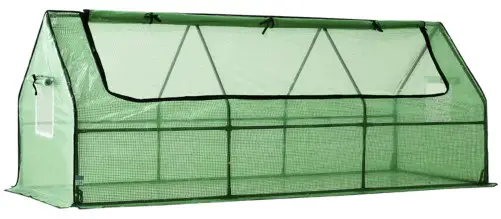 |
| Model #1316 with a Clear PVC Cover | Model #1318 with a Green PE Cover |
IMPORTANT!
- The two models in this size (Model #1316 & Model #1318) are the SAME except for the COVER (#F).
- Model #1316 has a clear PVC cover.
- Model #1318 has a green PE cover.
Parts List
Please refer to this chapter if you’re owning a Quictent mini greenhouse in 95″ x 36″ x 36″ (Model #1316 & Model #1318). All parts come in one (1) box only. Please pay particular attention to make sure all parts are numbered and graphically indexed, so does the quantity for each part as per the Parts List below. If you need any help, please EMAIL the support team at your earliest convenience with the order number, required part(s), quantity for each part, and photos (or video clips, if applicable), we’ll get back soon to help out.
| Part Number | Diagram | Description | Quantity (PCS) |
| #1 | Long Pole (30.3″) | 12 | |
| #2 | | Pole with Curved End | 8 |
| #3 | Pole (12.8″) | 8 | |
| #4 | Long Pole (33.5″) | 2 | |
| #A | | 90-Degree 3-Way Connector | 6 |
| #B | | T-Shaped 3-Way Connector | 8 |
| #C | | X-Shaped 4-Way Connector | 4 |
| #D | | 4-Way Connector | 2 |
| #E |  | Stake | 8 |
| #F | | Cover | 1 |
Assembly
Read Before the Assembly
√ Check to make sure that you have all parts listed on the Parts Lists.
√ Before moving to the next step, please make sure the end of the poles are aligned with the bottom of the connectors, which indicates that the poles are fully seated inside the connectors.
Step 1 Connect the poles (#1 & #4) with the connectors (#A & #B). You’ll use:
| 6 x Part #1 2 x Part #4 4 x Part #A 4 x Part #B | 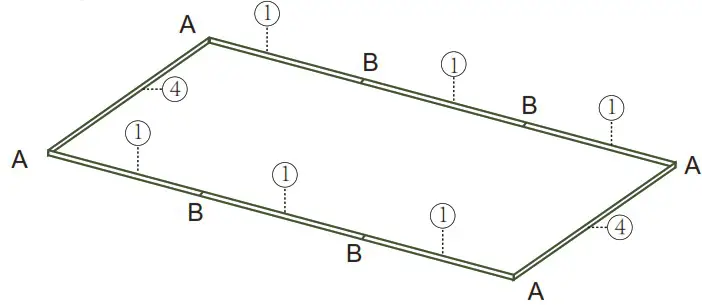 |
Step 2 Insert the poles (#3) into the assembled connectors (#A & #B), then put the connectors (#B & #C) on the top of each pole. You’ll use:
| 8 x Part #3 4 x Part #B 4 x Part #C | 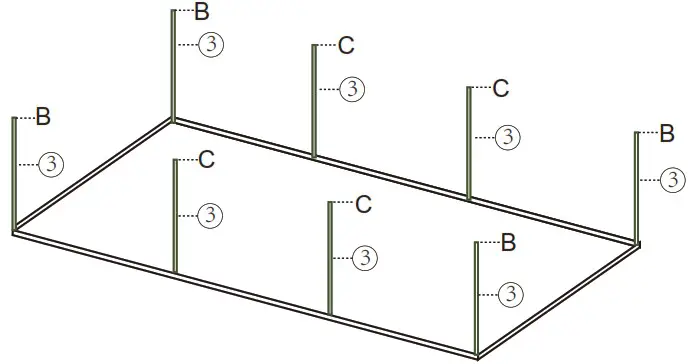 |
Step 3 Connect the poles (#1 & #2) with the assembled connectors (#B & #C). You’ll use:
| 6 x Part #1 8 x Part #2 |  |
Step 4 Connect the poles (#1) with the connectors (#A & #D). You’ll use:
| 3 x Part #1 2 x Part #A 2 x Part #D | 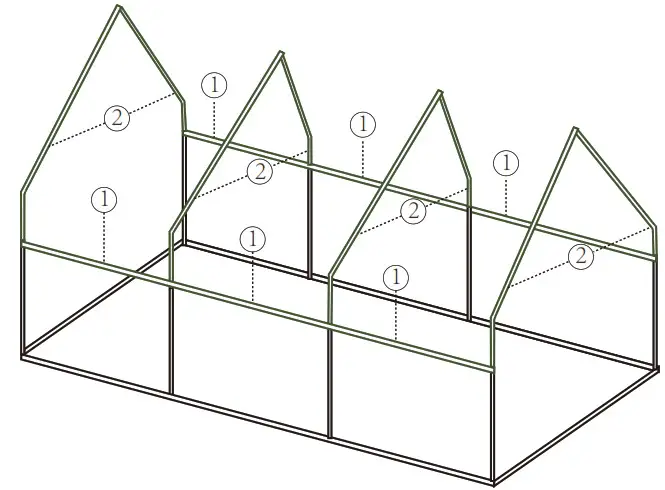 |
Step 5 Put on the cover.
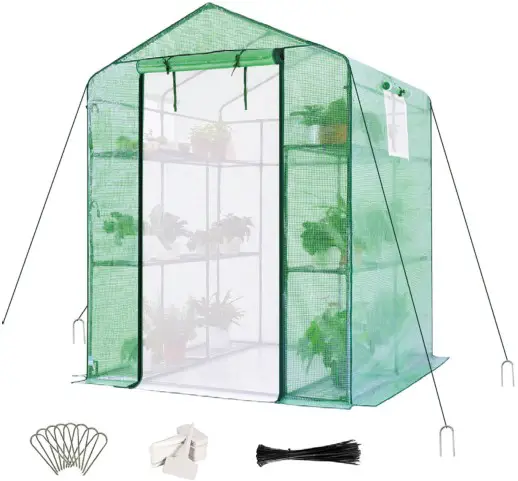
56″ x 29″ x 77″
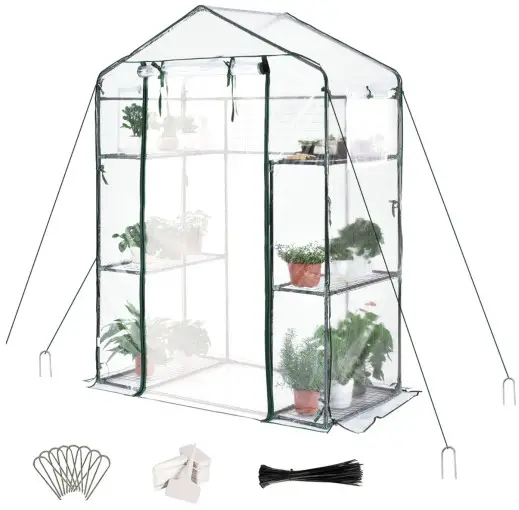 | 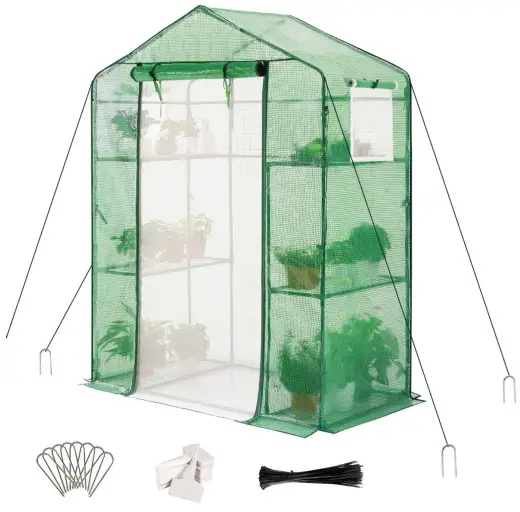 |
| Model #1309 with a Clear PVC Cover | Model #1309G with a Green PE Cover |
IMPORTANT!
- The two models in this size (Model #1309 & Model #1309G) are the SAME except for the COVER (#J).
- Model #1309 has a clear PVC cover.
- Model #1309G has a green PE cover.
Parts List
Please refer to this chapter if you’re owning a Quictent mini greenhouse in 56″ x 29″ x 77″ (Model #1309 & Model #1309G). All parts come in one (1) box only. Please pay particular attention to make sure all parts are numbered and graphically indexed, so does the quantity for each part as per the Parts List below. If you need any help, please EMAIL the support team at your earliest convenience with the order number, required part(s), quantity for each part, and photos (or video clips, if applicable), we’ll get back soon to help out.
| Part Number | Diagram | Description | Quantity (PCS) |
| #1 | Pole (30.3″) | 4 | |
| #2 | Pole (26.8″) | 15 | |
| #3 | Pole (22.4″) | 16 | |
| #4 | Pole (11″) | 20 | |
| #5 | | Pole with Curved End | 4 |
| #A |  | 90-Degree 3-Way Connector | 6 |
| #B |  | T-Shaped 3-Way Connector | 4 |
| #D |  | 4-Way Connector | 18 |
| #E | 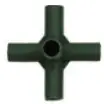 | 5-Way Connector | 2 |
| #G |  | 120-Degree 3-Way Connector | 2 |
| #I |  | Short Steel Shelf | 6 |
| #J |  | Cover | 1 |
| #K |  | Long Steel Shelf | 1 |
| #L | 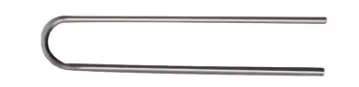 | Stake | 8 |
| #M |  | Rope | 4 |
| #N |  | T-Shaped Plant Tag | 50 |
| #O |  | S-Shaped Hook | 10 |
| #P |  | Cable Tie | 30 |
Assembly
Read Before the Assembly
√ Check to make sure that you have all parts listed on the Parts Lists.
√ Before moving to the next step, please make sure the end of the poles are aligned with the bottom of the connectors, which indicates that the pipes are fully seated inside the connectors.
Step 1 Start from the bottom (first tier) by connecting the poles with connectors. You’ll use:
| 2 x Part #1 4 x Part #2 8 x Part #3 4 x Part #4 4 x Part #A 4 x Part #D | 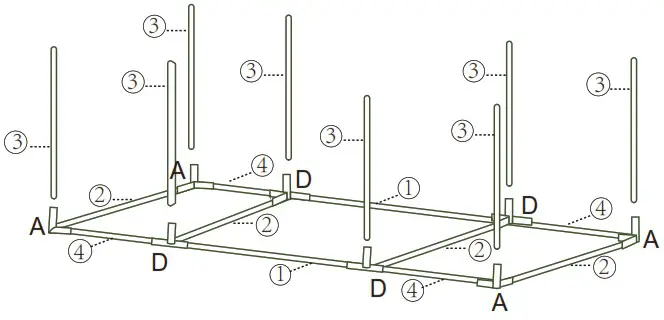 |
IMPORTANT! Please recheck to make sure each part is tightly connected.
Step 2 Let’s move to the second tier. You’ll need:
| 4 x Part #2 8 x Part #3 4 x Part #4 8 x Part #D | 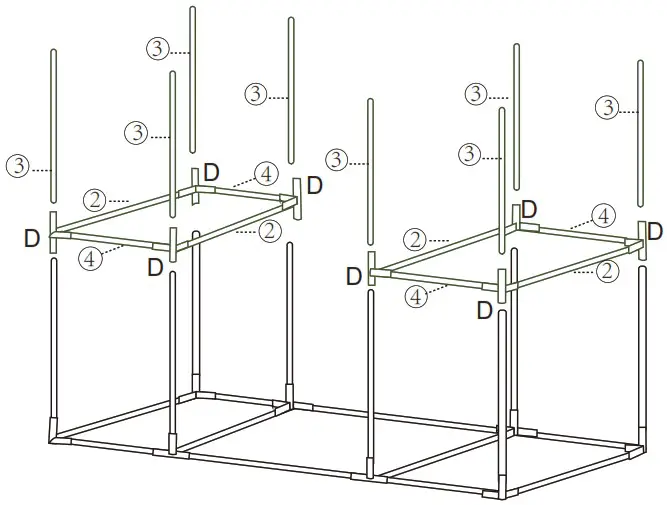 |
IMPORTANT! Please recheck to make sure each part is tightly connected.
Step 3 To assemble the third tier, please use:
| 1 x Part #1 4 x Part #2 10 x Part #4 2 x Part #A 4 x Part #D 2 x Part #E | 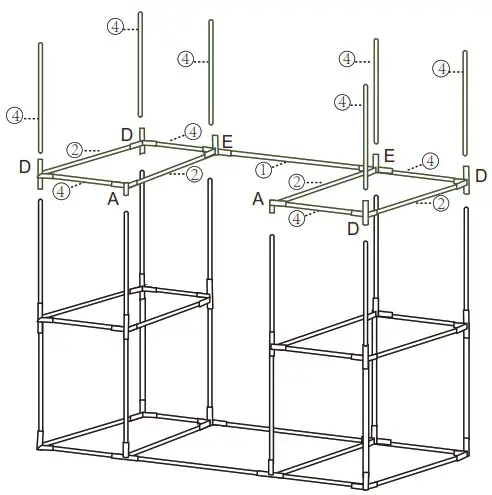 |
IMPORTANT! Please recheck to make sure each part is tightly connected.
Step 4 Now we can assemble the roof with:
| 1 x Part #1 3 x Part #2 2 x Part #4 4 x Part #5 4 x Part #B 2 x Part #D 2 x Part #G | 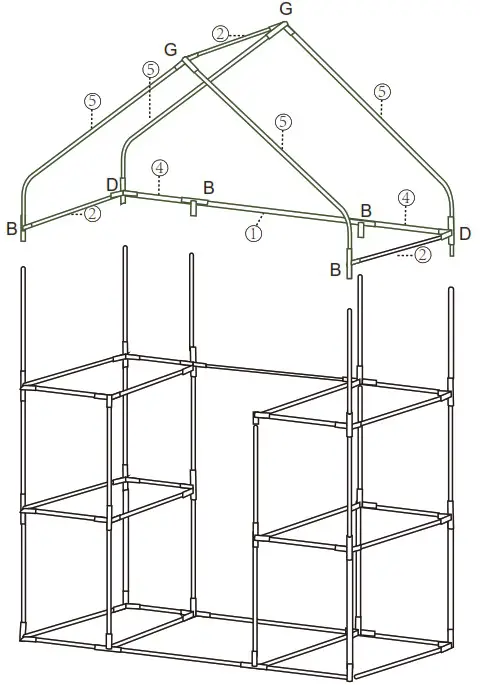 |
IMPORTANT! Please recheck to make sure each part is tightly connected.
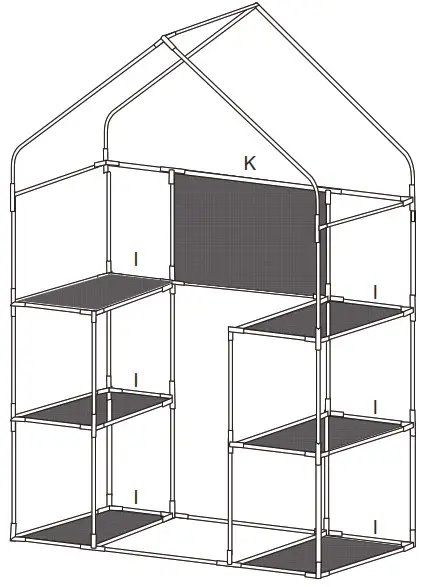
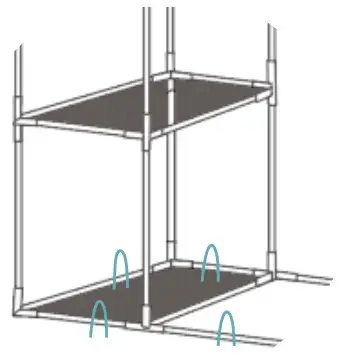
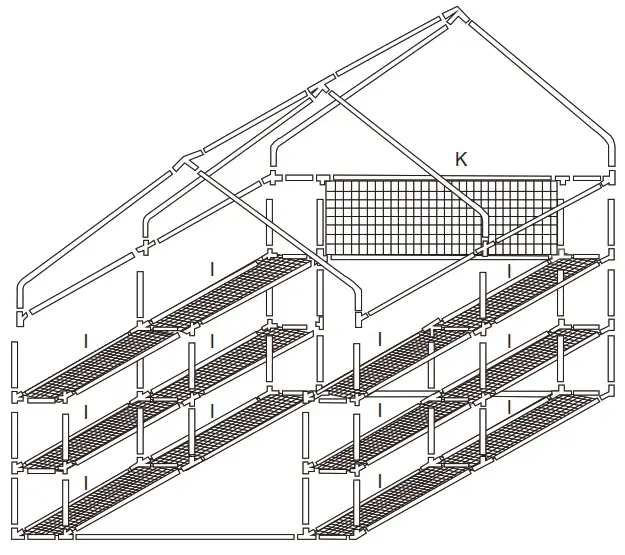
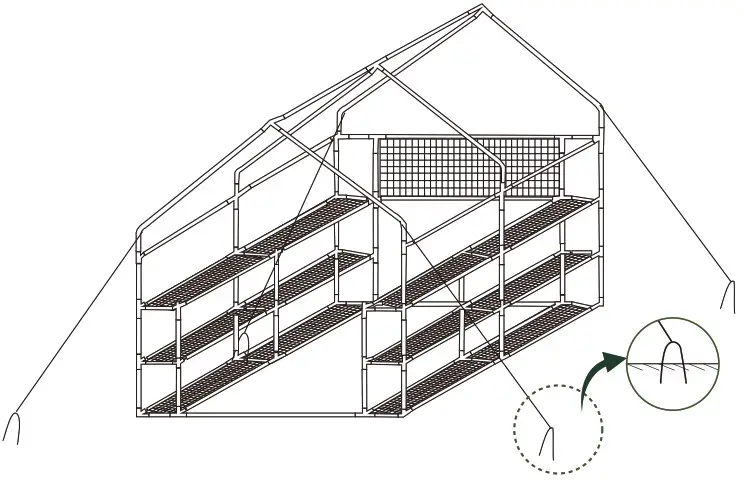
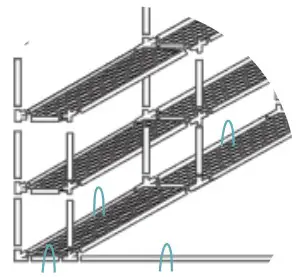
Step 5 Put the Short Steel Shelf (#I) and the Long Steel Shelf (#K) in the respective tier with the Cable Tie (#P), then put on the Cover (#J).
NOTICE!
To avoid the tip-over of the structure when using it, please:
- Place the heavy items on the bottom to weigh down the greenhouse.
- Keep a balance of the weight on shelves of both sides.
Secure the Greenhouse
The Stakes (#L) and Ropes (#M) are included for each greenhouse. You can use them together or use the stakes only to secure the structure.
Method 1 Use the Stakes and Ropes together. Tie the ropes to the frame and fix the other end of each to the ground with stakes.
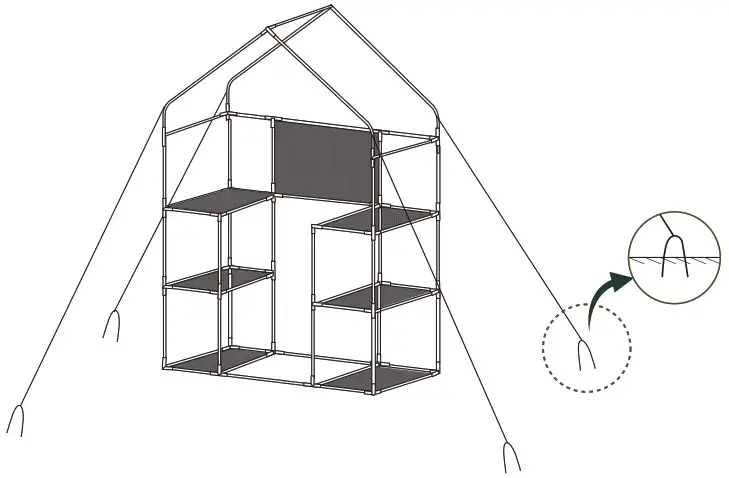
Method 2 Use the Stakes. Fix the bottom of the frame with stakes. It works well in preventing the frame from deforming.
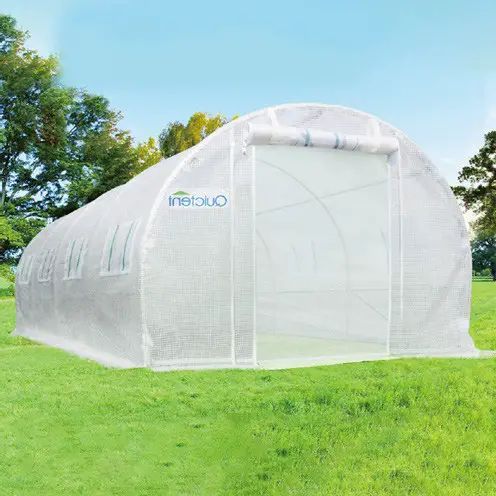
56″ x 56″ x 77″
 |  |
| Model #1317W with a Clear PVC Cover | Model #1317G with a Green PE Cover |
IMPORTANT!
- The two models in this size (Model #1317W & Model #1317G) are the SAME except for the COVER (#J).
- Model #1317W has a clear PVC cover.
- Model #1317G has a green PE cover.
Parts List
Please refer to this chapter if you’re owning a Quictent mini greenhouse in 56″ x 56″ x 77″ (Model 1317W & Model #1317G). All parts come in one (1) box only. Please pay particular attention to make sure all parts are numbered and graphically indexed, so does the quantity for each part as per the Parts List below. If you need any help, please EMAIL the support team at your earliest convenience with the order number, required part(s), quantity for each part, and photos (or video clips, if applicable), we’ll get back soon to help out.
| Part Number | Diagram | Description | Quantity (PCS) |
| #1 | Pole (30.3″) | 4 | |
| #2 | Pole (26.8″) | 30 | |
| #3 | Pole (22.4″) | 24 | |
| #4 | Pole (11″) | 28 | |
| #5 | | Pole with Curved End | 6 |
| #A | | 90-Degree 3-Way Connector | 6 |
| #B | | T-Shaped 3-Way Connector | 4 |
| #C | | X-Shaped 4-Way Connector | 2 |
| #D | | 4-Way Connector | 24 |
| #E | | 5-Way Connector | 8 |
| #G | | 120-Degree 3-Way Connector | 2 |
| #H |  | Curved 4-Way Connector | 1 |
| #I | | Short Steel Shelf | 12 |
| #J | | Cover | 1 |
| #K | | Long Steel Shelf | 1 |
| #L | | Stake | 10 |
| #M | | Rope | 4 |
| #N | | T-Shaped Plant Tag | 50 |
| #O | | S-Shaped Hook | 10 |
| #P | | Cable Tie | 40 |
Assembly
Read Before the Assembly
√ Check to make sure that you have all parts listed on the Parts Lists.
√ Before moving to the next step, please make sure the end of the poles are aligned with the bottom of the connectors, which indicates that the pipes are fully seated inside the connectors.
Step 1 Start from the bottom (first tier) by connecting the poles with connectors. You’ll use:
| 2 x Part #1 8 x Part #2 12 x Part #3 6 x Part #4 4 x Part #A 8 x Part #D | 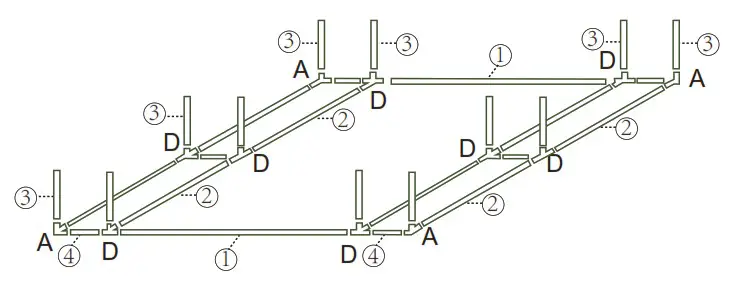 |
IMPORTANT! Please recheck to make sure each part is tightly connected.
Step 2 Let’s move to the second tier. You’ll need:
| 8 x Part #2 12 x Part #3 6 x Part #4 8 x Part #D 4 x Part #E | 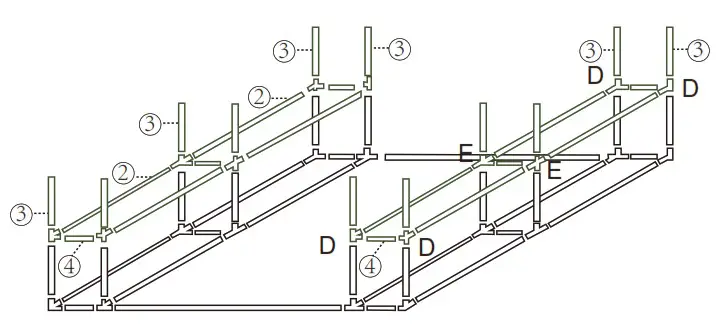 |
IMPORTANT! Please recheck to make sure each part is tightly connected.
Step 3 To assemble the third tier, please use:
| 1 x Part #1 8 x Part #2 14 x Part #4 2 x Part #A 6 x Part #D 4 x Part #E | 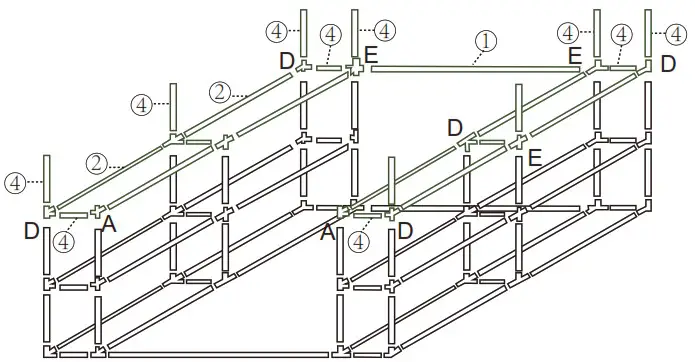 |
IMPORTANT! Please recheck to make sure each part is tightly connected.
Step 4 Now we can assemble the roof with:
| 1 x Part #1 6 x Part #2 2 x Part #4 6 x Part #5 4 x Part #B 2 x Part #C 2 x Part #D 2 x Part #G 1 x Part #H | 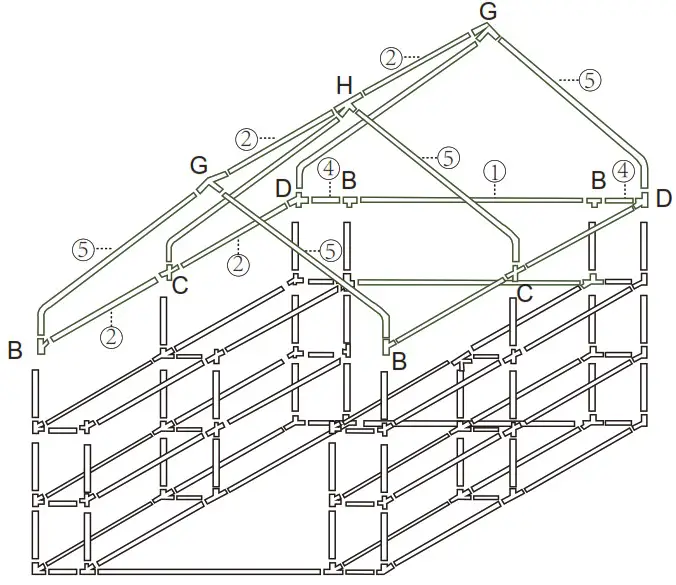 |
IMPORTANT! Please recheck to make sure each part is tightly connected.
Step 5 Put the Short Steel Shelf (#I) and the Long Steel Shelf (#K) in the respective tier with Cable Ties (#P), then put on the Cover (#J).
NOTICE!
To avoid the tip-over of the structure when using it, please:
- Place the heavy items on the bottom.
- Keep a balance of the weight on shelves of both sides.
Secure the Greenhouse
The Stakes (#L) and Ropes (#M) are included for each greenhouse. You can use them together or use the stakes only to secure the structure.
Method 1 Use the Stakes and Ropes together. Tie the ropes to the frame and fix the other end of each to the ground with stakes.
Method 2 Use the Stakes. Fix the bottom of the frame with stakes. It works well in preventing the frame from deforming.
Maintenance
To help you maintain your mini greenhouse in optimal condition and for longer service life, please refer to our suggestions below:
- Please secure the cover at all times by tying all the ropes inside and fixing the extended part with extra weights (soil, bricks, stones, sandbags, etc.)
- Please close the windows and doors whenever ventilation is not required.
- Please move the structure and plants indoors or to somewhere that is sheltered in bad weather (storms, windy days, hurricanes, tornadoes, etc.)
- Please clean up snow in time if you use the structure in winter, or it would collapse due to overloading.
- Please understand that the local weather influences the performance. You could apply other equipment if higher temperatures are required.
Warranty
The limited warranty covering the materials and the craftsmanship under normal use and service conditions takes effect from the purchase date (according to the
Purchase History):
- A 365-day warranty for the Frame Poles.
- A 180-day warranty for the Cover.
- A lifetime warranty for other parts not mentioned above.
We also provide a great discount for our regular customers when they purchase replacement parts after the warranty expires.
Please note that the purchase proof of order (order number or shipping information on the shipping carton) is the only valid evidence to claim for warranty.
REMINDERS
- Please note that the purchase proof of order (order number or shipping information on the shipping carton) is the only valid evidence to claim for warranty.
- To get what you need as soon as possible, we strongly suggest you provide all of the following information at your first inquiry:
• Order number
• Part number
• Quantity required for each part
• Pictures (or video clips, if applicable)
WARNING
- Restructuring the product without written permission from Quictent in advance would VOID the warranty.
- Damages due to improper use in severe weather conditions, including but not limited to high winds, heavy rain, sleet, snow, etc., will NOT be covered by the warranty.
![]()