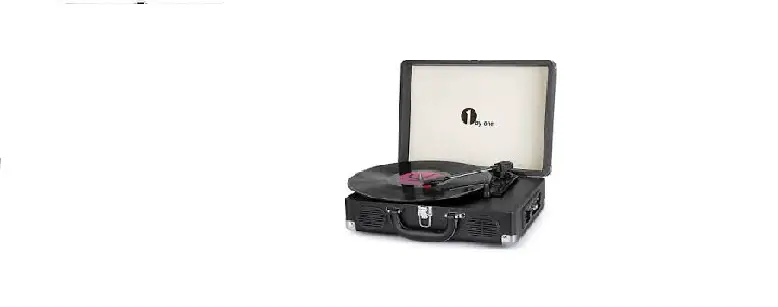
1 by one MD-809 Vintage Turntable

PLEASE READ THIS INSTRUCTION MANUAL BEFORE USING THE PRODUCT
BOX CONTENTS
Make sure the items listed below are included in the box:
- Main Turntable Unit
- Power Adapter
- Instruction Manual
LOCATION OF THE CONTROLS
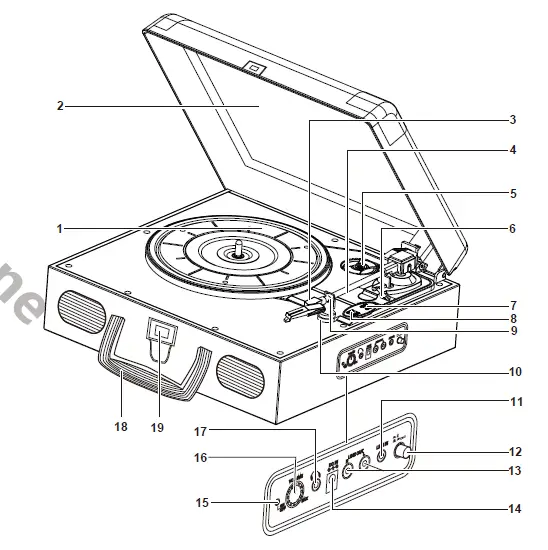
Controls:
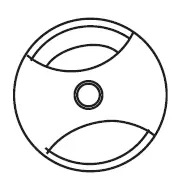
- PLATTER
- DUST COVER
- HEADSHELL AND STYLUS
- TONE ARM
- 45-RPM ADAPTER
- TONE ARM LIFT LEVER
- AUTO STOP CONTROL SWITCH
- SPEED SELECTOR (33/45/78 RPM)
- LOCKING CLAMP
- TONE ARM REST
- LINE-IN JACK
- BT BUTTON
- LINE-OUT RCA JACKS
- DC INPUT JACK
- ON/OFF LED INDICATOR
- POWER ON/OFF AND VOLUME CONTROL KNOB
- HEADPHONE JACK
- HANDLE
- LOCK
GETTING STARTED/MAIN OPERATION
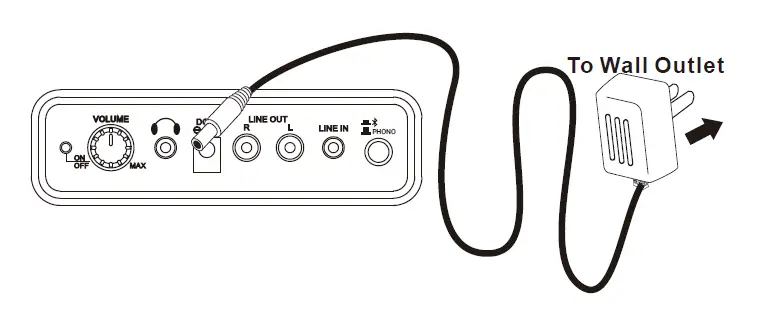
Connecting power adapter
- Plug the power adapter into a normal power outlet.
- Insert the DC plug of the power adapter cord into the DC INPUT jack at the back of the turntable.
Note:
- Only use the supplied adapter.
- Please ensure your outlet voltage is compatible before using this turntable.
LISTENING TO A RECORD
- Lift the DUST COVER all the way up until it stops. The cover will stay open.
- Remove the tie-wrap from the TONE ARM (when using for the first time) and secure the TONE ARM on the TONE ARM REST.
- Remove the white protective needle cover by gently pulling it forward.

- Release the TONE ARM LOCKING CLAMP by gently pushing to the right. This will unlock the TONE ARM from the TONE ARM REST.
 Note: Re-engage the LOCKING CLAMP when moving the turntable to another location.
 - Turn the Power On/Off and VOLUME CONTROL knob clockwise to turn on the turntable.
- Place a record on the turntable platter and select the desired speed (33/45/78) appropriate for your record.
- Lift the TONE ARM CONTROL lever and move the TONE ARM to the desired starting point over the record.
- Lower the TONE ARM CONTROL lever and the TONE ARM will move down and music will start playing.
- Turn the VOLUME CONTROL dial to adjust the volume to the desired level.
- Slide the AUTO STOP CONTROL switch to choose the auto stop function.
- At the end of the record, the TONE ARM will stop automatically. You should return the TONE ARM to the TONE ARM REST manually.
- Turn the Power On/Off and VOLUME CONTROL knob anti-clockwise to turn off the unit.
 Note: Re-engage the LOCKING CLAMP when moving the turntable to another location.
Note: When playing records, the sound output of the built-in amplifier and speakers are limited to avoid feedback and rumble. If you wish to listen to your music in a higher volume, you should connect an external amplifier/speaker using the turntable’s AUDIO OUTPUT function
ADAPTER FOR 45 RPM (ACCESSORY)
This adapter allows you to play 45-RPM records.
- Gently place your 45 RPM record onto the turntable.
- Place the 45 RPM ADAPTER over the spindle.
- Follow normal turntable operation steps to play your record.
USING BLUETOOTH FOR AUDIO OUTPUT
- Press and release the BT Button to go to Bluetooth mode.
- Set up the Bluetooth playback device so it searches for other Bluetooth devices.
- Select the entry ‘1byone BS019’ from the list of found devices on your Bluetooth playback device.
- Play your music through the connected device and enjoy.
Note:
- The effective distance between your external device and the turntable is 10 meters.
- If a mobile call is received, the music will stop playing until the call ends.
USING LINE-OUT RCA JACKS FOR AUDIO OUTPUT
- You can run the audio from the turntable through your home stereo, television, or other stereo sources by using the LINE-OUT RCA jacks.
- This connection requires a standard RCA or RCA to 3.5mm cable (not included). Plug the red and white connectors on one end of the cable into the red and white LINE-OUT RCA jacks on the rear of the turntable. The other end of the cable will plug into the INPUT jacks of your selected device.
- Operate the turntable as usual.
Note: You may still hear your turntable’s integrated speakers when using the Audio Output feature. Turn the volume of the integrated speakers to a minimum to only hear audio from the external connected device.
USING HEADPHONE JACK
- You can listen to the audio from the turntable via your own headphones.
- To make this connection, simply connect your headphones to the HEADPHONE jack.
- Operate the turntable as usual
LINE-IN FUNCTION
- When using this function, stop all record playing.
- Connect your device (e.g. smartphone or MP3 player) to the LINE-IN jack with a 3.5mm-3.5mm audio cable (not included).
- You can listen to the music from your device at the turntable player.
POWER MANAGEMENT FUNCTION
The turntable will automatically go into standby mode after 15 minutes if it is not being used. To resume operation, simply turn the Power On/Off and Volume CONTROL knob to the Off position and then turn it back on again.
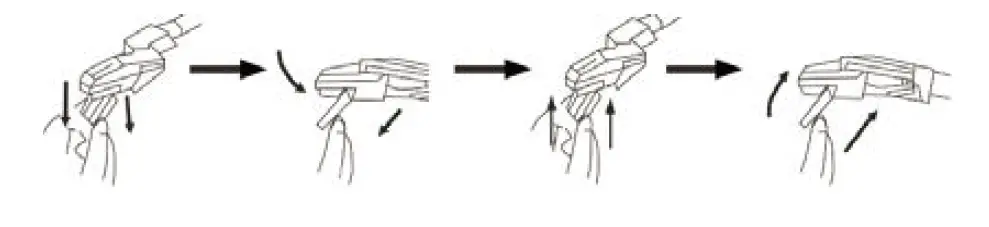
REPLACING THE STYLUS
It’s suggested to replace the stylus after 400 hours of use.
Please follow the steps below to change the stylus:
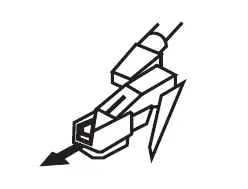
- Unlock the TONE ARM LOCKING CLAMP and lift the TONE ARM.
- At the front end of the headshell, place the tip of your fingernail between the red stylus holder and the black cartridge housing as shown. Press down on the red stylus holder until it separates from the cartridge housing.
- Completely remove the red stylus holder with worn stylus and discard it.
- Place the new red stylus holder with stylus under the cartridge housing. First, press upward on the back side of the stylus holder, and then press up on the front edge of the stylus holder until it snaps into place on the cartridge housing.
SAFETY INSTRUCTIONS
- Read these instructions and follow them.
- Keep these instructions and heed all warnings.
- Do not use this product near water.
- Clean the turntable only with a dry cloth.
- Do not block any ventilation openings.
- Install in accordance with the manufacturer’s instructions.
- Do not install near any heat sources such as radiators, heat registers, stoves, or other apparatus (including amplifiers) that produce heat.
- Do not defeat the safety of the polarized or grounding-type plug. A polarized plug has two blades with one wider than the other. A grounding type plug has two blades and a third grounding prong. The wide blade or the third prongs are provided for your safety. If the provided plug does not fit into your outlet, consult an electrician for replacement of the obsolete outlet.
- Protect the power cord from being walked on or pinched, particularly at the plug and the point where the cord exits from the product.
- Only use attachments/accessories specified by the manufacturer.
- Unplug this product during lightning storms or when unused for long periods of time.
- Refer all servicing to qualified service personnel. Servicing is required when the product has been damaged in any way such as the power-supply cord or plug is damaged, liquid has been spilled or objects have fallen into the product, the product has been exposed to rain or moisture and does not operate normally, or has been dropped.
- The product should not be exposed to dripping or splashing and no objects filled with liquids, such as vases, shall be placed on the product.
FCC / IC WARNING
This device complies with Part 15 of the FCC/Rules and Industry Canada’s license-exempt RSSs. Operation is subject to the following two conditions:
- This device may not cause interference.
- This device must accept any interference, including interference that may cause undesired operation of the device.
IMPORTANT WARNING
WARNING: TO REDUCE THE RISK OF FIRE OR SHOCK, DO NOT EXPOSE THIS PRODUCT TO RAIN OR MOISTURE
CAUTION: TO REDUCE THE RISK OF FIRE OR SHOCK, DO NOT REMOVE COVER OR BACK. NO USER-SERVICEABLE PARTS INSIDE. REFER SERVICING TO QUALIFIED PERSONNEL
Class II equipment symbol This symbol indicates that the turntable has a double system.
Note
Please do not attempt to open the back cover or power adapter as opening or removing the cover may expose you to dangerous voltage or other hazards. There are no user servicing components inside.
Note
This digital device does not exceed the Class B limits for radio noise emissions from digital devices as set by the IC and the FCC. These limits are designed to provide reasonable protection against harmful interference in a residential installation.
Notes
- If experiencing interference from a radio receiver, reorient or relocate the receiving antenna.
- Increase the separation between the device and the receiver.
- Connect the device into an outlet on a circuit different from that to which the receiver is connected
- Consult the dealer or an experienced radio/TV technician for assistance.
Notes
- The label is located on bottom of the product.
- No naked flame sources, such as lighted candles, should be placed on the product.
- The product is only intended to be used in moderate climates.
TROUBLESHOOTING
If you have followed the instructions and are having difficulty when operating the turntable, please locate the PROBLEM in the left column below. Check the corresponding POSSIBLE CAUSE AND SOLUTION column to locate and fix the problem.
| PROBLEM | POSSIBLE CAUSE AND SOLUTION |
| No power | Ensure that the turntable is powered on Check the master volume is not turned to minimum Remove the power adapter/connection cable and reconnect again after 2 minutes. |
|
No sound on phono source | Ensure the turntable is on the correct source. The protective needle cover was not removed. Remove it first. The tie-wrap was not removed from underneath the tone arm. Remove it first. Tone arm LOCKING CLAMP was not released. Release it first. |
| Poor sound on phono source | The stylus is dirty. Remove dust on the stylus with a stylus-cleaning brush. Dust or dirt has collected on the record. Clean the record with a high-quality record cleaner. |
|
No sound on audio out | Ensure the turntable is on correct source. Check that the turntable is powered on. Check the volume level on the external device. Check the correct source is selected on the external device. Remove the audio cable and reconnect again. |
SPECIFICATIONS
| SPECIFICATIONS | |
| AC adapter | AC Input = 100-240V 50/60Hz DC Output = 12V 500mA |
| Record speed | 33, 45, 78 RPM |
| Power output at Phono | 0.3W x2 RMS power output |
| Power output at USB | 1.8W x2 RMS power output |
| Bluetooth specification | Version 5.0 |
Specifications and functions connected to the continual improvement of the device are subject to change without notice.


