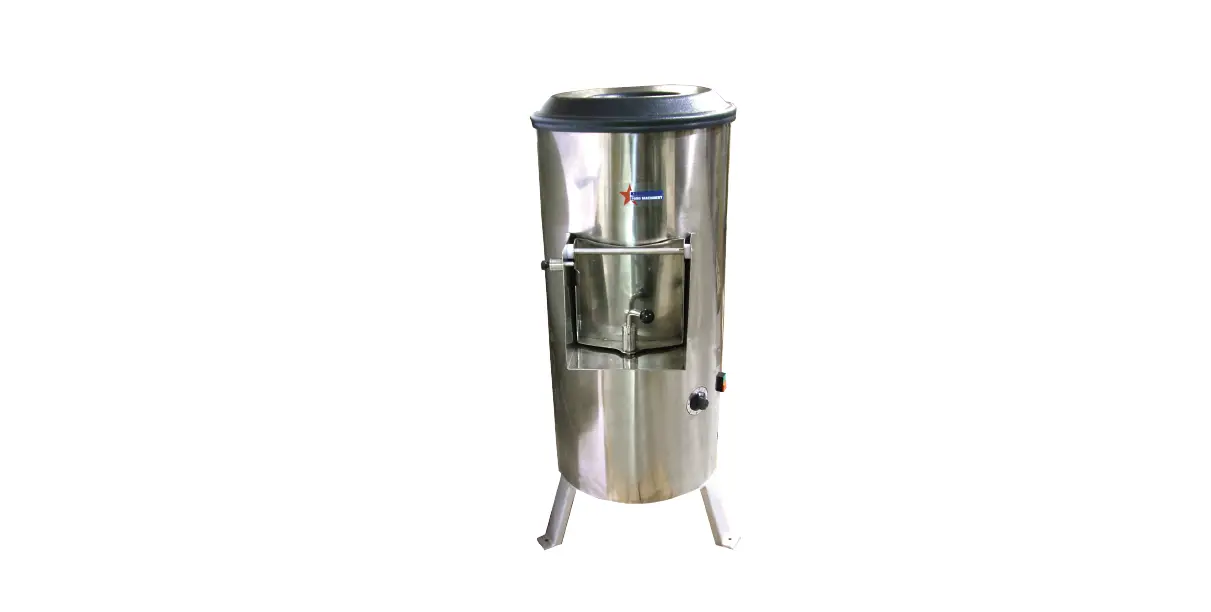
OMCAN PE-BR-0025 Potato Peeler 

General Information
Omcan Manufacturing and Distributing Company Inc., Food Machinery of America, Inc. dba Omcan and Omcan Inc. are not responsible for any harm or injury caused due to any person’s improper or negligent use of this equipment. The product shall only be operated by someone over the age of 18, of sound mind, and not under the influence of any drugs or alcohol, who has been trained in the correct operation of this machine and is wearing authorized proper safety clothing. Any modification to the machine voids any warranty and may cause harm to individuals using the machine or in the vicinity of the machine while in operation.
CHECK PACKAGE UPON ARRIVAL
Upon receipt of an Omcan shipment please inspect for external damage. If no damage is evident on the external packaging, open carton to ensure all ordered items are within the box, and there is no concealed damage to the machine. If the package has suffered rough handling, bumps or damage (visible or concealed), please note it on the bill of lading before accepting the delivery and contact Omcan within 24 hours, so we may initiate a claim with the carrier. A detailed report on the extent of the damage caused to the machine must be filled out within three days, from the delivery date shown in the shipping documents. Omcan has no recourse for damaged products that were shipped collect or third party.Before operating any equipment, always read and familiarize yourself with all operation and safety instructions.Omcan would like to thank you for purchasing this machine. It’s of the utmost importance to save these instructions for future reference. Also save the original box and packaging for shipping the equipment if servicing or returning of the machine is required.
Safety and Warranty
ATTENTION
Always unplug the machine before cleaning or maintenance.
IMPORTANT
This equipment is not to be used by persons (including children) with any physical or mental inabilities, or without operation experience and knowledge, only acquired by means of instruction and supervision of security staff.
IMPORTANT
If the cord is not in a condition to be used, to avoid accidents it must be replaced through the supplier, an authorized technician or someone qualified for the service.
DANGERS
Some areas of the electric device have parts and terminals that are connected to high voltage. These parts may cause severe, or even lethal, electrical shocks when touched. Never touch manual commands such
as switches, buttons, keys and knobs with wet hands, wet clothes and/or wet shoes. By not following these instructions, the operator could be exposed to severe, or even fatal, electrical shocks.
WARNINGS
The operator has to be familiar with the position of the ON / OFF switch to make sure the switch is easily accessed when necessary. Before any kind of maintenance, physically remove the plug from its socket. Provide space for the comfortable operation to avoid accidents. Water or oil spilled on the floor will be slippery and dangerous. Make sure the floor is clean and dry. Never use a manual command (switch, buttons, lever) without full understanding of the function. If any work is to be made by two or more persons, coordination signs will have to be given for each operation step. Every step of the operation shall be taken only if a sign has been made and responded.
RECOMMENDATIONS
In case of power shortage, immediately turn the machine OFF. Use recommended or equivalent lubricants, oils or greases. Avoid mechanical shocks as they may cause failures or malfunction. Do not allow water, dirt or dust to penetrate the mechanical or electrical components of the machine. DO NOT MODIFY the original characteristics of the machine. DO NOT MODIFY original characteristics of the machine. DO NOT REMOVE, TEAR OFF OR TAMPER any safety or identification labels of the machine. If any label has been removed or is no longer legible, contact your nearest dealer for a replacement.
SAFETY PROCEDURES AND NOTES BEFORE SWITCHING THE MACHINE ON IMPORTANT
Carefully read ALL instructions of this manual before turning the machine ON. Be sure to be familiar with the instructions and that you understand all information contained in this manual. If you have any questions, contact your nearest dealer.
DANGER
An electric cable or electric wire with a damaged jacket or bad insulation could cause electrical shocks as well as electrical leaks. Before using the equipment, check the conditions of all wires and cables.
RECOMMENDATIONS
Be sure ALL instructions in this manual have been thoroughly read and understood. Every function and the operational procedure has to be understood by the operator. Any manual command (switch, button or lever) shall be given only after being sure it is the correct one.
PRECAUTIONS
The electric cable has to be compatible with the power required by the machine. Cables touching the floor or close to the machine need to be protected against short-circuiting.
ROUTINE INSPECTION RECOMMENDATIONS
When checking the tension of the belts or chains, DO NOT introduce your fingers between the belts, pulleys, chain and gears.
PRECAUTIONS
Check the motor and turning or sliding parts of the machine, in case of abnormal noises. Check the tension of the belts and chains and replace the set when belt, chain or gears show signs of being worn out. When checking tension belts or chain, DO NOT introduce your fingers between belts, pulleys, chains and gears. Check protections and safety devices to make sure they are working properly.
- Unplug the machine when you need to remove any removable part during cleaning, maintenance or any other operation.
- Never make use of any tool or instrument that is not originally part of the machine during any operation.
- Never touch the Abrasive Disc when the machine is working because it can cause injury.
- Keep hands away from moving parts.
- When replacing the Abrasive Disc, ensure that it perfectly fits into the Central Shaft Pin to avoid damages to the machine.
RESIDENTIAL USERS:
The vendor assumes no liability for parts or labor coverage for component failure or other damages resulting from installation in non-commercial or residential applications. The right is reserved to deny shipment for residential usage; if this occurs, you will be notified as soon as possible.
1 YEAR PARTS AND LABOUR BENCH WARRANTY
Within the warranty period, contact Omcan Inc. at 1-800-465-0234 to schedule a drop off to either an Omcan authorized service depot in the area, or to an Omcan Service warehouse to repair the equipment. Unauthorized maintenance will void the warranty. Warranty covers electrical and part failures, not improper use. Please see https://omcan.com/disclaimer for complete info.
WARNING
The packaging components are classified as normal solid urban waste and can therefore be disposed of without difficulty.In any case, for suitable recycling, we suggest disposing of the products separately (differentiated waste) according to the current norms.
Technical Specifications
| Model | PE-BR-0025 |
| Power | 1 HP / 0.75 kW |
| Consumption | 0.73 kW/h |
| Capacity | 55 lbs. / 25 kgs. |
| Output (approx.) | 1100 lbs. / 499 kgs./hr. |
| Electrical | 110V / 60Hz / 1 |
| Weight | 99 lbs. / 45 kgs. |
| Packaging Weight | 136 lbs. / 61.7 kgs. |
| Dimensions | 26.4” x 21.6” x 45.5” / 670 x 549 x 1156mm |
| Packaging Dimensions | 31” x 49” x 52” / 787 x 1245 x 1321mm |
| Item Number | 20367 |
Installation
The Potato Peeler must be installed onto a stable working surface. Verify the voltage of the power source it will be connected to (110V). The power cord has two flat pins and one round pin for grounding). It is mandatory that the three pins are properly connected before using the equipment. It is recommended to install the machine close to a sewer or to canalize the residues by extending the Exit Tube located on the lower part of the machine.
IMPORTANT
Make sure the Abrasive Disc is well placed on the Central Shaft Pin before switching the machine on.Check if the Potato Peeler is firm in its position. Install the water entrance and exit. Check if the inner abrasive disc walls are properly placed. Observe the link attachment with the lock.
Operation
IMPORTANT
Under no circumstances touch the Abrasive Disc when it is in moving. Secure the lid, open the water tap,set the timer and activate the ON/OFF switch. With the machine on and with water falling at the center of the abrasive disc, pour the product to be processed inside it. For the PE-BR-0025, put 25 Kg of potatoes at most. The working time varies from one to five minutes. If the potatoes are being peeled to irregularly, it is possible to observe the process through the lid opening. The PE-BR-0025 is designed to process normal shaped potatoes, any other vegetable with irregular shape will need a manual finishing even after processing. To remove the peeled product, keep the machine running, shut down the water and open the door by pulling the lock upwards. Lift it until the side lock and keep the door open. This way the product will be expelled. To close the door, release the side lock by pulling it sideways.
Do not operate the machine with long hair which might touch any part of the machine because it may lead to serious accidents. Tie your hair up well and/or cover your hair with a scarf. Only trained or skilled personnel shall operate this machine. NEVER operate the machine without all original safety devices in perfect condition.
Maintenance
Keep the machine clean. Always TURN THE MACHINE OFF by removing the plug from the socket before cleaning it. Never clean the machine unless it has come to a complete stop. Put all components back to their functional positions before turning it ON again. Do not place your fingers in between belts, pulleys, chains and gears.
DANGER
Every maintenance operation is dangerous when the machine is ON. TURN IT OFF BY PULLING THE PLUG OUT OF THE SOCKET DURING MAINTENANCE.
IMPORTANT
Always remove the plug from the PowerPoint1. Remove the internal lining by lifting it upwards. Clean this part with plenty of water.
CLEANING
To conduct the proper cleaning of the machine, follow the instructions below:
- Remove the internal lining by lifting it upwards. Clean this part with plenty of water.
- Turn the empty machine on and let it function for a few minutes while adding water.
- Switch OFF the machine and unplug it, then wait until the Abrasive Disc has stopped moving completely.
- Rub the external part of the machine with a wet cloth.
- Remove the Abrasive Disc by lifting vertically.
- Use a brush with nylon bristles and plenty of water to clean the disc.
- Replace the internal lining, minding the lock attachment.
- Replace the disc on the machine proceeding inversely. Make sure the disc fits proper to the pin of the central shaft.
IMPORTANT
Never use water jets to wash the machine.
IMPORTANT
Take care of your machine and use it properly and with responsibility. It will bring you benefits.
INSTRUCTIONS TO APPLY THE GLUE KIT AND ABRASIVE MATERIAL
Kindly follow the instructions below to apply the Glue Kit and Abrasive Material to the discs.
- Make sure that the unit is turned off and completely disconnected from any power supply. After this you can Access the disc and remove it from the unit.
- The remaining old abrasive material and kit glue still present in the disc to be renewed must be completely taken out. For that heat up the disc until it reaches around 300°C of temperature for 10 minutes, this will make the remaining abrasive material and kit glue fall from the disc, a blowtorch can be used to perform this job (Make sure you use all safety measures and precautions to realize this step). After that, and when the disc is in an appropriate temperature to be handled, clean all of its surface thoroughly, it must be 100%clean to receive the new kit glue and abrasive material. Failure in cleaning up the disc will result in failure to apply the new kit glue and abrasive material.
- With the disc in cold/room temperature, distribute the already mixed glue kit on its surface in an equal manner (see point 6). With the help of a paintbrush, apply a uniform layer of the already mixed glue kit all over the superior face of the disc.
- After step 3) apply in a uniform manner, all over the superior face of the disc, a homogeneous layer of the abrasive material (code 36969.1), use the help of a sieve to help you achieve a homogenous distribution.
- Keep the renewed disc completely still for a period of 24 hours to make sure that the glue kit and the abrasive material are totally fixed on the disc.
- Instructions to Prepare the Glue Kit. The Glue Kit is the mixing of two products:
- Product A (araldite 65g).
- Product B (hardener 30gr).
The mixing must be done in a disposable recipient, with the help of a wooden spatula, also disposable. Mix the two products very well until the end result is completely equal and with a uniform color.
IMPORTANT
The Glue Kit can be stored for a maximum period of 1 year in a dry place, away from sunlight, in temperature between 18 and 25º C. Past the period informed above the Glue Kit properties can be lost and its use is not surface.
Troubleshooting
The Potato Peeler was designed to operate with minimum maintenance. However, some irregularities may occur during its operation due to the natural wear caused by the use of the equipment. If there is any problem with your machine, check the below table for possible solutions.
| Problems | Causes | Solution |
| The machine does not turn ON. | Power outage. Problem on internal or external electric circuit of the machine. | Check if there is power. Call a qualified technician. |
| Burnt smell or smoke. | Problem on the internal or external electric circuit of the machine. | Call a qualified technician. |
| The machine turns on but when the product is placed on the disc, it stops or spins in low rotation. | Skidding belts or problems with the electric motor. | Call a qualified technician. |
| Strange noises. | Abrasive Disc is misplaced. There are damaged ball bearings. | Place the Abrasive Disc appropriately on the Central Shaft Pin. Call a qualified technician. |
| Water leak in the bottom of the machine. | Damaged retainer. | Call a qualified technician. |
ADJUSTMENTS AND REPLACEMENT OF COMPONENTS
The Abrasive Disc is covered with an aluminum oxide layer responsible for the food peeling. After some time, the aluminum oxide wears out and the efficiency of the machine decreases. The Abrasive Disc must then be replaced.
Parts Breakdown

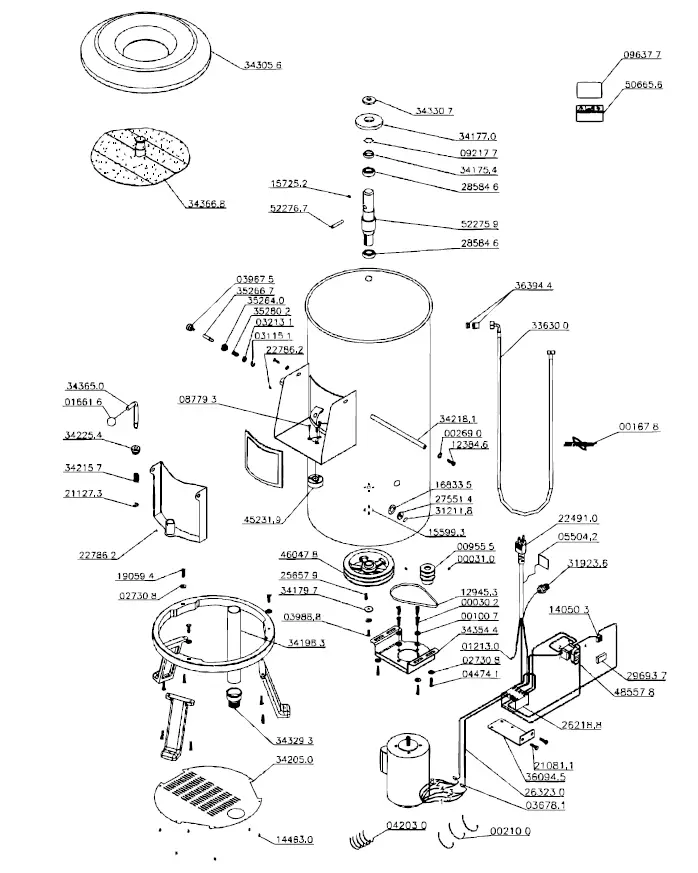
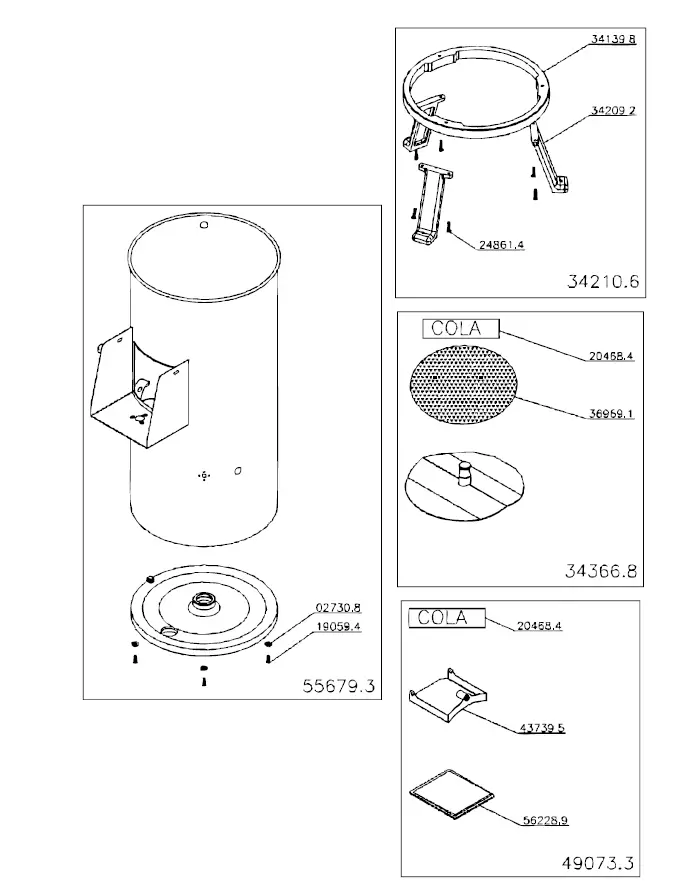
Model PE-BR-0025 20367
| Item No. | Description | Position | Item No. | Description | Position | Item No. | Description | Position |
| 27686 | PFS SEX UNC1/4×3/4 RTZB for 20367 | 00030.2 | 38341 | Washer 1/4×5/8×1,2mm Stainless Steel for 20367 | 19384.4 | 27745 | Tampa Trigger for 20367 | 34225.4 |
| 38143 | Screw 5/16×5/16 for 20367 | 00031.0 | 27711 | Screw M5x10 DIN 933 Stainless Steel for 20367 | 21081.1 | 24024 | Funnel Lid (MOL.37663.9) for 20367 | 34305.6 |
| 30234 | Washer L 1/4×1 6 ZB for 20367 | 00100.7 | 27712 | Ring 10 Din 6799 for 20367 | 21127.3 | 27746 | Reveting Plate for 20367 | 34312.9 |
| 27687 | Logo 145mm for 20367 | 00167.8 | 27714 | PFS M5x5 DIN 916 INOX for 20367 | 22786.2 | 27747 | Adapt.Short Thread D.60×2 for 20367 | 34329.3 |
| 27688 | Clamp K22 (T-50R) for 20367 | 00210.0 | 27715 | PFS M6x30 DIN 933 INOX for 20367 | 24861.4 | 27748 | Nylon Washer for 20367 | 34330.7 |
| 27689 | Oxid of Aluminum for 20367 | 00257.7 | 27716 | Key Way 4.76×25 for 20367 | 25657.9 | 27749 | Door Set for 20367 | 34339.0 |
| 27691 | Term. PRE-ISOL.165012 for 20367 | 00736.6 | 27717 | Contactor CWM18.10 110V 50/60 for 20367 | 26218.8 | 27750 | Motor Support for 20367 | 34354.4 |
| 38142 | Moving Poley for 20367 | 00955.5 | 27719 | FIO Internal 2×1.5x1000mm for 20367 | 26323.0 | 27751 | Trigger Axis C / Fold for 20367 | 34365.0 |
| 27692 | Insult Term EF-4228 for 20367 | 01213.0 | 27720 | Omcan Logo (Machines) for 20367 | 27154.3 | 24025 | Abrasive Disc for 20367 | 34366.8 |
| 21838 | Sphere with Hole 1/2″ for 20367 | 01661.6 | 27721 | Button for 20367 | 27551.4 | 27753 | Poly Belt V 12PJ for 20367 | 34421.4 |
| 27693 | Washer L.A8,4 ZB for 20367 | 02730.8 | 27722 | Bearing 6005 DDU for 20367 | 28584.6 | 27754 | Maintenance / Cleaning Label for 20367 | 34686.1 |
| 27694 | Ring 10×1 DIN 471 for 20367 | 03115.1 | 27724 | Silicone Protection Cap for 20367 | 29693.7 | 27755 | Diamond Rubber Plate Set for 20367 | 35214.4 |
| 27695 | Allen Screw M6x8 for 20367 | 03188.7 | 27725 | Etiq.Para Buttonhole Timer for 20367 | 31211.8 | 27756 | Coating Set for 20367 | 35216.0 |
| 16403 | Washer L 3/8″ Stainless Steel for 20367 | 03213.1 | 27726 | Cord Holder PG13,5 LC+P/9 for 20367 | 31923.6 | 27757 | Lateral Latch Cover for 20367 | 35264.0 |
| 27696 | Nylon Cover CN-4478 for 20367 | 03678.1 | 27727 | Water Inlet Set for 20367 | 33630.0 | 27758 | Pino da Trava Lateral for 20367 | 35266.7 |
| 27697 | Knob M5x10mm for 20367 | 03967.5 | 27728 | Background Machined (Etched) for 20367 | 34132.0 | 27759 | Side Lock Spring for 20367 | 35280.2 |
| 27698 | Screw M6x16 for 20367 | 03988.8 | 27729 | Central Shaft for 20367 | 34133.9 | 27760 | Chapa Contactor Grey for 20367 | 36094.5 |
| 27699 | Cramp T 18R Small for 20367 | 04203.0 | 27730 | Aro Usinado (Cinza) for 20367 | 34139.8 | 65980 | Motor 1CV 60Hz W FC-95V19 (Flange Nor) for 20367 | 36149.6 |
| 27700 | Screw M8x20 Din 933 ZB for 20367 | 04474.1 | 27731 | CS Cabinet for 20367 | 34141.0 | 27761 | Nipple/Reduction Set for 20367 | 36394.4 |
| 27710 | Glue Kit DB/DP-10/DC for 20367 | 04636.1 | 27732 | Moved Pulley Poly V (Primer) for 20367 | 34165.7 | 38146 | Plate Diamant.4x180x233mm for 20367 | 36456.8 |
| 27702 | PFS M6x20 DIN 965 Inox for 20367 | 08779.3 | 27733 | Polia Mot. Poly V (Primer) for 20367 | 34174.6 | 27762 | Aluminum Oxide No.46 for 20367 | 36969.1 |
| 27703 | Ring 47×1,75 DIN 472 for 20367 | 09217.7 | 27734 | Retainer 25x47x10 for 20367 | 34175.4 | 27763 | Etiq.Servico Heavy for 20367 | 38533.6 |
| 16416 | Screw M6x12 DIN 933 Stainless Steel for 20367 | 12384.6 | 27735 | Central Shaft Pin for 20367 | 34176.2 | 27764 | Insulation Frame for 20367 | 44569.0 |
| 38144 | Belt A 22 for 20367 | 12945.3 | 27736 | Rubber Protection for 20367 | 34177.0 | 38140 | Flange Fixacao da Porta for 20367 | 45231.9 |
| 24021 | Timer for 20367 | 14050.3 | 27737 | Washer 7x30x3 for 20367 | 34179.7 | 38141 | Driven Pulley D.164 Primer for 20367 | 46047.8 |
| 16435 | Screw M4x10 for 20367 | 14463.0 | 27738 | Complete Background for 20367 | 34181.9 | 65978 | Cabo 3×1,5mm2 C/Plug Tipo “M” for 20367 | 46811.8 |
| 30279 | Screw B.3,5×9,5 DIN 7971 for 20367 | 15599.3 | 27739 | Exit Tube for 20367 | 34198.3 | 65979 | On/Off Key without/LED for 20367 | 48557.8 |
| 64823 | Screw M5x5 DIN 916 for 20367 | 15725.2 | 27740 | Back Lock for 20367 | 34205.0 | 78551 | Cleaning Maintenance Label for 20367 | 50665.6 |
| 27706 | Timer Label for 20367 | 16833.5 | 27741 | PE Machined (Etched) for 20367 | 34209.2 | 64824 | Central Shaft for 20367 | 52275.9 |
| 27707 | Spacer Washer for 20367 | 16971.4 | 27742 | Rim with Mounted Feet for 20367 | 34210.6 | 64822 | Guide Pin 8×50 DIN 7 M6 for 20367 | 52276.7 |
| 27708 | PFS B.3.5×19 DIN 7981 In for 20367 | 16973.0 | 27743 | Spring Trigger for 20367 | 34215.7 | 65977 | Gabinete Completo for 20367 | 55679.3 |
| 27709 | Screw M8x16 DIN 933 ZB for 20367 | 19059.4 | 27744 | Separator Door for 20367 | 34218.1 | 65981 | Insulation Frame FE006-230 for 20367 | 56228.9 |
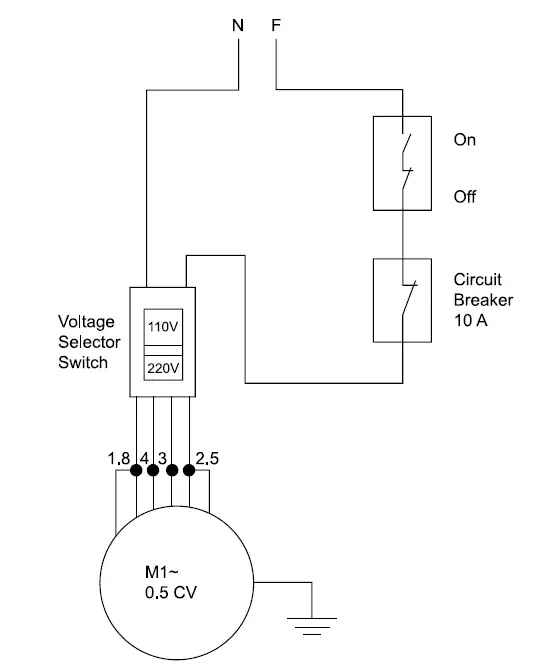
Electrical Schematics
Warranty Registration
Thank you for purchasing an Omcan product. To register your warranty for this product, complete the information below, tear off the card at the perforation and then send to the address specified below. You can also register online by visiting: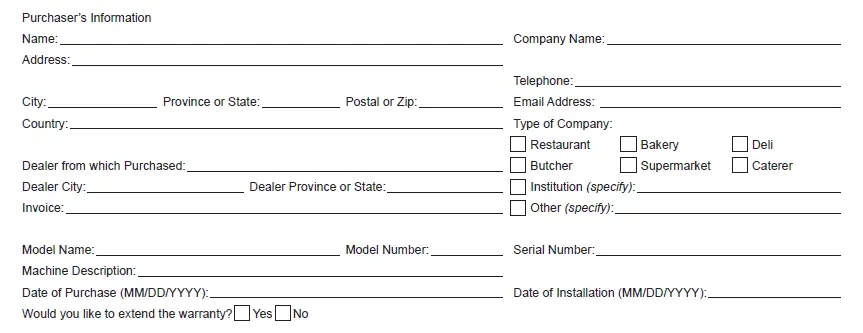
Since 1951 Omcan has grown to become a leading distributor of equipment and supplies to the North American foodservice industry. Our success over these many years can be attributed to our commitment to strengthening and developing new and existing relationships with our valued customers and manufacturers. Today with partners in North America, Europe, Asia and South America, we continually work to improve and grow the company. We strive to offer customers exceptional value through our qualified local sales and service representatives who provide convenient access to over 5,000 globally sourced products.


