
![]()
Manual
Product name: DK01A One hand Keyboard with converter function
Product Picture: 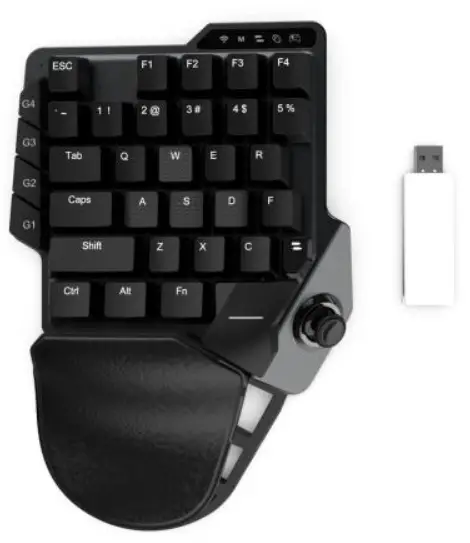
Specification:
- Mechanical switches optional(Red/Blue/Green etc).
- 35Full anti-ghosting keys : ESC, F1, F2, F3, F4, ~, 1, 2 , 3, 4 , 5, Tab, Q, W, E, R, Caps, A, S, D, F, Shift, Z, X, C, turbo, Ctrl, Alt, Fn, Space, R3( Joystick Press ), G1, G2, G3, G4
- 3 different backlit lighting effects.
- Support 4 G-key macro setting.
- Detachable 3M charging cable and 1500mAh Li-battery.
- Ergonomic form factor with adjustable palm rest.
- Support Turbo function.
LED lights & Indicators
- Hold FN and then press “F2” for 4 different backlit brightness.
- Hold FN and then press “5” to switch 3 different lighting effects.
Macro G1-G4 Setting:
Macro set multiple keyboard & mouse buttons into a single button (G1, G2, G3, G4). For example, you can set:“ UP, UP, DOWN, LEFT, RIGHT, X, O” to execute by pressing the G1 key on the keyboard. You can create up to 4 groups of Custom macros and the macro can have up to 15 keys ( Except Turbo, FN key )
a. Hold FN and press G1 to enter Macro mode, keyboard backlit “White” keep on.
b. Press action keys on the keyboard(Support max 12 steps).
c. Hold FN and press G1 to save and exit Macro mode.
d. Press G1 to active Marco setting.
PS:
- Clear Macro setting, hold FN and press G1 to enter macro mode and then press G1 to save and exit.
- Same macro setting method for G2, G3, G4.
Turbo Setting
Setting Method
- Hold and press Turbo to enter setting mode, keyboard backlit turns White.
- Press the Action key in the keyboard or mouse(F1/1/2/3/Q/E/R/F/C/Space/Shift/Tab/Caps/Click/Middle Button), the action key backlit turns to Red.
- Setting finished and press action key “Red” backlit lighting.
- Cancel the Turbo key, hold and press Turbo and press the action key again, the Red backlit turns to White then Turbo is canceled.
CONNECTION
Connect to PS4/PS4 Silm/PS4 Pro
a. Power on PS4 console and insert the dongle into the console.
b. Plug PS4 original controller into 2.4G dongle port by cable.
c. Plug mouse into the keyboard.
d. Turns on the keyboard(First-time connection press FN+ESC).
e. And then 2.4G dongle LED turns to Blue and connected.
Notice: Please ensure that the original controller USB cable in use is the Charging and Data Sync Cable. The USB the cable which only has a charging function is not supported with this device.
Connect to PS3
a. Power on PS3 console.
b. Insert 2.4G dongle into PS3 console.
c. Plug mouse into the keyboard.
d. Turns on the keyboard(First-time connection press FN+3).
e. And then 2.4G dongle LED turns to Yellow and connected.
Connect to Xbox Series X|S/Xbox One|S|X Console
a. Power on Xbox console and insert the dongle into the console.
b. Plug Xbox original controller into 2.4G dongle port by cable.
c. Plug mouse into the keyboard.
d. Turns on the keyboard(First-time connection press FN+ESC).
e. And then 2.4G dongle LED turns to Green and connected.
Connect to Switch Console
a. Power on Switch and put it into the dock.
b. Insert 2.4G dongle into the dock.
c. Plug mouse into the keyboard.
d. Turns on the keyboard(First-time connection press FN+ESC).
e. And then 2.4G dongle LED turns to Red and connected.
Keymap:
| Keyboard Button | Nontendo Switch | PS3 | PS4 | Xbox one | PC |
| Button Fl | Dpad UP | Dpad UP | Dpad UP | Dpad UP | Button Fl |
| Button 1 | Dpad LEFT | Dpad LEFT | Dpad LEFT | Dpad LEFT | Button 1 |
| Button 2 | Dpad DOWN | Dpad DOWN | Dpad DOWN | Dpad DOWN | Button 2 |
| Button 3 | Dpad RIGHT | Dpad RIGHT | Dpad RIGHT | Dpad RIGHT | Button 3 |
| Button W | Joystick UP | Joystick UP | Joystick UP | Joystick UP | Button W |
| Button A | Joystick LEFT | Joystick LEFT | Joystick LEFT | Joystick LEFT | Button A |
| Button D | Joystick RIGHT | Joystick RIGHT | Joystick RIGHT | Joystick RIGHT | Button D |
| Button S | Joystick DOWN | Joystick DOWN | Joystick DOWN | Joystick DOWN | Button S |
| Joystick UP | Joystick UP | Joystick UP | Joystick UP | Joystick UP | Button W |
| Joystick LEFT | Joystick LEFT | Joystick LEFT | Joystick LEFT | Joystick LEFT | Button A |
| Joystick RIGHT | Joystick RIGHT | Joystick RIGHT | Joystick RIGHT | Joystick RIGHT | Button D |
| Joystick DOWN | Joystick DOWN | Joystick DOWN | Joystick DOWN | Joystick DOWN | Button S |
| SPACE Joystick | L3 | L3 | L3 | L3 | Shift |
| Button F | x | x | Button F | ||
| Button SPACE | A | A | Button Space | ||
| Button C | B | B | Button C | ||
| Button R | Y | Y | Button R | ||
| Large Anti-skid Roller | R3 | R3 | R3 | R3 | Large Anti-skid Roller |
| Button E | R | R1 | R1 | RB | Button E |
| Mouse Left Button | ZR | R2 | R2 | RT | Mouse Left Button |
| Tab | — | Select | Options | View | Tab |
| Caps | + | Start | / | Menu | Caps |
| ∼ | Capture | / | Share | / | ∼ |
| Shift | L3 | L3 | L3 | L3 | Shift |
| Button Q | L | L1 | L1 | LB | Button Q |
| Mouse Right Button | ZL | L2 | 12 | LT | Mouse Right Button |
| Esc | HOME | PS | PS | HOME | Esc |
FCC Caution:
This device complies with part 15 of the FCC Rules. Operation is subject to the following two conditions: (1) This device may not cause harmful interference, and (2)this device must accept any interference received, including interference that may cause undesired operation. Any changes or modifications not expressly approved by the party responsible for compliance could void the user’s authority to operate the equipment.
Note: This equipment has been tested and found to comply with the limits for a ClassB digital device, pursuant to part 15 of the FCC Rules. These limits are designed to provide reasonable protection against harmful interference in a residential installation. This equipment generates uses and can radiate radio frequency energy and, if not installed and used in accordance with the instructions, may cause harmful interference to radio communications. However, there is no guarantee that interference will not occur in a particular installation. If this equipment does cause harmful interference to radio or television reception, which can be determined by turning the equipment off and on, the user is encouraged to try to correct the interference by one or more of the following measures:
- Reorient or relocate the receiving antenna.
- Increase the separation between the equipment and receiver.
- Connect the equipment into an outlet on a circuit different from that to which the receiver is connected.
- Consult the dealer or an experienced radio/TV technician for help.
The device has been evaluated to meet general RF exposure requirements. The device can be used in portable exposure conditions without restriction.


 Keyboard User Manual")


