![]() CB27 PRO Mini CB Radio Instruction Manual
CB27 PRO Mini CB Radio Instruction Manual
KNOW ABOUT THIS RADIO
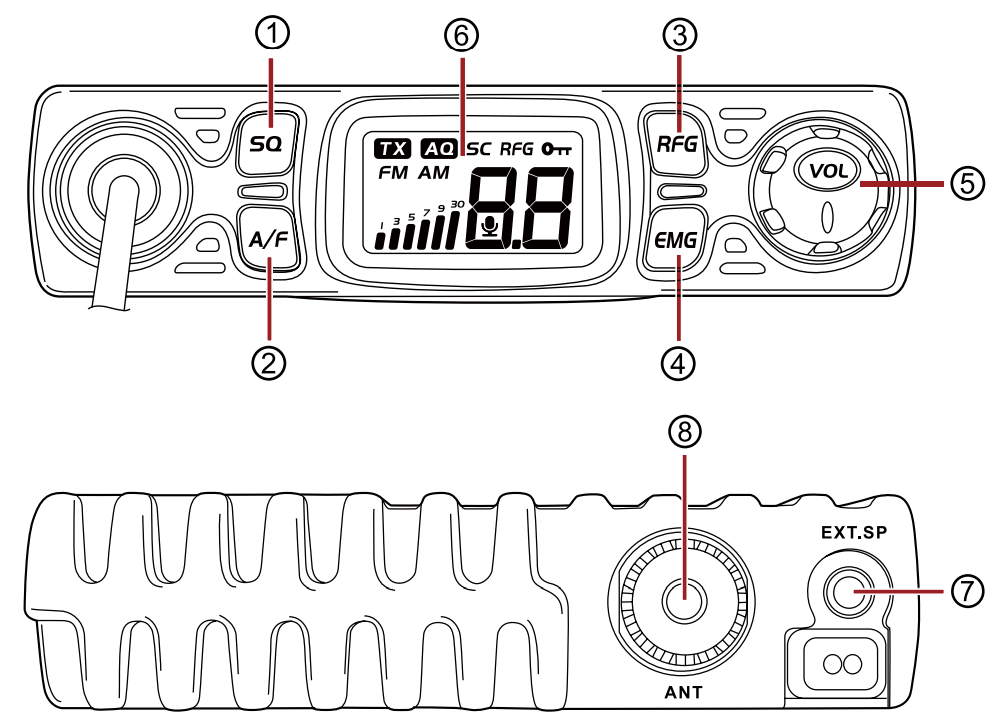
| 1 | Squelch control, manual (SQ), automatic (ASQ) |
| 2 | Mode / Scan key |
| 3 | RF Gain control |
| 4 | CH9 / CH19 / Keypad lock / VOX control / VOX setting |
| 5 | Power On/Off Volume control |
| 6 | LCD |
| 7 | External speaker Jack (3.5mm mono jack) |
| 8 | SO 239) for 259) Antenna Jack (type plug (type PL |
HOW TO USE THIS RADIO
2.1 Power On/Off the Radio
- Turn VOL switch clockwise to power on the radio, the LCD displays the Norms and then displays channel number.
- Turn VOL switch anti-clockwise, until hear Ka Ta, the radio is powered off.
2.2 Volume control
Turn clockwise to increase volume, anti-clockwise to decrease volume.
2.3 Channel Control
- Short press microphone [ UP ] or [ DN ] to change working channel.
- Hold microphone [ UP ] or [ DN ] can fast change working channel.
2.4 Squelch level control(O.F to 3.4 level available)
- Short press
 , until LCD displays SQ and then displays X.X, X.X stands for SQ level, the bigger value stands for high squelch level.
 - Short press [ UP ] or [ DN ] to change SQ level.
- Hold [ UP ] or [ DN ] can fast change SQ level.
- Short press or wait for 3 seconds to store and exit. A » Note: The higher SQ level selected, the stronger signal required to open speaker and hear the calling.
2.5 ASQ control(A.1-A.9 level available)
- Hold key, until LCD displays AQ, the ASQ function turned on. The LCD will displays “A.X”, “X” stands for the ASQ level, the bigger value stands for high squelch level.
- Short press microphone [ UP ] or [ DN ] to change ASQ level
- Hold microphone [ UP ] or [ DN ] can fast change ASQ level.
- Short press or wait for 3 seconds to store and exit.
 Note: The higher SQ level selected, the stronger signal required to open speaker and hear the calling.
2.6 Mode control
- Short press
 key to switch between AM /FM mode.
 - The LCD displays the selected mode.
2.7 RF Gain contro
- Short press
 key, LCD displays RFG and the present RF gain level flashes.
 - Short press microphone [ UP ] or [ DN ] to change level.
- Short press [PTT] switch to exit RF gain level control. Note: When RFG function is on the LCD displays RFG, if RFG level is 6 means the attenuation is 6dBm.
2.8 Emergency Channel
- Short press key to choose CH9,the Chanel number flashes
- Short press flashes.key again to choose CH19, the channel number flashes.
- Short press key to choose CH9, the channel number
2.9 Keypad Lock
- Holdkey for over 3 seconds to lock the keys, LCD displays “
 “.
“. - Hold key third time to return to last normal channel. key for over 3 seconds again to unlock the keys, disappears form LCD.
2.10 VOX control
- Press and hold [PTT] switch; 2
- Short press key to activate or deactivate the VOX function. “I” is displayed when the function is active.Note: The VOX function allows transmitting by speaking into the original microphone without pressing the PTT switch. » In order to prevent the VOX function from being triggered by mistake, the radio will automatically turn off the VOX function after it is powered off.
2.11 VOX Setting
- Turn on the power while pressing setting. “key to enter the VOX function
 ” flashes in the LCD.
 - Short press key to choose wanted setting.
LX: stands for sensitivity level. allows the adjustment of the microphone for an optimum transmission quality. Adjustable level form 1 (high sensibility) to 9 (low sensibility) tX: stands for delay time. allows avoiding the sudden cut of the transmission by adding a delay at the end of speaking. The level is adjustable form 1 (short time delay) to 9 (long time delay) - Short press microphone [ UP ] or [ DN ] to set desired level.
- Hold key to store and exit setting.
2.12 Scan function
- Hold to start scan function, “SC” falshes in the LCD;
- Press microphone [ UP ] or [ DN ] to change scan direction during scan;
- Hold or short press [PTT] switch to exit scan function.
2.13 Norms control
- Hold to power on radio, until LCD displays the norms;
- Press microphone [ UP ] or [ DN ] to choose wanted norms;
- Power off and power on again.
2.14 Install external speaker
Choose a 160 external speaker with 3.5mm mono connector.![]() WARNING: The sound output mode of the machine is BTL output, and the two pins of the speaker cannot be connected to the ground net or the machine shell! Otherwise, there will be a large DC current flowing through the speaker, which will burn the speaker and components.
WARNING: The sound output mode of the machine is BTL output, and the two pins of the speaker cannot be connected to the ground net or the machine shell! Otherwise, there will be a large DC current flowing through the speaker, which will burn the speaker and components.
2.15 Resume factory default
- Hold key to power on radio, until the LCD displays “rt”, the resume work finish.
- All channel and function setting will resume factory default after above operation.
SPECIFICATION
| GENERAL | ||
| Modulation Mode | AM/FM | |
| Frequency Range | 26.965-27.405MHz | |
| Frequency Tolerance | ±5.0ppm | |
| Input Voltage | 13.2V | |
| Dimensions | 109x104x25mm | |
| Weight | 415g | |
| Operating Temperature Range | -20°C to +50°C | |
| Current Drain | Transmit | 3A MAX |
| Receive | Squelched 0.3A | |
| VOL Max | 0.7A | |
| Antenna Connector | UHF, SO-239 | |
| TRANSMITTER | ||
| Power Output | 4 Watts FM/AM | |
| Transmission interference | inferior to 4nW | |
| Frequency Response | 300-3000Hz | |
| Modulated signal distortion | inferior to 5% | |
| Output Impedance | 50 ohms | |
| RECEIVER | ||
| Sensitivity | Less than 1uV for 10dB(S+N)/N | |
| Image Rejection | 70dB | |
| Adjacent Channel Rejection | 60dB | |
| IF Frequencies | 1st 10.695MHz | |
| 2nd 455KHz | ||
| Automatic Gain Control(AGC) | Less than 10dB change in audio | |
| Output for inputs from 10 to 50000uV | ||
| Squelch | less than 1 uV | |
| Audio Output Power | 1Watts at 160 less than 10% distortion | |
| Frequency Response | 300-3000Hz | |
SPECIAL COMBINATION OPERATION
- To turn on/off VOX, press and hold PTT + short press EMG. Then a microphone marker will appear on the screen.
- If you need to set the VOX up, please press and hold EMG and power on, short press EMG to enter LX (VOX level setting) or TX (time delay setting). The VOX level controls the VOX sensitivity. The VOX delay setting controls. the transmission delay to prevent the ending speech from not being transmitted.
- If you need to select Mode, please press and hold A/F and turn it on, then press the UP/DN button of the microphone to select BAND. After the selection is completed, please turn off the radio, and then turn it on again. The mode would be your selected Mode now (MODE: CB(US&EU)/ CE/UK/PL/12/DE/IN).
- If you need to use US or EU mode, please select “CB mode”.
- It is forbidden to connect the power supply above 15V.
OVERVIEW OF ASSIGNED FREQUENCIES CB FRO
| Band ID US or EU. | Band ID CE: | Band ID U. | |||||||
| AM 4.0W | Cept | Europe | United Kingdom | ||||||
| FM 4.0W | FM 4.0W | 40 CH FM 4.0W | 40CH FM 4.0W | ||||||
| CH.NO. | Freq.(MHz) | ||||||||
| 1 | 27. | CH.NO. | Freq.(MHz) | CH.NO. | Freq.(MHz) | CH.NO. | Freq.(MHz) | ||
| 2 | 27. | 1 | 27. | 1 | 27. | 1 | 28. | ||
| 3 | 27. | 2 | 27. | 2 | 27. | 2 | 28. | ||
| 4 | 27. | 3 | 27. | 3 | 27. | 3 | 28. | ||
| 5 | 27. | 4 | 27. | 4 | 27. | 4 | 28. | ||
| 6 | 27. | 5 | 27. | 5 | 27. | 5 | 28. | ||
| 7 | 27. | 6 | 27. | 6 | 27. | 6 | 28. | ||
| 8 | 27. | 7 | 27. | 7 | 27. | 7 | 28. | ||
| 9 | 27. | 8 | 27. | 8 | 27. | 8 | 28. | ||
| 10 | 27. | 9 | 27. | 9 | 27. | 9 | 28. | ||
| 11 | 27. | 10 | 27. | 10 | 27. | 10 | 28. | ||
| 12 | 27. | 11 | 27. | 11 | 27. | 11 | 28. | ||
| 13 | 27. | 12 | 27. | 12 | 27. | 12 | 28. | ||
| 14 | 27. | 13 | 27. | 13 | 27. | 13 | 28. | ||
| 15 | 27. | 14 | 27. | 14 | 27. | 14 | 28. | ||
| 16 | 27. | 15 | 27. | 15 | 27. | 15 | 28. | ||
| 17 | 27. | 16 | 27. | 16 | 27. | 16 | 28. | ||
| 18 | 27. | 17 | 27. | 17 | 27. | 17 | 28. | ||
| 19 | 27. | 18 | 27. | 18 | 27. | 18 | 28. | ||
| 20 | 27. | 19 | 27. | 19 | 27. | 19 | 28. | ||
| 21 | 27. | 20 | 27. | 20 | 27. | 20 | 28. | ||
| 22 | 27. | 21 | 27. | 21 | 27. | 21 | 28. | ||
| 23 | 27. | 22 | 27. | 22 | 27. | 22 | 28. | ||
| 24 | 27. | 23 | 27. | 23 | 27. | 23 | 28. | ||
| 25 | 27. | 24 | 27. | 24 | 27. | 24 | 28. | ||
| 26 | 27. | 25 | 27. | 25 | 27. | 25 | 28. | ||
| 27 | 27. | 26 | 27. | 26 | 27. | 26 | 28. | ||
| 28 | 27. | 27 | 27. | 27 | 27. | 27 | 28. | ||
| 29 | 27. | 28 | 27. | 28 | 27. | 28 | 28. | ||
| 30 | 27. | 29 | 27. | 29 | 27. | 29 | 28. | ||
| 31 | 27. | 30 | 27. | 30 | 27. | 30 | 28. | ||
| 32 | 27. | 31 | 27. | 31 | 27. | 31 | 28. | ||
| 33 | 27. | 32 | 27. | 32 | 27. | 32 | 28. | ||
| 34 | 27. | 33 | 27. | 33 | 27. | 33 | 28. | ||
| 35 | 27. | 34 | 27. | 34 | 27. | 34 | 28. | ||
| 36 | 27. | 35 | 27. | 35 | 27. | 35 | 28. | ||
| 37 | 27. | 36 | 27. | 36 | 27. | 36 | 28. | ||
| 38 | 27. | 37 | 27. | 37 | 27. | 37 | 28. | ||
| 39 | 27. | 38 | 27. | 38 | 27. | 38 | 28. | ||
| 40 | 27. | 39 | 27. | 39 | 27. | 39 | 28. | ||
| 40 | 27. | 40 | 27. | 40 | 28. | ||||
| Band ID PL: | Band ID 12: | Band ID DE | ||||||
| Poland | Italy | Germany | Germany | |||||
| AM 4.0W | AM 4.0W | 40 CH FM/AM 4.0W | ||||||
| FM 4.0W | FM 4.0W | 80 CH FM 4.0W | ||||||
| CH.NO | Freq.(MHz) | CH.NO | Freq.(MHz) 26.965 | CH.NO | Freq.(MHz) | CH.NO. | Freq.(MHz) | |
| 1 | 26.960 | 1 | 1 | 27. | 41 | 27. | ||
| 2 | 26.970 | 2 | 27. | 2 | 27. | 42 | 27. | |
| 3 | 26.980 | 3 | 27. | 3 | 27. | 43 | 27. | |
| 4 | 27.000 | 4 | 27. | 4 | 27. | 44 | 27. | |
| 5 | 27.010 | 5 | 27. | 5 | 27. | 45 | 27. | |
| 6 | 27.020 | 6 | 27. | 6 | 27. | 46 | 27. | |
| 7 | 27.030 | 7 | 27. | 7 | 27. | 47 | 27. | |
| 8 | 27.050 | 8 | 27. | 8 | 27. | 48 | 27. | |
| 9 | 27.060 | 9 | 27. | 9 | 27. | 49 | 27. | |
| 10 | 27.070 | 10 | 27. | 10 | 27. | 50 | 27. | |
| 11 | 27.080 | 11 | 27. | 11 | 27. | 51 | 27. | |
| 12 | 27.100 | 12 | 27. | 12 | 27. | 52 | 27. | |
| 13 | 27.110 | 13 | 27. | 13 | 27. | 53 | 27. | |
| 14 | 27.120 | 14 | 27. | 14 | 27. | 54 | 27. | |
| 15 | 27.130 | 15 | 27. | 15 | 27. | 55 | 27. | |
| 16 | 27.150 | 16 | 27. | 16 | 27. | 56 | 27. | |
| 17 | 27.160 | 17 | 27. | 17 | 27. | 57 | 27. | |
| 18 | 27.170 | 18 | 27. | 18 | 27. | 58 | 27. | |
| 19 | 27.180 | 19 | 27. | 19 | 27. | 59 | 27. | |
| 20 | 27.200 | 20 | 27. | 20 | 27. | 60 | 27. | |
| 21 | 27.210 | 21 | 27. | 21 | 27. | 61 | 27. | |
| 22 | 27.220 | 22 | 27. | 22 | 27. | 62 | 27. | |
| 23 | 27.250 | 23 | 27. | 23 | 27. | 63 | 27. | |
| 24 | 27.230 | 24 | 27. | 24 | 27. | 64 | 27. | |
| 25 | 27.240 | 25 | 27. | 25 | 27. | 65 | 27. | |
| 26 | 27.260 | 26 | 27. | 26 | 27. | 66 | 27. | |
| 27 | 27.270 | 27 | 27. | 27 | 27. | 67 | 27. | |
| 28 | 27.280 | 28 | 27. | 28 | 27. | 68 | 27. | |
| 29 | 27.290 | 29 | 27. | 29 | 27. | 69 | 27. | |
| 30 | 27.300 | 30 | 27. | 30 | 27. | 70 | 27. | |
| 31 | 27.310 | 31 | 27. | 31 | 27. | 71 | 27. | |
| 32 | 27.320 | 32 | 27. | 32 | 27. | 72 | 27. | |
| 33 | 27.330 | 33 | 27. | 33 | 27. | 73 | 27. | |
| 34 | 27.340 | 34 | 27. | 34 | 27. | 74 | 27. | |
| 35 | 27.350 | 35 | 27. | 35 | 27. | 75 | 27. | |
| 36 | 27.360 | 36 | 27. | 36 | 27. | 76 | 27. | |
| 37 | 27.370 | 37 | 27. | 77 | 27. | |||
| 38 | 27.380 | 38 | 27. | 78 | 27. | |||
| 39 | 27.390 | 39 | 27. | 79 | 27. | |||
| 40 | 27.400 | 40 | 27. | 80 | 27. | |||
Thank You for Shopping at Radioddity! FIND TUTORIALS, SUPPORT AND MORE![]() https://www.radioddity.com/
https://www.radioddity.com/![]() https://www.facebook.com/radioddity
https://www.facebook.com/radioddity![]() https://www.youtube.com/c/Radioddityradio
https://www.youtube.com/c/Radioddityradio
![]() Visit Radioddity.com For Downloads And Help
Visit Radioddity.com For Downloads And Help


