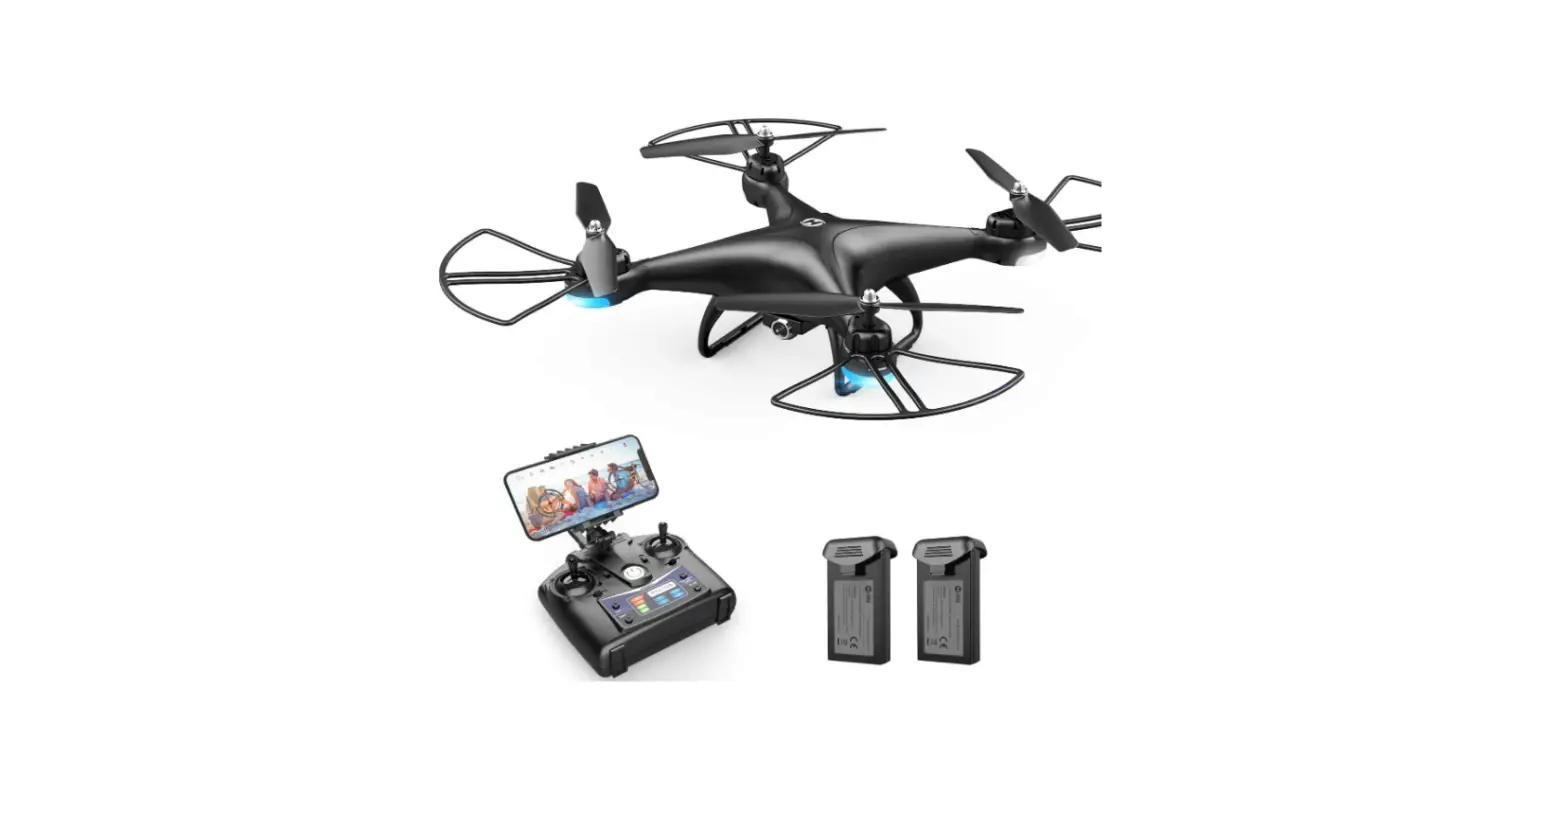
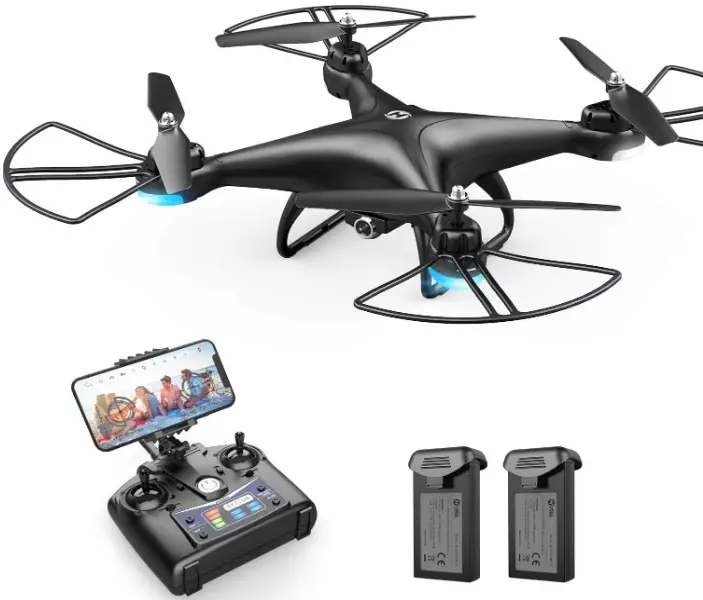
Holy Stone HS110D FPV RC Drone with HD Camera
DISCLAIMER & WARNING
- Please read this Disclaimer & Warning and Safety Guidelines carefully before using our product. This product is not recommended for people under the age of 14. By using this product, you hereby agree to this disclaimer and signify that you have read it fully. You agree that you are responsible for your own conduct and any damage caused while using this product, and its consequences. You agree to use this product only for purposes that are proper and in accordance with local regulations, terms, and all applicable policies and guidelines Holy Stone may make available.
- When using this product, please be sure to strictly abide by the specification requirements and safety guidelines stated in this document. Any personal injury property damage, legal disputes, and all other adverse events caused by the violation of the safety instructions or due to any other factor WILL NOT be Holy Stone’s responsibility.
SAFETY GUIDELINES
Check Before Use
- CD This product is not a toy, but it is a high-precision drone that integrates various electronic stability and control mechanisms. Please be sure to set up this drone carefully and correctly to ensure safe, accident-free operation.
- Please be sure that the batteries of the drone and transmitter are clean and undamaged.
- Please be sure that all the propellers are undamaged and installed in the right orientation.
- Please do a thorough check of the product before each use. Check for the firmness of the parts, any signs of cracks and wear of the propeller, battery power and effectiveness of the indicator, etc. If after doing a complete check any issues are found, please refrain from using the product until the issue has
been taken care of.
Flight Environment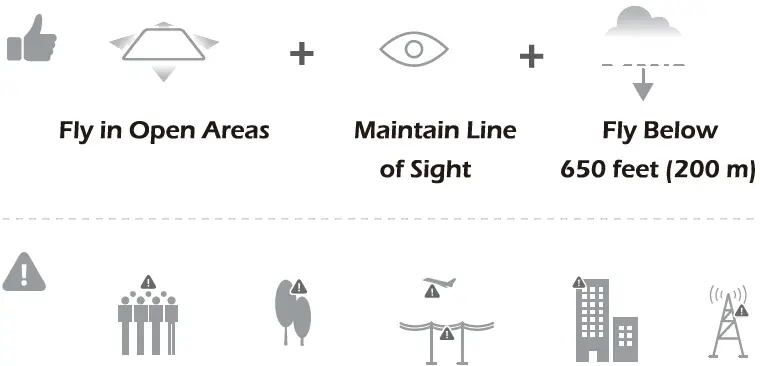
- Avoid flying over or near obstacles, crowds, high-voltage power lines, trees, airports,s or bodies of water. DO NOT fly near strong electromagnetic sources such as power lines and base stations as it may affect the onboard compass.

- Don’t use this drone in adverse weather conditions such as rain, snow, fog, and wind.

Operations Requirements
- CD Please don’t use this product to follow any moving vehicles.
- During the flight, only turn off the motor in case of an emergency.
- Please fly the drone back to you as soon as possible when the battery is running low.

- Stay away from the rotating.
- Don’t fly in the No-Fly Zone. propellers and motors.

Use of Battery
- Please ensure batteries are fitted in the correct orientation as shown in the instruction manual.
- Avoid short circuits by fitting the batteries incorrectly, and do not crush or squeeze the batteries as this could carry the risk of an explosion.
- Do not mix new and old batteries as this can lead to poor performance of the product.
- Dispose of used batteries carefully, and do not litter.
- Please keep dead batteries away from heat and fire.
- If the device is not going to be used for an extended period of time, remove the batteries to prevent potential damage from battery leakage.
- It is recommended to only use the USB charging cable that comes with the drone to charge the battery.
- Don’t connect the battery directly to wall outlets or car cigarette-lighter sockets.
- Don’t attempt to disassemble or modify the battery in any way.
- Don’t pierce the battery casing with a nail or other sharp object break it open with a hammer, or step on it!
- Don’t use the battery if it gives off an odor, generates heat, or becomes discolored or deformed. Or appears abnormal in any way. If the battery is in use or being charged, remove it from the device or charger immediately and discontinue use.
- Always charge the batteries in a fireproof container and away from combustible material. Don’t charge on surfaces that can catch fire-this includes wood, cloth, carpet, or in the application’s device.
- Don’t immerse the battery in water or allow it to get wet.
- Don’t solder the battery terminal directly.
- Keep the battery out of reach of children or pets.
- Don’t short-circuit the battery by connecting wires or other metal objects to the positive(+) and negative(-) terminals.
Li-Po Battery Disposal & Recycling
Waste Lithium-polymer batteries must not be placed with household trash. Please contact a local environmental or waste agency or the waste agency or the supplier of your model or your nearest Li-Po battery recycling center
MAINTENANCE
- CD Clean the product after each use with a clean. soh cloth.
- Avoid prolonged exposure to direct sunlight and avoid the buildup of heat on the drone.
- This device is not waterproof and must not be submerged in water under any circumstance. Failure to maintain the device completely dry will result in the failure of the unit.
- Check the charging plug and other accessories for signs of damage frequently. If any part of the device is damaged, refrain from flying until maintenance can be carried out.
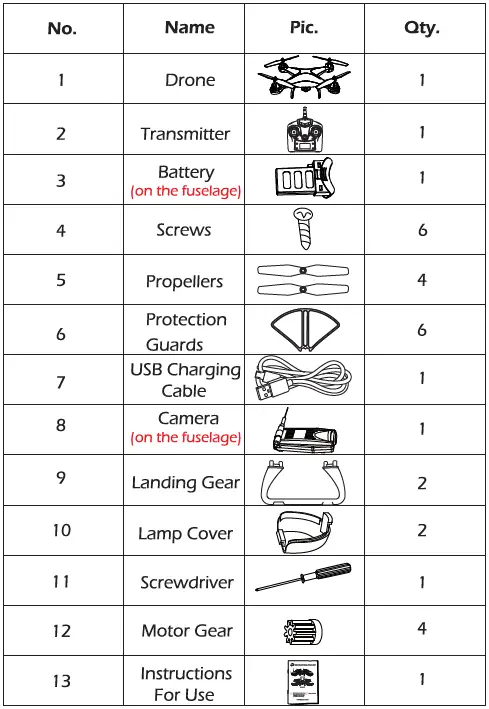
PACKAGE CONTENTS
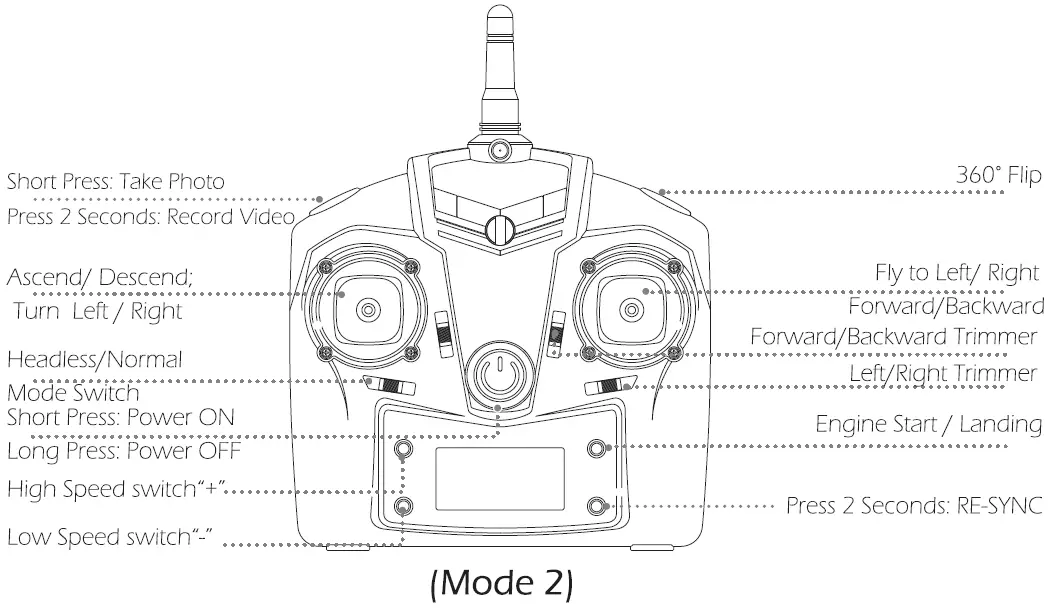
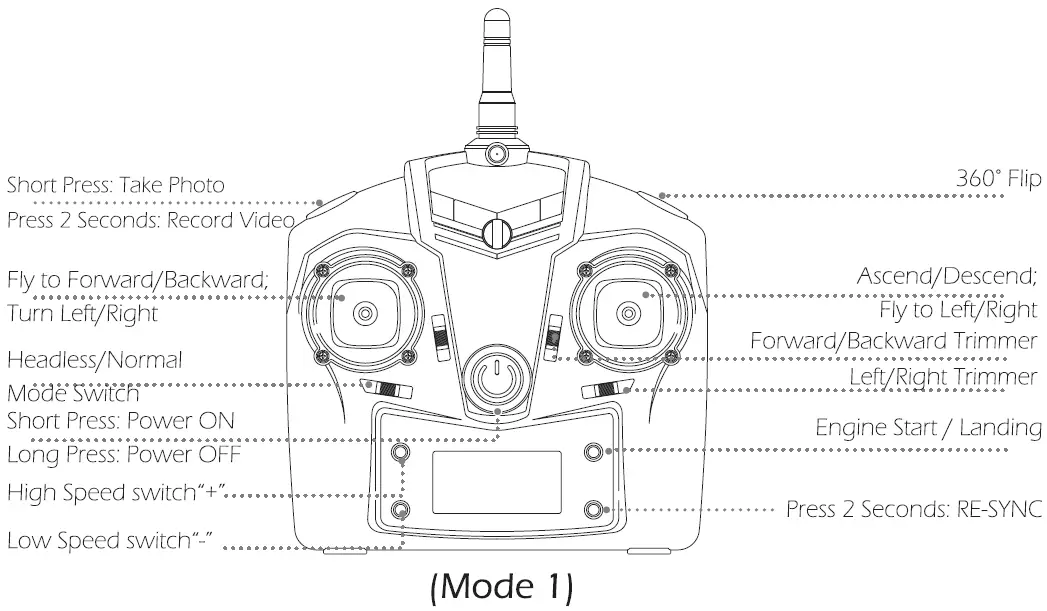
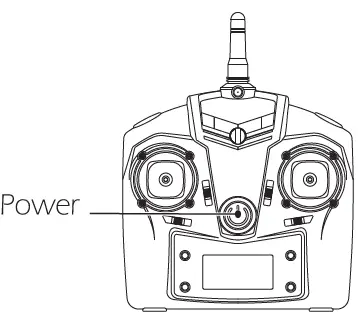
TRANSMITTER FUNCTIONS
- Power on the transmitter, Left-hand throttle MODE 2 will be the default setting. (Recommended Mode!)

- To enter MODE 1, power on the transmitter while holding the upper left button. (Please do not release the upper left button until the transmitter is powered on)

DRONE’S DETAILS
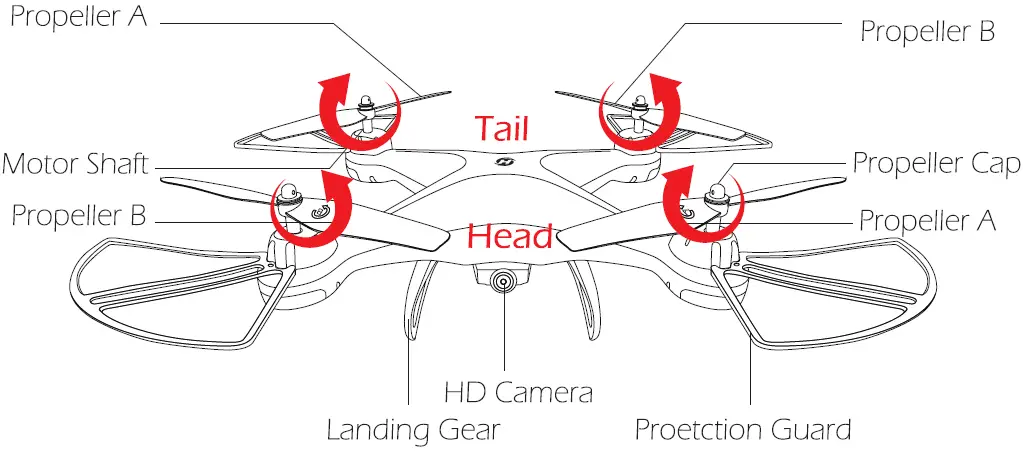
Please note that all propellers must be installed in the correct orientation. (Pay attention to the letter “A” or “B” printed on each propeller when installing.)
CHARGE THE BATTERY
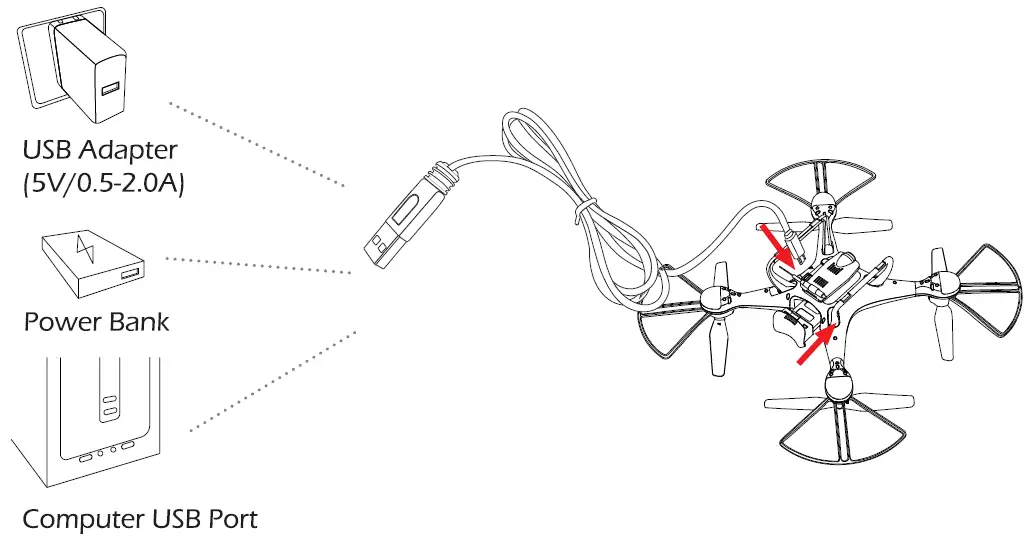
- Make sure the battery is connected to the drone, and insert the USB charging cable into the USB adapter(SV/2A recommended).
- Connect the USB charging cable to the charging port on the drone. The indicator on the power switch will turn red when charging and turn off when the battery is fully charged.
- Charging time: about 1 20 minutes. To ensure safety and optimal flying, please read the information on “Use of Battery” on the “SAFETY GUIDELINES” and charge the batteries before the flight.
INSTALLATION
Propeller
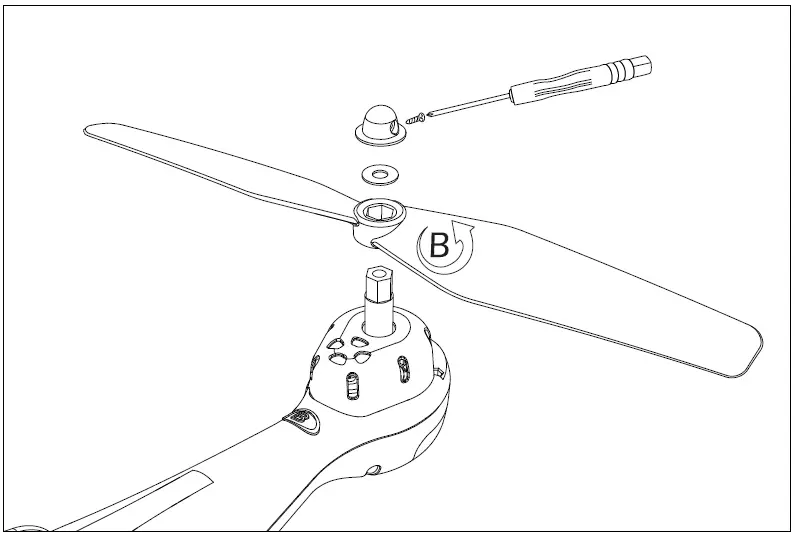
- Unscrew the small screw on the propeller cap.
- Take the propeller cap, fixing ring, and propeller out.
- Attach the new propeller.
- Attach the fixing ring, propeller cap, and screw back. (When installing, pay attention to the letters “A” and “B” printed on the propeller, and make sure that the direction of arrow rotation above the propeller is the same as the arrow direction of rotation on the drone’s wing!)
Protection Guard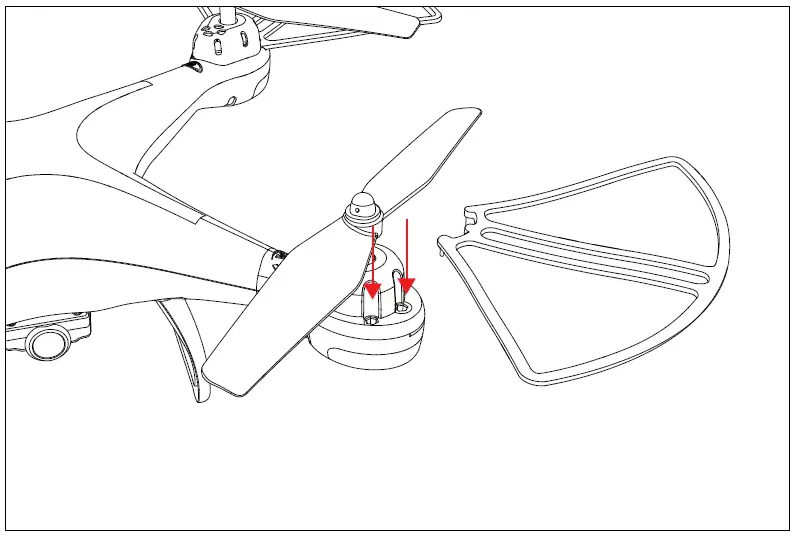
As shown in the figure above, please install the Propeller Guard on the motor base.
Landing Gear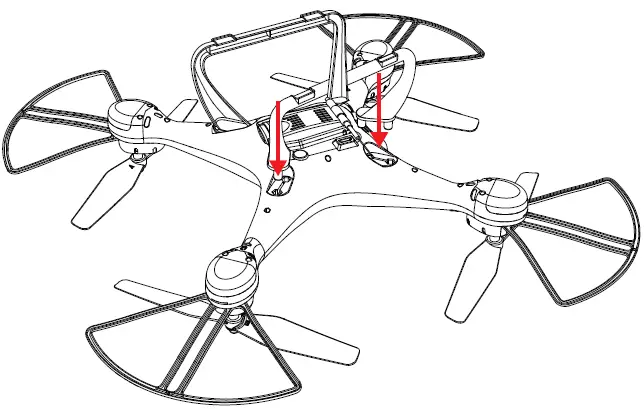
As shown in the figure above, please install the Landing Gear on the bottom of the drone.
Camera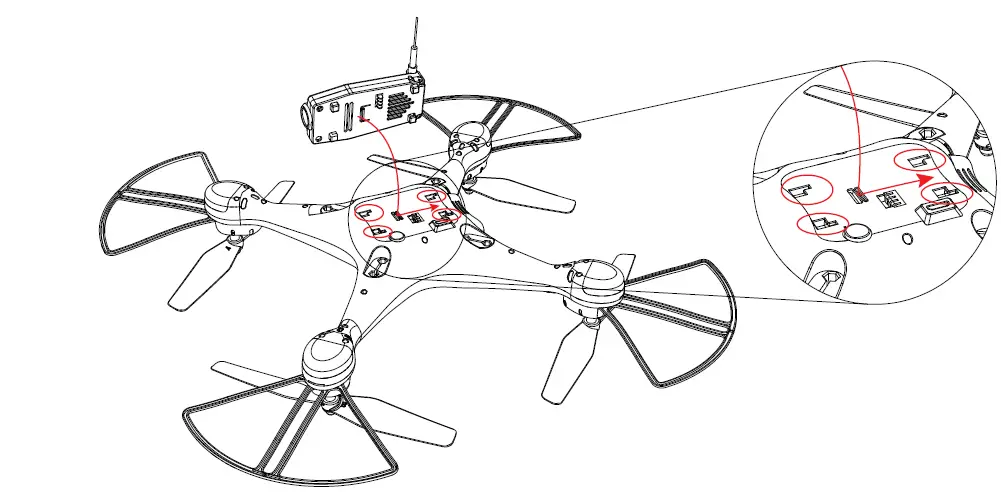
- According to the above diagrams, please make sure that the camera is mounted on the four camera slots at the bottom of the fuselage, then pull the camera back to lock it.
- Push the camera forward to take it out.
Phone Hold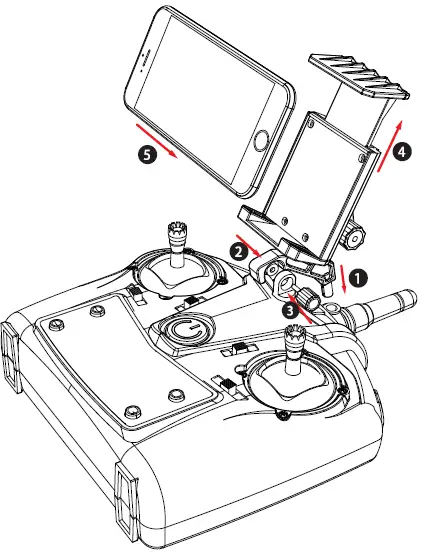
- Install the phone holder to the transmitter and fix it with the big screw which comes with the drone.
- Pull the phone hold up to adjust the width of the phone holder to fit the phone’s size
Drone Battery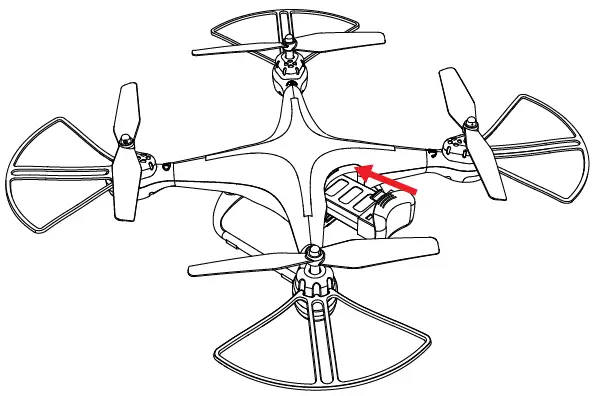
According to the above diagrams, push the battery forward to install the battery, and pull it back to take it out.
Transmitter Battery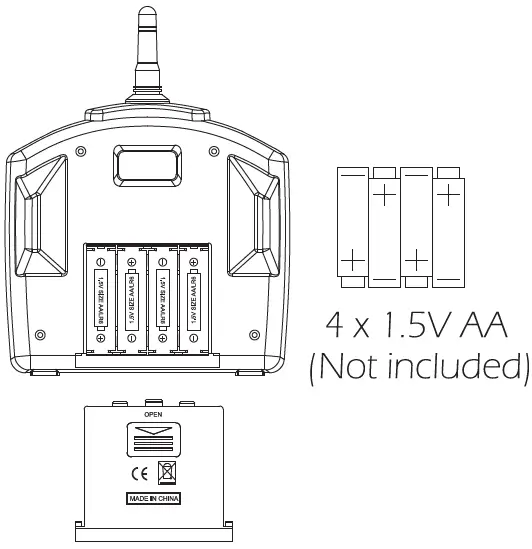
According to the above diagrams, Install 4 x 1 . SV M batteries in the battery compartment of the transmitter.
Note: Always pay close attention to battery polarity when inserting any batteries to make sure they are fitted correctly.
FLIGHT OPERATION
Please Note, all of the following operations are taking Mode 2 for example.
Pair the Drone
- Power on the transmitter.

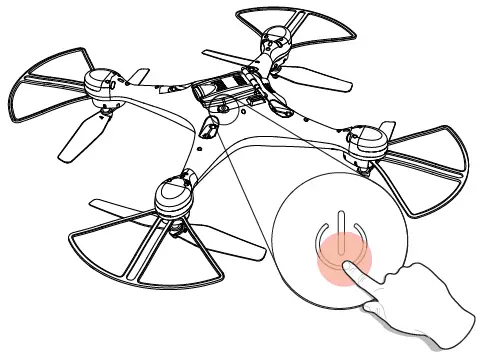
- Power on the drone.

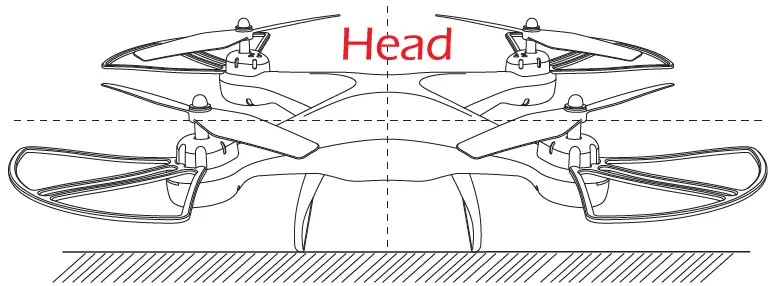
- Place the drone on a flat and level surface with the head forward and the tail towards the pilot.

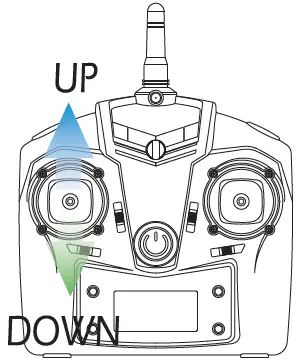
- Push the throttle joystick up and then down to pair the drone and transmitter. The LED indicator lights on the drone will flash slowly if the drone is paired successfully.

Calibrate the Gyro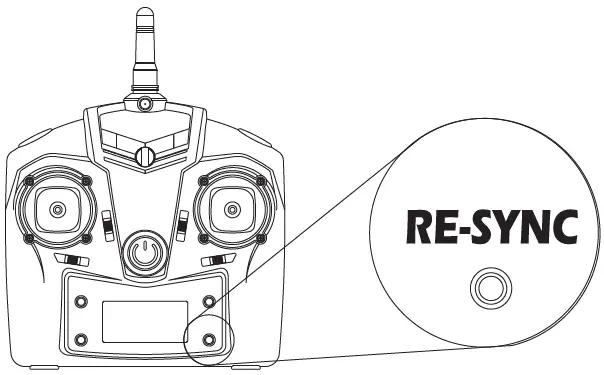
Press the RE-SYNC button for 2 Seconds to calibrate the gyro of the drone.
Engine Start; Landing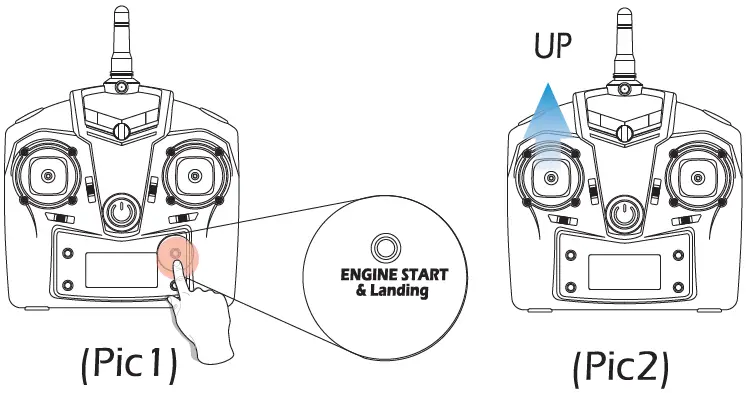
Press the “Engine Startjlanding” button(Pic 1), the propellers will start spinning at low speed. Push the throttle joystick up (Slowly) to take off (Pic2). If you want to make the drone land, press the “Engine Startjlanding” button again, and the drone will land slowly by itself until it touches the ground.
Manual Landing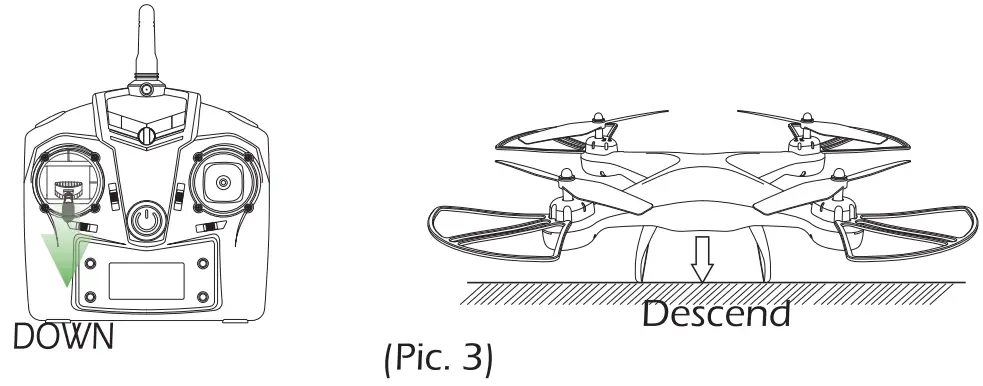
Push the throttle joystick down (slowly) until the drone touches the ground. Hold a few seconds to stop the motors.
Flight Control
Throttle/Left) Joystick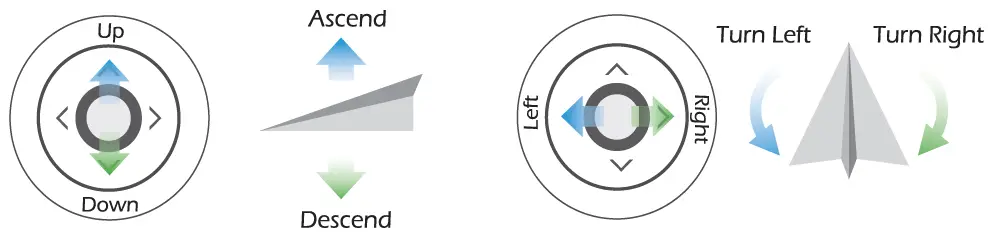
Direction/Right) Joystick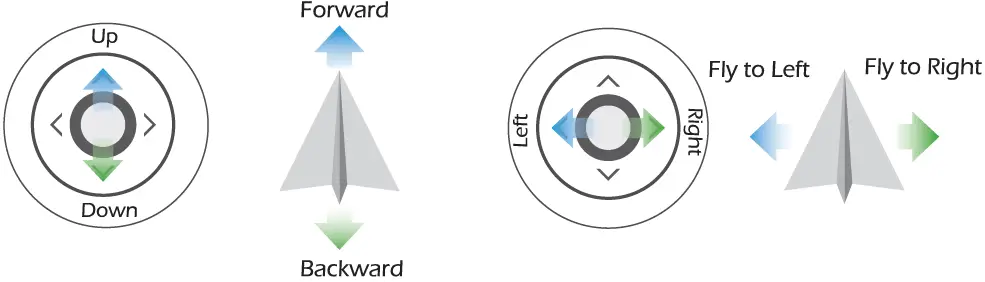
FUNCTIONS INTRODUCTION
Emergency Stop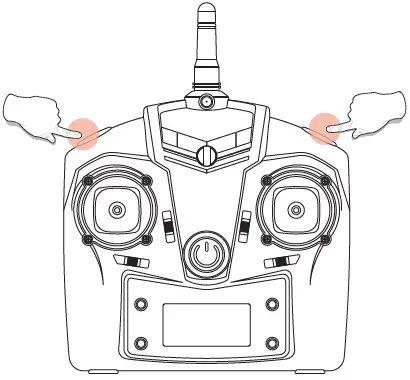
- Only stop motors mid-flight in emergency situations when doing so can reduce the risk of damage or injury.
- Press the UPPER LEFT(Photo Function) and UPPER RIGHT(Flip Function) buttons at the same time, the motors will stop immediately.
Speed Switch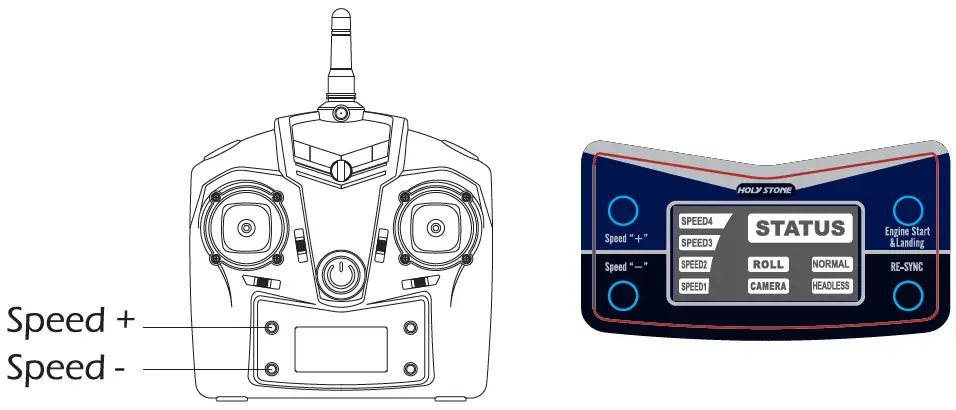
This drone comes with 5-speed levels (Low/Medium/High/Expert; Racing). Press the “Speed+” or “Speed-” button on the transmitter to switch the speed. The speed status will be shown on the LED display of the transmitter. (The Medium Speed is the default speed mode, and on Racing rate, the indicator light of “Speed 4” will keep flashing.)
Altitude Hold
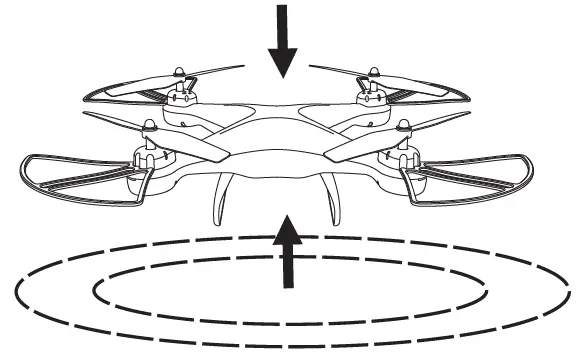
During the flight, the altitude hold function allows you to release the throttle joystick, and the drone will keep hovering at its current height.
360° Flip
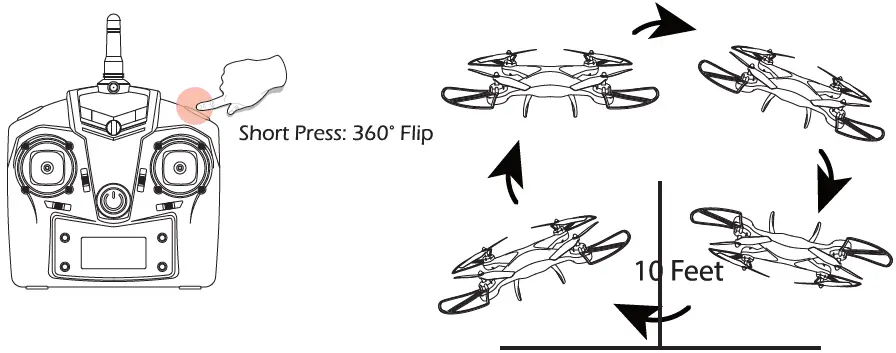
When you become familiar with all the functions of the drone, you can try this amazing flip mode. When you fly the drone at least IO feet high, press the 360° flip button on the Upper Right of the transmitter, then push the Right Joystick Forward/Backward or Left/Right, and the drone will do a flip toward the corresponding direction. If you are in Mode 1, push the Right Joystick Left/Right, or push the Left Joystick Forward/Backward, and the drone will do a flip toward the corresponding direction.
Caution: The drone will flip best when the battery is fully charged.
Headless Mode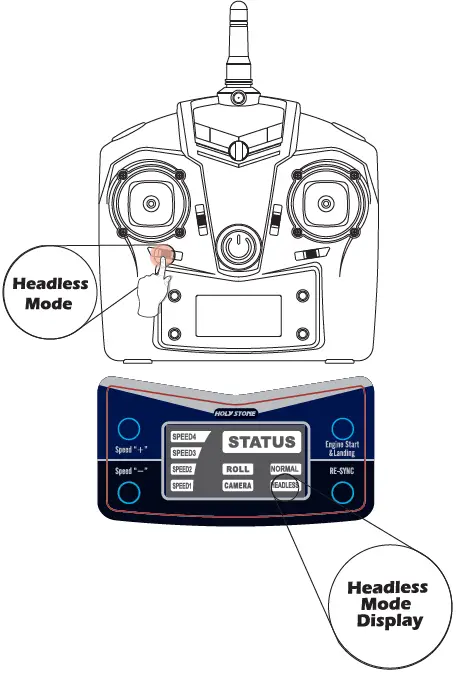
A Do not use the Headless Mode until you totally comprehend the instruction for use. Flying in Headless Mode without sufficient experience might result in loss or damage to the device.
- Press the Headless Mode button on the transmitter to enter Headless Mode, and the “HEADLESS” mode status indicator lights on the transmitter will light up.
- Press the Headless Mode button again to exit Headless Mode, and the “NORMAL” mode status indicator light on the transmitter will light up.
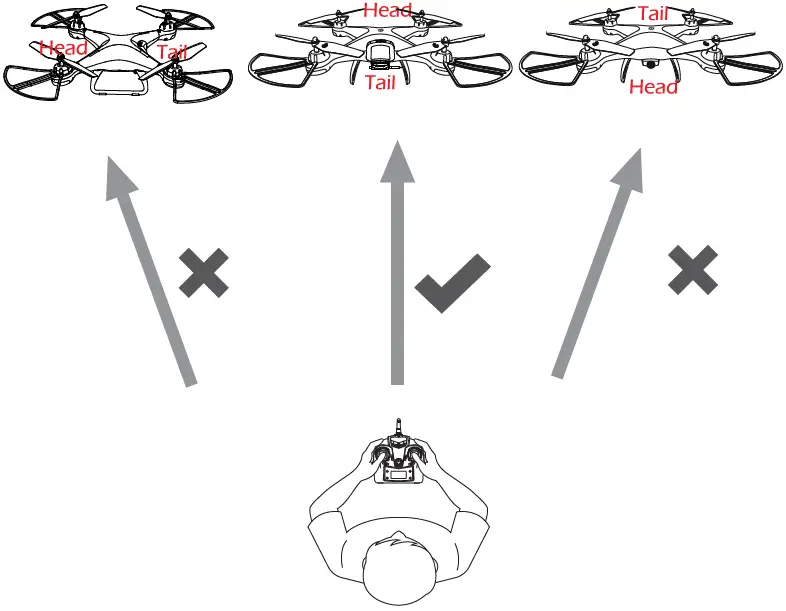
Please make sure the pilot stays in the same orientation as the drone head faces when the drone takes off.
Under Headless Mode, the forward direction is the direction that the head of the drone faces when the drone takes off. In order to make sure the pilot can tell the drone’s direction, we recommend that pilots stay in the same orientation as the drone head faces when the drone takes off. If so, when the pilot pushes the direction joystick forward, the drone will fly forward. If the pilot pushes the direction joystick backward, the drone will fly toward him/her. If the pilot moves the right stick left /right, the drone will move left/right relative to you. It is very important that the pilot stays in the same orientation as the drone head faces when the drone takes off.
Trimmer Function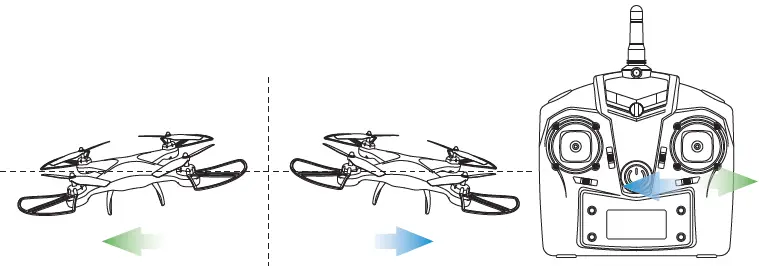
L/R Sideward Fly Trim: When the drone drift to the left or the right side, slide the trim button in the opposite direction to re-balance the drone.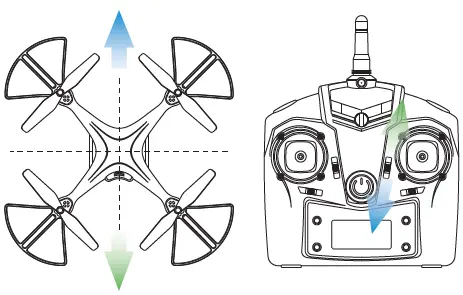
F/8 Sideward Fly Trim: When the drone drifts to forward or backward, slide the trim button in the opposite direction to re-balance the drone.
Drone Status Indicators
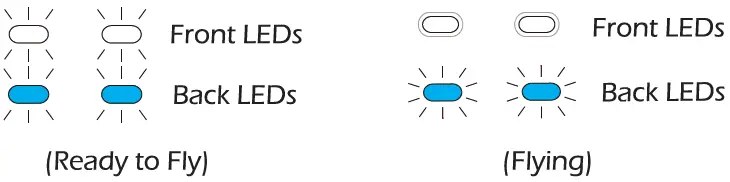
Fully charge the battery of the drone and pair the drone to the transmitter, the Back LED Indicators will turn Blue and the Front LED Indicators will turn white. When the four Breath Lights are on, it means that the drone is ready to fly. When flying, the Front White LED Lights will stay solid and the Back LED lights will blink constantly.
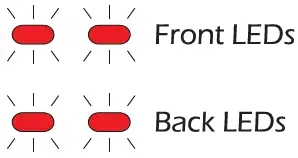
When the drone starts running low on battery, the four indicators on the drone will turn red and blink SLOWLY. This means you should fly the drone back and land it to charge the drone’s battery.
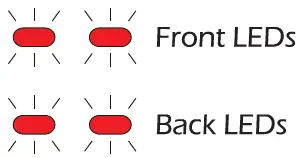
When the drone doesn’t fly and the four red indicators blink QUICKLY, it means the drone is in a critical error state and needs to be paired again.
APP FUNCTION
Download the APP
Connect to the App Store™ or Google Play™ and download the” HSS2 FPV” application for free.

Wi-Fi Connection
Connect your smartphone to the Wi-Fi of the Drone and check the drone’s status on the “HSS2 FPV” App.
- CD Power on the Drone.
- On your smartphone, launch a search of the available Wi-Fi networks:
- if you are using an iPhone or an iPad, select Settings > Wi-Fi;
- if you are using an Android smartphone, select Settings > Wireless and networks > Wi-Fi.
- Select the Wi-Fi network: HolyStoneFPV _xxxxx
- Wait for your smartphone to connect to the Wi-Fi network of the drone.
(This connection is generally represented by the Wi-Fi logo appearing on your smartphone’s screen.) - Enter the “HSS2 FPV” application. The connection between your smartphone and the Drone is established automatically.
SPECIFICATION
Drone
- Model: HS 1 I 0D/HS200D
- Weight: 148. 1 g / 5.22oz
- Max Flight Time: 1 0 minutes
- WIFI Distance: 100 m (Outdoor And Unobstructed)
- Motor Model: 86 16
- Hovering: Enabled
- Operating Temperature Range: 32° to 104°F (0° to 40°()
- Dimensions: 320 x 320 x 92 mm
TRANSMITTER
- Operating Frequency: 2.4 GHz
- Max Transmission Distance: 120 m (outdoors and unobstructed)
- Operating Temperature Range: 32° to 104°F (0′ to 40°()
- Battery: 4x 1.5 V Alkaline batteries M
- Mobile Device Holder: Smartphones
FLIGHT BATTERY
- Capacity: I 000 mAh
- Voltage: 3. 7 V
- Battery Type: Li-Po
- Energy: 3.70 Wh
- Net Weight: 30. I g / 1.06 oz
- Charging Temperature Range: 41° to I 04°F (5° to 40°()
- Charging Time: 120 mins
APP/ LIVE VIEW
- Mobile App: HSS2 FPV
- Max Wi-Fi Signal Distance: 60m
- Live View Working Frequency: 2.4 GHz ISM
- Live View Quality: 7 20P @ 20fps
- Latency: Low Latency Video (depend on conditions and mobile device)
- Required Operating Systems: iOS 7.0 or later/ Android 4.4 or later
- Recommended Devices: 4.7″ to 6.0″ Smartphones
CAMERA
- Lens: FOV I 20° f/2.0
- Still Photography Modes: Single Shot
- Video Recording Modes: HD I 280x720p
- Max Video Bitrate: 25 Mbps
- Supported File Systems: FAT32
- Photo: JPEG
- Video: AVI
- Operating Temperature Range: 32° to I 04°F (0° to 40°)
USB CHARGING CABLE
- Voltage: 5 V
- Rated Power: 5: IO W
TROUBLESHOOTING
| THE PROBLEM | REASON | SOLUTION |
| The indicator lights on the drone are blinking and the drone does not respond to the transmitter. | I Communication between the drone and transmitter is bad.
2. Battery power is low | I Place the drone on a level surface. and pair the drone again
2. Charge the battery. |
| The propellers spin but the drone is unable to take off | I. The propellers are assembled in the wrong orientation
2. The propellers are distorted. | I. Replace the propellers according to the instruction on page 9.
2. Replace the propellers |
| The drone shakes hardly | The propellers are distorted. | Replace the propellers. |
| The trim buttons fail to keep the drone balanced. | The propellers are distorted.
2. Motors don’t work properly | I Replace the propellers.
2. Replace the motor. |
| The drone becomes out of control after crashes. | The Gyro sensor loses its balance after crashing. | Recalibrate the gyro. |
Please do not hesitate to contact us if you need further support.
- 1(855) 888-6699
- [email protected] (USA)
- [email protected] (CAJ
- [email protected] (EU)
- [email protected] (JP)
GENERAL INFORMATION
FCC Notice: This device complies with Part I 5 of the FCC Rules.
Operation is subject to the following two conditions:
- This device may not cause harmful interference.
- This device must accept any interference received, including interference that may cause undesired operation.
NOTE
This equipment has been tested and found to comply with the limits for a Class B digital device, pursuant to Part I 5 of the FCC Rules. These limits are designed to provide reasonable protection against harmful interference in a residential installation. This equipment generates uses and can radiate radio frequency energy and, if not installed and used in accordance with the instructions, may cause harmful interference to radio communications. However, there is no guarantee that interference will not occur in a particular installation. If this equipment does cause harmful interference to radio or television reception, which can be determined by turning the equipment off and on, the user is encouraged to try to correct the interference by one or more of the following measures:
- Reorient or relocate the receiving antenna.
- Increase the separation between the equipment and the receiver.
- Connect the equipment to an outlet on a circuit different from that to which the receiver is connected.
- Consult the dealer or an experienced radio/TV technician for help.
WARNING: Changes or modifications not expressly approved by the party responsible for compliance could void the user’s authority to operate the equipment.
RF Exposure
The equipment complies with FCC radiation exposure limits set forth for an uncontrolled environment. This device should be installed and operated with a minimum distance of 20cm between the radiator & your body.
IC Notice:
This device complies with Canada Industry license-exempt RSS standard(s).
Operation is subject to the following two conditions:
- this device may not cause interference, and
- this device must accept any interference. Including interference that may cause undesired operation of the device.
CAN NMB-3 (B) RF Exposure
Radiation Exposure Statement: This equipment complies with IC radiation exposure limits set forth for an uncontrolled environment. This equipment should be installed and operated with a minimum distance of 20cm between the radiator & your body.
MANUFACTURER INFORMATION
Manufactured by Xiamen Huoshiquan Import & Export CO, LTD Room 703, No. 813-2 Xiahe Road, Siming District XIAMEN. China + 1 (855) 888-6699
FAQ’s
The main difference between HS100 and HS110 is that the HS110 has an HD camera, while the HS100 does not.
The main difference between HS100 and HS200 is that the HS200 has a GPS function, while the HS100 does not.
Please refer to the video below for details.
Please refer to the video below for details.
Please refer to the video below for details.
Nope SD card is not included in this package
These are poor responses to crucial questions. It doesn’t matter what the FAA standards are if this awesome drone can travel half that distance because the description states that the maximum video transmission range is 196 feet or 60 meters.
Its point of view is fairly broad, but it is not downward looking. (You wouldn’t want to land on the lens of the camera.)
I believe it doesn’t because it lacks a GPS, although I could be mistaken.
Each battery can fly for 10 minutes when fully charged, for a total of 20 minutes.
Altitude Hold is present.
On my Galaxy S9 (Android), the app runs without any issues. Downloading the app is the best way to learn more. You ought to be alright if the app functions.
You might think about the HS100, whose camera can be changed while you’re in the air.
Yes, flying is pretty simple. Fantastic for novices, I began in the living room until I could move outside. This drone is amazing.
Yes, it has a 720P HD Wi-Fi Modular Camera with a 120° FOV.


