AGES 14+
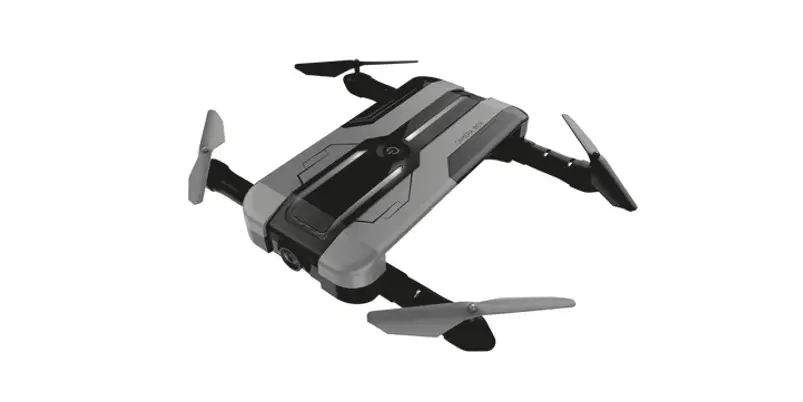
FPV HD Camera Drone Optional Flow Posting Version
Please read the Instruction Manual carefully before using it. Please keep it for your further reference.
Matters Needing Attention
- This product could be indoor or outdoor (wind force is less than Beaufort force 4). In order to avoid crashing or damage, please fly this product in a barrier-free environment.
- This product is equipped with precision electronic parts. To ensure optimum performance, maintain dryness, and keep away from moisture, flame, or strong light.
- To ensure safety, do not use other li-poly batteries. Different batteries may have different electronic parts and settings.
- To ensure safety and avoid short circuits, battery swell, and deformation, even explosions, do not use another A/C adaptor for charging. 5. Please ensure the quadcopter’s battery is full, all blades are tight and no damage during your preflight.
- Do not fly in the no-fly zone according to your local law and regulations. Keep away from obstacles and crowds.
- To ensure this product is structurally safe, do not disassemble the unit or assembled it optionally. Any retted or repair must use the included spare parts.
- To ensure flight safety, fly in open ground, keep a safe distance, and do not touch any part of the quadcopter during flight.
- Read this instruction manual carefully before the flight.
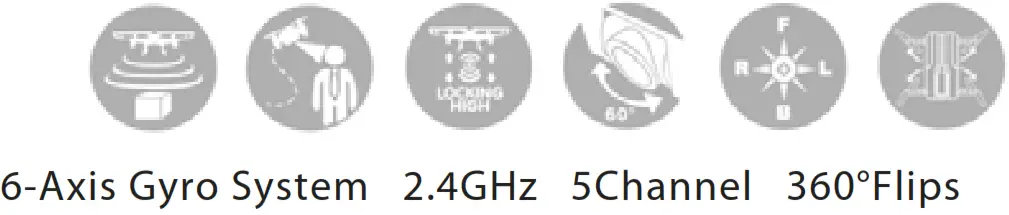
FUNCTIONS INTRODUCTION
1. Optical Flow Positioning Version
Use the built-in camera to track the movement of the image’s light spots and dark spots, then calculate out the point’s move distance relative to quadcopters speed and lock the quadcopter’s position. In short, the optical flow positioning system helps quadcopter’s auto-setting height with more precision.
2. Image recognition
Use an image tracking algorithm, can fast scan, recognize and remember the facial features of the image, and follow the motion of the video object.
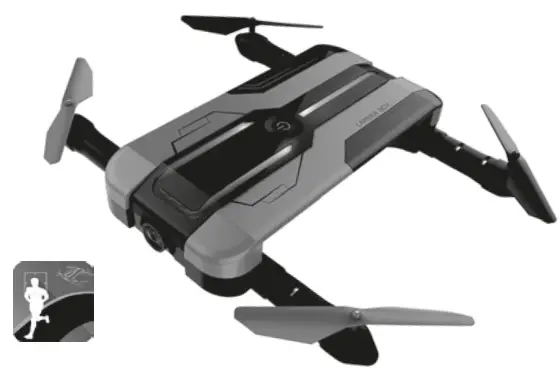
Target Tracking
Target Tracking technology, allow the body and object in the state of motion can be followed and shooting.
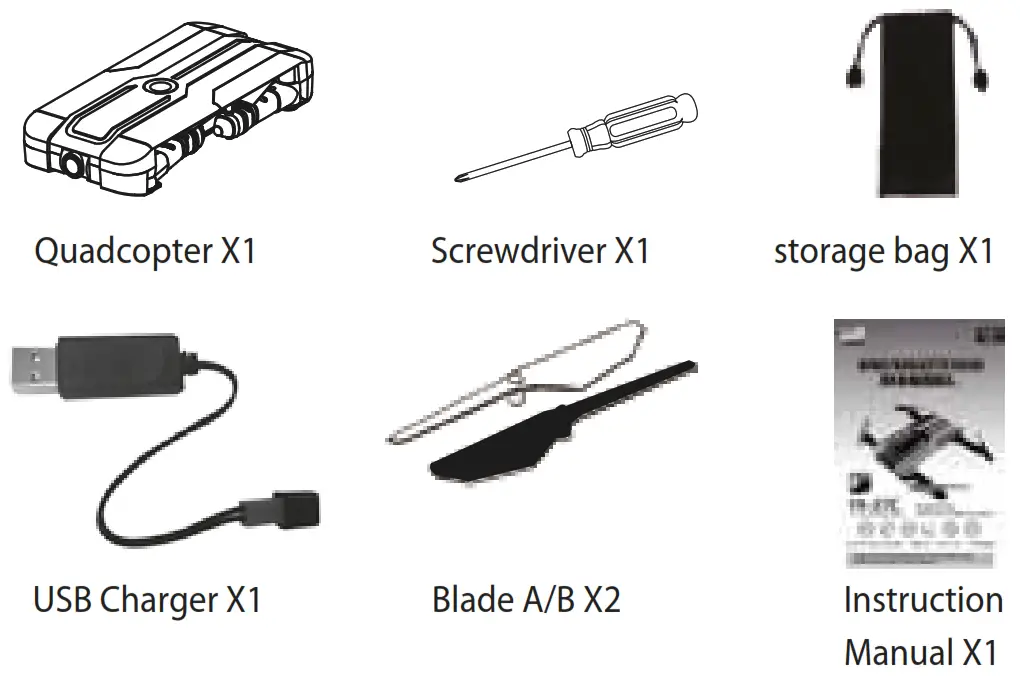
PARTS LIST
PRE-FLIGHT CHECKING LIST
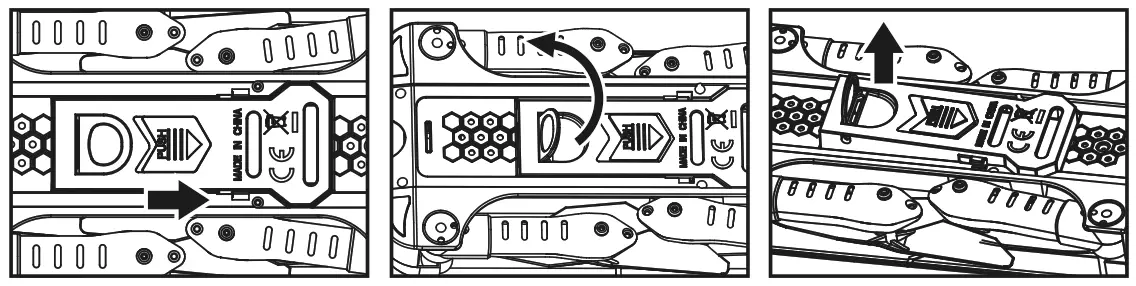
Li-poly battery charging
1. Through the opening switch director arrow of the battery cover pull to the right side that to open the battery cover.
2. pick up the shake hands handle cover of the battery box.
3. Pull up the shake hands handle cover and take out the battery box.
4. connect the input of the battery box to the output of the USB cable and connect the USB cable’s input side to the computer output side or other chargers which with a USB port.
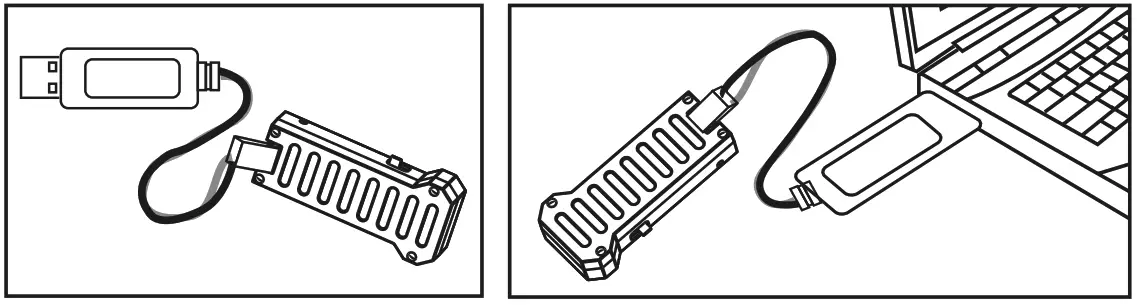
• USB cable’s red indicator lights on means battery is charging, the light of means battery was fully charged. The charging time is about 120-150 mins. Fly time is about 8 mins.
• Long time no use this product, please ensure battery with 50% power to keep battery life.
To keep the battery with 50% power, charge it 60-75 mins.
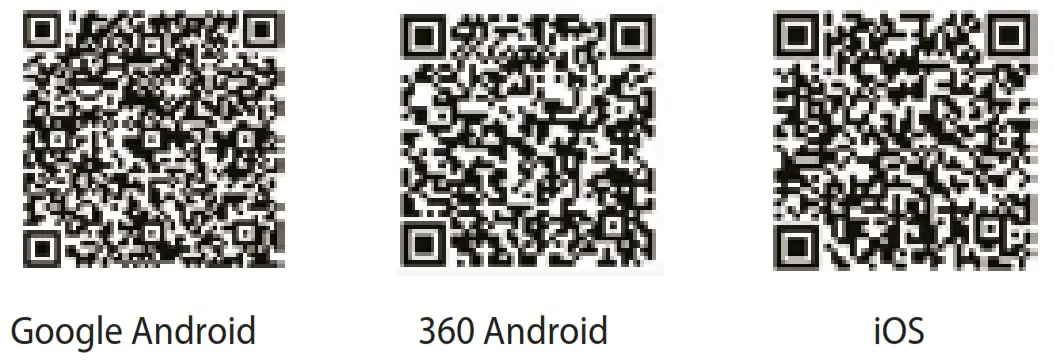
Download Software
Use a smartphone to scan the QR code for downloading the software, “HK Drone”.
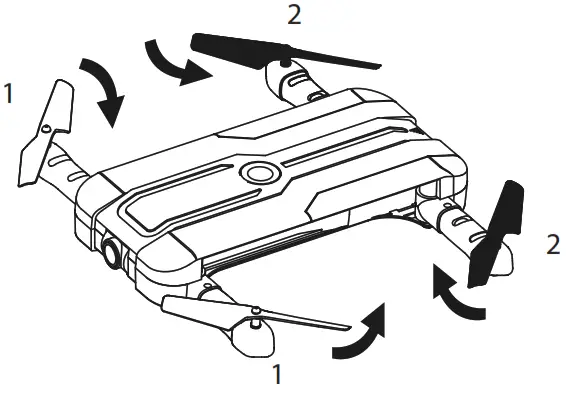
Drone Arms Folding Order
Fold the forearms near the camera first then back arms. To open arms, pull them in opposite direction.
Camera angle adjustment
This product support angle 30° ~ 90° of all self e requirements within the range, push the camera to the desired angle to help you and the more beautiful you When the “Target Tracking” function is required, push the camera to the minimum position, and the maximum limit trace is top to the bottom shell (as shown below).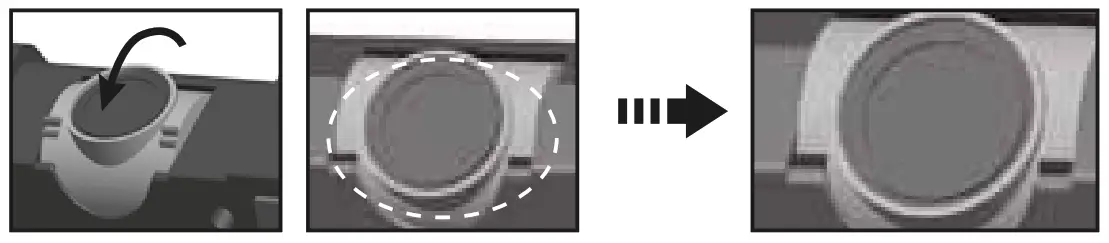
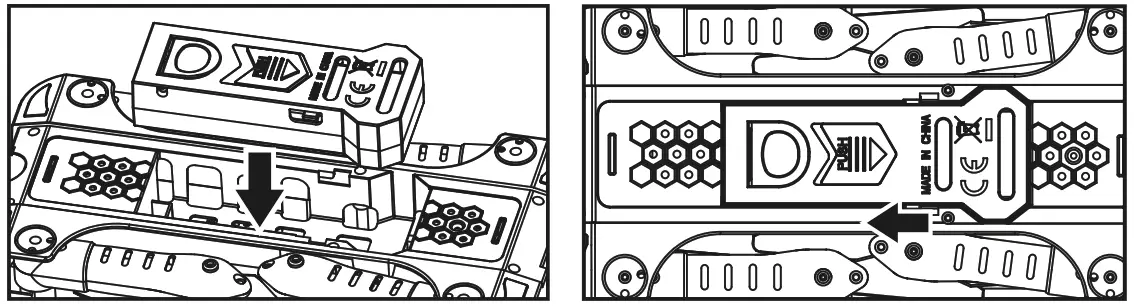
STARTUP AND SHUT DOWN
after full of charge, pull the battery box into battery groove with opposite direction in opening switch director and lock the cover.
Press the aircraft’s power switch for 2 seconds, the light at the top of the aircraft will lit up, and the two red LED lights at the bottom are ashing into a regular light.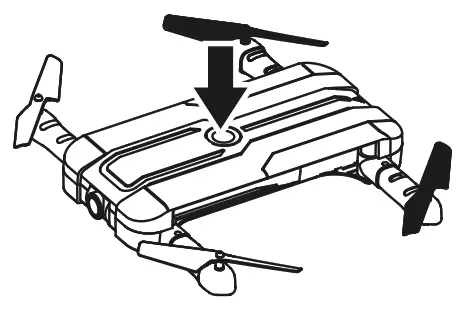
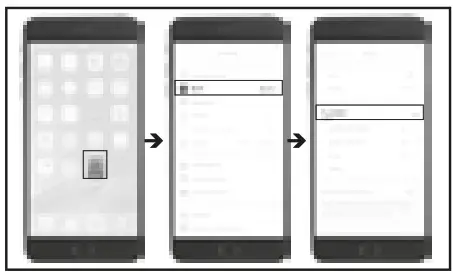
3. Go to the setting button in your smartphone, open Wi-Fi, lock into the “HK Drone xxxxxx ”.
4. Click to link till you see “Linked”, means paired. A: Go to settings
B: Open Wi-Fi
C: Connect
“HK Drone xxxxxx ”
5. Open the downloaded APP “HK Drone”, click the icon enter control menu and smartphone with real-time image
6. Click “ ![]() ” button into gyroscope calibration. Drone ’s four LED change from flashing to keep light on.
” button into gyroscope calibration. Drone ’s four LED change from flashing to keep light on.
7. Click “ ![]() ” button, drone fly up automatic and hover at a height. Or pull both left and right joysticks to an inside corner, then release them, drone’s blades start rotating at low speed. When pushing the accelerator joystick, fly drone upper, after releasing the joystick, drone hover at this position.
” button, drone fly up automatic and hover at a height. Or pull both left and right joysticks to an inside corner, then release them, drone’s blades start rotating at low speed. When pushing the accelerator joystick, fly drone upper, after releasing the joystick, drone hover at this position.
Shut Down Step
• To keep pulling the accelerator joystick to the lowest position, the drone will land and the blades stop rotation.
• Or click “ ![]() ” button, the drone also land and blades stop rotation.
” button, the drone also land and blades stop rotation.
• Or landing drone to your hand, catch drone’s bottom and turn it 180°, the drone also could be emergency stop.
APP MENU INTRODUCTION

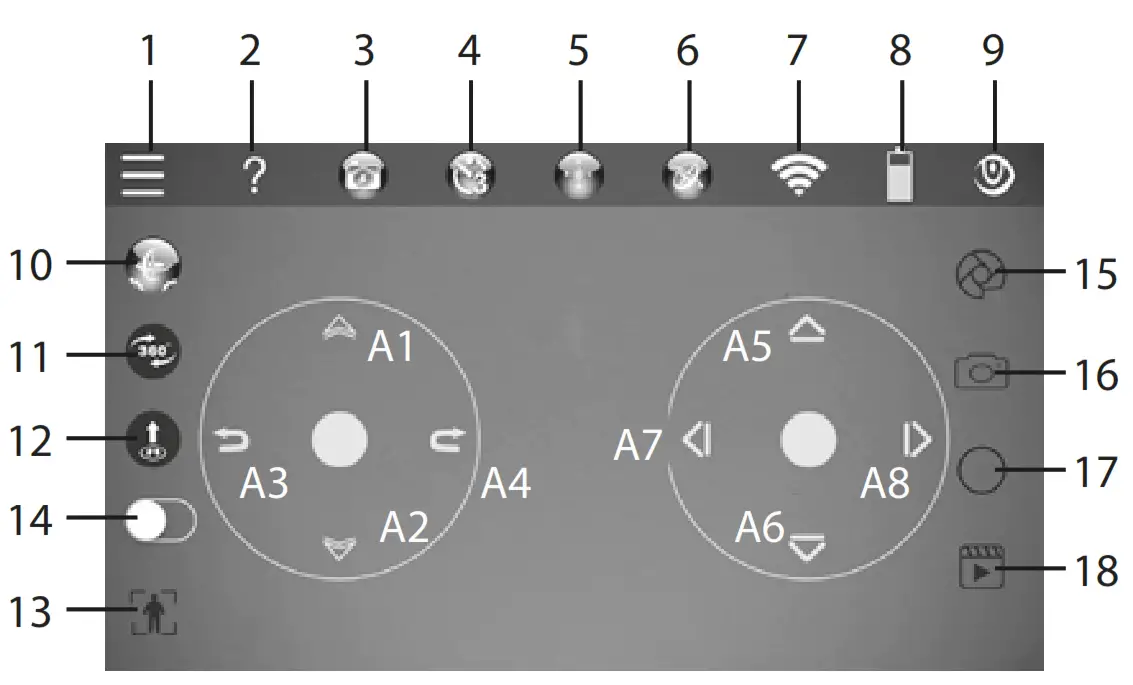
( 1 ). Settings
Click “![]() ” settings icon, appear below setting options
” settings icon, appear below setting options
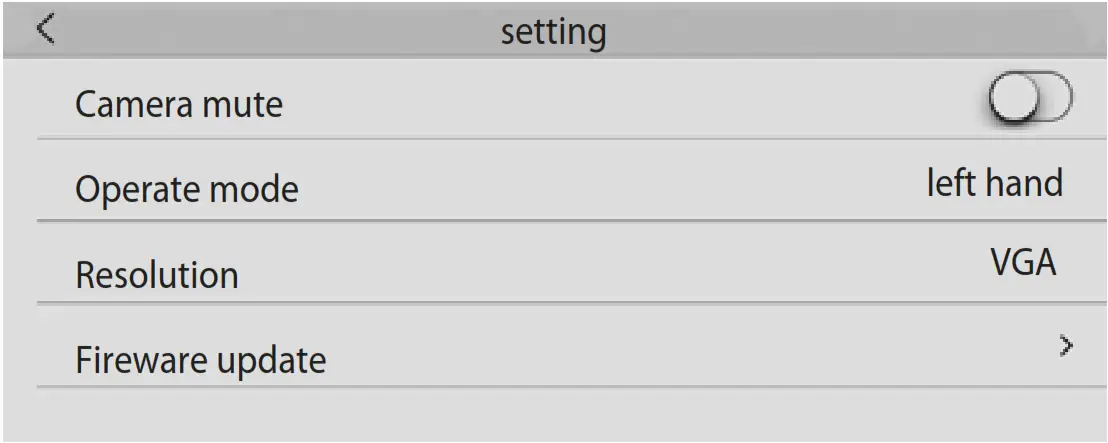
• Camera mute: open this option, in the main operating interface to take pictures, video, selfie, and so on are mute.
• Operation mode: left and right-hand operation mode switching
• Resolution: click the right arrow.
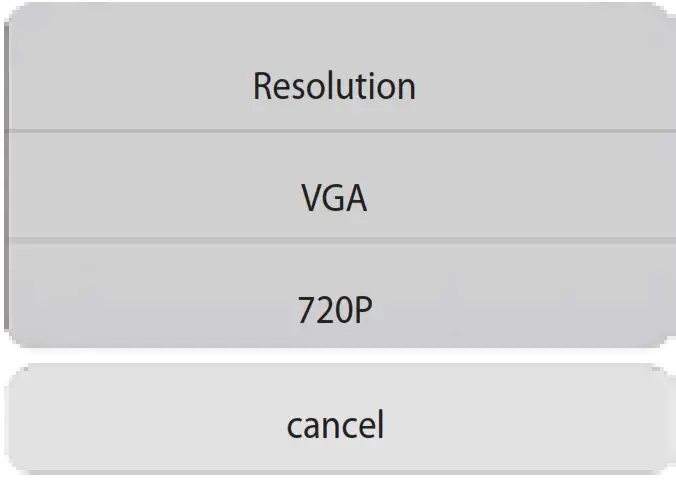 Select the required video transmission resolution.
• Software upgrade: click on the software upgrade options, open the following menu, you can update this APP software.
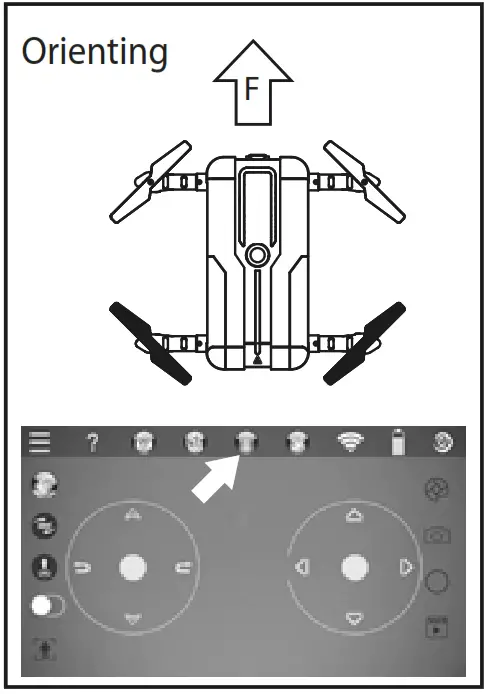
( 2 ) . The operation instructions
Click on ”![]() “ the operation description icon to view the entire APP corresponding icon function.
“ the operation description icon to view the entire APP corresponding icon function.
( 3 ). ![]() The selfie before selfie needs to make sure the aircraft must back for the operator aircraft backside toward the operator then click on the selfie, the aircraft will automatically rotate 180° face to the operator. Then it takes three images at the same time.
The selfie before selfie needs to make sure the aircraft must back for the operator aircraft backside toward the operator then click on the selfie, the aircraft will automatically rotate 180° face to the operator. Then it takes three images at the same time.
( 4 ). ![]() Delay photo
Delay photo
Click on the delay photo button, the aircraft will start the delay 3 seconds photo, that is, camera lock catch target, 3 seconds after it takes an official photo.
( 5 ). ![]() Headless Mode
Headless Mode
• Start and settings: After drone nish signal pairing, no matter drone land on the ground or hovering in the sky, just need to keep the drone’s front (camera position is front) the same as the smartphone’s operation interface, then press “ ![]() ” button to enter headless mode. The LED lights at the bottom of the drone will light on and keep flashing.
” button to enter headless mode. The LED lights at the bottom of the drone will light on and keep flashing.
In headless mode, with diagonal LED indicators’ ashing, no matter which direction the head (same side as a camera) faces too, now the smartphone’s front is the drone’s backside. Pull down the direction rod and the quadcopter will fly back, push it up and the quadcopter will fly farther.
• Exit Headless Mode: Press “ ![]() ” button again to exit headless mode. After exit headless mode, Drone’s LED indicators keep ligging on.
” button again to exit headless mode. After exit headless mode, Drone’s LED indicators keep ligging on.
( 6 ) ![]() Gravity sensor control mode Click “
Gravity sensor control mode Click “ ![]() ” button, smartphone’s screen was switched to Gravity Sensor Mode. In gravity sensor mode, swing the phone to control the drone’s direction and flight.
” button, smartphone’s screen was switched to Gravity Sensor Mode. In gravity sensor mode, swing the phone to control the drone’s direction and flight.
( 7 ). ![]() Signal intensity display
Signal intensity display
( 8 ). ![]() Aircraft power display
Aircraft power display
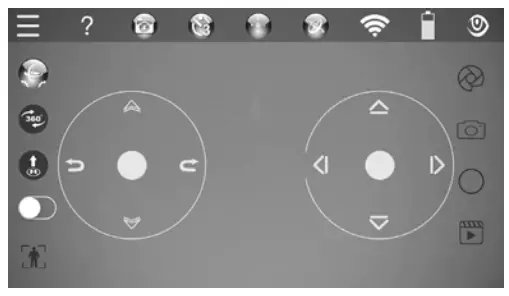
( 9 ). ![]() Joystick display / concealment
Joystick display / concealment
(10). The gyro calibration
• ![]() To carry out the gyro calibration before taking o, make sure that the aircraft is hovering smoothly after take off.
To carry out the gyro calibration before taking o, make sure that the aircraft is hovering smoothly after take off.
• When the aircraft encountered a collision or crashing, also use this method to correct the gyroscope.
(11). ![]() 360° Flips
360° Flips
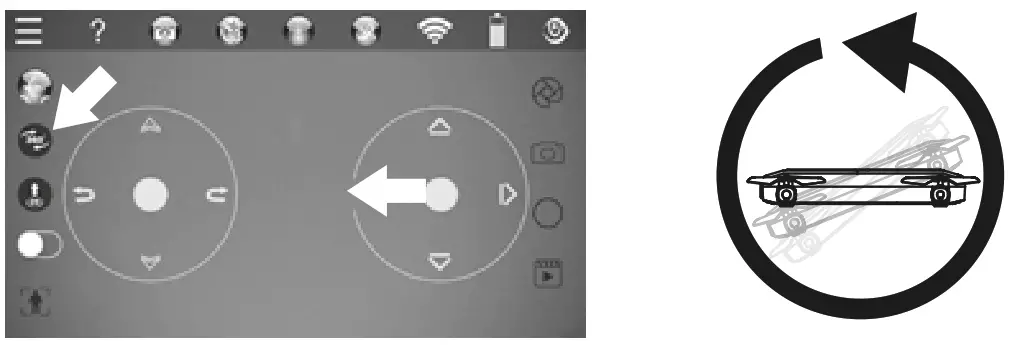
• Left flip Click “ ![]() ” button and pull the right rod to left, the drone will flip 360° to left.
” button and pull the right rod to left, the drone will flip 360° to left.
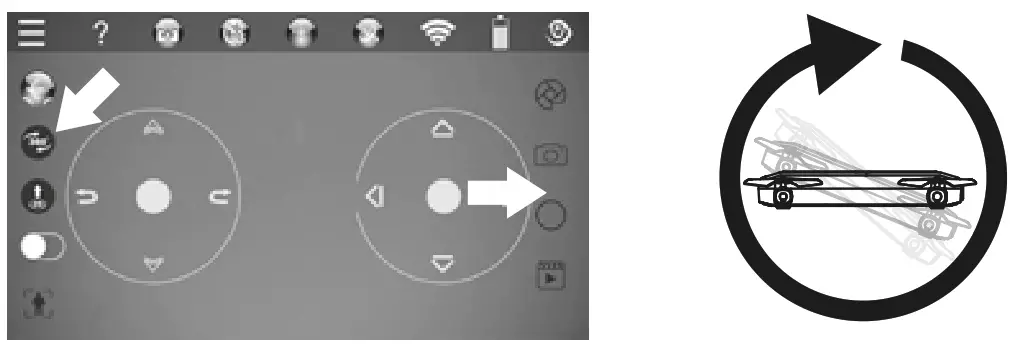
• Right flip
Click “![]() ” button and pull the right rod to right, drone will flip 360° to right.
” button and pull the right rod to right, drone will flip 360° to right.
**Low power alarm when four LED lights ashing on the aircraft, indicating that the aircraft’s power has been exhausted, the aircraft will automatically turn off the rolling function
(12). ![]() One key take o /
One key take o / ![]() One key landing
One key landing
• When aircraft did not take off, interface show “ ![]() ” one key take off icon.
” one key take off icon.
• When aircraft hovering, interface show “ ![]() ” one key landing icon.
” one key landing icon.
(13). Tracking statu![]()
Clicks the “ ![]() ” icon, the tracking status icon turns red, and the yellow box dump out in the middle of the screen.
” icon, the tracking status icon turns red, and the yellow box dump out in the middle of the screen.
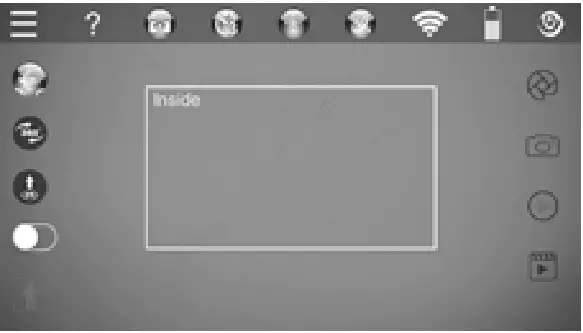
To select the capture target in the inside box, after the capture target box is selected, the green box flashes in the middle of the screen. The captured target will be tracked at all times.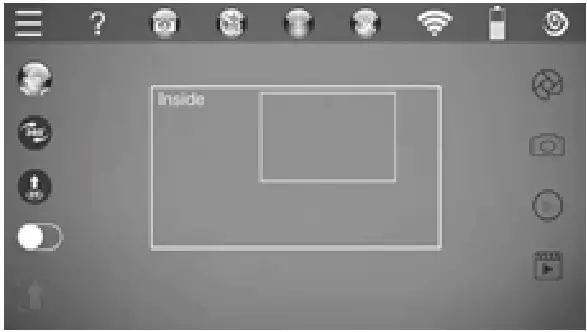
(14). ![]() Open Tracking Mode
Open Tracking Mode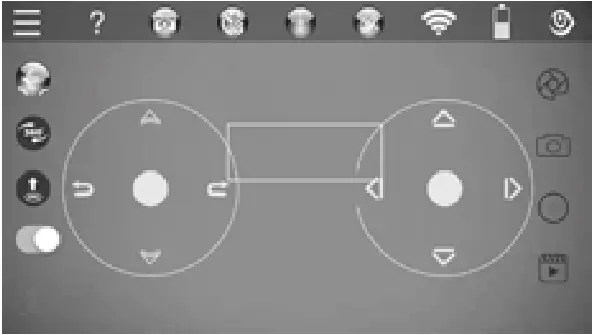
• Open ” ![]() ” start tracking the icon, when the joystick is again in the middle of the screen, the green box flashes, and the target is tracked at all times.
” start tracking the icon, when the joystick is again in the middle of the screen, the green box flashes, and the target is tracked at all times.
• Before tracking your target, the drone needs to keep higher than the target about 50-100cm
• When the target moves / backward / turn left/turn right and so on, the aircraft captures the tracking target, and moves forward / backward/left/right and so on as it.
• When the aircraft is tracking and capturing the target, coming obstacles, can adjust the direction of the aircraft through the joystick to avoid impact it.
• A when the joystick adjusts the direction of the drone, the drone shuts down to track, if it is necessary to continue tracking, it needs to capture the target again.
(15). ![]() Take photo setting
Take photo setting
1. Click “![]() ” take photo icon, which appears below setting options.
” take photo icon, which appears below setting options.
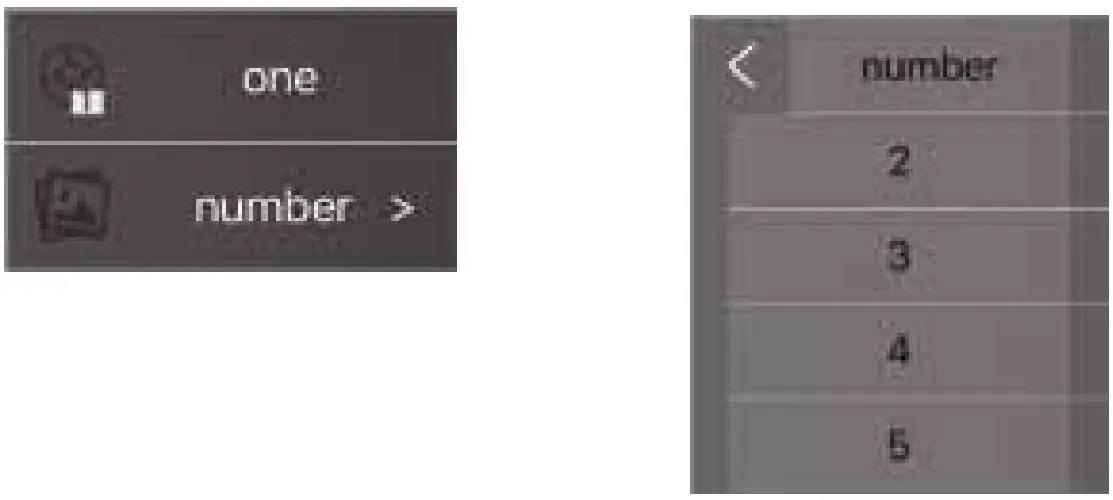
2. Click the page option, shown below options as image.
3. Finally click the required photo number of multiple shots.
(16). ![]() Take Photo
Take Photo
Click ”![]() ” take photo icon, aircraft takes the photo as the setting required number. By default, one picture is taken, and the number of pages can be selected for multiple shots when you need.
” take photo icon, aircraft takes the photo as the setting required number. By default, one picture is taken, and the number of pages can be selected for multiple shots when you need.
(17). ![]() Take Video
Take Video
Click “ ![]() ” take video icon, for taking video at that time recording icon change to “ ” the Ends icon. Click the Ends icon to stop taking video.
” take video icon, for taking video at that time recording icon change to “ ” the Ends icon. Click the Ends icon to stop taking video.
(18). ![]() File view
File view
Click “![]() ” file view icon, which appear below page:
” file view icon, which appear below page: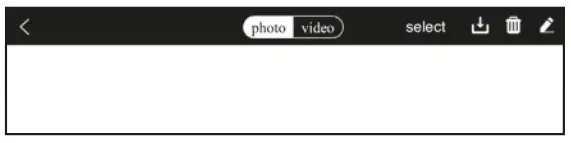 Photos, videos can be viewed as needed.
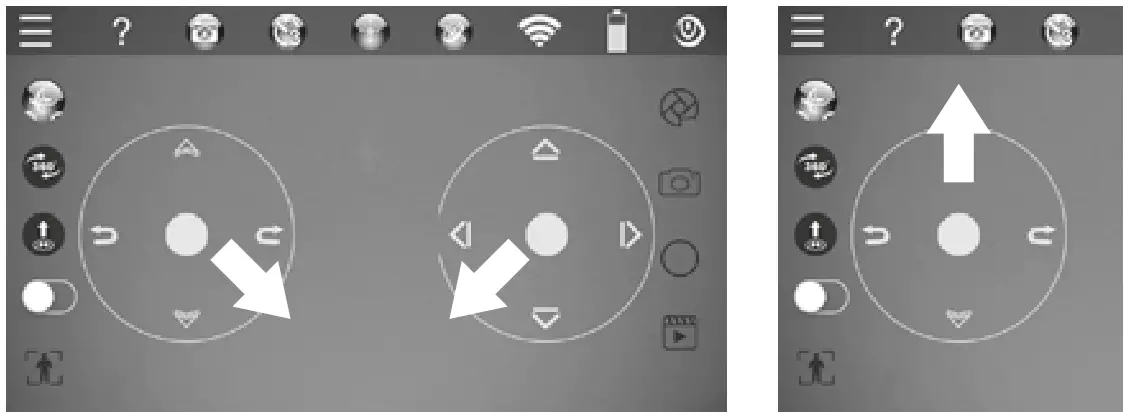
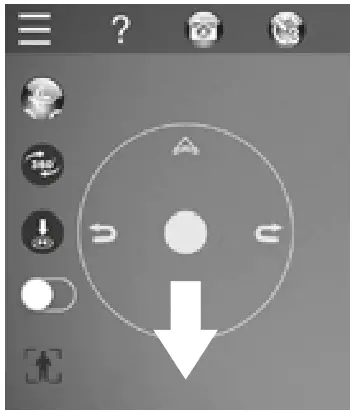
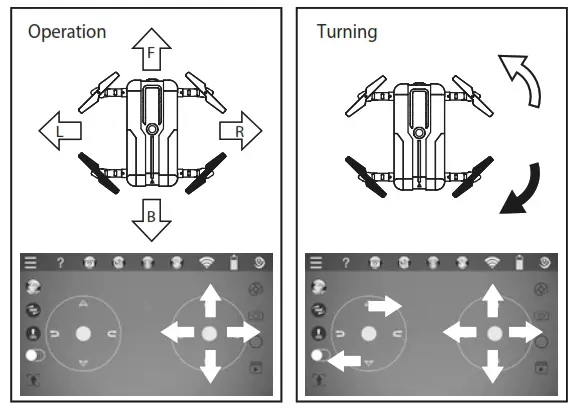
• A1/A2: Ascend/Descend Pull left rod up or down,
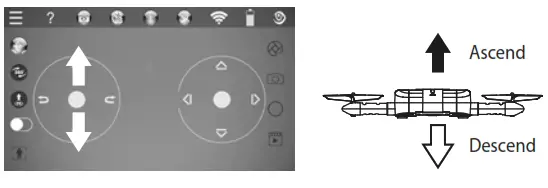
• A3/A4: Turn Left/Turn Right
Pull left rod to left or right, drone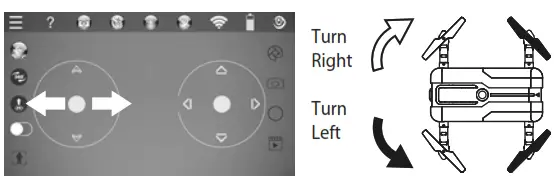 • A5/A6: Forward/Backward
Pull right rod to up or down, drone fliy forward or backward.
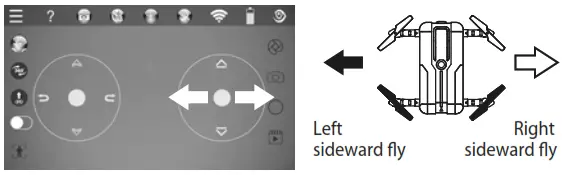
• A7/A8: Left/Right sideward fly
Pull right rod to left or right, drone flying to the left side or right side.
INSTALL BLADES
When drone’s blade damage after crashing, please change it with the included spare parts.
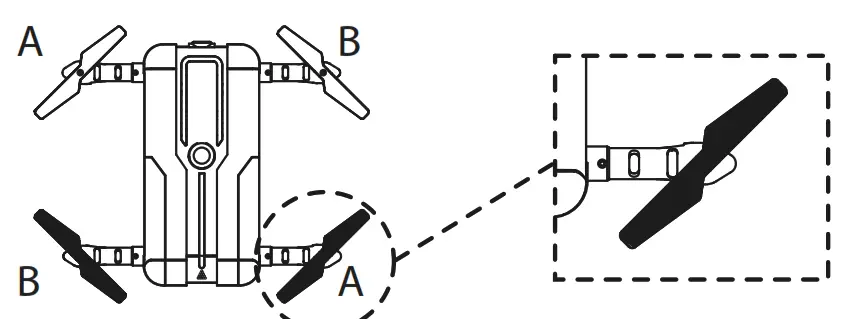 The blades shall be installed at a designated location. Blade’s number should be the same as the number on the drone. Or drone may not fliy up.
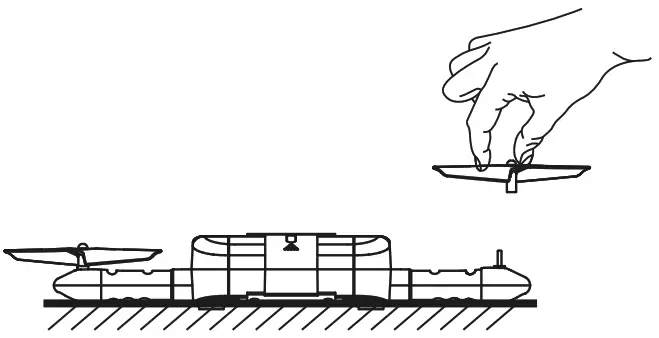
Install blades: Hold the blade’s central location to aim at the motor shaft and press down to lock. Be careful do not to damage or deform the blades.
 TROUBELE SHOOTING
 TROUBELE SHOOTING
Problem | Reason | Solution |
| The quadcopter did not respond | 1. Signal matching failed. | 1. Re-matching again. |
| 2. Quadcopter or transmitter low voltage. | 2. Fully charge the battery or replace the transmitter batteries. | |
| The quadcopter shake | Blade impact deformation | Righting blades or replacing blades. |
| Failed flips | 1. Improper operation | 1. Checking the instruction manual again. |
| 2. Quadcopter low power. | 2. Fully charged the battery. | |
| The quadcopter response delay | Over control distance. | Do not fly over of 30 meters. |
Distributed by:
TechBrands by Electus Distribution Pty. Ltd.
320 Victoria Rd, Rydalmere
NSW 2116 Australia
Ph: 1300 738 555
Int’l: +61 2 8832 3200
Fax: 1300 738 500
www.techbrands.com
Made in China


