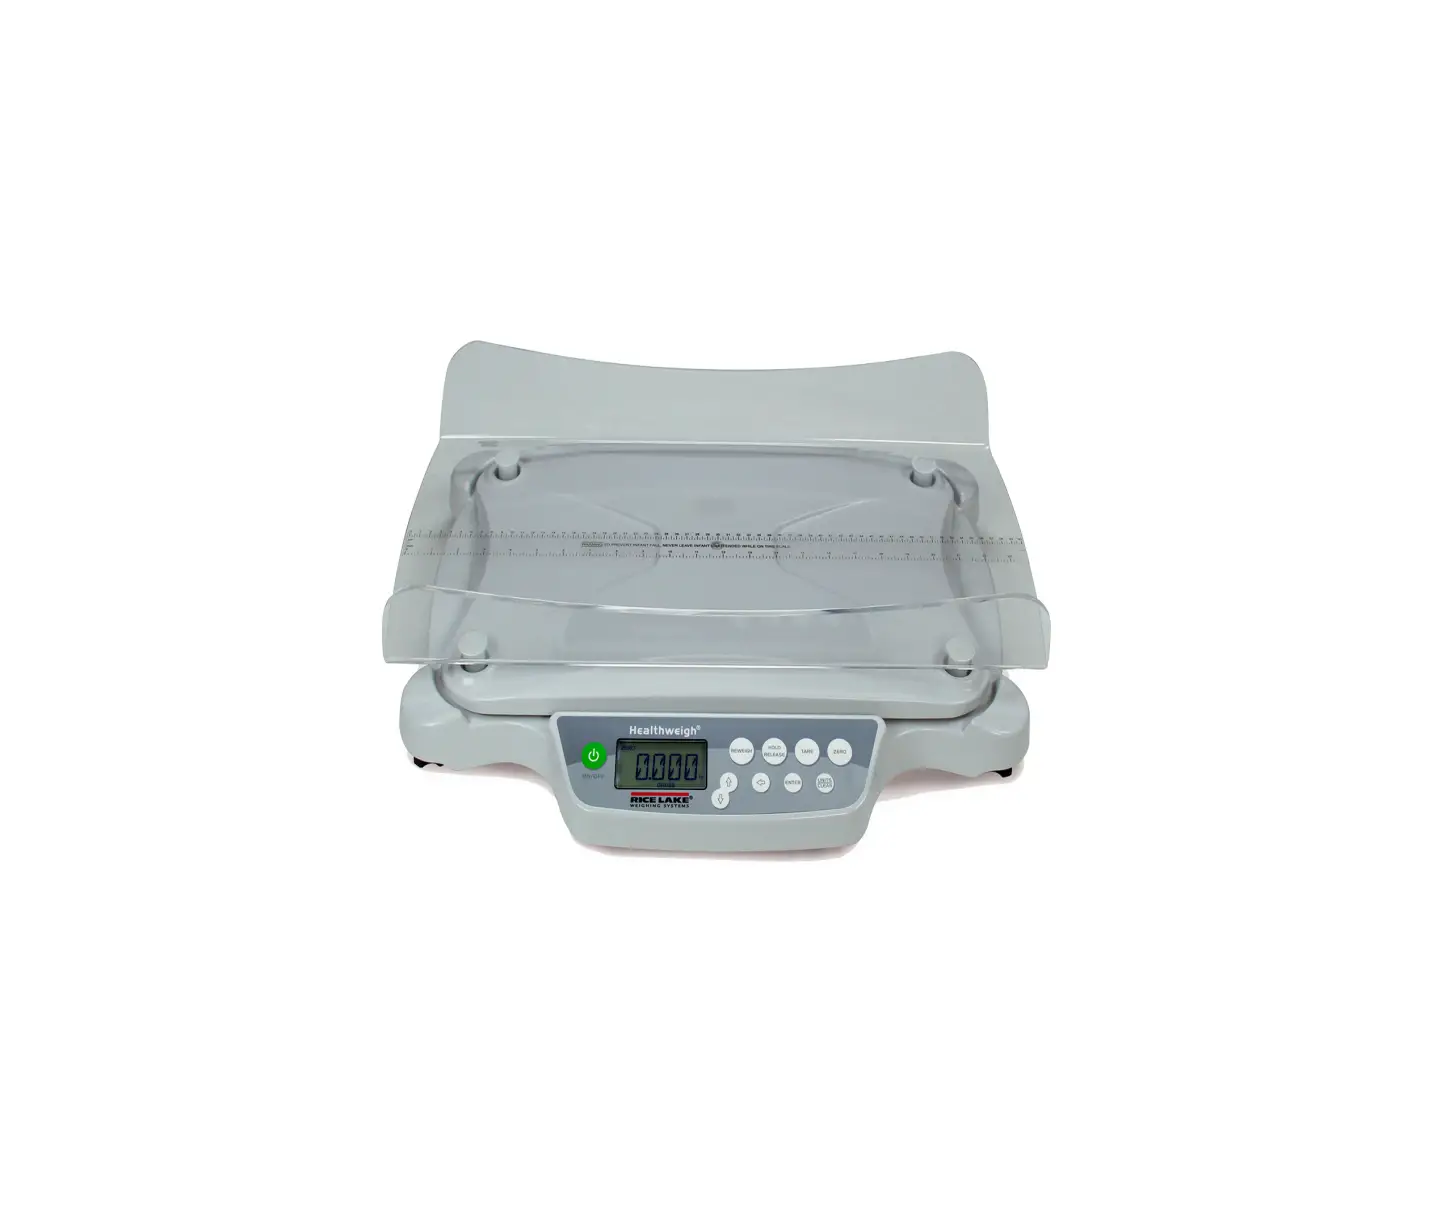
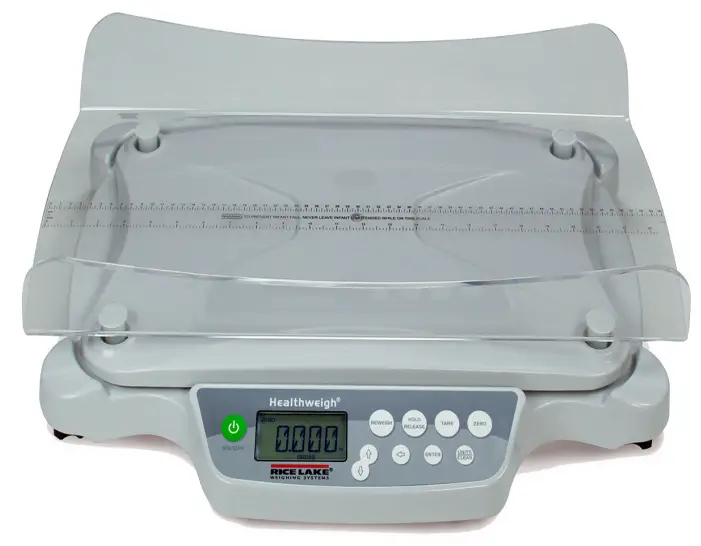
RICE LAKE 650-10-1 Neonatal Baby Scale
Revision History
This section tracks and describes manual revisions for awareness of major updates.
| Revision | Date | Description |
| E | February 14, 2023 | Established revision history. Added current formatting and battery updates. |
Introduction
The 650-10-1 Neonatal Scale provides precise weighing of infants and newborns. The scale is equipped with Motiontrap™, a special motion sensing weighing technology, which compensates for involuntary movement caused by an active infant. The infant’s weight can be displayed in pounds/ounces or in kilograms/grams. The weight is displayed until reweighing is performed or until the scale zeros out.
There are precautions that must be taken to prevent injury to the baby and damage to the scale.
Follow all instructions for installation and usage included in this manual. The manufacturer is not responsible for any damage or injury from incorrect operation or manipulation by the user.
 Manuals and additional resources are available from Rice Lake Weighing Systems at www.ricelake.com/manuals Warranty information is available at www.ricelake.com/warranties
Safety Definitions:
 DANGER: Indicates an imminently hazardous situation that, if not avoided, will result in death or serious injury. Includes hazards that are exposed when guards are removed.
 WARNING: Indicates a potentially hazardous situation that, if not avoided, could result in serious injury or death. Includes hazards that are exposed when guards are removed.
 CAUTION: Indicates a potentially hazardous situation that, if not avoided, could result in minor or moderate injury.
 IMPORTANT: Indicates information about procedures that, if not observed, could result in damage to equipment or corruption to and loss of data.
General Safety
 Do not operate or work on this equipment unless this manual has been read and all instructions are understood. Failure to follow the instructions or heed the warnings could result in injury or death. Contact any Rice Lake Weighing Systems dealer for replacement manuals.
WARNING
Failure to heed could result in serious injury or death.
Never leave an infant unattended on the scale.
Ensure weighing tray is secured to scale base prior to placing an infant/newborn on weighing tray.
Do not transport the scale with the infant in the weighing tray.
Do not use around flammable materials.
Scale should only be used to determine weight of infant/newborns. It is not intended to diagnose, prevent and monitor diseases.
To avoid cross contamination, the scale plate must be cleaned after each use. Avoid direct skin contact during weighing. Use
disposable paper towels or bed pads for each scale.
Operation at other voltages than specified could damage the equipment.
Rice Lake Weighing Systems offers optional adapters. Utilizing an adapter not supplied by the company voids all warranties.
Do not modify this scale without authorization of the manufacturer.
Do not drop the scale or subject it to violent shocks.
For accurate weighing, the scale must be placed on a flat, stable surface.
For accurate weighing, verify proper operation according to the procedure described in this manual before each use.
Standard Features
- Movement compensation technology
- Two-sided tray with built in measuring tape
- Hold function
- Reweigh
- Lb/kg toggle key
- RS-232 or USB output
- Auto power-off
- Low battery indicator
- 6 AA LiFeS2 lithium iron disulfide batteries
Options
- AC Adapter
 NOTE: AC adapter does not charge the batteries
Information Symbols
The International Electro-Technical Commission (IEC) has established a set of symbols for medical electrical equipment, which classify a connection or warning as a potential hazard.
The classification of symbols is as follows:
 Type BF (Body Protected)
This means that the unit complies with the specified requirements of this standard to provide protection against electric shock. Waste Electrical and Electronic Equipment (WEEE)
The device can be sent back to the manufacturer for recycling or proper disposal. Alternatively, the device must be disposed in accordance with national laws when scale is no longer used.
Scale Display
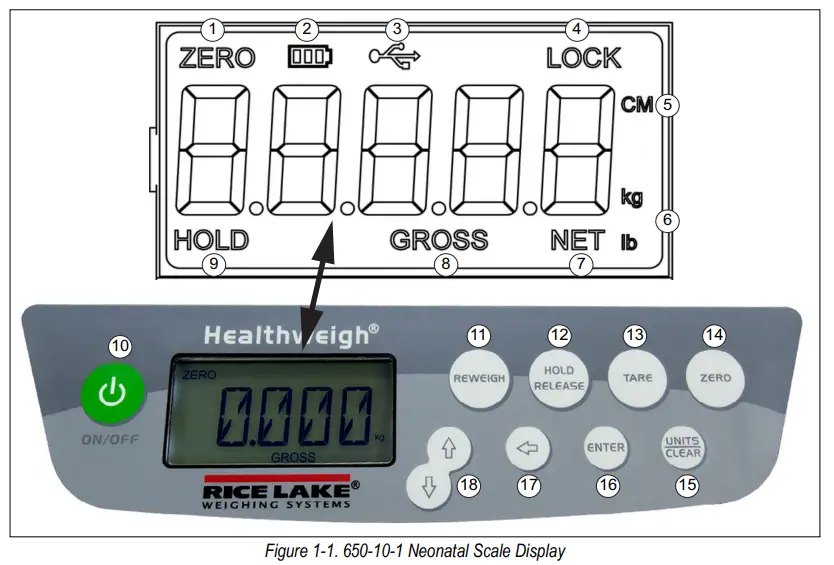
| Item No, | Description | Function |
| 1 | Zero | Zeros display; enables tare of weight for weighing accessories |
| 2 | Battery Icon | Indicates scale is running on battery power |
| 3 | USB | Indicates USB port is available |
| 4 | Lock | Indicates scale weight is locked and will remain on display |
| 5 | Unit length | Displays baby’s length; inches or centimeters |
| 6 | Unit weight | Displays baby’s weight; pounds or kilograms |
| 7 | Net | Indicates net weight of infant after blankets/accessories have been tared off |
| 8 | Gross | Indicates gross weight of infant including blankets/accessories |
| 9 | Hold | Displayed weight remains on display after removing infant from scale |
| 10 | On/Off | Turns scale on/off |
| 11 | Reweigh | Allows repeated reweighing of an infant; a long key press activates the print function |
| 12 | Hold/Release | First press holds current weight on display; a second press releases it |
| 13 | Tare | Removes weight of items used to place baby on scale; scale zeros and NET displays |
| 14 | Zero | Returns scale to zero, only works if the weight is stable |
| 15 | Units/Clear | Toggles between lb and kg on display; Clear function is used in setup mode only |
| 16 | Enter | Used in setup mode only |
| 17 | Shift Left | Press to shift the flashing digit to the left when entering a preset tare |
| 18 | Up/Down Arrows | Adjusts the value of the flashing digit/number during menu setup; also used for adjusting a preset tare value |
Operation
Before Using the Scale
Use the following steps for initial setup
- Press
 to turn on scale. After self test, 0 displays.
 - Place weight (maximum 33 lb/15 kg) on the scale.
 flashes on the displays until weight calculation is complete.
The weight calculation is complete once the motion indicator turns on. - Press
 to select the weight mode, lb or kg.
 - Press . Remove the weight, the weight continues to display.
- Press to remove hold. 0 displays.
 to turn on scale. After self test, 0 displays.
 to select the weight mode, lb or kg.
 NOTE: If the setup procedure failed, see Section 6.1 on page 19. If the problem is not resolved, contact a qualified service provider.
Weighing
Use the following steps to weigh on the scale.
- Press to turn the scale on. After self test, 0 displays.
- Place a pad or other accessory to be used on the weighing tray.
- Press
 to remove the weight of a pad or other accessory, 0 displays.
 - Place the infant on the scale. Infants weight displays.
- Press to weigh the infant again, for more accurate results.
- Remove the infant from the scale. 0 displays.
 to remove the weight of a pad or other accessory, 0 displays.
 to weigh the infant again, for more accurate results.
NOTE: If the scale is not used for two minutes, it turns off.
Hold and Release Function
Use the following steps to use the Hold/Release function.
- Press to turn the scale on. After self test, 0 displays.
- Place the infant on the scale. Infants weight displays.
- Press .
- Remove infant from the scale, the weight remains on the scale and Hold displays.
- Press to return to zero.
NOTE:  can be pressed with infant still on the scale. Once infant is removed, 0 displays.
Manual Tare
Use the following steps to manually tare the scale.
- Press to turn the scale on. After self test, 0 displays.
- Place the item to tare (blanket, accessories) on the scale.
- Press until scale zeros and NET displays. If item is removed from the scale a negative weight displays.
- Place the infant, with item tared, on the scale. The infant’s weight and NET displays.
- Remove the infant and item tared. The tared weight is stored in memory.
- To cancel the tare weight, press until display returns to 0 and Gross displays. The tare weight cancels when the scale is turned off.
Preset Tare
- Press to turn the scale on. After self test, 0 displays.
- Press . The default tare value is displayed (default is programmed to be 33.0 lb/15.0 kg) while the zero is flashing.
- Press
 and to adjust the value.
 - Press to start the tare function. NET displays.
 and
and  to adjust the value.
 to start the tare function. NET displays.
Assembly
Unpacking
Open in an area that has room for unpacking the scale. The 650-10-1 Neonatal Scale comes with the following pieces:
- Weighing tray
- Base assembly
- USB and RS-232 cable
- Six AA LiFeS2 lithium iron disulfide batteries
Remove parts from the carton and unwrap the packing material carefully to prevent scratching the parts.
If the 650-10-1 must be returned or shipped to a different location, it must be properly packed with sufficient packing materials.
If possible, retain the original carton for shipping or moving the scale.
IMPORTANT: Damage caused by improper packaging is not covered by the warranty.
Powering the Scale
The scale operates on batteries (included) or an AC adapter, available from Rice Lake Weighing Systems.
The scale automatically switches to battery operation when an AC power source is not available.
Install Batteries
- Set the scale on a sturdy, flat surface.
- Tip the unit to access the battery chamber.
 MPORTANT: Do not tip the scale completely up side down, this could damage the load cells.
 - Remove four screws from the cover plate. Cover plate will come off at the same time. Retain for re-installation.
- Insert six batteries into the battery chamber according to the diagram inside.
- Replace the cover plate and secure with screws.
- Set the scale up right on a flat surface.
Battery Status
| Battery status | Flag indicator |
| Maximum charge |
|
| Medium 2 charge | |
| Medium 1 charge | |
| Low charge | |
| Minimum charge | Flashing |
| Auto shut off imminent | Scrolls LOW bAt |
Table 2-1. Battery Indicator Status
NOTE: If when using AC adapter or USB power, the battery icon is off. When using battery or USB power supply, the back-light power is reduced to 60%.
AC adapter does not charge the batteries.
AC Power Supply – Optional
An optional 120 VAC or 230 VAC adapter is available from Rice Lake Weighing Systems. To operate the unit using the AC adapter, plug the cable into the back of the scale and the AC adapter plug into a power source.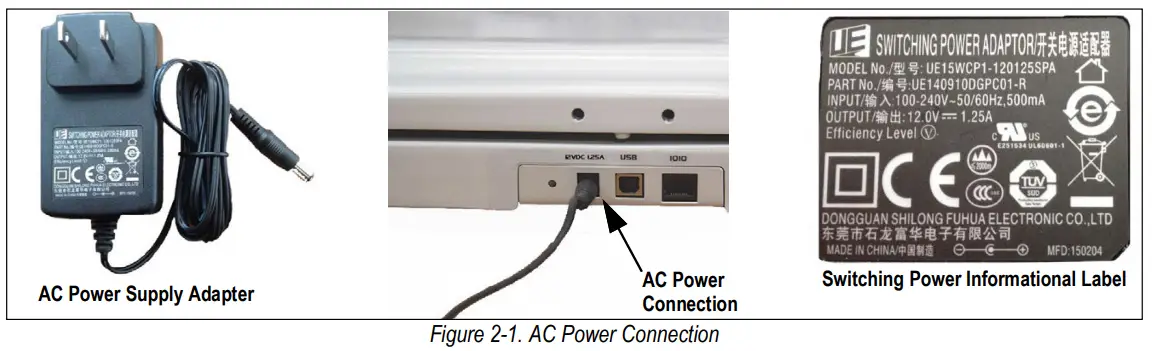
IMPORTANT: Utilizing an adapter not supplied by Rice Lake voids all warranties.
Scale Setup
- Ensure the scale is placed on a sturdy, flat surface.
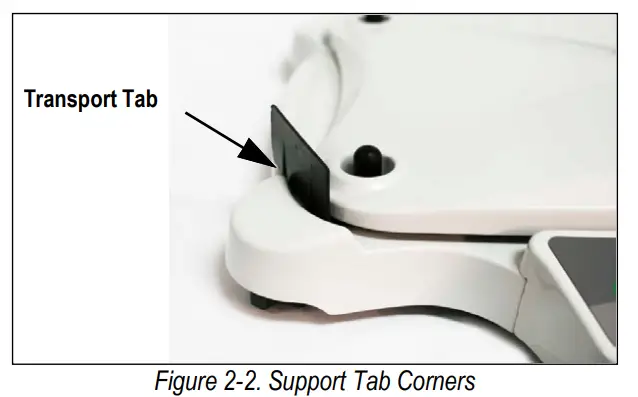
- Remove the transport support tabs from each corner of the scale base.

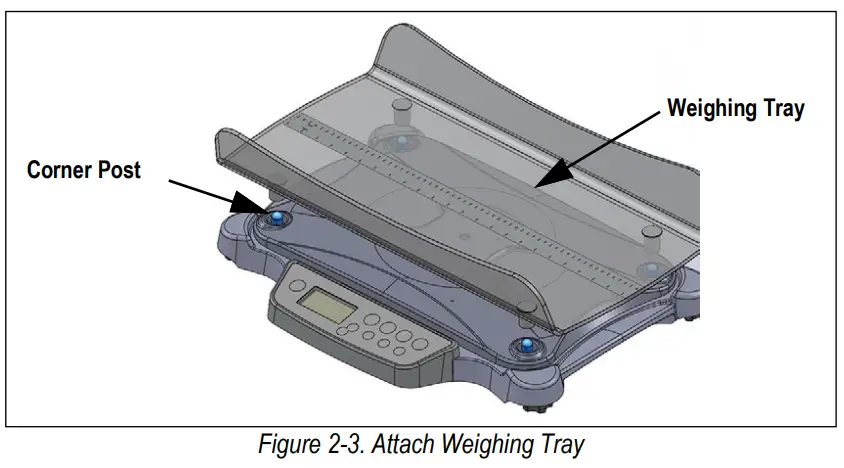
- The scale is equipped with four level adjusting feet. Rotate the adjustable feet located under the scale base to level the scale.
- Place weighing tray on the base assembly ensuring it is securely resting on the four corner posts.

Scale Configuration
Use the scale configuration to set up the scales parameters and options, that are essential for the functioning of the scale.
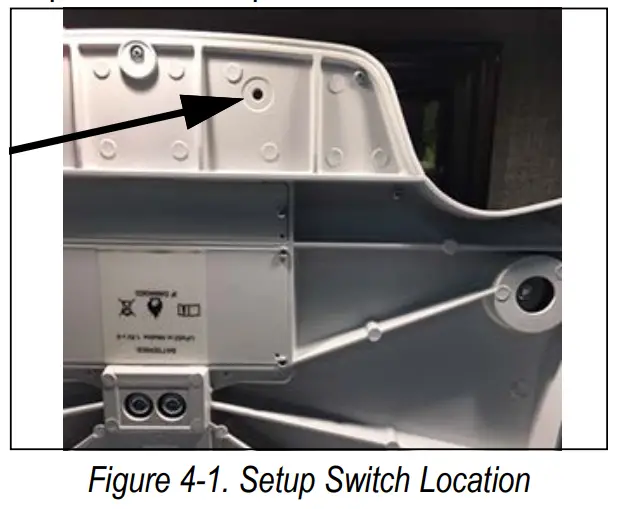
Access to the setup switch is located on the underside of the unit. Use a non-conductive object and gently press the internal setup switch.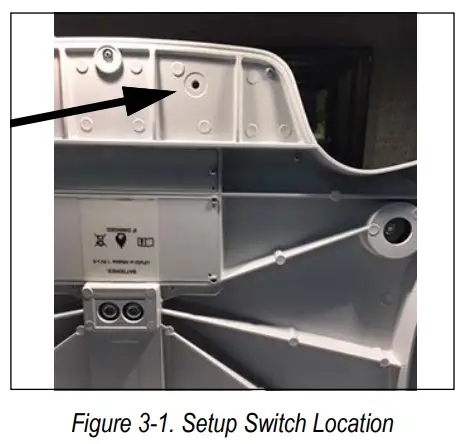
The measuring unit of the menu will be according to the measuring unit of the last calibration.
User Menu
- Press to turn the scale on, when START displays press and hold until ID and firmware ID number flashes on the display.
- Press . TEST displays.
- Press to enter menu or
 to scroll to next parameter.
 to scroll to next parameter.
Table 3-1. User Menu Parameters
| Parameter | Settings | Description |
| TEST | Test menu | |
| RID xxxxx | Internal ID number | |
| VER xx.xx | Development internal sub version | |
| A2D | Raw weight data | |
| VALUE | Processed weight in live display | |
| BAT | Raw bat value[BAT/16] | |
| USER | Access some of the parameters from the PROG menu. | |
| BAUD | (96) – UART baud rate. Values: 48, 96, 144, 192, 288, 384, 576, 1152 | |
| TOFF | (5) – Auto off timer in minutes (0 = Always on) – maximum 9 When using external power supply this parameter is irrelevant | |
| LIVE | (OFF) OP0 – Live weighing (0=Disable, 1=Enable, Default is Disable). | |
| MAIN | Communication protocol (0=ESC, 1=Maintenance, Default is ESC). Default – OFF | |
| OP1 | SPACE (7) Number of new lines after print (hex: 0x0d 0x0a) | |
| SAVE | Programming done, parameters save to EEPROM. | |
| GRAV | Gravity settings | |
| G-CAL | gravity at calibration location, read only | |
| G-LOC | gravity at user location GUPDAT • if ON, value can be updated; • if OFF, value is read only • after value is changed the first time, it is set to OFF. | |
| RTC | ??? (settings only displayed when option is on) | |
| Time | HH.MM set minutes, press enter, set hour | |
| Date | DD.MM set month, press enter, set day | |
| Year | YY set last two digits of year (example: 2017 enter 17) | |
| DONE | Reboots scale |
Verification Menu
- From ID display, press to scroll to the verification menu.
- Press to enter the menu.
Table 3-2. Verification Menu Parameters
| Parameter | Description and Settings |
| MONT | Set the next verification date in month. Default – 11 If set to zero no verification message (CNTL) will be displayed. On entering this menu will always show 11 month. The CNTL message is displayed on startup for 10 seconds |
| SAVE | Saving will indicate verification was done and the next verification date was saved. |
| DONE | Reboots scale after 3 seconds. |
Maintenance Menu
- From ID display, press the On Board key to scroll to the maintenance menu. The On Board key is under the keypad and has a seal on the opening.
- Press to change sub-menu and to choose the required menu.
- Press to enter the menu.
Table 3-3. Maintenance Menu Parameters
| Parameter | Description and Settings |
| PROG | Programming menu |
| CALIB | Calibration process |
| DEF | Load default menu, select Yes or No |
| DONE | Reboots scale |
Programming Menu
Table 3-4. Programming Menu Parameters
| Parameter | Default | Description and Settings |
| FULL | 20 kg\40 lb | Full capacity* |
| LOAD | 10 kg\20 lb | Calibration Load – can be changed from the calibration menu; max full capacity* |
| ASTART | 0.030 kg\0.060 lb | Weight Process Start Limit – determines when weight algorithm starts (===== displays), below this value the scale displays live weight; max (full capacity)/10* Also used to determine manual or function tare on the 38 model. |
| ARW | 0.050 kg\0.100 lb | Auto-Reweigh – restarts weigh algorithm if weight changes by more than set value; max full capacity* |
| SAL | 0.005 Sec | Semi-Auto-Live – interval between weight displays during algorithm process; max 0.9 sec |
| ROUND | 0.005 kg\0.010 lb | Scale resolution – Displays the high round if in dual range
The decimal point location is set according to DISP parameter |
| BAUD | 96 | UART baud rate – settings: 48, 96, 144, 192, 288, 384, 576, 1152 Value entered is multiplied by 100 example: 96 x 100 = 9600 |
| ATOL | 2 0-255 | Algorithm Initial Tolerance – if value is above 255, doesn’t proceed and returns to previous value |
| ALEN | 8 0-10 | Algorithm Initial Exponent – if value is above 10, it returns to previous value |
| ATOUT | 11 0-15 | Algorithm Maximal Exponent – if value is above 15, it returns to previous value. |
| TOFF | 5 | Auto Off Timer 0-9 minutes (0 = always on) only applies when battery powered |
| TLOC | 3 | Auto Release Lock Timer – in seconds (0 = NO RELEASE, can have values from 0 to 9) Every x seconds the lock is released and the weighing algorithm restarts. |
| LANG | 1 | Print Language – 0 = English, 1 = French |
| SPACE | 7 | Number of new lines after print (hex: 0x0d 0x0a) |
| UNITS | kg\lb | Units of Measure displayed (kg, lb or kg\lb) |
| OP | — | Binary options:
|
| SAVE | — | Press to save parameters to EEPROM (only displays if changes have been made) |
| DONE | — | Scale reboots |
* The lb menu values will be multiplied by 2. (example: full 250.0 kg = 500.0 lb)
* The decimal point location is fixed in this program to 0.000
Calibration
Use the following steps to enter into the calibration mode and calibrate the unit.
- Press and hold and then press until ID is displayed.
- Using a non-conductive instrument, press the setup switch located under the unit. PROG displays

- Press the left arrow until CALIB is displayed.
- Press .
- Use or to select 20 lb or 10 kg.
 NOTE: If using a different weight value other than those listed in Step 5, press again and the far right digit flashes.
Press the up or down arrows to change the weight value. The left arrow moves to the next digit on the left, allowing changes to the value. - Press to save that weight value. CLEAR displays.
- Make sure the platter is empty and press . displays.
- PUT is displayed. Put the entered value (ie: 20 lb) onto the platter. displays.
- Press . The scale calibrates that weight. Once calibrated, SAVE is displayed.
- Press . The scale displays DONE.
- Press so goes back to DONE, then press . The scale reboots and returns to weigh mode.
RS-232 Communication
The scale comes with an RS-232 port which enables weight data to be transmitted to other equipment, such as a computer or printer. The RS-232 cable with DB-9 connector (PN 100719) is available from Rice Lake Weighing Systems. Figure 5-1 shows where the RS-232 connection is.
The RS-232 parameters are 9600 baud (selectable in the programming mode), 8 data bits, 1 stop bit, no parity and no handshaking.
The method to access weight data from the computer is:
- ushbutton keypad print – Done by pressing and holding the REWEIGH key.
With a stable, in-range weight, press and hold the REWEIGH key for at least three seconds. Note that if the scale does not beep after five seconds, then release the button as the weight was either in motion, or out of range. The print will show on the display when it is transmitting data.
If displaying weight, the scale will send out the following 21 character string:
xx,oooo<xx<SP>uu<SP>mmmmm<SP><CR><LF>
Where:
xxxxxxxxx is the weight with decimal point and(-) neg sign, if negative uu is the unit (lb or kg).
mmmmm is the mode (gross or net)
Examples:
-10 Lb net = <SP><SP><SP><SP>-1 0.0<SP>lb<SP><SP>Net<SP><SP><SP <CR><LF>
10 Lb gross = <SP><SP><SP><SP><SP>-1 0.0<SP>lb<SP>Gross<SP><CR <LF>
USB Connection
he 650-10-1 Neonatal Scale has the capability of connecting to a PC using a USB connection and a USB cable. That connection location is shown in Figure 5-1.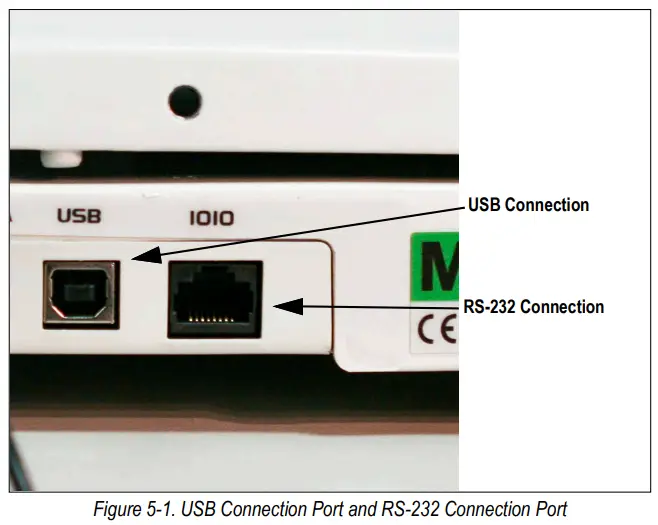
Connecting software and downloads should be addressed by an IT professional, and can vary depending on the computer platform used. Basic information on USB driver installation using Windows® is described in the following steps and serves only as an example.
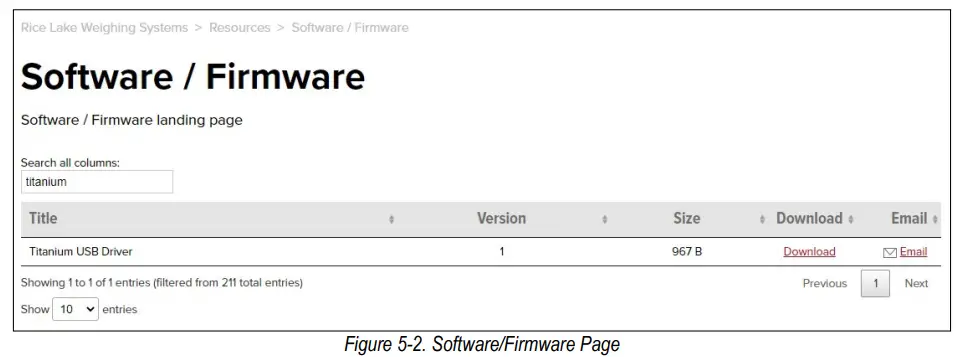
A USB driver can be downloaded from the Rice Lake Weighing Systems website at:
https://www.ricelake.com/resources/software-firmware
- Search for Titanium USB Driver.

- Click on Download to open and download the driver to a local computer.
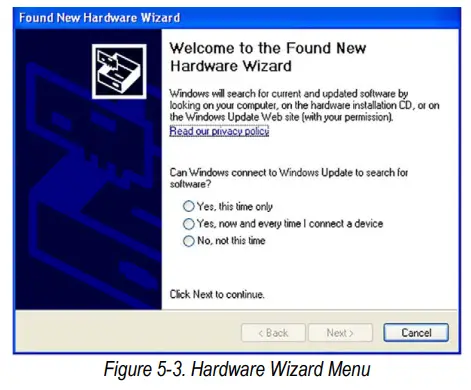
- When the USB cable is connected to the indicator and the scale is turned on, a display prompts to navigate through the software install process.

- Select No, not this time, and then click Next.
- Select Install the Software Automatically, then select Next. A file transfer screen displays as the file downloads and installs to the computer.
- Click Finish when the completion screen displays.
- To verify the installation, view the driver by looking at the device manager of the system.

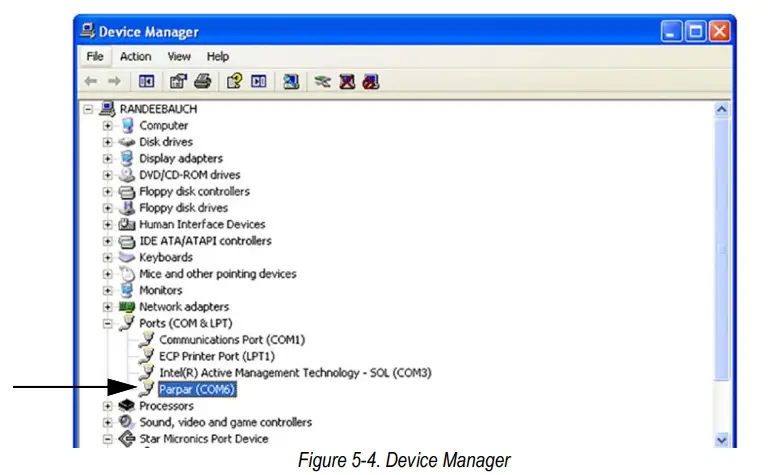
- To configure a printer using the USB driver, open the software driver Parpar in the device manager (Figure 5-4). The port assigned to that driver is displayed.
- Ensure the USB cable is properly connected and the unit is on.
10. Open and connect a terminal emulation program, such as Hyperterminal, via the USB driver. Select the port assigned to the software driver Parpar to establish a port. The terminal emulation program is necessary to view information transmitted from the indicator to the PC.
11. Press . The following example tickets print.
 NOTE: A single print ticket has four spaces after the “patient weight” and only one space between weight and lb in the examples shown above. Then seven after.
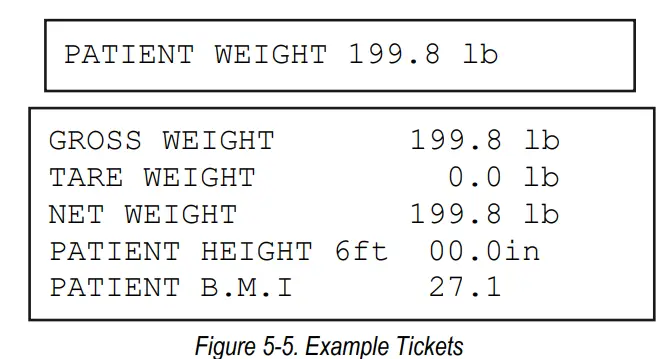
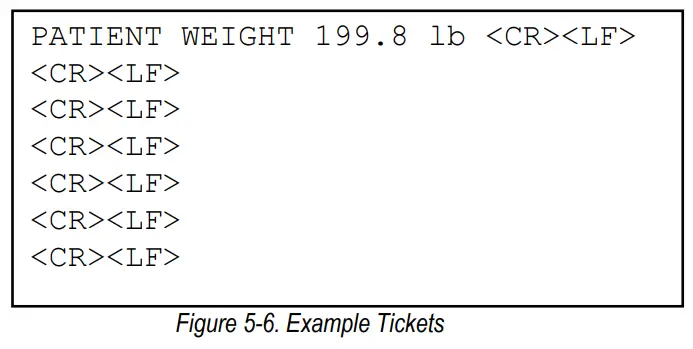
IMPORTANT: Figure 5-6 is for IT information only. The tickets print as in Figure 5-5.
Troubleshooting and Maintenance
Troubleshooting & Testing
Refer to the following instructions to check and correct any failure before consulting service personnel.
Table 6-1. Troubleshooting Table
| Symptom | Possible Cause | Corrective Action |
| Scale does not turn on when using just batteries | Dead batteries | Connect the scale to a power source or change batteries |
| Scale does not turn on | Dead battery | Connect the scale to a power source |
| Faulty electrical outlet | Use a different electrical outlet | |
| Bad power supply | Replace optional adapter | |
| Questionable weight or the scale does not zero | External object is interfering with the scale | Remove the infant/interfering object from the weighing tray from the scale |
| Display did not show 0.0 before weighing | Remove the infant, zero the scale and begin the weighing process again | |
| Scale is not placed on a level surface | Place the scale on a stable surface and begin the weighing process again | |
| The weighing tray is not placed properly | Place the weighing tray in its proper place | |
| Scale is out of calibration | Check the scale with a known weight value | |
| The display shows o_L d message | The load on the scale exceeds the capacity | Remove the excess weight and use the scale according to its stated limit |
| The display show Err | The RECALL key was pressed with insufficient weight on the scale. | Place more than 2 lb, 30 oz on the scale |
Maintenance
The following section provides instructions for maintaining and cleaning the 650-10-1 Neonatal Scale. Maintenance operations other than those described in this section should be performed by qualified service personnel.
Maintenance
The following section provides instructions for maintaining and cleaning the 650-10-1 Neonatal Scale. Maintenance operations other than those described in this section should be performed by qualified service personnel.
Go through the following steps for basic maintenance
- Check the overall appearance of the entire scale for any obvious signs of damage, abuse, etc.
- Inspect the condition of the optional AC adapter for cord cracking or fraying, or for broken or bent prongs.
Cleaning
Proper care and cleaning is essential to ensure a long life of accurate and effective operation. WARNING: Before beginning the cleaning process, disconnect the scale from the AC power source.
Clean all external surfaces with a clean, damp cloth or tissue. Mild soap and water solution may be used. Dry with a clean soft cloth.
IMPORTANT: Do not immerse the scale into cleaning or other liquid solutions.
Do not use Isopropyl alcohol or other solutions to clean the display surface.
Specifications
Capacity:
Range 1: 0 to 10 lb × 0.05 oz (0 to 5 kg x 1 g)
Range 2: 10 to 33 lb × 0.1 oz (5 to 15 kg x 2 g)
Power:
12 VDC, provided by six AA lithium batteries
(included) or AC adaptor (optional)
Measuring Tape:
0 to 23.5 in × 0.125 in
(0 to 60 cm × 0.25 cm)
Battery Type:
Six Li-FeS2 batteries
Operating Temperature:
50 °F to 95 °F (10 °C to 35 °C)
Display:
5-digit LCD display, 0.75 in (1.9 mm) digit height
Warranty:
Two-year limited
Approvals: E113986
Limited Warranty
Rice Lake Weighing Systems (RLWS) warrants that all RLWS equipment and systems properly installed by a Distributor or Original Equipment Manufacturer (OEM) will operate per written specifications as confirmed by the Distributor/OEM and accepted by RLWS. All systems and components are warranted against defects in materials and workmanship for two years.
RLWS warrants that the equipment sold hereunder will conform to the current written specifications authorized by RLWS. RLWS warrants the equipment against faulty workmanship and defective materials. If any equipment fails to conform to these warranties, RLWS will, at its option, repair or replace such goods returned within the warranty period subject to the following conditions:
- Upon discovery by Buyer of such nonconformity, RLWS will be given prompt written notice with a detailed explanation of the alleged deficiencies.
- Individual electronic components returned to RLWS for warranty purposes must be packaged to prevent electrostatic discharge (ESD) damage in shipment. Packaging requirements are listed in a publication, Protecting Your Components From Static Damage in Shipment, available from RLWS Equipment Return Department.
- Examination of such equipment by RLWS confirms that the nonconformity actually exists, and was not caused by accident, misuse, neglect, alteration, improper installation, improper repair or improper testing; RLWS shall be the sole judge of all alleged non-conformities.
- Such equipment has not been modified, altered, or changed by any person other than RLWS or its duly authorized repair agents.
- RLWS will have a reasonable time to repair or replace the defective equipment. Buyer is responsible for shipping charges both ways.
- In no event will RLWS be responsible for travel time or on-location repairs, including assembly or disassembly of equipment, nor will RLWS be liable for the cost of any repairs made by others.
These warranties exclude all other warranties, expressed or implied, including without limitation warranties of merchantability or
fitness for a particular purpose. Neither RLWS nor distributor will, in any event, be liable for incidental or consequential
damages.
RLWS and buyer agree that RLWS’s sole and exclusive liability hereunder is limited to repair or replacement of such goods. In accepting this warranty, the buyer waives any and all other claims to warranty.
Should the seller be other than RLWS, the buyer agrees to look only to the seller for warranty claims.
No terms, conditions, understanding, or agreements purporting to modify the terms of this warranty shall have any legal effect unless made in writing and signed by a corporate officer of RLWS and the Buyer.
© Rice Lake Weighing Systems, Inc. Rice Lake, WI USA. All Rights Reserved.
RICE LAKE WEIGHING SYSTEMS • 230 WEST COLEMAN STREET • RICE LAKE, WISCONSIN 54868 • USA
© Rice Lake Weighing Systems. All rights reserved.
Rice Lake Weighing Systems® is a registered trademark of Rice Lake Weighing Systems.
All other brand or product names within this publication are trademarks or registered trademarks of their respective companies.
All information contained within this publication is, to the best of our knowledge, complete and accurate at the time of publication. Rice Lake Weighing Systems reserves the right to make changes to the technology, features, specifications and design of the equipment without notice.
The most current version of this publication, software, firmware and all other product
updates can be found on our website:
www.ricelake.com
© Rice Lake Weighing Systems Content subject to change without notice.
230 W. Coleman St. • Rice Lake, WI 54868 • USA
U.S. 800-472-6703 • Canada/Mexico 800-321-6703 • International 715-234-9171 • Europe +31 (0)26 472 1319
http://www.ricelake.com/

References
 Rice Lake Weighing Systems
-
Manuals | Rice Lake Weighing Systems
-
Training | Rice Lake Weighing Systems
-
Warranties
-
Videos and Webinars | Rice Lake Weighing Systems
-
Rice Lake Weighing Systems
-
Rice Lake Weighing Systems
-
Rice Lake Weighing Systems
-
Manuals | Rice Lake Weighing Systems
-
Firmware
-
Training | Rice Lake Weighing Systems


