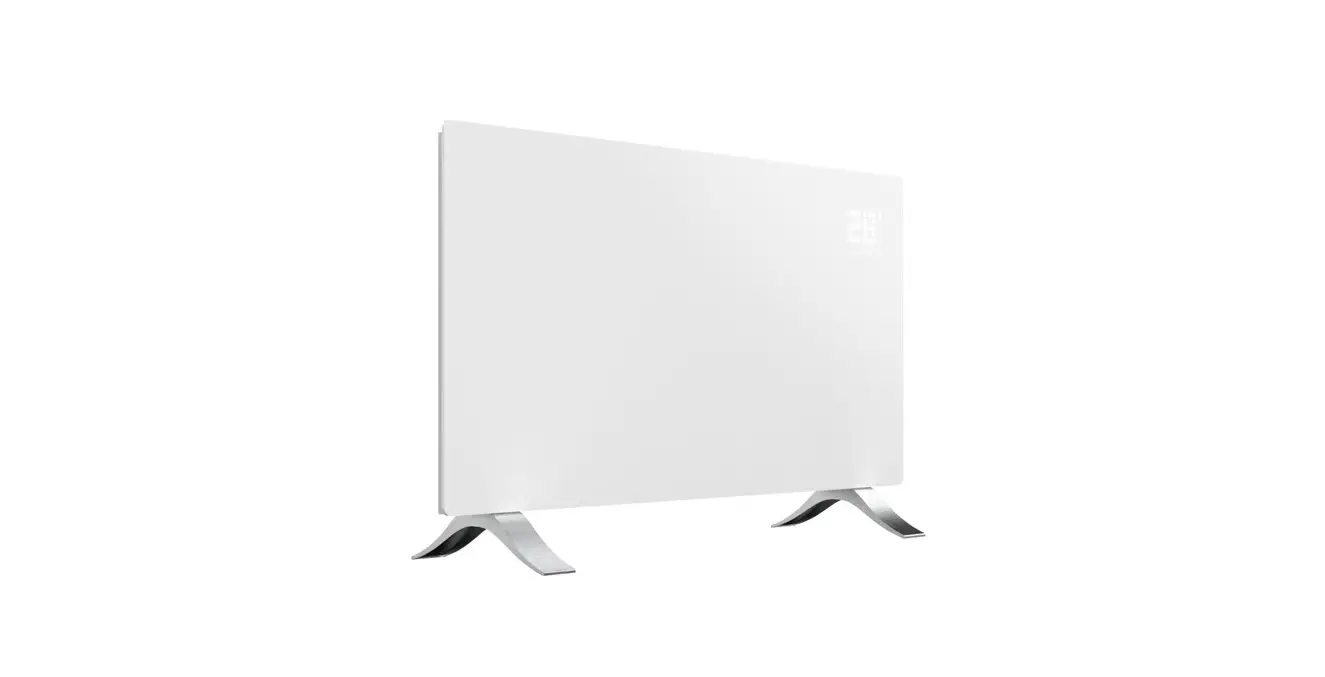
![]() 0720 1000 W Smart Radiator
0720 1000 W Smart Radiator
Instruction Manual
Overview
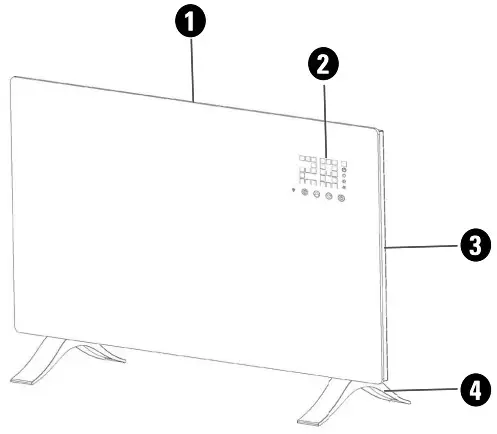
| 1. Air outlet | 3. Power switch |
| 2. Control panel and display | 4. Detachable feet |
Control panel and remote control
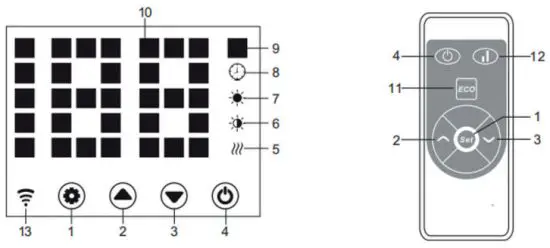
| 1. Settings | 8. Timer indicator |
| 2. Up | 9. Temperature indicator |
| 3. Down | 10. LED display |
| 4. Power | 11. Display on/off |
| 5. Heating indicator | 12. Low/high heat |
| 7. Low heat indicator | 13. wif indicator |
| 8. High heat indicator |
| Specifications | 40720 | 40721 |
| Power | AC 230 V, 50 Hz, 1000 W | AC 230 V, 50 Hz, 2000 W |
| Wifi | 2.4 GHz | 2.4 GHz |
| IP rating | IP24 | IP24 |
| Size | 51.5 cm x 45 cm x 10.5 cm | 83.5 cm x 45 cm x 10.5 cm |
| Weight | 6.1 kg | 9.6 kg |
| Frequency range | 2412-2472 MHz | 2412-2472 MHz |
| Effective radiated power | 12.41 dBm | 12.41 dBm |
Assembly
Attach the feet
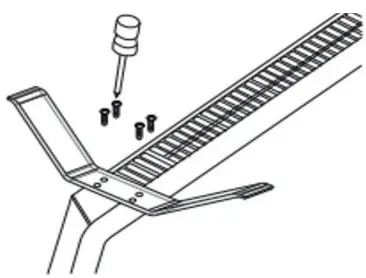 On the underside of the radiator, there are two areas with four sets of screw holes.
Align the feet to the holes and use the included screws to attach the feet, see image to the right.
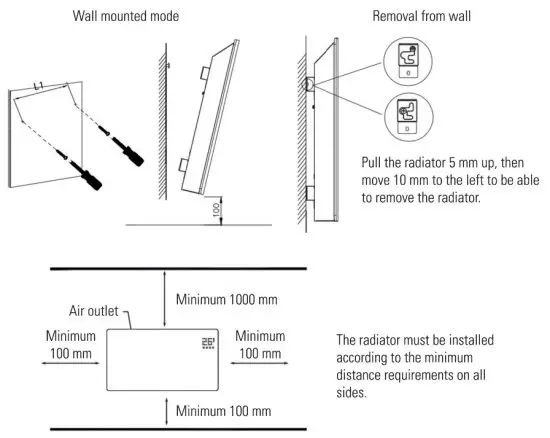
Wall mounting
Use
Plug the power cable into a wall outlet. Turn on the power switch on the back of the radiator. Buttons 1-4 are displayed. Press the Power button to start the radiator. The display shows the current temperature in the room.
Press the Settings button. The temperature indicator starts to flash, indicating temperature mode. Press the Up and Down buttons to set the desired temperature and then wait until the radiator confirms the temperature.
Activate the heat modes with the Up and Down buttons. Press the Up button to start “High heat”. The heating and high heat indicators light up. Press the Down button to activate “Low heat”. The heating and low heat indicators light up.
Setting the timer
The start timer can be set when the radiator is not in heating mode. Make sure neither the high heat nor low heat indicators are active. Press the Settings button to enter temperature mode. Set the desired temperature and press the Settings button again. Now you can set the starting timer up to 24 hours.
The end time is set while the radiator is currently heating up in “High heat” mode or “Low heat” mode Make sure either the low heat or high heat indicators are active. Press the Settings button, set the desired temperature, and press the Settings button again to enter the end-timer mode. Here you can set for how
long the radiator runs until it turns off You can set the end timer up to 24 hours
Child lock function
The child lock function can be activated while the radiator is in heating mode. Press and hold the Up and Down buttons simultaneously for three seconds to activate the child lock. No changes can be made when the child lock is activated.
To unlock the child lock, press and hold the Up and Down buttons again for three seconds.
Night mode
Press and hold the Settings button and the Down button simultaneously for three seconds to activate the night mode. The display turns off, showing only the indicators for the active settings.
Temperature display
Press and hold the Settings and Up buttons for 10 seconds to change between Celsius (C°) and Fahrenheit (F°)
Mobile app
- Find and install the ‘Smart life – Smart living’ app on App Store or Google Play store depending on what device you are using.
- Register an account in the app or log in to an existing one. Make sure you are connected to your local 2 4 GHz network
- Turn on the radiator and press “Add device” or “+” in the app to add a new device.
- Go to “Small Home Appliances” and choose “Heater (Wi-Fi}”
- Enter the details for your 2.4 GHz wifi in the next step
- The app searches for the radiator and confirms when the pairing is successful
Note! The pairing procedure might change due to regular app updates.
If the instruction seems different, please visit www.kjell.com/40720->”Support” for updated instructions.
Wifi reset
To reset the wifi of the radiator, press and hold the Settings button for 3 seconds while the radiator is in heating mode.
Features
The radiator is equipped with a high-limit switch. The radiator automatically turns off if it is overheating and turns automatically on when it has cooled down.
If the temperature decreases to 3°C or more within two minutes, the radiator stops heating. The temperature indicator starts to flash. Press the Power button to turn it off and on again.
Safety information
![]() WARNING· Do not cover the radiator If covered, there rs a risk of overheating and even fire.
WARNING· Do not cover the radiator If covered, there rs a risk of overheating and even fire.
WARNING: Do not use the radiator if the glass panels are damaged.
CAUTION: Parts of the radiator can become very hot and cause burns. Pay particular attention when children and vulnerable people are close to the radiator.
Do not place the radiator directly below a wall socket The radiator is not intended for outdoor use Do not use the radiator around water and places such as baths, showers, pools, or other liquids.
Always use the radiator upright.
Do not use the radiator with an extension cord.
Do not use the radiator on long-haired carpets.
The radiator is not intended for use by persons (including children) with reduced physical, sensory, or mental capabilities, or lack of experience and knowledge unless they have been given supervision or instructions on how to use the radiator by a person responsible for their safety.
Keep the radiator away from moisture.
Unplug the radiator and let it cool down completely before moving or storing it.
Unplug the radiator and wait for it to cool down before cleaning it. Use the damp cloth to clean the exterior.
Let the radiator dry completely.
If the power cord is damaged, do not operate the radiator. Consult a qualified electrician or service technician. Do not perform any form of repair on the appliance yourself Unplug the radiator when it is not in use.
Simplified EU Declaration of Conformity
Kjell & Company hereby declares that this device is in compliance with the essential requirements and other relevant provisions of Directive 2014/53/EU. Full text of the EU declaration of conformity is available at www.kjell.com/40720 & www.kjell.com/40721
ECO information for the electric local space heaters according to (EU) 2015/1188
| Item | Symbol | 40720 | 40721 | Unit | Item | Unit |
| Heating output | Type of heat input, for electrical storage local space heaters only (select one) | |||||
| Nominal heat output | p nom | 1 | 2 | kW | manual heat charge control, with integrated thermostat | No |
| Minimum heat output (indicative) | p min | 0.5 | 1 | kW | manual heat charge control with room and/or outdoor temperature feedback | No |
| Maximum continuous heat output | p max, C | 0.96 | 1.98 | kW | electronic heat charge control with room and/or outdoor temperature feedback | Yes |
| Auxiliary electricity consumption | fan assisted heat output | No | ||||
| At nominal heat output | elmax | 0.996 | 1.985 | kW | Type of heat output/room temperature control (select one) | |
| At minimum heat output | elmin | 0.478 | 0,979 | kW | single-stage heat output and no room temperature control | No |
| In standby mode | elSB | 0.0004 | 0.0004 | kW | two or more manual stages, no room temperature control | No |
| with mechanic thermostat room temperature control | No | |||||
| electronic room temperature control plus day timer | No | |||||
| electronic room temperature control plus week timer | Yes | |||||
| Other control options (multiple selections possible) | ||||||
| room temperature control, with presence detection | No | |||||
| room temperature control, with open window detection | Yes | |||||
| with distance control option | Yes | |||||
| with adaptive start control | No | |||||
| with working time limitation | Yes | |||||
| with black bulb sensor | Yes | |||||
www.cleverio.se
Box 50435 Malm~
Sweden
2021-08-13 ![]() Cleverio®
Cleverio®


