AINAVITO
Product Manual
Knowledgeable & Useful

Device wiring diagram
Device Port List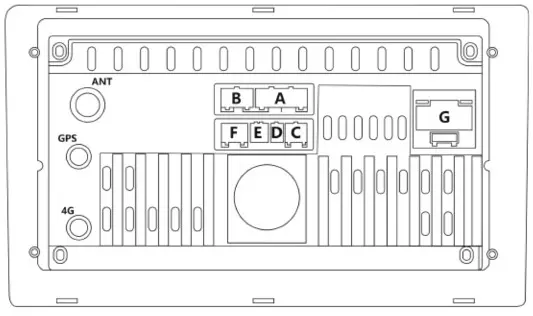
| A:Audio /video port B:NULL C:CAN in/out | D:4PIN USB port E:6PIN USB port F:Rear view port |
Power Port Pin Definition
| G1:GND G2:Battery+ G3:ACC G4:ILL G5:Rear CAM Conrtol G6:SWC KEY-2 G7: SWC KEY-1 | G8:ANT power 12V G9:FRG10:RLG11:FR+ G12:RL+ G13:FLG14:RR+ G15:FL+ G16:RR- |
Pin Definition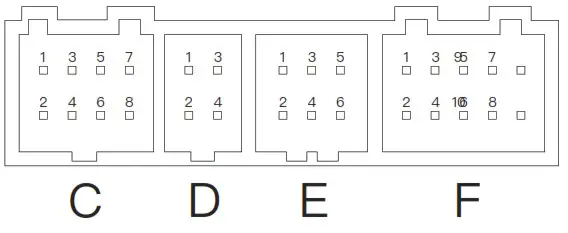
| C1: GND C2: CENTER OUT C3: AUDIO RL OUT C4: AUDIO RR OUT C5: NULL C6: NULL C7: CAN_RXD C8: CAN_TXD | D1: USB1 5V D2: USB1_OTG+ D+ D3: USB1 GND D4: USB1_OTG- DE1: USB2 5V E2: USB2_HOST+ D+ E3: USB2 GND E4: USB2_HOST- D- E5: NULL E6: NULL F1: UART5_TX2 F2: BT_ANT F3: UART5_RX2 F4: GND | F5: IR F6: REAR_CAM+ F7: 12V_OUT F8: GND F9: BRAKE F10: BT/WiFi_ANT |
Pin Definition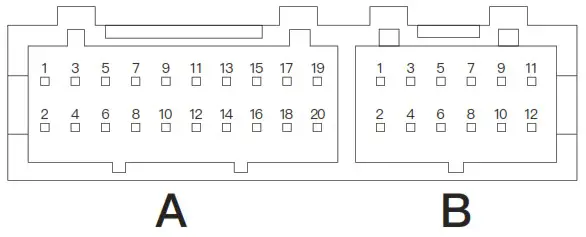
| A1: AMP_POWER CONTROL A2: GND A3: AUDIO IN_R A4: AUDIO OUT_L A5: AUDIO IN_L A6: AUDIO OUT_R A7: SIM_DATA A8: GND | A9: SIM_DEC A10: SIM GND A11: SIM_SCLK A12: GND A13: SIM_ RESET A14: NULL A15: SIM_VDD A16: SUB OUT A17: DTV_CVBS A18: AUX_CVBS_IN A19: MICA20: MIC+ | B1: LEFT_DET or NULL B2: RIGHT_DET or NULL B3: GND or NULL B4: VIN_FRONT or NULL B5: GND or NULL B6: VIN_RIGHT or NULL B7: GND or NULL B8: VIN_REAR or NULL B9: GND or NULL B10: VIN_LEFT or NULL B11: 5V+ or NULL B12: 5V+ or NULL |
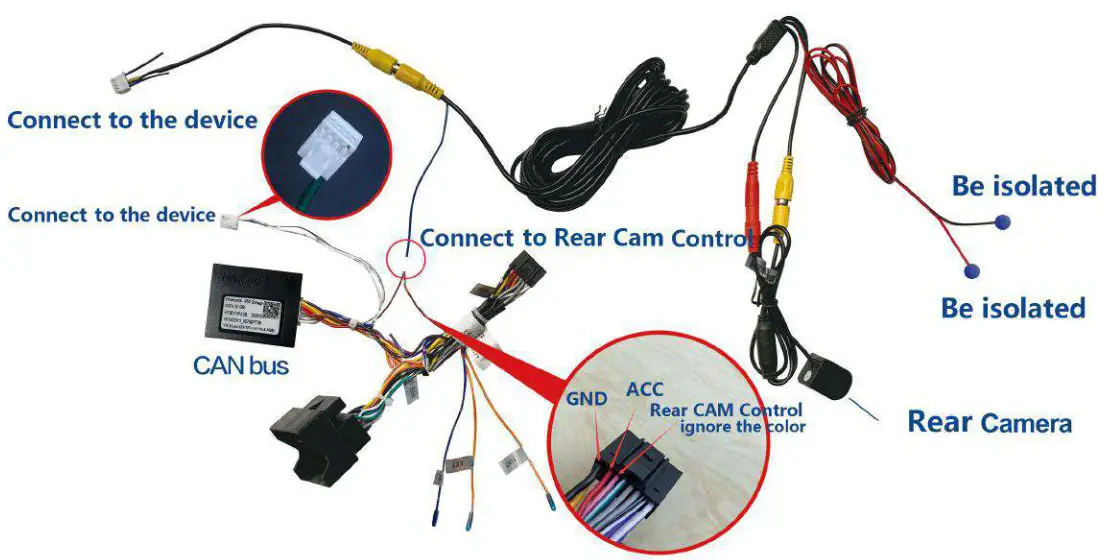
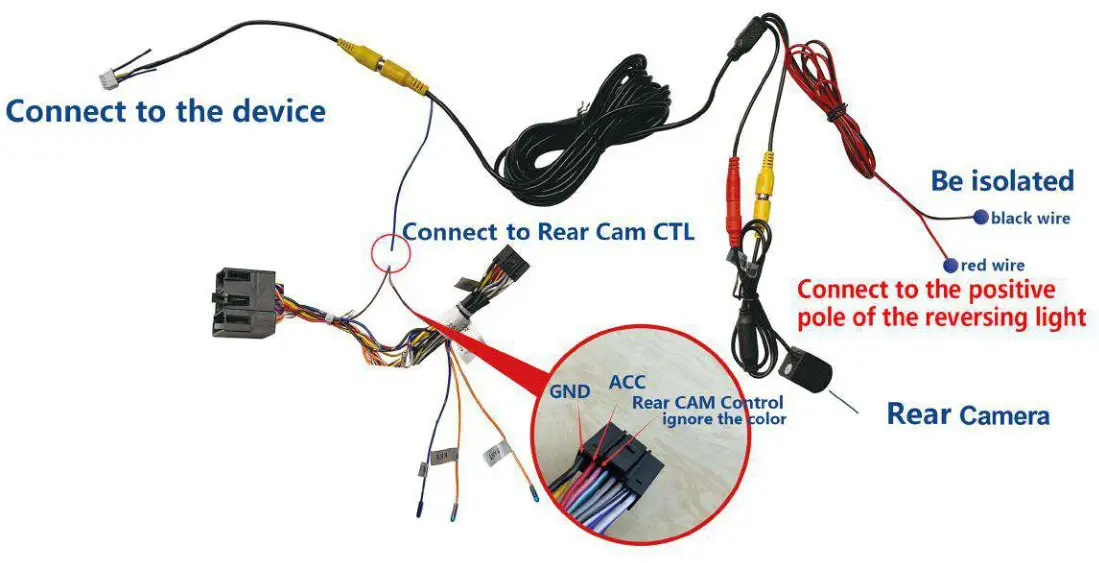
HOW TO CONNECT REAR CAMERA(the device equiped with CANbus)
Desktop
| 1. Navigation 2. Bluetooth 3. More Applications 4. Radio 5. Settings | 6. Km/h or mph (details on page 6) 7. Date & Time 8. Music or Radio info. 9. APPS (long press to replace apps) |

Drag touch screen down to pop up the drop-down menu, and drag it up to hide.
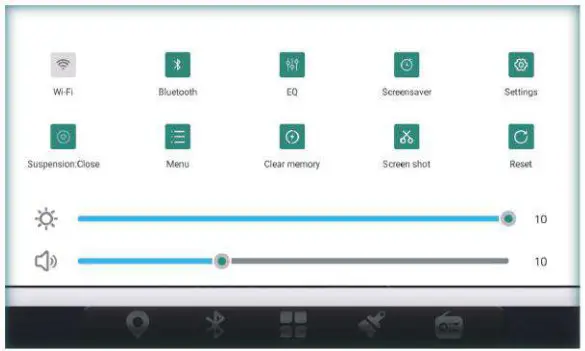
| 1. Wi-Fi: short press to turn on/off, long press to enter. 2. Bluetooth: click to enter the Bluetooth page. 3. Equalizer: jump to the sound adjustment page. 4. Screensaver: display time information, touch the screen to cancel the display. 5. Settings: jump to the settings page. 6. Suspension: floating icon, closed by default, click to open. | 7. Menu: parameter adjustment entry for some applications. 8. Clear memory: clean up the memory, end the running application, and release the memory. 9. Screen shot: screen capture and save to file manager10. Restart: whether the pop-up box confirms to restart the device. 11. Below is the brightness and volume bar, drag the blue node to adjust. |
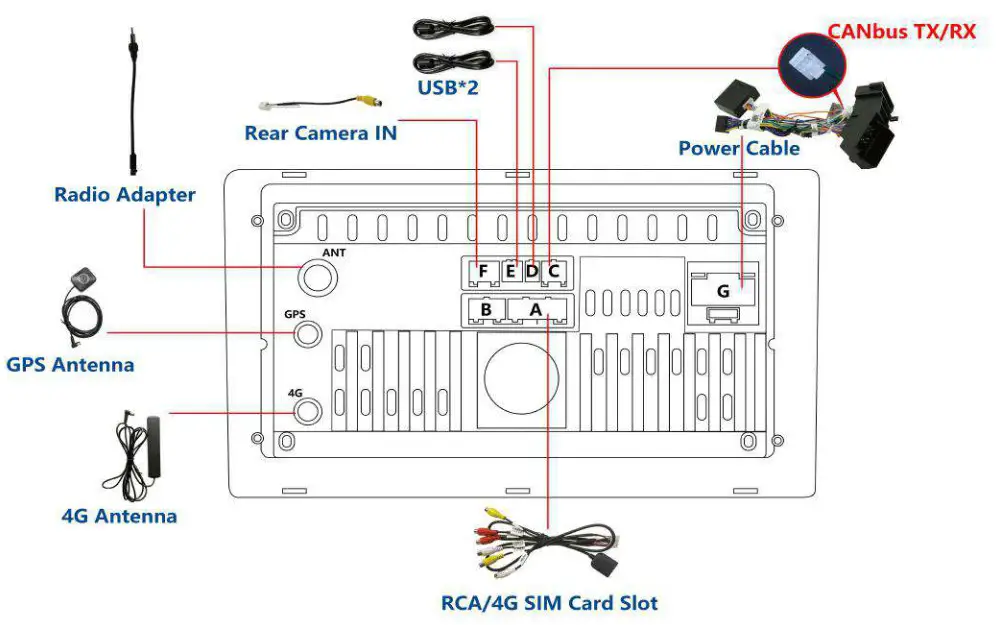
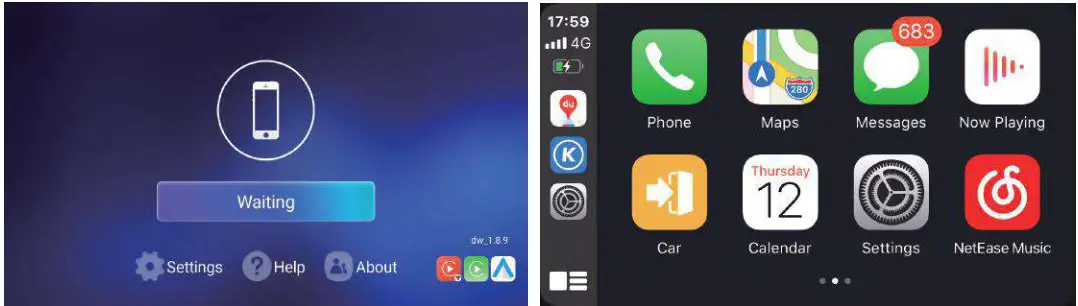
TLINK
Tlink is the name of the application that supports the apple carplay & Android autoplay function.
Connection steps (wireless carplay for iPhone):
- Mobile phone pairing device Bluetooth.
- Open Tlink and enter the connection page.
- Tlink will automatically detect the device.
- Confirm “Use carplay If necessary” on your iPhone.
If it doesn’t work, please contact us .
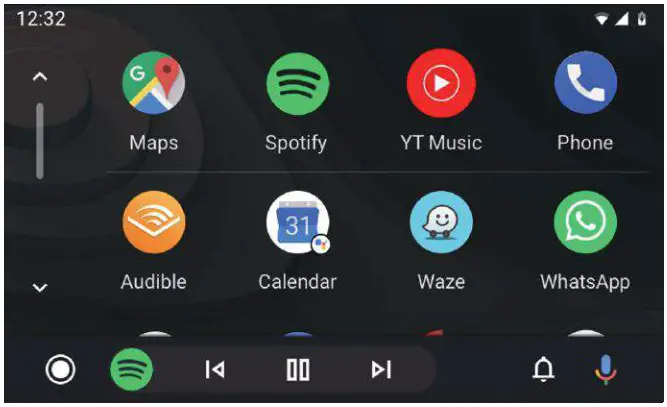
Android Auto
- Wired Android auto connection: Open TLINK app, use original mobile phone USB cable to connect 4pin USB port.
- Wireless Android auto connection: Connect Bluetooth ->Open Tlink app ->Authorize to connect.
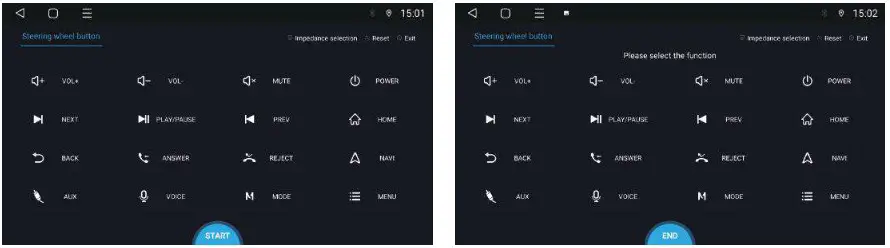
Setting Wheel
Multi-function steering wheel learning steps(only for no CANbus cars):
- Click ‘Setting Wheel’ to enter the steering wheel interface.
- Click “START”.
- Select the key to learn, such as “Volume +”.
- Press the corresponding physical button on the steering wheel, and the button will be highlighted in blue after learning, learning the button one by one and click “END” when you finished.
Before learning the keys, you can choose high, medium and low impedance according to your needs; When you need to clear the learning records, you should click “START”->then “Reset”.
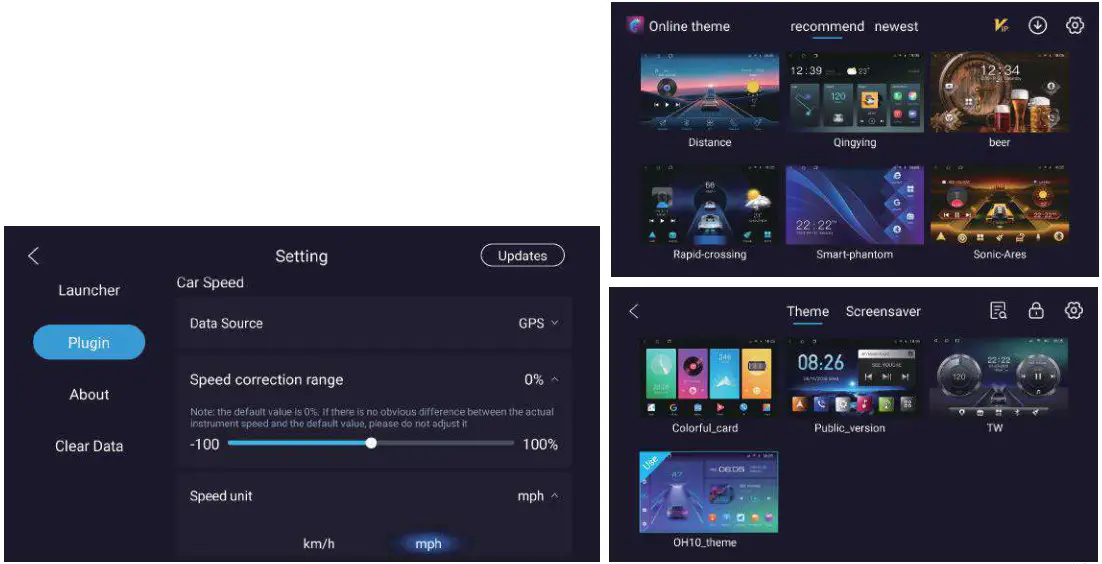
Themes
- We can buy online themes according to our needs.
We can click to find and switch the theme we bought.
 - Click
 to enter the “Setting”, We can switch km/hand mph.
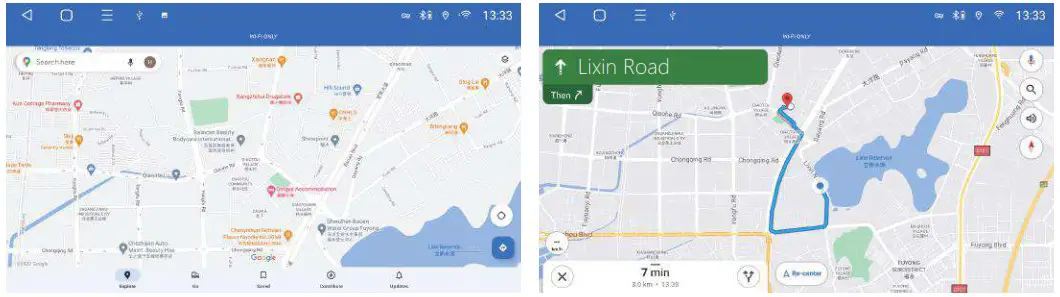
- Navigation software installation.
Network installation: log in “play store” to search for the navigation apps-download and install.
Manual installation: Download navigation APK to the U disk, connect to the device USB port-open “APK installer”/” file manager”-find the corresponding directory and click to install. - Bind navigation application: (need to bind navigation application before use navigation) Open “Settings”-> Navigation->Navigation software selection->Select the application that needs to be bound->click “Return” to save.
- Navigation memory activation: (Enter the map interface after the car is powered on) settings-General -“memory start Navigation” is set to on.
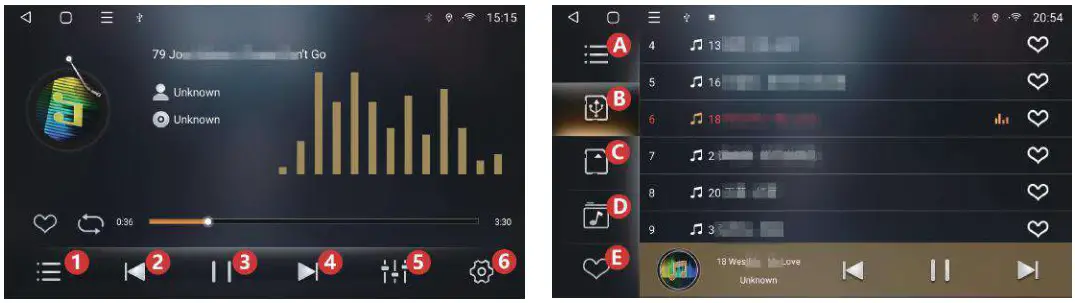
Music
| 1. Play list 2. Previous song 3. Next song 4. Pause/resume playback 5. Equalizer 6. Lyrics settings | A. Play list B. U disk C. SD card D. iNand E. Favorite List iNand directory playback: Connect audio U disk, “File Manager”-check the audio file and click ”copy”- switch to “Flash”-“iNand” folder-click Paste and restart the device. |
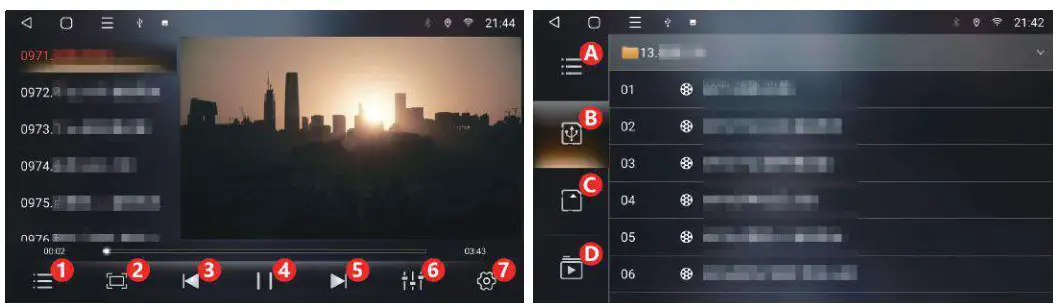
Video
| 1. Play list 2. Full/Half screen 3. Previous video 4. Pause/resume playback 5. Next song 6. Equalizer 7. settings(floating video/brake) | A. Play list B. U disk C. SD card D. iNand iNand directory playback: Connect video U disk, “File Manager”-check the video file and click ”copy”- switch to “Flash”-“iNand” folder-click Paste and restart the device. This player supports:MP4/AVI/DVIX/ FLV/MOV/MKV/3GP |
Bluetooth
When the Bluetooth is not connected, you can only enter the setting and pairing page.
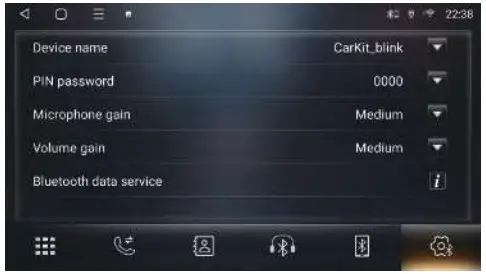 | 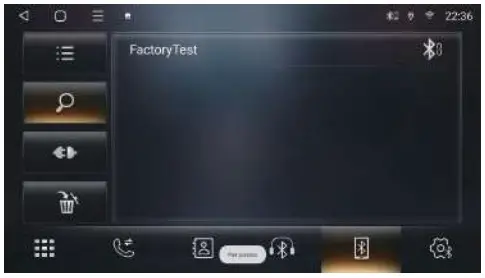 | 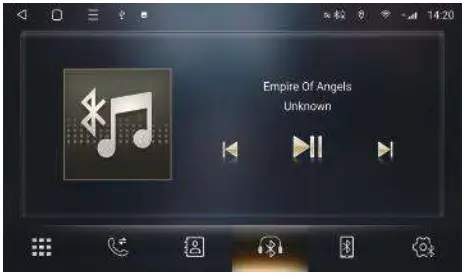 |
| The device name and PIN code can be changed, as well as Bluetooth data service, microphone gain and volume gain. | Enter the pairing interface, click | Connect to the device Bluetooth, open the Bluetooth music interface, and then play the music in the mobile phone. |
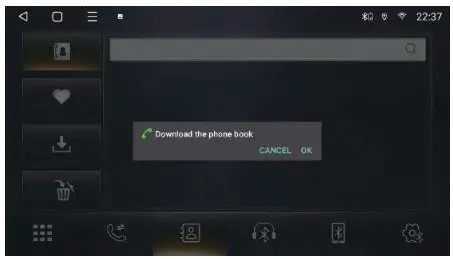 Contact download steps:
Phonebook interface ![]() -Click
-Click ![]() -download, then the mobile phone pops up the box “Are you allowed to access contact information” , click confirm, the device will synchronize the phone contacts.
-download, then the mobile phone pops up the box “Are you allowed to access contact information” , click confirm, the device will synchronize the phone contacts.
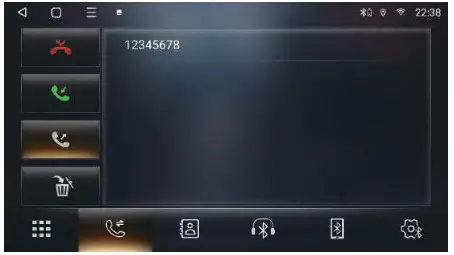 The icons at the bottom of Bluetooth are: Dial Keypad, Call History,Phone Book, Bluetooth Music, Pairing, Settings.
Call history includes missed calls, received calls, outgoing calls, and deleted phone book
Settings
- Display
1.1 Brightness setting: slide the node to adjust.
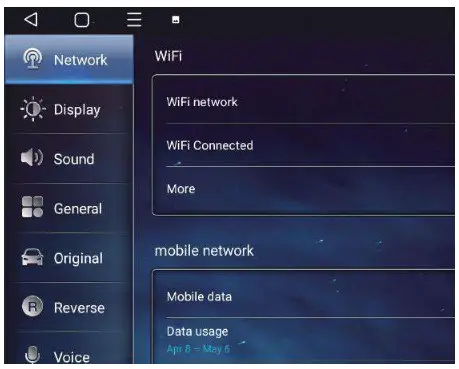
1.2 Brightness mode: automatic, day mode or night mode. - Network
2.1 WIFI connection: turn on/off the Wi-Fi button to connect/disconnect the network.
2.2 Other network settings: flight mode. - Sound
3.1 Set the sound priority: system, third-party sound priority or smart setting priority.
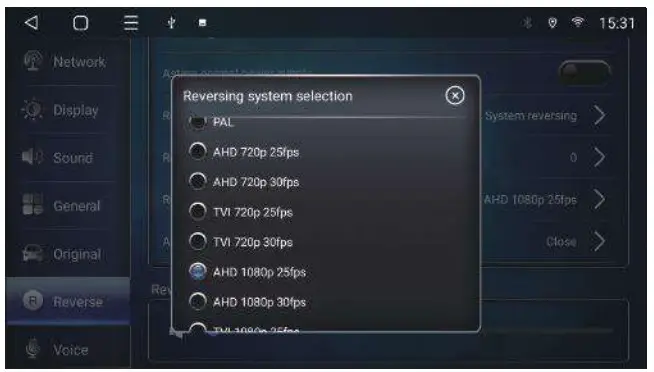
3.2 Mixing settings: navigation mixing, turn on by default, we can set navigation broadcast and background music mixing/unmixed. - Reversing
NTSC NTSC ordinary CVBS camera TVI 720 30fps TVI 30-frame HD camera PA L PAL ordinary CVBS camera AHD 1080p 25fps AHD 1080p 25-frame ultra-clear camera AHD 720 25fps AHD 25-frame HD camera AHD 1080p 30fps AHD 1080p 30-frame ultra-clear camera AHD 720 30fps AHD 30 frames HD camera TVI 1080p 25fps TVI 1080p 25-frame ultra-clear camera TVI 720 25fps TVI 25-frame HD camera TVI 1080p 30fps TVI 1080p 30-frame ultra-clear camera 
 Reversing mirror: turn off by default, turn on “reversing mirror”, the rear camera interface will reverse left and right.
Reversing radar: turn on by default.
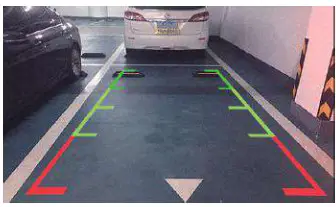
Reversing trajectory: turn on by default.
Reversing line ruler: turn on by default.
Astern normal power supply: turn off by default.
Reversing volume control: Reversing mute/unmute.
on the reversing camera interface, tap the screen to set brightness, contrast, saturation, and reversing trajectory adjust. - General Settings
 Reversing mirror: turn off by default, turn on “reversing mirror”, the rear camera interface will reverse left and right.
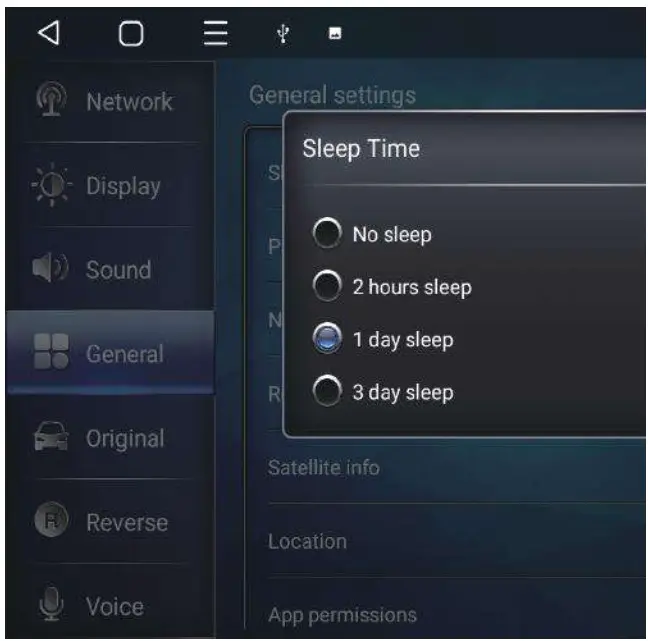
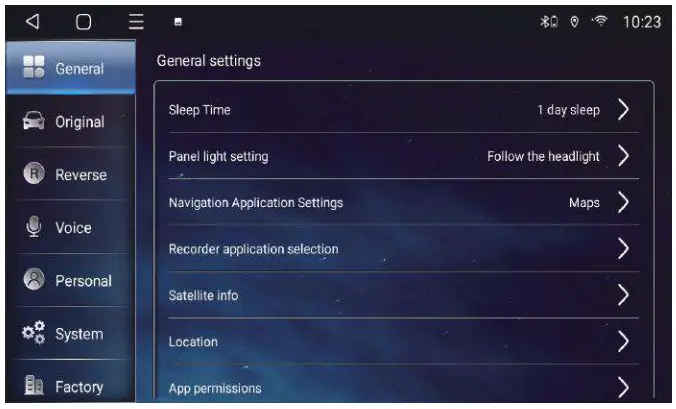
- Sleep time
No sleep: It doesn’t support hibernation, the device will not start quickly.
2 hours Sleep: The device supports quick start when the car is locked within 2 hours.
1 day Sleep: The device supports quick start when the car is locked within 24 hours.
3-day Sleep: The device supports quick start when the car is locked within 72 hours. - Panel light setting
Follow the headlight: The device panel light will light up when the car turns on the headlights.
Normally on: The panel lights will turn on when the car starts the engine.
- Original car setting: Some original car functions can be set on this page, such as air condition display, reversing radar etc.
- Personal: The language can be changed on this page.
- System settings
Reset factory: If you want to reset the device to factory settings, you need to go to the factory settings to back up the APK, then go back and click on reset factory.
Reset factory steps: Factory(123456)-Backup APK-Backup installed APK, System-Reset factory(7890).
NOTICE: Do not change the options in the factory settings. It may affect the device works well.
Radio
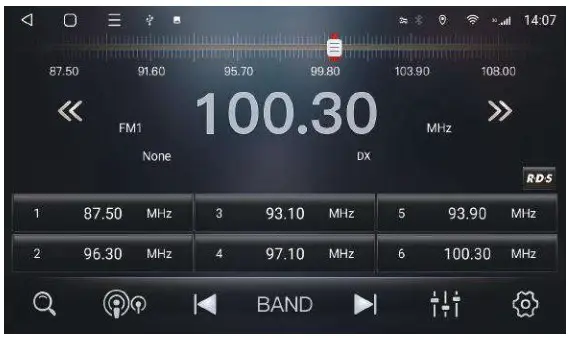
- Click
 to scan the stations, the searched stations are stored in the P1-P6 (87.5 MHz)cell of FM1-FM3 (or AM1-AM3), slide to browse all the stored stations.
  DX/LOC switch; long range/close range search for radio stations.
 Click to search for radio stations, Long press and drag the stations to P1-P6.
 Switch to FM (frequency modulation) mode and AM (medium wave) radio mode.
 Low/High-frequency search for radio stations by long press.
 Equalizer: click to jump to the equalizer interface.
 Settings: channel selection (stereo/mono).
File Manager
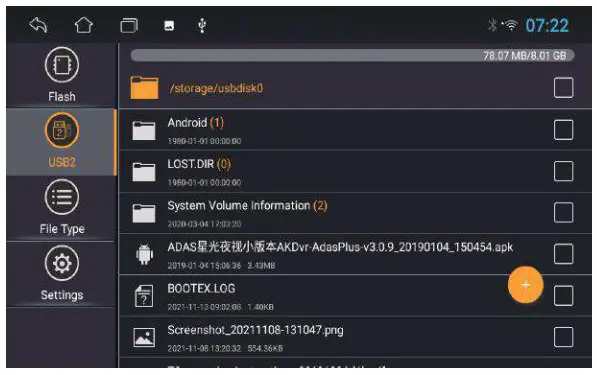 A powerful and easy-to-use resource management software, classified management of music,video, gallery, applications and documents, efficient search for target resources. Application installation, file copy, delete, information view, cut and other functions are all available. It also supports external device operation, Such as U disk.
Equalizer (DSP)
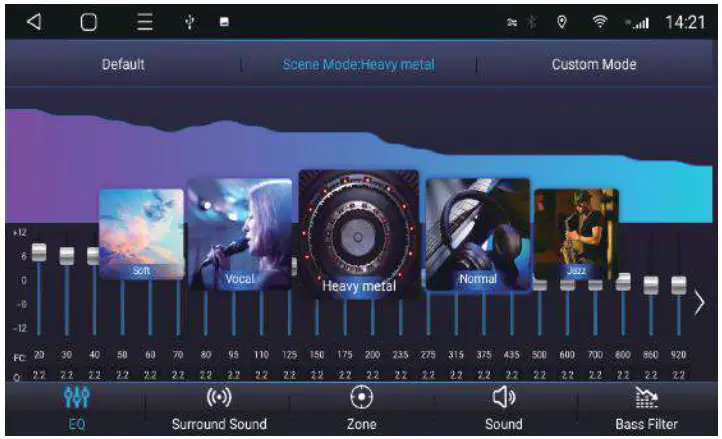 EQ
EQ
Eight types of sound effects provide selection, you can adjust the signal of different frequencies to customize the sound.
Surround sound
Six surround position modes. Different position has different music effect. You can also adjust the sound field delay to change the sound effect.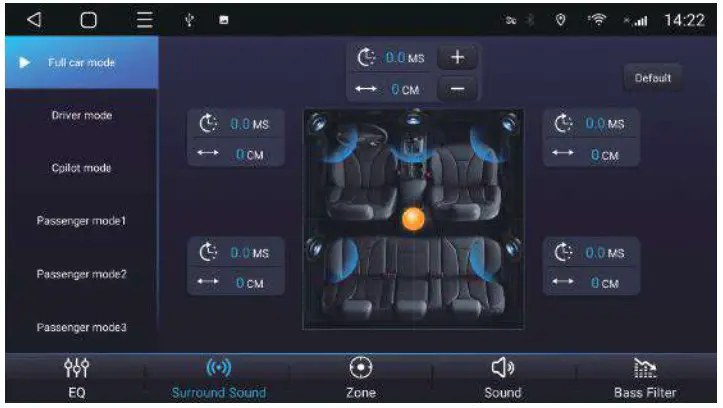
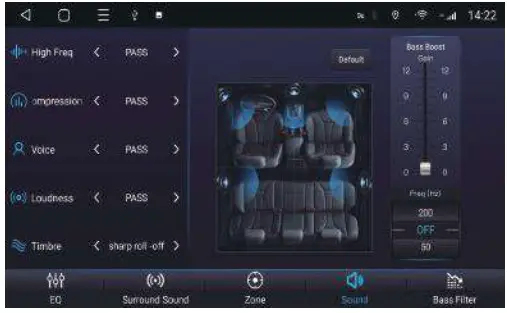 | 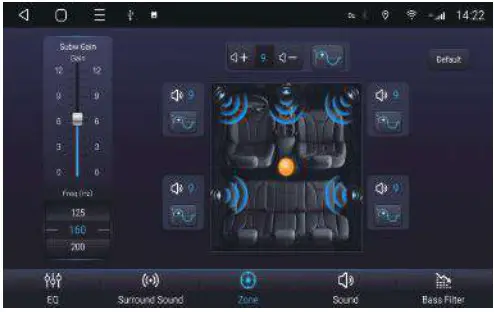 | 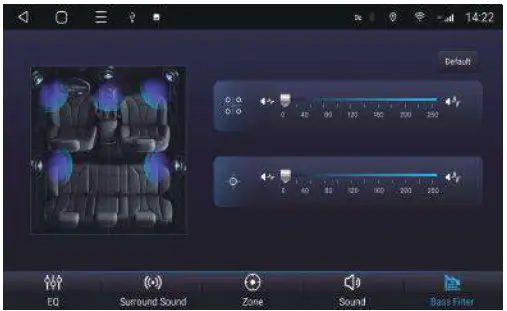 |
| Zone The sound field setting is centered by default (means sound balanced output). For example, move the node to the driver’s seat area, and the sound will be output from this area. | Sound Adjust the ‘bass boost’ effect of different frequencies, the interval value is 0-12 (enhancement registration). | Bass Filter The adjustment range is 0-250Hz, The higher the frequency, the greater the bass filtering effect. Adjustable front/rear speaker effect. |
Play Store
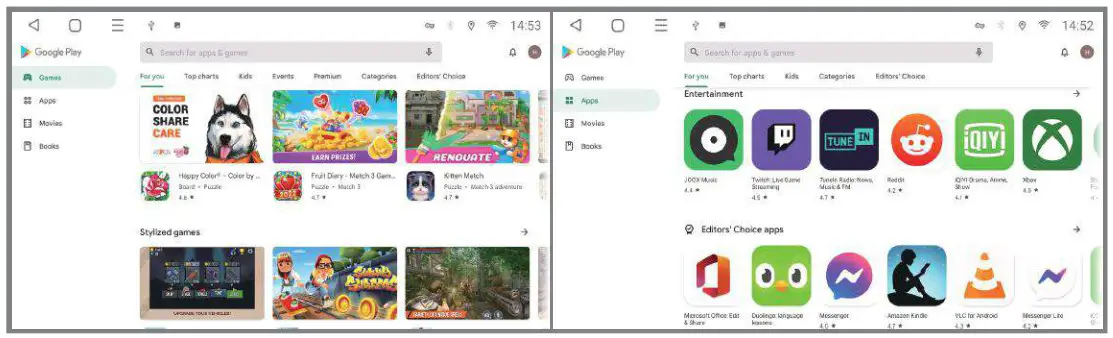
It is the official application store for devices running the Android operating system, allowing users to browse, download applications. It is also a digital media store for the Android operating system. It contains services including Books, Games, Movies etc..
AUX
Connect your front view or right view to our CVBS in port. Then click AUX to display the image on the screen. If no other device is connected, turn on AUX and it will show no video signal.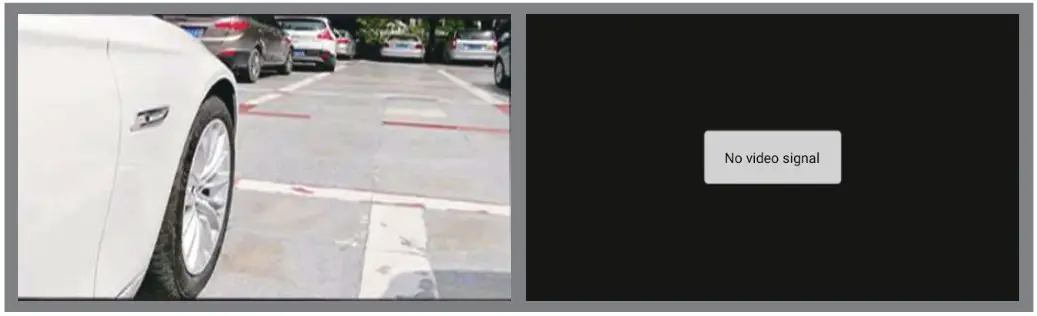
APK installer
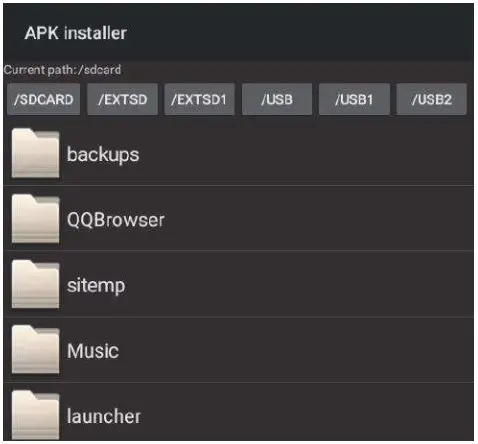
APK installer is an APP specially used for application installation, supporting multiple device types operation.
Installation steps:
- Download the APPs to the U disk and connect the U disk to the device.
- Open ‘APK Installer’.
- Select the directory [USBO/USB1/USB2] to switch the USB port.
- Find the applications and click Install.
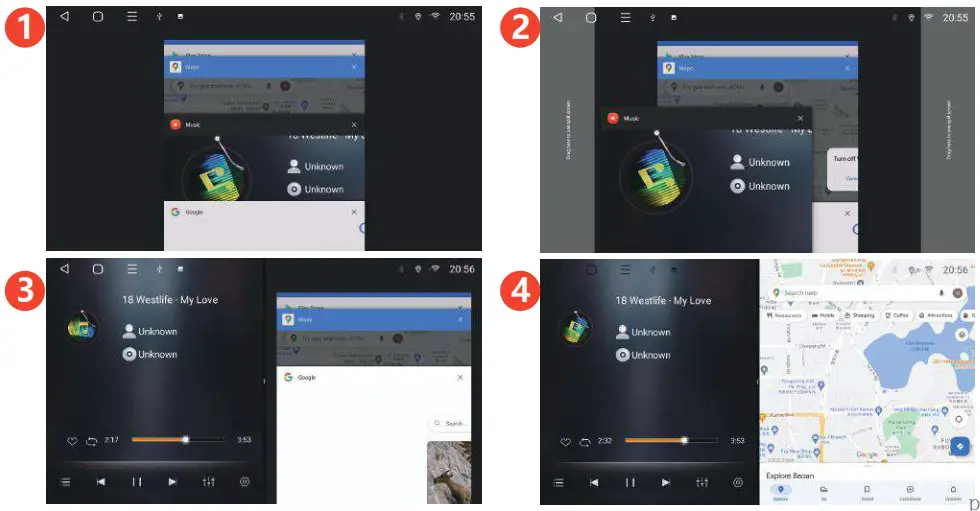
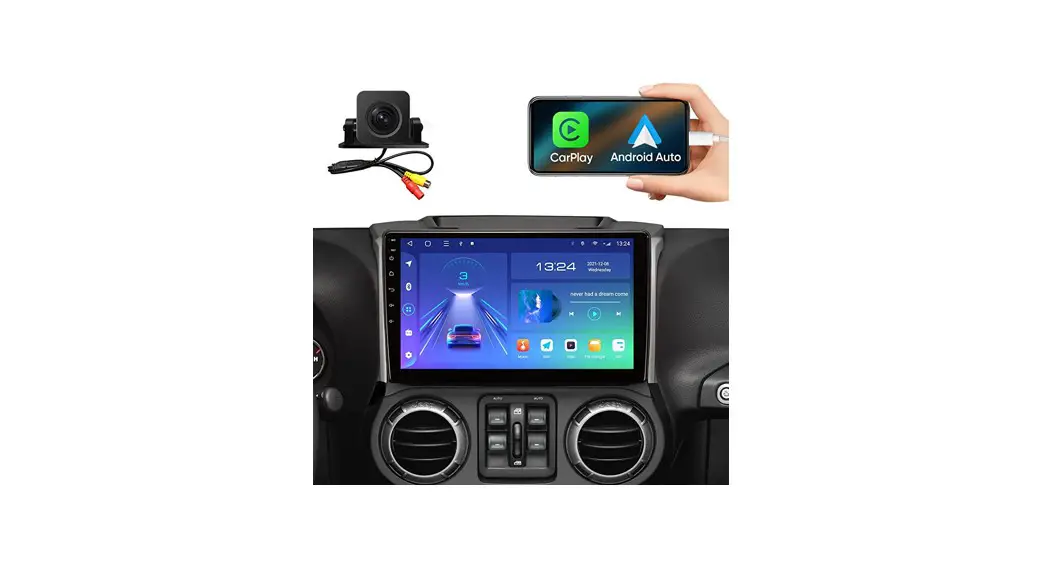
Split screen display
Click ![]() to enter the running application interface, long press and drag the application to both sides of the screen.
to enter the running application interface, long press and drag the application to both sides of the screen.