Mammotome MEP10 Elite Biopsy Device User Guide
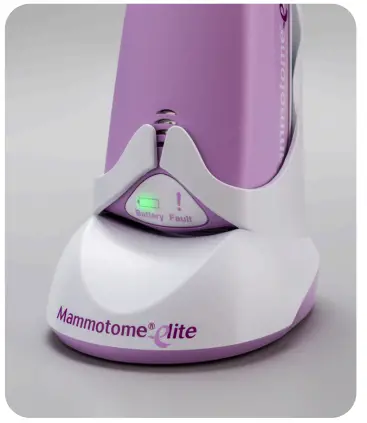
Charging the Holster
After cleaning and disinfecting, place the holster into the charging base. The holster will emit a two-tone beep to indicate correct placement into the base.
Holster On Charger
![]() SOLID = Battery is fully charged.
SOLID = Battery is fully charged.![]() FLASH = Battery is charging.
FLASH = Battery is charging.![]() FLASH = Battery is charging. Holster must remain on charging base.
FLASH = Battery is charging. Holster must remain on charging base.
Holster Not On Charger
![]() SOLID = Sufficient charge available to complete one or more procedure(s).
SOLID = Sufficient charge available to complete one or more procedure(s).![]() FLASH = Sufficient charge available to complete one procedure.
FLASH = Sufficient charge available to complete one procedure.![]() SOLID = Insufficient charge. Return holster to charging base.
SOLID = Insufficient charge. Return holster to charging base.
When charging, set the holster on top of this guide for quick, easy reference.
Troubleshooting
![]()
- Ensure the probe is outside the patient.
- Disassemble the probe from the holster and replace it with a new probe.
- If the indicator light does not turn off, contact Mammotome Technical Support.
If the battery indicator light is not illuminated after probe loading:
![]()
- Check the battery indicator to ensure there is sufficient charge.
- Ensure the alignment and locking tabs are securely in place.
- Ensure it is the initial use of the probe.
- Replace the probe with a new probe.
- If the indicator light does not turn on, contact Mammotome Technical Support.
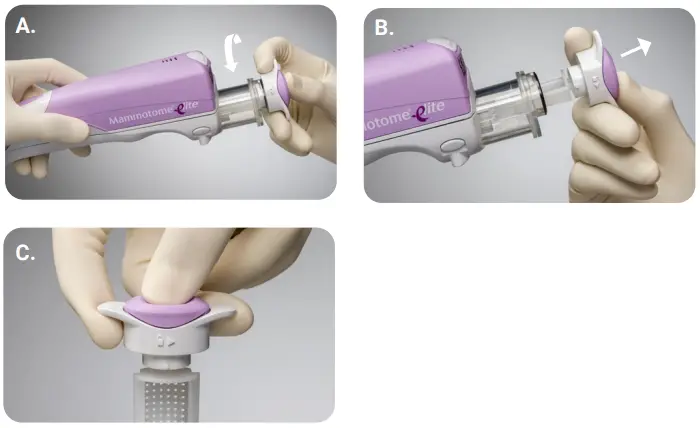
Loading the Probe
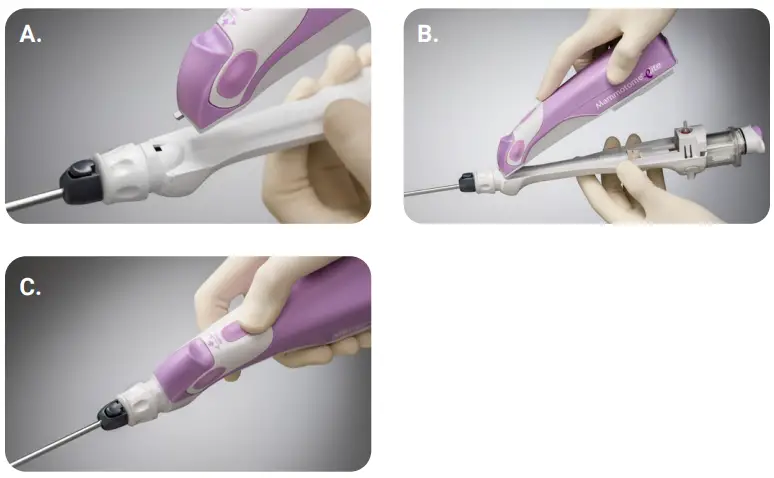
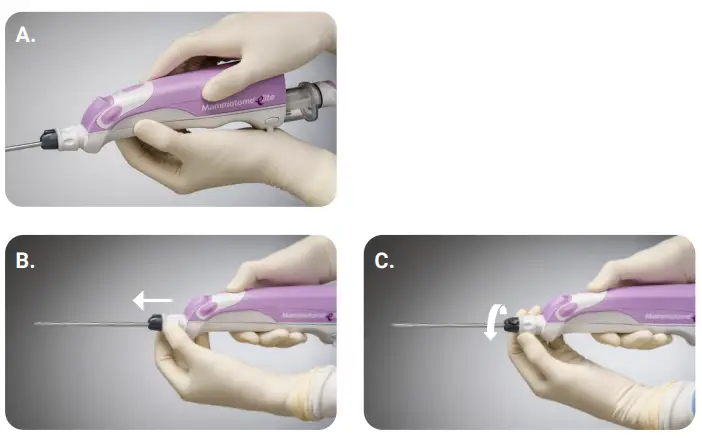
Step 1
Grasp the probe body and align the alignment tab with the holster notch (A). Push the probe base into the holster while maintaining the alignment (B).
Step 2
Push the probe body firmly into the holster until a click is heard, indicating the locking tabs have engaged the holster (C).
Note: Automatic initialization will begin
If the holster is left undisturbed for 10 minutes after loading a probe, the holster will enter a sleep mode to conserve battery charge. During sleep mode, the biopsy and battery indicator lights will turn off and the buttons will be inactive. Once the holster is moved, the device will wake from sleep mode. Any time the holster is motionless for one hour with or without a probe attached, the holster will go into a deep sleep mode.
Place the holster into the charging base without the probe and remove from the charging base to turn the holster back on.
Priming the Probe
Interrupting the Biopsy Cycle
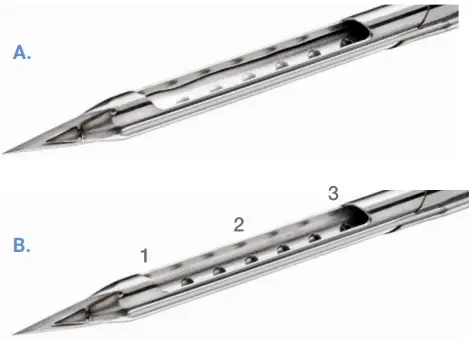
Interrupt a biopsy cycle (as described below) leaving the aperture exposed (A). Use a sterile syringe to insert 0.5cc of saline into the needle aperture (approximately 7-10 drops). Press the active biopsy button to advance the cutter.
Push the active biopsy button once to initiate the biopsy cycle. To interrupt the biopsy cycle, push the active biopsy button again when the cutter is retracting from position 1 to 3 (B) or when the cutter is advancing from position 3 to 2. The cutter will retract to position 3, and the biopsy indicator light will flash orange. Complete the cycle by pushing the active biopsy button.
Ensure the probe is attached to the holster. Press and hold the two inactive biopsy buttons simultaneously for three seconds.
There will be an audible indicator and all three indicator lights will flash green (A).
Press and release the desired active biopsy button. The active biopsy button is stored in the device for future use (B).
Tissue Sampling Procedure
Introduce the probe through the incision and position the probe tip in the target area with the tip past the lesion. Imaging guidance should be used as appropriate. Push the active biopsy button on the holster once to acquire a tissue sample. The biopsy cycle proceeds: a vacuum is created, the inner cutter of the probe is retracted, tissue is drawn into the aperture, and the cutter rotates and translates forward, cutting tissue (A).
When the cutter reaches the distal end of the aperture, the vacuum will transport the sample to the specimen collection cup.
Needle Rotation (optional)
Pull the needle rotation knob out (B). Then rotate to desired clock position and release (C).
Removing the Probe from the Coaxial Cannula
Disconnect the integrated coaxial cannula and remove the probe by pressing the coaxial release button, leaving the cannula in place.
Post Sampling Instructions
Step 1
Rotate the specimen collection cap counterclockwise 1/4 turn (A).
Step 2
Remove the cap and tissue basket together (B).
Step 3
Press the tissue basket release button to remove the tissue basket from the specimen collection cap for ease of transport to pathology (C).
Note: Sterile forceps may be used to aid in removing the samples from the tissue basket, if needed.
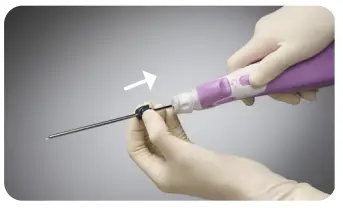
Removing the Probe from the Holster
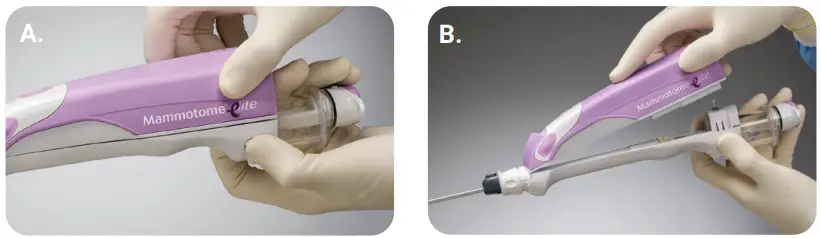
While pressing down on the probe’s locking tabs, pull the probe out of the holster cavity (A). Dispose of the probe in accordance with the institution’s policy for infectious waste disposal (B).
Product Codes
| Code | Description | Qty |
| MEH1 | Mammotome® Elite Holster (includes charger base and power cord) | 1 |
| MEP10 | 10G Mammotome® Elite Ultrasound Probe | 5 |
| MEP13 | 13G Mammotome® Elite Ultrasound Probe | 5 |
| MEI10 | 10G Mammotome® Elite Introducer Stylet | 5 |
| MEI13 | 13G Mammotome® Elite Introducer Stylet | 5 |
Technical Specifications
| Attribute | MEP10 | MEP13 |
| Needle Length (w/o coaxial cannula) | 136mm | 136mm |
| Needle Length (w/ coaxial cannula) | 122mm | 122mm |
| Needle Diameter | 3.5mm | 2.6mm |
| Aperture Length | 19.1mm | 18.4mm |
| Dead Space | 10.0mm | 10.4mm |
| Tip to Center | 19.6mm | 19.6mm |
Technical Support
 For technical support contact us via phone at 1-877-926-2666 (option 3) or by email at [email protected].
Order Placement
![]() Contact your Customer Service Representative at 1-877-926-2666 between the hours of 8:00am and 5:00pm EST. Shipping details and an order confirmation number will be provided to you upon completion of your order.
Contact your Customer Service Representative at 1-877-926-2666 between the hours of 8:00am and 5:00pm EST. Shipping details and an order confirmation number will be provided to you upon completion of your order.
 Send your order via fax to your Customer Service Representative at 1 888-260-6362.
 Send your order via email to your Customer Service Representative at [email protected].
For complete product details, see Instructions for Use.
Product may not be approved or available in your region. Please check with your local Mammotome representative.
© 2022 Devicor Medical Products, Inc. All rights reserved. Devicor, Mammotome and Mammotome Elite are registered trademarks of Devicor Medical Products, Inc., in the USA and optionally in other countries. Other logos, product and/or company names might be trademarks of their respective owners. MDM# 12-0041 Rev 9/22


