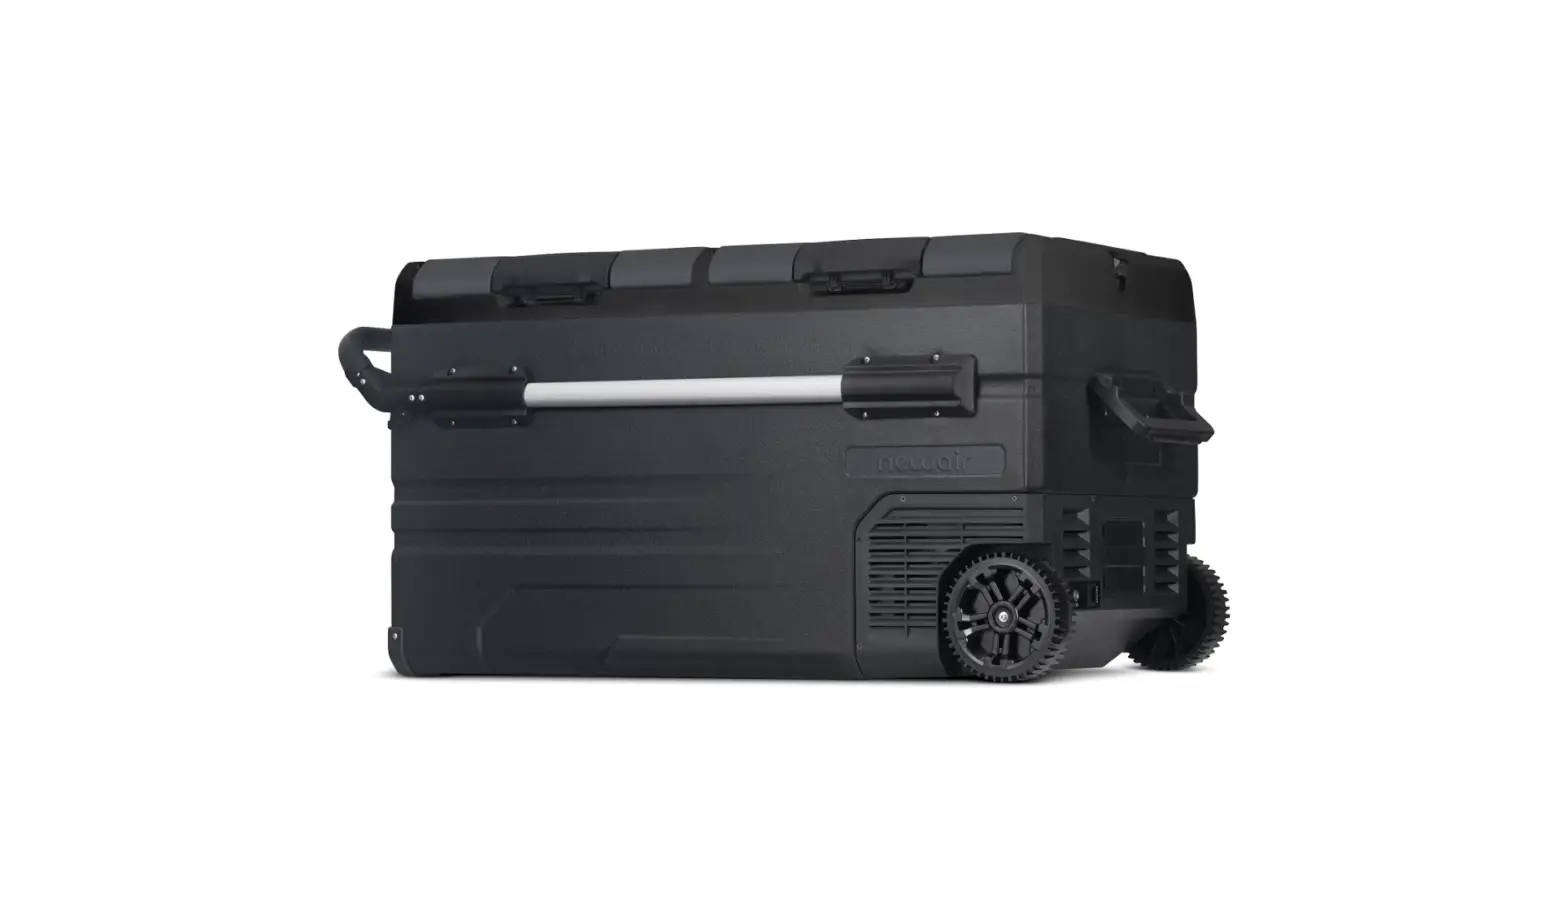
newair NPR122GA00 Portable 115 Quart Car Fridge and Freezer Owner’s Manual
A Name You Can Trust
Trust should be earned and we will earn yours. Customer happiness is the focus of our business.
From the factory to the warehouse, from the sales floor to your home, the whole Newair family promises to provide you with innovative products, exceptional service, and support when you need it the most.
Count on Newair
As a proud Newair owner, welcome to our family. There are no robots here, real people shipped your product and real people are here to help you.
Contact Us
Please reach out to our customer service team before making a return to your store of purchase. We are happy to help with any questions or concerns!
Mon-Fri from 8-4 PST at:
Call: 1-855-963-9247
Email: [email protected]
Online: www.newair.com
A team member will respond to you within 24 hours.
Follow Us
![]() Facebook.com/newairusa
Facebook.com/newairusa![]() Instagram.com/newairusa
Instagram.com/newairusa![]() YouTube.com/newairusa
YouTube.com/newairusa![]() Twitter.com/newairusa
Twitter.com/newairusa
SPECIFICATIONS
| MODEL NO. | NPR122GA00 |
| RATED VOLTAGE: | DC 12V/ 24V, AC100 – 240V, Solar (12 ~ 50V) |
| USB PORT VOLTAGE: | 5V/1Amp |
| POWER CONSUMPTION: | 80W |
| SOLAR PANEL INPUT: | DC5521 Connector |
| NET STORAGE CAPACITY: | 115Qt/109L |
| NOISE LEVEL: | 45dB |
| TEMPERATURE RANGE: | -20°C ~ 20°C (-4°F ~ 68°F) |
| NET WEIGHT: | 64Ib |
| UNIT SIZE (W X D X H): | 40” x 22” x 21” |
REGISTER YOUR PRODUCT ONLINE
Register Your Newair Product Online Today!
Take advantage of all the benefits product registration has to offer:
 Service and Support
Diagnose troubleshooting and service issues faster and more accurately
 Recall Notifications
Stay up to date for safety, system updates and recall notifications
 Special Promotions
Opt-in for Newair promotions and offers
Registering your product information online is safe & secure and takes less than 2 minutes to complete:
Alternatively, we recommend you attach a copy of your sales receipt below and record the following information, located on the manufacturer’s nameplate on the rear of the unit. You will need this information if it becomes necessary to contact the manufacturer for service inquiries.
Date of Purchase: ___________________________________________
Serial Number: ____________________________________________
Model Number: ____________________________________________
SAFETY INFORMATION & WARNINGS
![]() WARNING! Failure to obey these warnings could result in malfunction of your device and possible Injury for yourself and other users.
WARNING! Failure to obey these warnings could result in malfunction of your device and possible Injury for yourself and other users.
- Do not operate the car fridge and freezer if it is visibly damaged.
- Do not block the gaps of the car fridge and freezer with things like pin, wire, etc.
- Do not expose the car fridge and freezer to rain or soak it in water.
- Do not place the car fridge and freezer near naked flames or other heat sources (heaters, direct sunlight, gas ovens etc.)
- Do not store explosive substances like spray cans with flammable propellants in the car fridge and freezer.
- Before starting the car fridge and freezer, ensure that the power supply line and the plug are dry.
- Check if the voltage specification on the type plate matches that of the energy supply.
- Once unpacked and before turning on, the car fridge and freezer must be placed on a level surface for more than 6 hours.
- Make sure that the car fridge and freezer stays horizontally when it is running. The tilt angle must be less than 5o for long time running and be less than 45o for short time running.
- The refrigerator must be well ventilated for heat dissipation and make sure to keep some space around it (Back Space≥200mm, Side Space≥100mm.)
- The car fridge and freezer may only be repaired by qualified personnel.
Improper repairs can lead to safety hazards. I f the power cable is damaged, it must be replaced by the manufacturer, customer service or a similarly qualified person in order to prevent safety hazards.
![]() NOTICE!
NOTICE!
- The car fridge and freezer can be used by children aged 8 or over, as well as by persons with reduced physical, sensory or mental capabilities or a lack of experience and/or knowledge, providing they are supervised or have been taught how to use the car fridge and freezer safely and are aware of the resulting risks.
- Children must be supervised to ensure that they do not play with the car fridge and freezer.
- The installation of DC power in the boat must be handled by qualified electricians.
- Never pull the plug out of the socket by the cable.
- Disconnect the car fridge and freezer or switch it off when you turn off the engine. Otherwise, you may discharge the battery.
![]() CAUTION!
CAUTION!
- Food may only be stored in its original packaging or in suitable containers.
- Set suitable temperature for the food or medicine stored in the car fridge and freezer.
- Do not tum the car fridge and freezer upside down for drainage, remove the cover and drain from the hole at the bottom of the car fridge and freezer.
PARTS LIST
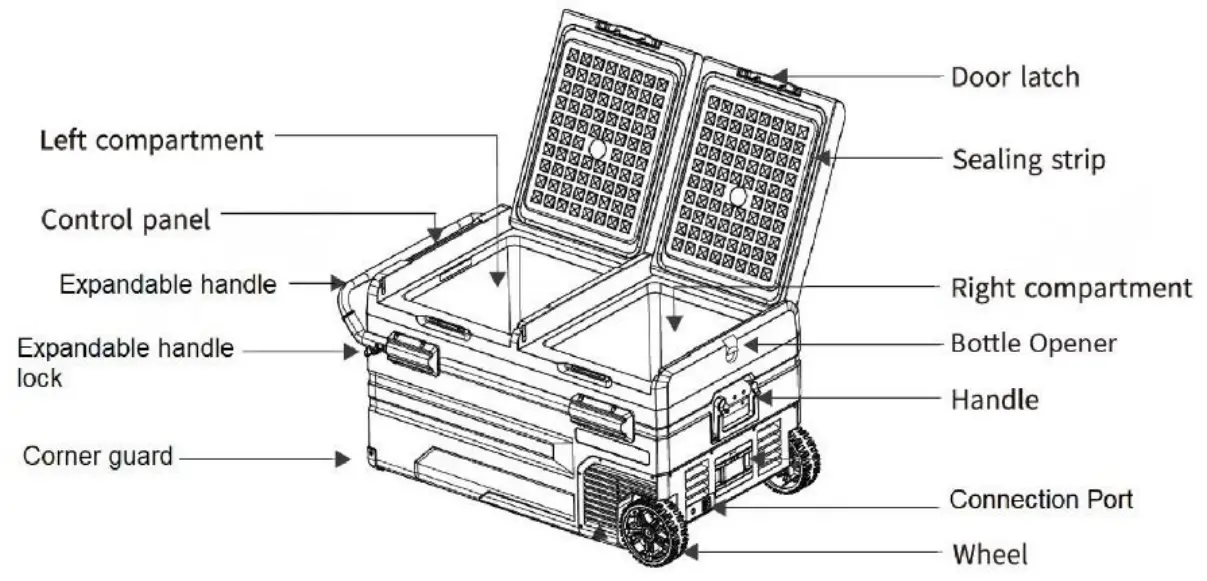
- DC compressor.
- Control panel with LCD digital display for temperature setting.
- Dual compartments with individual temperature control.
- Removeable wire storage baskets
- Interior drain plug
- Off-road wheels
- Expandable handle
- Reversible door
- Detachable battery port
- Charging port
- Bottle Opener
NOTE:
Press the rod buttons on both sides of the telescoping handle at the same time to pull the rod.
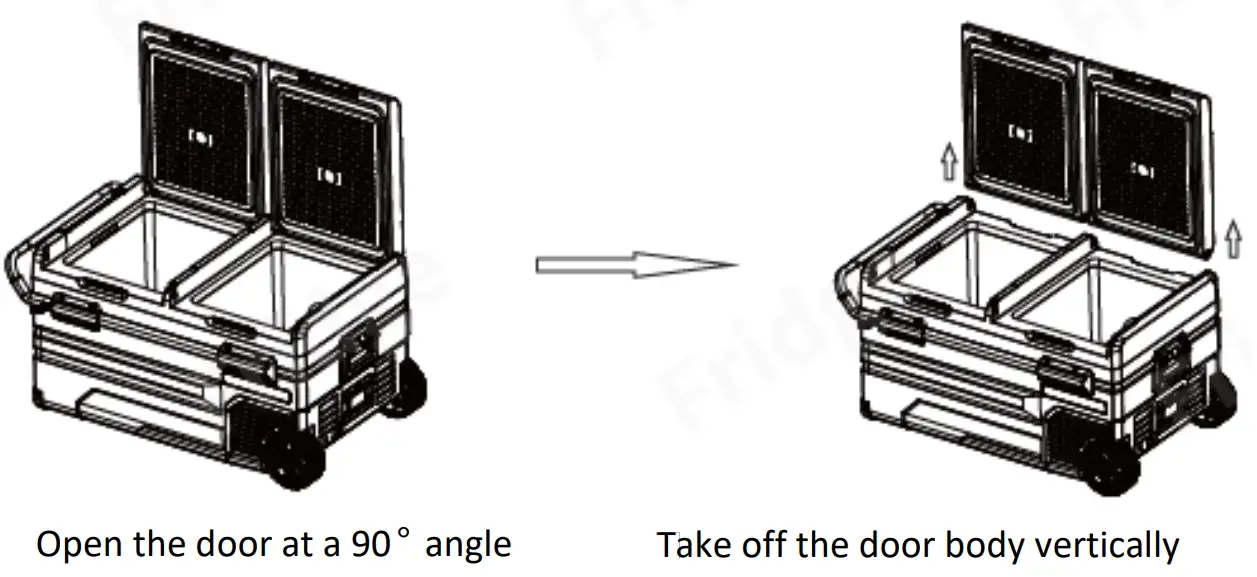
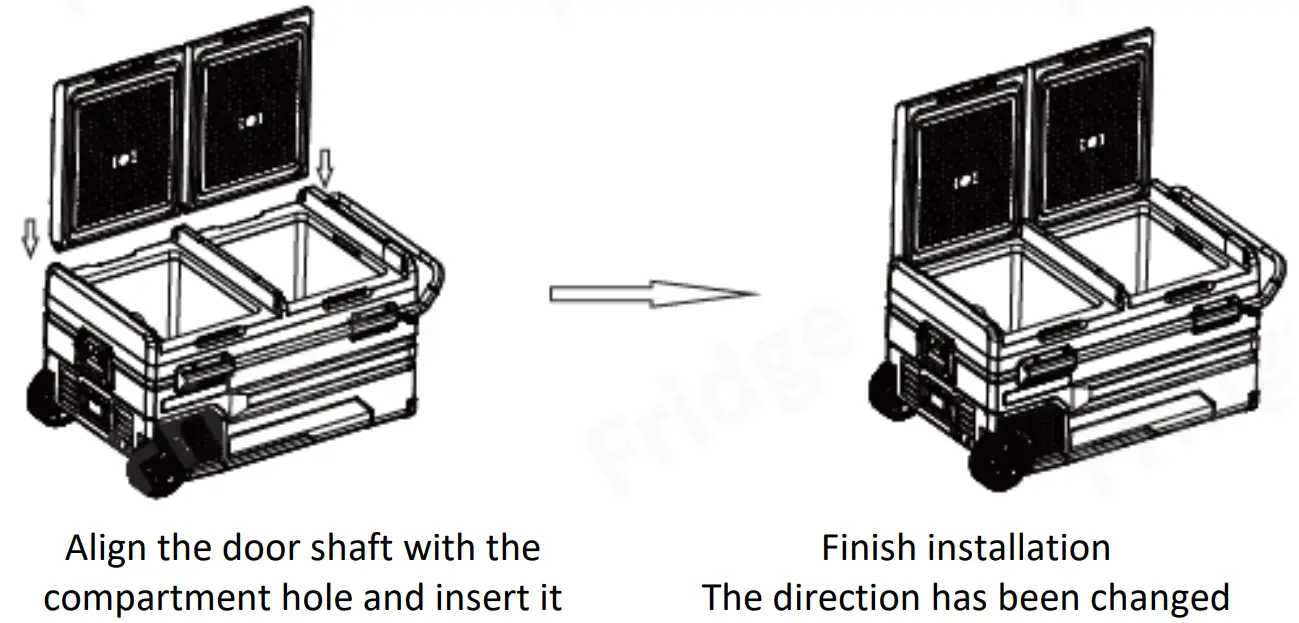
REVERSING DOOR INSTRUCTIONS
The door opening direction can be changed, please follow the instructions below:
Door Disassembly:
Door Installation
OPERATING INSTRUCTIONS
Power supply: Connect to 12V/24V DC power, 100~240V AC power (using the adapter) or solar (12V~50V).
Display Screen Initialization: When the fridge is connected to the power supply, the buzzer will make a long beep, and the display will be on for two seconds then enter the normal operating mode.
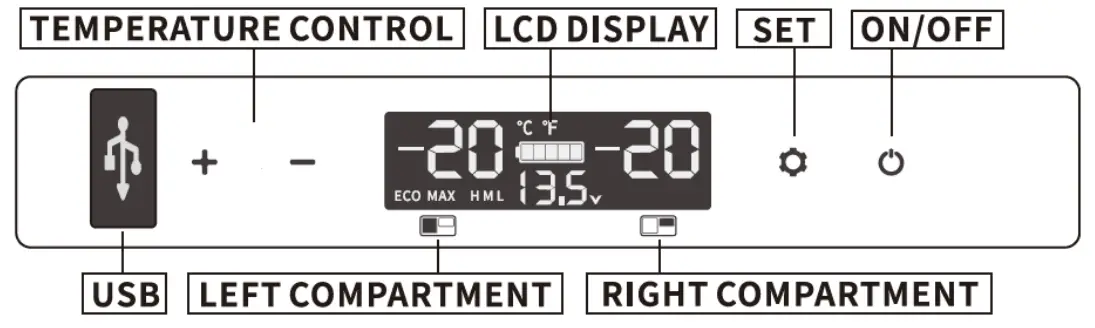
Power On/Off: Press ![]() to switch ON and hold for three seconds to switch OFF.
to switch ON and hold for three seconds to switch OFF.
Temperature Setting: Press + and ![]() at the same time for three seconds to switch ON/OFF the left compartment, press – and
at the same time for three seconds to switch ON/OFF the left compartment, press – and ![]() at the same time for three seconds to switch ON/ OFF the right compartment, two compartments cannot be switched off at the same time.
at the same time for three seconds to switch ON/ OFF the right compartment, two compartments cannot be switched off at the same time.
When both left and right compartments are set in running state, press + or – to enter left compartment temperature setting. Press + to increase temperature, press – to decrease temperature, and press ![]() to switch left/right compartment. The setting will be saved after stop operating for four seconds
to switch left/right compartment. The setting will be saved after stop operating for four seconds
(Note: the temperature displayed is the current temperature of the compartments, it’ll take a while to reach the set temperature.) Temperature setting range: -20 ~ 20oC (-4 ~ 68o F)
Cooling Mode: Press ![]() to switch MAX (fast cooling) and ECO (Energy saving Mode) (*Factory setting is MAX.)
to switch MAX (fast cooling) and ECO (Energy saving Mode) (*Factory setting is MAX.)![]()
Temperature Unit Setting: Switch off the fridge, press ![]() for three seconds until E1 displays, then switch to E5 by pressing
for three seconds until E1 displays, then switch to E5 by pressing ![]() again. Under E5 mode, press + or – to select Celsius or Fahrenheit. (*Factory setting is Celsius.)
again. Under E5 mode, press + or – to select Celsius or Fahrenheit. (*Factory setting is Celsius.)![]()
Battery Protection Mode: Press ![]() for three seconds until screen flashes, then press 0 again to select protection mode H(High), M(Middle) and L(Low) (*Factory setting is H.) H should be set when the product is connected to car power, and M or L should be set when it is connected to a portable battery or other back-up battery.
for three seconds until screen flashes, then press 0 again to select protection mode H(High), M(Middle) and L(Low) (*Factory setting is H.) H should be set when the product is connected to car power, and M or L should be set when it is connected to a portable battery or other back-up battery.![]()
Due to the different output voltages between vehicles, H should be set when the product is connected to car power, and M or L should be set when it is connected to a portable battery or other back-up battery.
The battery gear should be set from H to M or from M to L if there is a voltage protection code F1 shown on the panel. The battery gear should be set to H if the product keeps working after turning off the car engine, or the product may drain the battery.
VOLTAGE REFERENCE
| Mode | Input | DC 12V | DC 24V | ||
| CUT IN | CUT OUT | CUT IN | CUT OUT | ||
| L | 9.0V | 10.9V | 21.3V | 22.7V | |
| M | 10.1V | 11.4V | 22.3V | 23.7V | |
| H | 11.1V | 12.4V | 24.3V | 25.7V | |
*USB output: +5V DC/1A, suitable for small devices like mobile phones, tablets, etc.
Reset: switch off the fridge, press ![]() until E1 displays, under E1 mode, press + – at the same time until the display looks as follows:
until E1 displays, under E1 mode, press + – at the same time until the display looks as follows:
Instructions for solar charging: When using solar panel to charge the refrigerator, place the refrigerator in a cool place to avoid overheating that would cause malfunction of the refrigerator. The battery icon on the display will show the charging status when it is charging.
The charging input power should be higher than the working power of the refrigerator (about 40-45W), or press the power button to make the refrigerator enter the standby state, otherwise the battery will not be able to charge. It is recommended to use a 100W solar panel
Solar panel (SOLAR) charge connection:
Insert the solar charge cable into the refrigerator’s “SOLAR” terminal.
Max Solar Input Volt age: 50V
Max Solar Input Current: 10A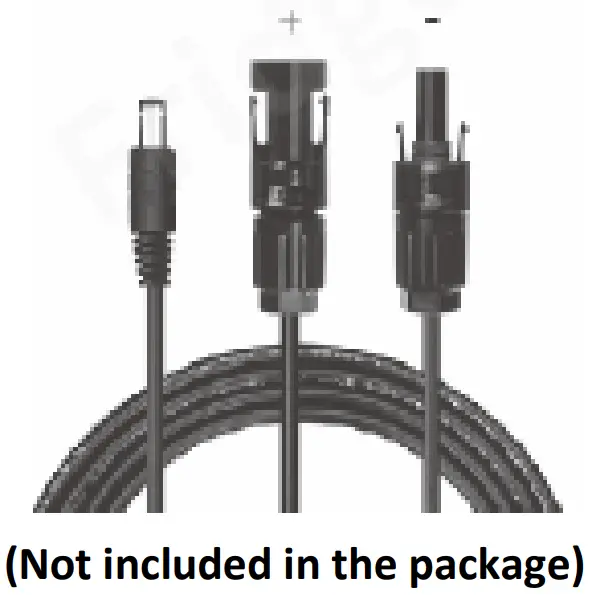
Instructions for in-vehicle use:
Engine start: select H, M or L mode (refer to the “Operating Instructions” section), and use car port power to operate the refrigerator.
Instructions for preserving your car battery: When using the car battery to charge, most cars will stop power supply after the engine is turned off, while some cars will continue to supply power. At this time, the battery protection should be adjusted to H, otherwise the car battery may be exhausted, resulting in insufficient power to start the car.
CLEANING & STORAGE
CLEANING
- Unplug the car fridge and freezer first to avoid electric shock.
- Use wet cloth to clean the car fridge and freezer and dry it.
- Remove the cover and drain from the hole at the bottom of the car fridge and freezer.
- Do not soak the car fridge and freezer in water and do not wash it directly.
- Do not use abrasive cleaning agents as these can damage the car fridge and freezer.
STORAGE
If the car fridge and freezer will not be in use for a long time, please follow the steps:
- Turn off the power and remove the plug.
- Remove all the items stored in the car fridge and freezer.
- Remove the cover and drain from the hole, wipe off excess water with a soft rag.
- Put the car fridge and freezer in a cool and dry place.
- Leave the lid slightly open to prevent odors from forming.
DEFROSTING
Humidity can form frost in the interior of the cooling device or on the evaporator. This reduces the cooling capacity. Defrost the car fridge and freezer in good time to avoid this.
- Switch off the car fridge and freezer.
- Take out the contents of the car fridge and freezer.
- Remove the cover and drain from the hole.
- Keep the lid open.
- Wi pe off the defrosted water.
Never use hard or sharp tools to remove ice or to loosen objects which have frozen in place.
DISPOSAL
Place the packaging material in the appropriate recycling waste bins wherever possible.
 If you wish to finally dispose of the product, ask your local recycling center or specialist dealer for details about how to do this in accordance with the applicable disposal regulations.
TROUBLESHOOTING
| Problem | Solution |
| Refrigerator does not work | Check if the switch is on. |
| Check if the plug and socket are connected well. | |
| Check if the fuse has been burnt. | |
| Check if the power supply is malfunctioned. | |
| Switching on/off the fridge frequently may cause start delay of the compressor. | |
| Refrigerator compartments are too warm | The door is opened frequently. |
| A large amount of warm or hot food was stored recently. Wait for the refrigerator to reach its selected temperature. | |
| The refrigerator has been disconnected for a period of time. | |
| Food is frozen | The temperature was set too low, please increase the temperature. |
| There is a “water flow” noise from inside the fridge | It’s a normal phenomenon, caused by the flow of refrigerant. |
| There are waterdrops around the refrigerator casing or door gap | It’ s a normal phenomenon, the moisture will condense to water when it touches a cold surface of the refrigerator. |
| The compressor is slightly noisy when starting | It’ s a normal phenomenon the noise will be reduced after the compressor works stably. |
| Code F1 displayed | Possible cause: low voltage to fridge. Adjust the battery protection from H to M or from M to L. |
| Code F2 displayed | Possible cause: condenser fan is overloaded. Disconnect power to fridge for 30 minutes& re-start. |
| Code F3 displayed | Possible cause: the compressor starts too frequently. Disconnect power to fridge for 30 minutes& re-start. |
| Code F4 displayed | Possible cause: compressor not kicking in. Disconnect power to fridge for 30 minutes & re-start. |
| Code F5 displayed | Possible cause: overheating of the compressor & electronics. Disconnect power to fridge for 30 minutes & re-start. |
| Code F6 displayed | Possible cause: no parameter can be detected by the controller. Disconnect power to fridge for 30 minutes & re-start. |
| Code F7 or F8 displayed | Possible cause: temperature sensor is faulty. Contact manufacturer for service. |
LIMITED MANUFACTURER’S WARRANTY
This appliance is covered by a limited manufacturer’s warranty. For one year from the original date of purchase, the manufacturer will repair or replace any parts of this appliance that prove to be defective in materials and workmanship, provided the appliance has been used under normal operating conditions as intended by the manufacturer.
Warranty Terms:
During the first year, any components of this appliance found to be defective due to materials or workmanship will be repaired or replaced, at the manufacturer’s discretion, at no charge to the original purchaser. The purchaser will be responsible for any removal or transportation costs.
Warranty Exclusions:
The warranty will not apply if damage is caused by any of the following:
- Power failure
- Damage in transit or when moving the appliance
- Improper power supply such as low voltage, defective household wiring or inadequate fuses
- Accident, alteration, misuse or abuse of the appliance such as using non-approved accessories, inadequate air circulation in the room or abnormal operating conditions (extreme temperatures)
- Use in commercial or industrial applications
- Fire, water damage, theft, war, riot, hostility or acts of God such as hurricanes, floods, etc.
- Use of force or damage caused by external influences
- Partially or completely dismantled appliances
- Excess wear and tear by the user
Obtaining Service:
When making a warranty claim, please have the original bill of purchase with the purchase date available. Once confirmed that your appliance is eligible for warranty service, all repairs will be performed by a Newair™ authorized repair facility. The purchaser will be responsible for any removal or transportation costs. Replacement parts and/or units will be new, re-manufactured or refurbished and is subject to the manufacturer’s discretion. For technical support and warranty service, please email [email protected].


