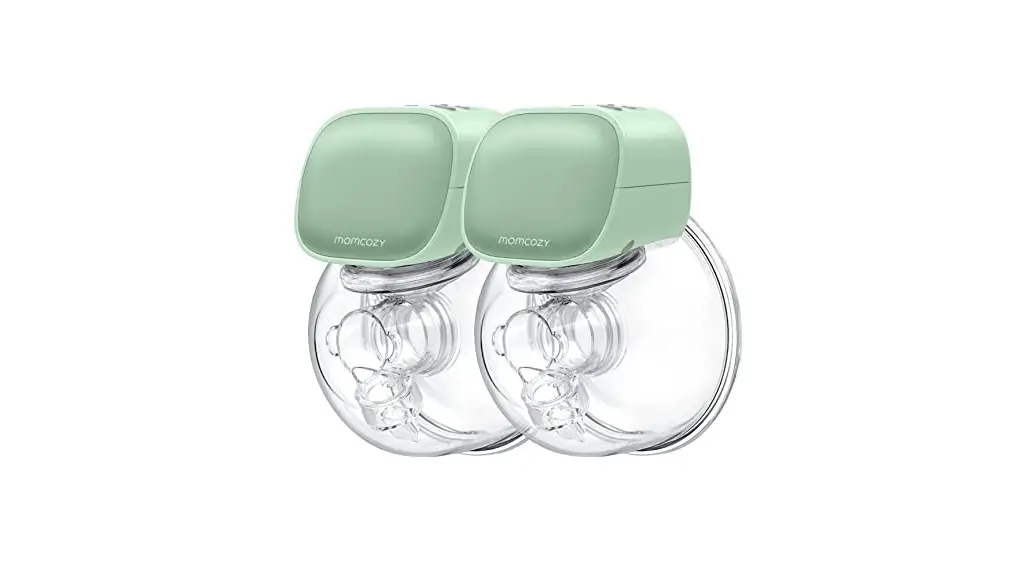
![]() S9 Double Wearable Breast Pump
S9 Double Wearable Breast Pump
User Manual
OVERVIEW
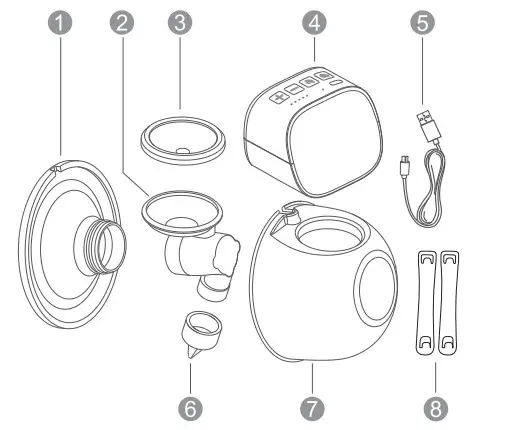
Parts list
| Silicone Flange | Linker |
| Silicone Diaphragm | Pump Motor |
| USB cable | Silicone Valve |
| Milk Collector | Bra Adjustment Buckle |
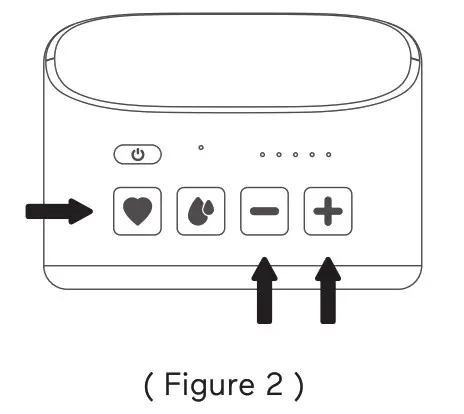
CONTROL PANEL
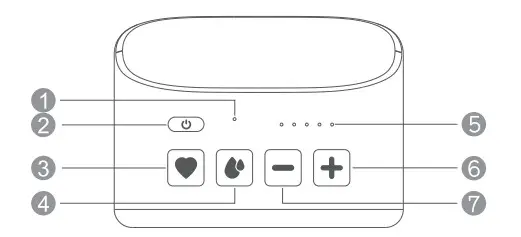
| Battery Indicator | Power On / Off Button |
| Massage Mode Button | Expression Mode Button |
| Level Indicator | Increase Intensity |
| Decrease Intensity |
Note
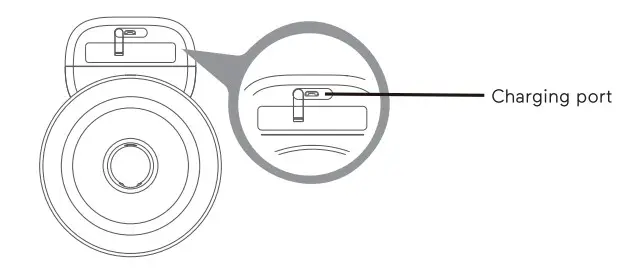
This product has a built-in lithium battery. When the battery indicator flashes in red, we recommend that you use a certified 5V![]() 1A adapter to charge the battery as soon as possible.
1A adapter to charge the battery as soon as possible.
CLEANING AND STERILIZING
- For the first time and before each use, you must disassemble, wash and sterilize all the breast pump parts that come into contact with breast milk.
- Never wash or sterilize the pump motor, this component does not come into contact with your breast milk. You can wipe this part clean with a soft cloth.
- Please use hot water/steam/sterilization pot for sterilization, temperature shall not exceed 100 ° C.
- Drinking water is recommended to use for cleaning.
- Take care when cleaning the valve and silicone diaphragm, if it gets damaged, your breast pump will not function properly.
- To clean the valve, tub it gently between your fingers in warm soapy water.
- Do not insert objects as this may cause damage.
ASSEMBLING
To assemble the electric breast pump, follow the steps below.
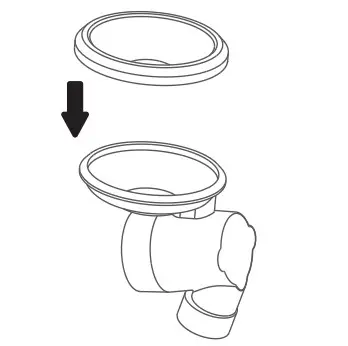
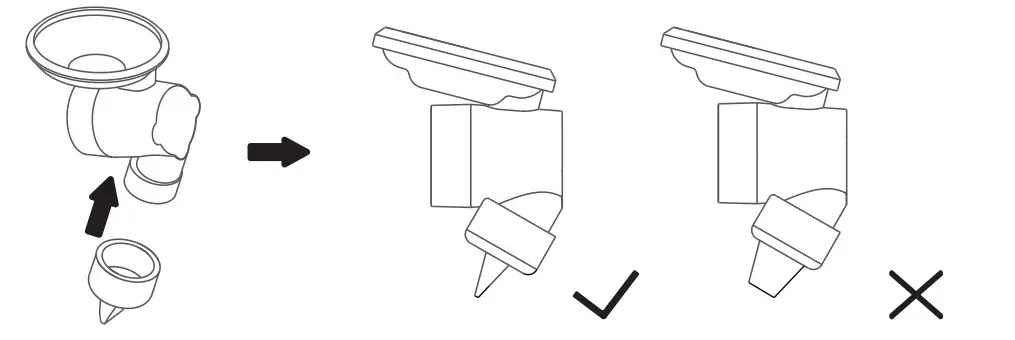
- Put the Silicone Diaphragm into the linker and press it with your hands to make the edges fasten tightly to ensure a perfect seal.

- Install the valve into the bottom of the linker, and make sure it is installed in the correct direction.

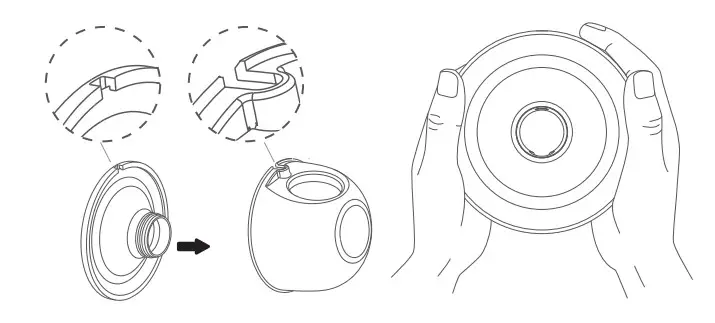
- Put the assembled linker into the Milk Collector, with the “ear part of the Linker aligned with the internal slot of the Milk Collector, and press the Linker disc part with both hands to fasten the edges firmly to ensure complete sealing.

- Install the Silicone Flange on the Milk Collector, align the deflector on the Silicone Flange with the deflector on the Milk Collector, and press the edges with both hands to ensure that it fits nicely.

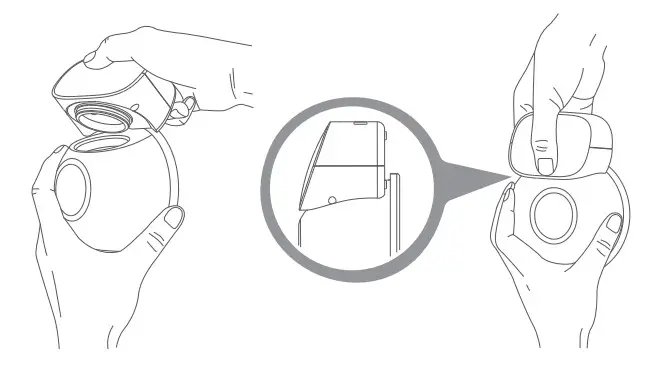
- Press the Pump Motor onto the Milk Collector to ensure that it fits perfectly.

- Unplug the dust plug and connect the USB charging cable to charge the battery.

USING THE ELECTRIC BREAST PUMP
![]() To begin pumping
To begin pumping
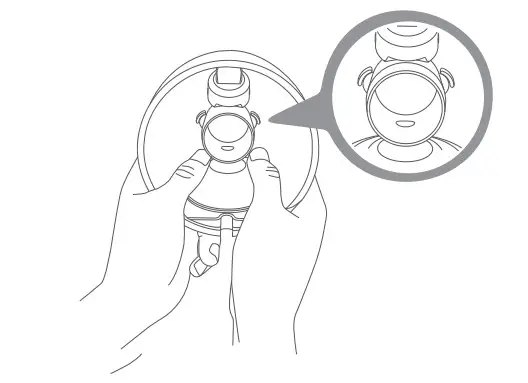
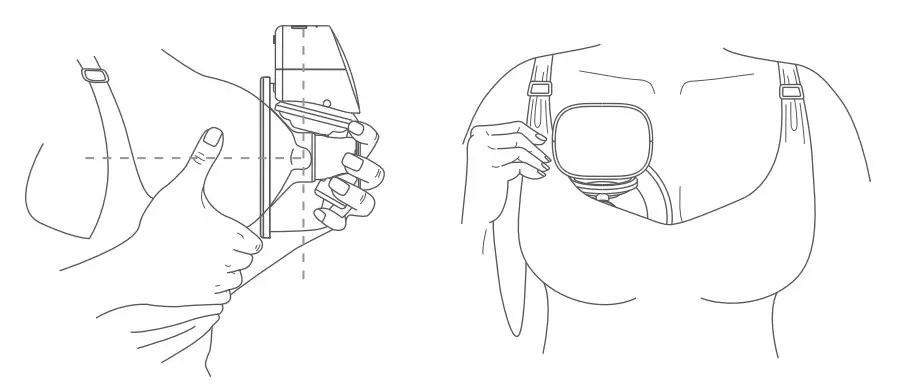
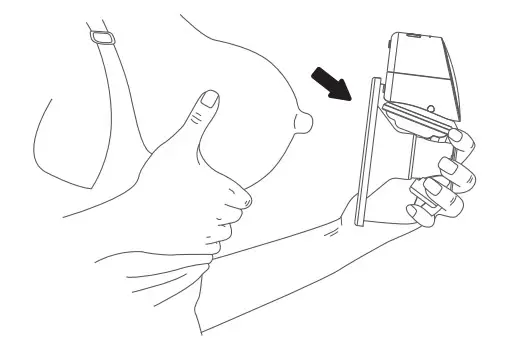
- Press the silicone Flange firmly against the breast, leave no gaps and make sure your nipples are centered. Keep it upright. Be careful not to distort the position of the product and the chest, otherwise, the breast pump will not have suction.

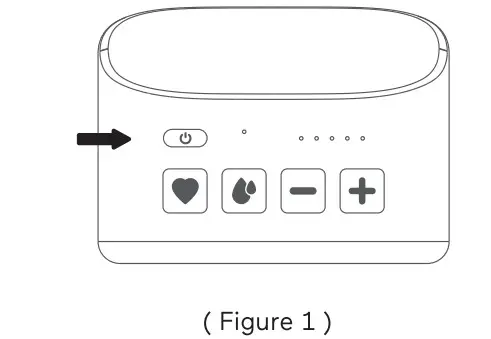
- Press the power on/off button to start the breast pump. (Figure 1)

- You can press the”
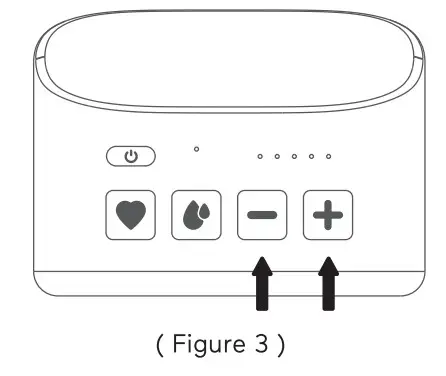
 “Button to select the Massage Mode. There are 5 levels in this mode indicated by the level indicator lights. You can choose the Suction that makes you comfortable by pressing the “+” and “–” button. In the early postpartum period, the milk duct is not easy to conduct, this mode can be used to stimulate the breast and effectively promote breast milk secretion.
- You can press the”
 ” button to select the breast Expression Mode Button. There are 5 levels in this mode indicated by the level indicator lights. You can select the suction that is comfortable for you by pressing the “#” and “=” buttons lightly. In the early postpartum period, a woman is prone to breast discomfort, such as swelling, lumps, etc, this mode can alleviate breast problems.
- When you have finished expressing, press the power button to switch off the breast pump and carefully remove the pump body from your breast.

SUCTION AT SITTING POSITION
Relax the body, sit on a comfortable chair and lean slightly forward (use the cushion for back support). Make sure to keep the breast pump and Milk Collector upright. 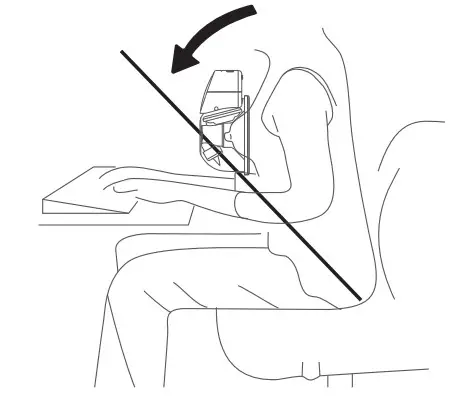
BRA ADJUSTMENT BUCKLE
Adjusting the length of bra straps will make suction more comfortable.
One end of the Bra Adjustment Buckle hung on the inside buckle of the nursing bra. The length of the bra strap can be adjusted by changing the nursing bra buckle on the other end of the Bra Adjustment Buckle. 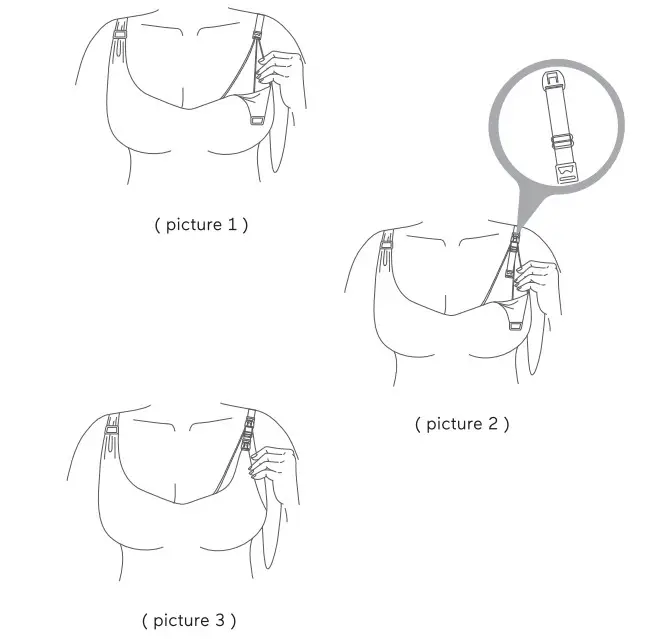
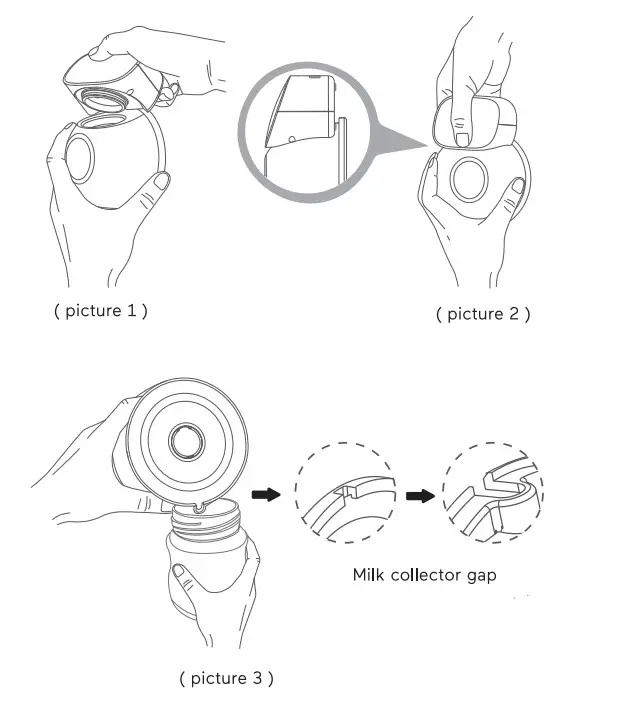
POURING MILK
Please keep the breast pump upright and remove the pump motor from the pump body carefully. When pouring the milk into the bottle, make sure the gap of the Milk Collector is against the bottle mouth.
STORING YOUR BREAST MILK
Storing breast milk
Store the breast milk in a clean and sterilized storage bag or sealed bottle, and put them in the freezer immediately.
Unfreeze breast milk
Put the frozen breast milk in the fridge to unfreeze overnight. In case of any emergency, you can defrost the milk in a bowl of hot water with the bottle standing upright, or a bottle warmer to heat the milk quickly.
Tips 1
- Only store the breast milk collected by a sterilized breast pump.
- Do not freeze the breast milk repeatedly
- Do not mix fresh breast milk with frozen breast milk
- Be sure to discard the remaining breast milk after feeding
Tips 2
- Remember! Always check the milk temperature before feeding.
- Never heat breast milk in the microwave as this may destroy valuable nutrients and antibodies.
- Uneven heating may lead to localized overheating of the milk, which may cause burns.
- Do not immerse a frozen bottle in boiling water to avoid cracks or breakage.
FCC Statement: This device complies with Part 15 of the FCC Rules. Operation is subject to the following two conditions: (1) This device may not cause harmful interference, and (2) This device must accept any interference received, including interference that may cause undesired operation.
Warning: Changes or modifications to this unit not expressly approved by the party responsible for compliance could void the user’s authority to operate the equipment.
NOTE: This equipment has been tested and found to comply with the limit for Class B digital devices, pursuant to Part 15 of the FCC Rules. Their limits are designed to provide reasonable protection against harmful interference in a residential installation.
This equipment generates, uses, and can radiate radio frequency energy and, if not installed and used in accordance with the instructions, may cause harmful interference to radio communications. However, there is no guarantee that interference will not occur in a particular installation. If the equipment does cause harmful interference to radio or television reception, which can be determined by turning the equipment off and on, the user is encouraged to try to correct the interference by one or more of the following measures:
- Reorient or relocate the receiving antenna.
- Increase the separation between the equipment and the receiver.
- Connect the equipment to an outlet on a circuit different from that to which the receiver is connected.
- Consult the dealer or an experienced radio/TV technician for help.


