
![]() BD 43/25 C Classic Bp Pack 80 Ah Li
BD 43/25 C Classic Bp Pack 80 Ah Li
User Manual
![]()
![]() Register your product
Register your product
www.kaercher.com/welcome
![]() Please read and comply with these original instructions prior to the initial operation of your appliance and store them for later use or subsequent owners.
Please read and comply with these original instructions prior to the initial operation of your appliance and store them for later use or subsequent owners.
Safety instructions
Before using the appliance for the first time, read and observe these operating instructions and the accompanying brochure:
Safety information for brush cleaning units and spray-extraction units, No. 5.956-251.0.
The device may only be operated when the cover and all lids are closed.
The appliance must only be operated on surfaces that do not exceed the max. permitted incline (see “Technical Specifications”).![]() WARNING Do not use the appliance on inclines.
WARNING Do not use the appliance on inclines.
Safety Devices
Safety devices serve to protect the user and must not be rendered in operational or their functions bypassed.
Safety Switch
If the safety switch is released, the brush drive shuts off.
Danger or hazard levels![]() DANGER
DANGER
For an immediate danger which can lead to severe injuries or death.![]() WARNING
WARNING
For a possibly dangerous situation which could lead to severe injuries or death.![]() CAUTION
CAUTION
Pointer to a possibly dangerous situation, which can lead to minor injuries.
ATTENTION
Pointer to a possibly dangerous situation, which can lead to property damage.
Information on battery (accumulator) and charger
Lithium-ion batteries are installed in the appliance. These are subject to special criteria. The removal and the installation as well as the examination of defective batteries may only be performed by the Kärcher aftersales service or a specialist.
Information on storage and transport can be obtained from your Kärcher aftersales service.![]() DANGER
DANGER
- Alterations and modifications on the appliance are prohibited.
- Do not open the battery, as there is a risk of an electrical shock; also, irritating or caustic vapors can escape. Do not expose the battery to direct sunlight, heat or fire, there is a risk of explosion.
- Do not operate the charger in explosive environment.
- Ensure sufficient ventilation during the charging process.
- Do not use the charger if dirty or wet.
- Do not work with open flames, generate sparks or smoke in the vicinity of a battery or a battery charging room. Danger of explosion.
![]() WARNING
WARNING
- Check the appliance and the power cable for damage prior to every use. Do not use damaged appliances and have damaged parts repaired by specialists only.
Keep children away from batteries and charger. Do not charge damaged batteries.
Have damaged batteries replaced by the Kärcher aftersales service. - Do not discard defective batteries in the domestic waste, inform Kärcher aftersales service.
- Avoid contact with liquids oozing out of defective battery packs. Rinse thoroughly if you accidentally come in contact with the fluid. Also consult a doctor if the fluid comes in contact with your eyes.
![]() CAUTION
CAUTION
- These operating instructions must be observed unconditionally. Observe recommendations of the lawmaker for handling batteries.
- The mains voltage must correspond with the voltage indicated on the type plate of the appliance.
- Use the charger only to charge approved battery packs.
- The accumulator may only be operated with this appliance. It is dangerous and prohibited to use it for other purposes.
Function
The scrubbing vacuum cleaner is used for the wet cleaning of level floors.
- The device can be easily adjusted to the respective cleaning task by adjusting the water volume and the detergent volume. The detergent dosing unit can be adjusted via the addition in the tank.
- The device is equipped with a fresh water and a waste water tank (25 litres each). These allow an effective cleaning with a long usage life.
- A working distance of 430 mm will improve the efficiency when you are using the appliance for a long period.
- Propulsion is accomplished by manually pushing the device and is supported by the rotation of the brushes.
Note:
The appliance can be equipped with various accessories depending on the cleaning task. Please request our catalogue or visit us on the Internet at www.kaercher.com.
Proper use
Use this appliance only as directed in these operating instructions.
- The appliance may only be used for the cleaning of hard surfaces that are not sensitive to moisture and polishing operations.
- The appliance is not suited for the cleaning of frozen grounds (e.g. in cold stores).
- The appliance may only be equipped with original accessories and spare parts.
- The appliance is not suited for the use in potentially explosive environments.
- The machine should not be used to suck in inflammable gases, undiluted acids or solvents. This includes petrol, thinning agents or hot oil that can form an explosive mixture when it comes in contact with sucked air. Do not use acetone, undiluted acids and solvents as they are aggressive towards the materials from which the appliance is made.
- The machine has been approved for use on surfaces with max. gradients as listed under “Technical Specifications”.
- This appliance is suited for the commercial use, e.g. in hotels, schools, hospitals, factories, shops, offices, and rental companies.
- The appliance was designed for the cleaning of floors inside or of covered surfaces.
- The application temperature ranges from +5°C to +40°C.
Environmental protection
| The packaging material can be recycled. Please do not throw the packaging material into household waste; please send it for recycling. | |
 | Old appliances contain valuable recyclable materials that should be recycled properly. Batteries, oil, and similar substances must not be released into the environment. Please dispose of your old appliances using appropriate collection systems. |
Information on ingredients (REACH) The latest information on ingredients can be found under: www.kaercher.de/REACH
Warranty
The warranty terms published by our competent sales company are applicable in each country. We will repair potential fail- rues of your accessory within the warranty period free of charge, provided that such failure is caused by faulty material or defects in fabrication. In the event of a warranty claim please contact your dealer or the nearest authorized Customer Service center. Please submit the proof of purchase.
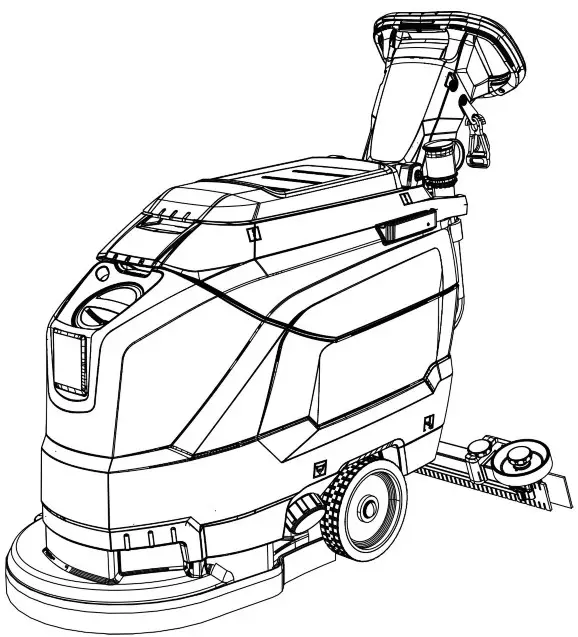
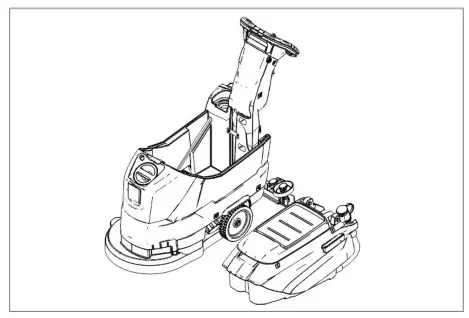
Operating and Functional Elements
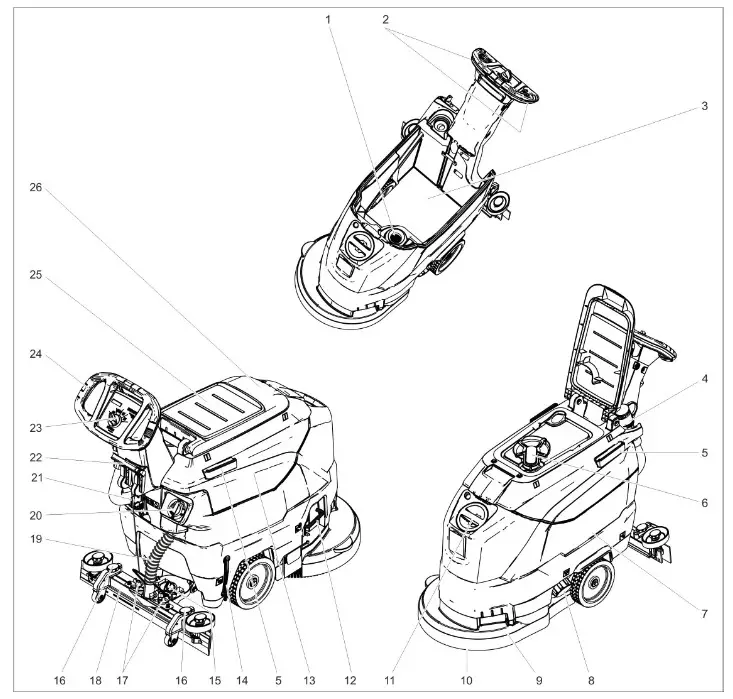
| 1 Fluff filter | 14 Fresh water level display |
| 2 Safety button | 15 Rotary handle to incline the vacuum bar |
| 3 Battery * | 16 Height adjustment of suction bar * |
| 4 Drain hose for wastewater with dosing unit | 17 Wing nuts for fastening the vacuum bar |
| 5 Holding rail for home base | 18 Vacuum bar * |
| 6 Float | 19 Suction hose |
| 7 Fresh water tank | 20 Water quantity regulator; |
| 8 Fresh water tank lock | 21 Battery socket |
| 9 Cleaning head | 22 Vacuum bar lowering lever |
| 10 Disc brush | 23 Operator console |
| 11 Fresh water reservoir filler neck | 24 Push handle |
| 12 Bow brush change | 25 Storage surface for cleaning set “Home base box“ |
| 13 Waste water tank | 26 Cover waste water tank |
* not included in the delivery
Colour coding
- The operating elements for the cleaning process are yellow.
- The controls for the maintenance and service are light gray.
Operator console
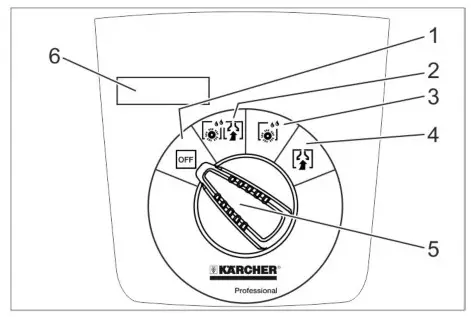
- OFF
Device is switched off - Normal mode
Wet clean the floor and vacuum up dirt water. - Intense mode
Wet clean the floor and allow the detergent to react. - Vacuum mode Suck in the dirt fleet.
- Program selection switch
- Display
Symbols on the machine
 | Battery socket |
 | Lashing point |
 | Mop holder ** |
 | Filling level fresh water tank 25% |
 | Bow brush change |
 | Vacuum bar lowering lever |
 | Drain outlet fresh water tank |
 | Dirt water discharge hose |
** option
Before Startup
Unloading![]() Unscrew the screws from the middle board of the pallet.
Unscrew the screws from the middle board of the pallet.![]() Push down the device holding the push handle and pull out the middle board.
Push down the device holding the push handle and pull out the middle board.![]() Remove the chocks in front of and next to the wheels.
Remove the chocks in front of and next to the wheels.![]() Push down the device holding the push handle and push it forwards up to the edge of the pallet.
Push down the device holding the push handle and push it forwards up to the edge of the pallet.![]() Lift the device off the pallet and set it on the floor.
Lift the device off the pallet and set it on the floor.
Check battery![]() Check that the circular connectors and the screw connections of the battery poles are tight.
Check that the circular connectors and the screw connections of the battery poles are tight.![]() If necessary, retighten the cables on the battery poles with a torque wrench:
If necessary, retighten the cables on the battery poles with a torque wrench:
Screw M8: 18 Nm
Screw M10: 23 Nm
Charging battery
Note:
The device is equipped with a safety mechanism to prevent total discharge, i.e. when the permissible minimum capacity is reached, the brush motor and the turbine are switched off.![]() Drive the machine directly to the charging station; avoid any steep gradients inthe process.
Drive the machine directly to the charging station; avoid any steep gradients inthe process.![]() DANGER
DANGER
Danger of injury due to electric shock. Observe the mains voltage and fuse protection on the type plate of the device.
Charging process
The charging time depends on the battery condition and the charger.
When the battery is empty, the charging time is approximately:
| Charger | Charging time, approx. [h] |
| 6.654-479.0 | 8 |
| 6.654-480.0 | 2 |
The appliance must not be used during the charging process.
ATTENTION
Risk of damage. Do not clean the device with water while the tank is removed.
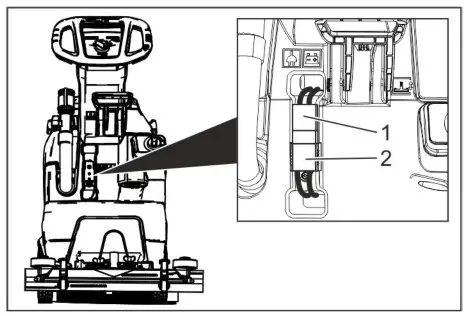
- Battery plug, appliance side
- Battery plug, battery side
![]() Detach the battery plug on the unit side.
Detach the battery plug on the unit side.
ATTENTION
Risk of damage!
- Do not connect the charger with the battery plug on the unit side.
- Only use a charger that is suitable for the installed battery type:
| Battery type | Charger |
| 6.654-454.0 | 6.654-479.0 |
| 6.654-480.0 |
Note: Please read the operating instructions of the charger manufacturer, especially the chapters on safety instructions!![]() Connect the battery plug on the battery side with the charger.
Connect the battery plug on the battery side with the charger.![]() Plug the mains plug of the charger into a power outlet.
Plug the mains plug of the charger into a power outlet.![]() Execute the charging process according to the information in the operating instructions of the charger.
Execute the charging process according to the information in the operating instructions of the charger.![]() Disconnect the battery connector from the charger.
Disconnect the battery connector from the charger.![]() Connect the battery plug on the device side with the battery plug on the battery side.
Connect the battery plug on the device side with the battery plug on the battery side.
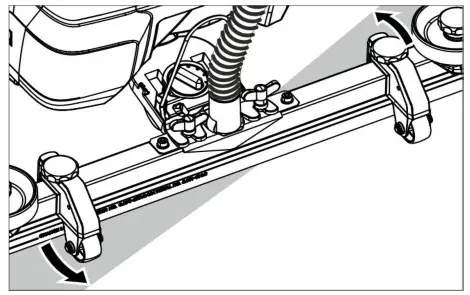
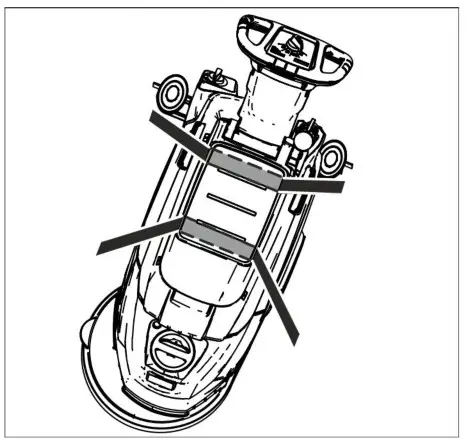
Installing the Vacuum Bar![]() Insert the vacuum bar into the vacuum bar suspension in such a manner that the profiled sheet is positioned above the suspension.
Insert the vacuum bar into the vacuum bar suspension in such a manner that the profiled sheet is positioned above the suspension.![]() Tighten the wing nuts.
Tighten the wing nuts.
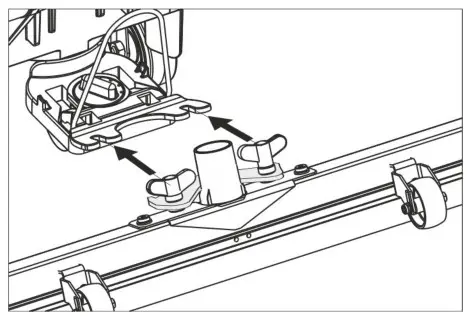
![]() Insert the suction hose.
Insert the suction hose.
Operation
![]() DANGER
DANGER
Risk of injury!
In dangerous situations, release the safety switch/drive lever.
Filling in detergents
Fresh water![]() Open the lock of the fresh water reservoir.
Open the lock of the fresh water reservoir.![]() Fill up fresh water (maximum 50 °C) until the lower edge of filling nozzle.
Fill up fresh water (maximum 50 °C) until the lower edge of filling nozzle.![]() Close the lock of the fresh water reservoir.
Close the lock of the fresh water reservoir.
Detergent![]() WARNING
WARNING
Risk of damage. Only use the recommended detergents. With other detergents, the operator bears the increased risk regarding the operational safety and danger of accident. Only use detergents that are free from solvents, hydrochloric acid and hydrofluoric acid.
Follow the safety instructions for using de- targets.
Note:
Do not use highly foaming detergents.
Recommended detergents:
| Application | Detergent |
| Routine cleaning of all water resistant floors | RM 746 RM 780 |
| Routine cleaning of glossy surfaces (e.g. granite) | RM 755 es |
| Routine cleaning and basic cleaning of industrial floors | RM 69 ASF |
| Routine cleaning and basic cleaning of fine stoneware tiles | RM 753 |
| Routine cleaning of tiles in sanitary areas | RM 751 |
| Cleaning and disinfection in sanitary areas | RM 732 |
| Removal of coating from all alkali-resistant floors (e.g. PVC) | RM 752 |
| Removal of coating from linoleum floors | RM 754 |
![]() Add the detergent to the fresh water reservoir.
Add the detergent to the fresh water reservoir.
Note:
If the fresh water tank is empty, the cleaning head continues working without liquid supply.
Setting the water quantity![]() Adjust the water quantity using the regulating button according to the dirt on the floor covering.
Adjust the water quantity using the regulating button according to the dirt on the floor covering.
Note:
Carry out initial cleaning attempts with low water volume. Increase water volume stepby-step until the desired cleaning result is achieved.
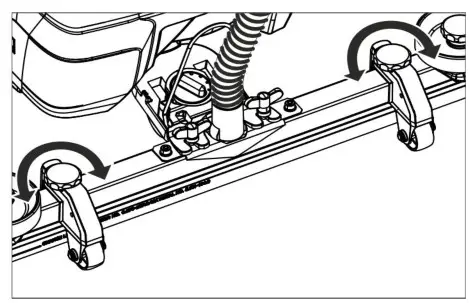
Setting the Vacuum Bar
Oblique position
To improve the vacuuming result on tiled floors the vacuum bar can be turned to an oblique position of up to 5°.![]() Loosen the wing nuts.
Loosen the wing nuts.![]() Turn the vacuum bar.
Turn the vacuum bar.
![]() Tighten the wing screws’
Tighten the wing screws’
Inclination
If the vacuum result is unsatisfactory the inclination of the straight vacuum bar can be modified.![]() Adjust the rotary handle to incline the suction bar. ;
Adjust the rotary handle to incline the suction bar. ;
Height
The bend of the suction lips upon contact with the floor is influenced with the height adjustment.
![]() Try adjusting the twist handles of the height adjustment until the best vac- umping result is achieved.
Try adjusting the twist handles of the height adjustment until the best vac- umping result is achieved.
Cleaning
ATTENTION
Risk of damage to the floor covering. Do not operate the appliance on the spot.![]() Turn the program selection switch to the desired cleaning program.
Turn the program selection switch to the desired cleaning program.![]() Pull the lever out and press it down; the vacuum bar is lowered. Lower the vacuum bar
Pull the lever out and press it down; the vacuum bar is lowered. Lower the vacuum bar
Note:
- For cleaning tiled floors, adjust the straight suction bar in such a way that cleaning is not done at an angle of 90 degrees to the joints.
- The inclined position and the inclination of the suction bar can be adjusted to achieve better suction results (see “Adjusting the suction bar”).
- If the waste water tank is full, the float closes the suction opening and the suction turbine runs at an increased speed. If this is the case, shut the vacuum off and drive to empty the waste water tank.
Shutting Down the Appliance
![]() Release the safety switch.
Release the safety switch.![]() Set the program selection switch to such- tion or vacuuming.
Set the program selection switch to such- tion or vacuuming.![]() Briefly drive forward and suck of the remaining water.
Briefly drive forward and suck of the remaining water.![]() Raise the vacuum bar.
Raise the vacuum bar.![]() Charge battery, if required.
Charge battery, if required.
Drain off dirt water![]() WARNING
WARNING
Please observe the local provisions regarding the wastewater treatment.![]() Take the water discharge hose from the support and lower above a suited collection device.
Take the water discharge hose from the support and lower above a suited collection device.
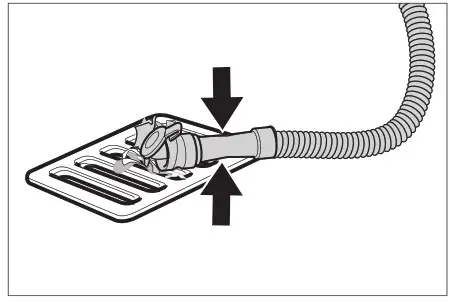
![]() Crush or bend the dosing equipment.
Crush or bend the dosing equipment.![]() Open the lid of the dosing equipment.
Open the lid of the dosing equipment.![]() Drain off the dirt water – regulate the water quantity by pressing or bending.
Drain off the dirt water – regulate the water quantity by pressing or bending.![]() Rinse the waste water tank with clear water.
Rinse the waste water tank with clear water.
Drain off clean water
![]() Unscrew the lock of the fresh water reservoir.
Unscrew the lock of the fresh water reservoir.
Transport
![]() DANGER
DANGER
Risk of injury! When loading or unloading the machine, it may only be operated on gradients up to the maximum value (see “Technical Specifications”). Drive slowly.![]() CAUTION
CAUTION
Risk of personal injury or damage! Mind the weight of the appliance during transport.![]() Use the pushing handle to push the appliance.
Use the pushing handle to push the appliance.
![]() When transporting in vehicles, secure the appliance according to the guidelines from slipping and tipping over.
When transporting in vehicles, secure the appliance according to the guidelines from slipping and tipping over.
Storage
![]() CAUTION
CAUTION
Risk of personal injury or damage! Consider the weight of the appliance when storing it. This appliance must only be stored in interior rooms.
Care and maintenance
![]() DANGER
DANGER
Risk of injury! Set the programme selector switch to “OFF” and pull the mains plug of the charger prior to performing any work on the appliance.
Remove the battery plug from machine.![]() Drain and dispose of the dirt water and the residual fresh water.
Drain and dispose of the dirt water and the residual fresh water.
Maintenance schedule
After each operation
ATTENTION
Risk of damage. Do not sluice the appliance with water and do not use aggressive detergents.![]() Drain off dirt water.
Drain off dirt water.![]() Rinse the waste water tank with clear water.
Rinse the waste water tank with clear water.![]() Clean the outside of the appliance with a damp cloth which has been soaked in mild detergent.
Clean the outside of the appliance with a damp cloth which has been soaked in mild detergent.![]() Check the fluff filter, clean if required.
Check the fluff filter, clean if required.![]() Clean the vacuum lips and the wiping lips, check for wear and replace if re- quire.
Clean the vacuum lips and the wiping lips, check for wear and replace if re- quire.![]() Check the brush for wear and replace if required (see “Maintenance tasks”).
Check the brush for wear and replace if required (see “Maintenance tasks”).![]() Charge the battery if required.
Charge the battery if required.
Weekly![]() When used regularly, charge the battery fully and without interruption at least once a week.
When used regularly, charge the battery fully and without interruption at least once a week.
Monthly![]() Check battery poles for oxidation.
Check battery poles for oxidation.![]() Check that the battery cables are tight,
Check that the battery cables are tight,![]() Clean the seals between waste water tank and cover and check for tightness, replace if required.
Clean the seals between waste water tank and cover and check for tightness, replace if required.![]() Clean sieve.
Clean sieve.![]() For long periods of disuse, only turn the device off when the battery is fully charged. Fully recharge the battery at least every month.
For long periods of disuse, only turn the device off when the battery is fully charged. Fully recharge the battery at least every month.
Yearly![]() Have the prescribed inspection carried out by the customer service.
Have the prescribed inspection carried out by the customer service.
Maintenance Works
Cleaning the sieve
- Cover
- Cover
![]() Open the cover.
Open the cover.![]() Turn cover the clockwise and remove it.
Turn cover the clockwise and remove it.![]() Remove and clean the sieve lying beneath it.
Remove and clean the sieve lying beneath it.![]() Insert the sieve.
Insert the sieve.![]() Replace the cover and lock it by turning it anti-clockwise.
Replace the cover and lock it by turning it anti-clockwise.![]() Close cover.
Close cover.
Replace or turn vacuum lips

- Wear indicator
- Vacuum lip
The vacuum lips must be replaced or reversed if they are worn down to the wear indicator.![]() Remove the vacuum bar.
Remove the vacuum bar.![]() Unscrew the star grips.
Unscrew the star grips.
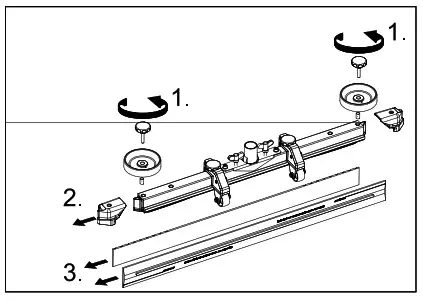
![]() Remove the plastic parts.
Remove the plastic parts.![]() Remove the vacuum lips.
Remove the vacuum lips.![]() Insert new or reversed vacuum lips.
Insert new or reversed vacuum lips.![]() Insert the plastic parts.
Insert the plastic parts.![]() Screw in and tighten the star grips.
Screw in and tighten the star grips.
Replacing the disk brushes![]() Push down the device holding the push handle so that the cleaning head is raised.
Push down the device holding the push handle so that the cleaning head is raised.![]() Press the pedal for changing the brushes downward beyond its resistance.
Press the pedal for changing the brushes downward beyond its resistance.
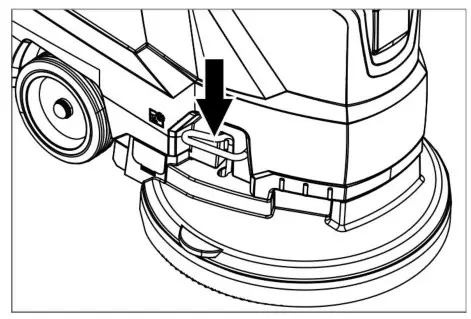
![]() Pull the device towards the back so that the disc brush becomes accessible.
Pull the device towards the back so that the disc brush becomes accessible.![]() Place a new disc brush on the floor in front of the device.
Place a new disc brush on the floor in front of the device.![]() Drive the device with the raised cleaning head over the new disc brush and lower the cleaning head. The brush locks into the drive.
Drive the device with the raised cleaning head over the new disc brush and lower the cleaning head. The brush locks into the drive.
Removing the waste water tank![]() Drain off dirt water.
Drain off dirt water.
![]() Lift up the waste water tank and put it aside.
Lift up the waste water tank and put it aside.
Batteries![]() DANGER
DANGER
Risk of explosion. Do not place tools or the like on the battery, i.e. on the terminal poles and cell connectors.
Recommended batteries
| Order No. | |
| 80 Ah | 6.654-454.0 |
Insert batteries and connect![]() Drain off dirt water.
Drain off dirt water.![]() Lift up the waste water tank and put it aside.
Lift up the waste water tank and put it aside.![]() Pull out the battery plug.
Pull out the battery plug.
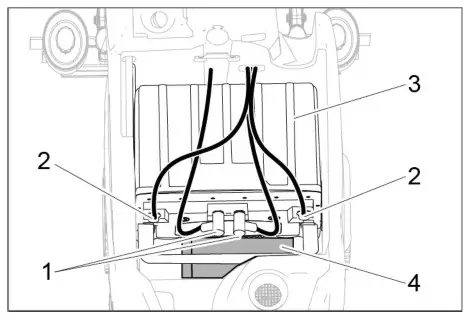
- Round plug
- Battery pole
- Battery
- Spacer
![]() Place the battery into the device as shown above.
Place the battery into the device as shown above.![]() Insert the spacer between the battery and the device on the side indicated in the picture.
Insert the spacer between the battery and the device on the side indicated in the picture.![]() CAUTION
CAUTION
When removing and installing the battery, the position of the machine might become unstable. Please ensure that it is in a secure position.![]() Clamp the connecting cables supplied onto the (+) and (-) battery terminals.
Clamp the connecting cables supplied onto the (+) and (-) battery terminals.![]() Plug both circular connectors into the battery. l
Plug both circular connectors into the battery. l
ATTENTION’
If the polarity is reversed (positive and negative terminals), the control electronics are destroyed. Pay attention to correct poles.![]() Place the waste water tank on the appliance.
Place the waste water tank on the appliance.
Note: Charge the batteries before commissioning the appliance. See also “Charging the batteries”.
Removing the batteries![]() Set the programme selector switch to “OFF”.
Set the programme selector switch to “OFF”.![]() Pull out the battery plug.
Pull out the battery plug.![]() Lift up the waste water tank and put it aside.
Lift up the waste water tank and put it aside.![]() Unplug both circular connectors from the battery.
Unplug both circular connectors from the battery.![]() Clamp off the minus pole of the battery.
Clamp off the minus pole of the battery.![]() Disconnect the cable from positive terminal of the battery.
Disconnect the cable from positive terminal of the battery.![]() Remove the support blocks or the foam pieces.
Remove the support blocks or the foam pieces.![]() CAUTION
CAUTION
When the batteries are installed and removed, the stability of the appliance can be compromised; ensure a safe stance.l![]() Remove the batteries.
Remove the batteries.![]() Dispose of the used batteries according to the local provisions.
Dispose of the used batteries according to the local provisions.
Maintenance contract
To ensure a reliable operation of the appliance maintenance contracts can be concluded with the competent Kärcher sales office.
Frost protection
In case of danger of frost:![]() Empty the fresh and waste water tank.
Empty the fresh and waste water tank.![]() Store the appliance in a frost-protected room.
Store the appliance in a frost-protected room.
Faults
![]() DANGER
DANGER
Risk of injury! Set the programme selector switch to “OFF” and pull the mains plug of the charger prior to performing any work on the appliance.
Remove the battery plug from machine.![]() Drain and dispose of the dirt water and the residual fresh water.
Drain and dispose of the dirt water and the residual fresh water.
Faults with display
| Display | Correction |
| ERR B | Check if foreign objects block the brush; remove foreign object if required. Set the programme selector switch to “OFF”, release the safety switch, wait for 3 seconds, restart. |
| ERR T | Set the programme selector switch to “OFF”, release the safety switch, wait for 3 seconds, restart. If the event recurs, call Customer Service. |
| LOW BAT | Charge battery. If the error is still displayed, check the two circular connectors on the battery are properly connected. If the event recurs, call Customer Service. |
| ERR TEMP | Allow device to cool down. |
| HANDS OFF | Release the safety switch and wait until the operating hours or the battery status are displayed. Then operate the safety switch again. |
| ERR REL | Set the programme selector switch to “OFF”, release the safety switch, wait for 3 seconds, restart. If the event recurs, call Customer Service. |
| ERR PWM | Set the programme selector switch to “OFF”, release the safety switch, wait for 3 seconds, restart. If the event recurs, call Customer Service. |
Battery status display
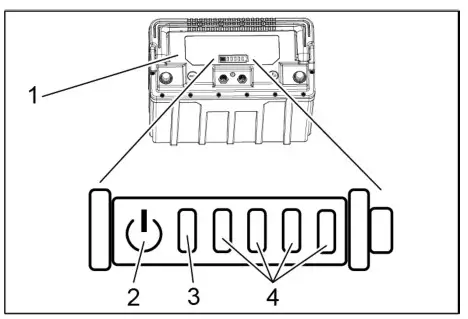
- Battery
- Button
- “Status” LED
- Indicator LED
 Press the button for 5 seconds.
No LED lights up: Charge the battery.
The status LED lights up green:
Together, all 5 LEDs indicate the battery’s charging state.
The status LED lights up red:
The indicator LEDs indicate a malfunction. Malfunctions described in the following table can be remedied by the user. Contact KÄRCHER Customer Service for all malfunctions indicated not described above.
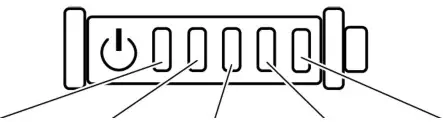 | Cause | Correction | ||||
| red | – | – | – | – | Battery too hot. | Allow the battery to cool down. |
| red | – | – | green | Battery management system too h | Allow the battery to cool down. | |
| red | – | green | – | Battery too cold for charging. | Move the device to a warmer place and wait until the battery has warmed up. | |
| red | – | green | green | Current consumption too high dur-Unplug ing charging. | the mains plug of the charger. Wait 10 seconds. Reinsert the mains plug. If the malfunction is displayed again, replace the charger. | |
| Device current consumption too high. | Switch off the device. If the malfunction occurs again after switching on, look for a fault in the device. | |||||
| red | green | – | green | Short-circuit | Check all battery connections. | |
| red | green | green | – | Cell voltage too low during dis- charge. | Charge battery. | |
| red | – | green | green | green | Cell voltage too high during Charg-Discharge ing. | battery to 20% remaining capacity. Then charge the battery. |
| red | green | – | – | green | Battery voltage too low. | Charge battery. |
| red | green | – | green | – | Malfunction during charging pro- cess. | Unplug the mains plug of the charger. Wait 10 seconds. Reinsert the mains plug. If the malfunction is displayed again, replace the charger. |
| red | green | – | green | green | ||
| red | green | green | – | – | Battery too cold to output power. | Move the device to a warmer place and wait until the battery has warmed up. |
| red | green | green | green | Power output malfunction. | Switch off the device. If the malfunction persists, contact Customer Service. | |
Faults without display on the console
| Failure | Correction |
| Appliance cannot be started | Turn the program selection switch to the desired programme. |
| Operate the safety switch. | |
| Insert battery plug. | |
| Check battery; charge it if required. | |
| Make sure that all battery terminals are connected. | |
| Insufficient water Quan- tity | Check fresh water level, refill tank if necessary. |
| Increase the water volume on the regulating knob for water volume. | |
| Clean sieve. | |
| Insufficient vacuum per- formance | Clean the seals between waste water tank and cover and check for tightness, replace if required. |
| Wastewater reservoir is full; shut off the appliance and empty the wastewater reservoir | |
| Clean the fluff filter. | |
| Clean the vacuum lips on the vacuum bar, replace if required | |
| Check if the cover on the dirt water discharge hose is closed | |
| Check the setting of the vacuum bar. | |
| Check suction hose for blockages; clean if required. | |
| Check the suction hose for tightness; replace if required. | |
| Insufficient cleaning re- suit | Check the brushes for wear, replace if required. |
| Increase the water volume. | |
| Check the brush type and the detergent for their suitability. | |
| Suction turbine is run- Ning rough | Clean the swimmer. |
| Brush does not turn | Check if foreign objects block the brush; remove foreign object if required. |
| If over-current switch in the electronics system has been triggered, turn programme selection switch to “OFF”. Afterwards, set it back to the desired programme. | |
| Vibrations during clean- ing | You might need to use a softer brush. |
| In case of faults that cannot be remedied using the table below please contact the customer service. | |
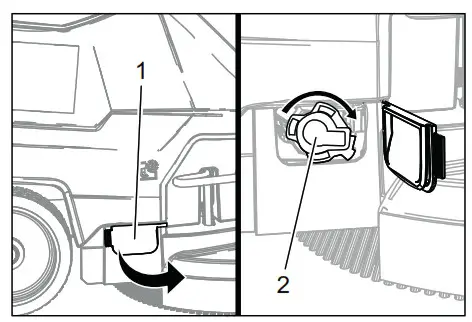
Cleaning the floater![]() Open the cover of the waste water tank.
Open the cover of the waste water tank.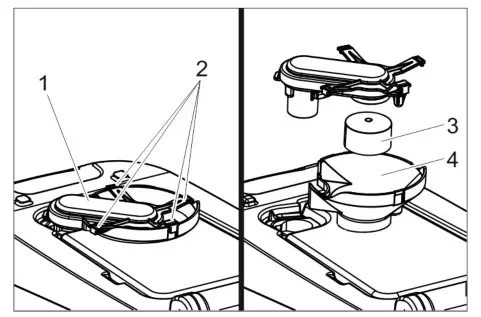
- Swimmer casing
- Lock hook
- Float
- Lower part
![]() Pull out the float casing towards the top.
Pull out the float casing towards the top.![]() Detach locking hooks.
Detach locking hooks.![]() Clean float and bottom part.
Clean float and bottom part.![]() Assemble the float casing and insert it into the device.
Assemble the float casing and insert it into the device.
Accessories
| Description | Part no.: | Description |
| Disc brush, white (very soft) | 4.905-024.0 | For the gentle cleaning of sensitive surfaces. |
| Disk brush, natural (white) | 4.905-023.0 | Made of natural fibres for spot cleaning and polishing. |
| Disk brush, red (medium, standard) | 4.905-022.0 | For the use with all common cleaning tasks. |
| Disk brush, black (hard) | 4.905-025.0 | For heavy soiling and for deep cleaning. For robust floorings only. |
| Driver plate pad | 4.762-533.0 | For cleaning with pads. With quick change coupling and center lock. |
| Pad, red (medium soft) | 6.369-470.0 | For cleaning and clearing of all floors. |
| Pad, green (medium hard) | 6.369-472.0 | For cleaning heavily soiled floors and for deep cleaning. |
| Pad, white | 6.369-469.0 | For polishing floors. |
| Pad, black (hard) | 6.369-473.0 | With stubborn soiling and for deep cleaning. |
| Microfiber pad | 6.905-526.0 | Routine cleaning and basic cleaning of fine stoneware tiles |
| Pad, beige (natural hair proportion) | 6.371-081.0 | For polishing and refreshing of hard and flexible floorings. |
| Diamond pad, white | 6.371-256.0 | For coarse cleaning and up valuation. Removes small scratches and ensures a clean, semi-gloss surface. |
| Diamond pad, yellow | 6.371-257.0 | For coarse cleaning and up valuation. Removes fine scratches and ensures an even more homogenous and shiny surface. |
| Diamond pad, green | 6.371-238.0 | For polishing high-gloss coated floor coverings and for quick polishing of terrazzo and natural stone surfaces. |
| Suction bar, 850 mm, straight | 4.777-401.0 | |
| Suction bar, 850 mm, bent | 4.777-411.0 | |
| Set homebased box | 4.035-406.0 |
| Description | Part no.: | Description |
| Mop holder | 9.753-023.0 | |
| Adapter Homebase | 5.035-488.0 | |
| Double hook | 6.980-077.0 | |
| Mop clip | 6.980-078.0 | |
| Bottle hook | 6.980-080.0 | |
| Universal hook | 4.070-075.0 |
Technical specifications
| Power | ||
| Nominal voltage | V | 24 |
| Battery capacity | Ah (5h) | 80 |
| Average power consump- tion | W | 1100 |
| Rated power suction tur- bine | W | 500 |
| Rated power brush drive | W | 600 |
| Vacuuming | ||
| Vacuum power, air vol- ume (max.) | I/s | 24 |
| Vacuuming power, nega- tive pressure (max.) | kPa (mbar) | 12 (120) |
| Type of protection | IPX 3 | |
| Cleaning brushes | ||
| Brush speed | 1/min | 155 |
| Brush diameter | mm | 430 |
| Dimensions and weights | ||
| Theoretical surface cleaning performance | m2/h | 1600 |
| Max. working range in- cline | % | 2 |
| Fresh/waste water tank volume | I | 25/25 |
| Max. water temperature | °C | 50 |
| Ambient temperature | °C | 5…40 |
| Net weight (transport weight) | kg | 76 |
| Total weight (ready to op- erate) | kg | 102 |
| Dimensions of battery compartment | mm | 350 x 350 |
| Values determined as per EN 6 335-2- 72 | ||
| Total oscillation value | m/s2 | <2,5 |
| Uncertainty K | m/s2 | 0,2 |
| Sound pressure level LpA | dB(A) | 66 |
| Uncertainty KPA | dB(A) | 1 |
| Sound power level L,A,„ + Uncertainty Kim | dB(A) | 81 |
EU Declaration of Conformity
We hereby declare that the machine described below complies with the relevant basic safety and health requirements of the EU Directives, both in its basic design and construction as well as in the version put into circulation by us. This declaration shall cease to be valid if the machine is modified without our prior approval.
| Product: | Floor cleaner |
| Type: | 1.127-xxx 1.515-xxx |
Relevant EU Directives
2006/42/EC (+2009/127/EC)
2014/30/EU
2011/65/EU
Applied harmonized standards
EN 60335–1
EN 60335–2–72
EN 55012: 2007 + A1: 2009
EN 61000–6–2: 2005
EN 62233: 2008
EN IEC 63000: 2018
Applied national standards
The signatories act on behalf of and with of the authority of the company management.
Documentation supervisor:
S. Reiser
Alfred Kärcher SE & Co. KG
Alfred-Kärcher-Straße 28-40
71364 Winnenden (Germany)
Tel.: +49 7195 14-0
Fax: +49 7195 14-2212
Winnenden, 2021/02/01
Declaration of Conformity
We hereby declare that the product described below complies with the relevant provisions of the following UK Regulations, both in its basic design and construction as well as in the version put into circulation by us. This declaration shall cease to be valid if the product is modified without our prior approval.
| Product: | Floor cleaner |
| Type: | 1.127-xxx 1.515-xxx |
Currently applicable UK Regulations
S.I. 2008/1597 (as amended)
S.I. 2016/1091 (as amended)
S.I. 2012/3032 (as amended)
Designated standards used
EN 60335–1
EN 60335–2–72
EN 55012: 2007 + A1: 2009
EN 61000–6–2: 2005
EN 62233: 2008
EN IEC 63000: 2018
National standards used
The signatories act on behalf of and with of the authority of the company management.
Documentation supervisor:
S. Reiser
Alfred Kärcher SE & Co. KG
Alfred-Kärcher-Straße 28-40
71364 Winnenden (Germany)
Tel.: +49 7195 14-0
Fax: +49 7195 14-2212
Winnenden, 2021/02/01
Accessories and Spare Parts
Only use original accessories and spare parts, they ensure the safe and trouble-free operation of the device.
For information about accessories and spare parts, please visit www.kaercher.com.
![]()
 THANK YOU!
MERCI! DANKE! GRACIAS![]() Register your product and benefit from many advantages.
Register your product and benefit from many advantages.
www.kaercher.com/welcome ![]()
![]() Rate your product and tell us your opinion.
Rate your product and tell us your opinion. www.kaercher.com/dealersearch
Alfred Kärcher SE & Co. KG
Alfred-Kärcher-Str. 28-40
71364 Winnenden (Germany)
Tel.: +49 7195 14-0
Fax: +49 7195 14-2212
2-2-NN-A4-GS-03323 http://kaer.ch/er/?l=TwSoJtl9IUOwZyAe1rHDyw
References
 Neu am Niederrhein: AAN Unternehmensverband
 Ihr Partner für Gabionen und Steinkröge. Von der Planung bis zur Realisierung.
-
aspiration.La
-
batteria.Se
-
Cleaning equipment and pressure washers | Kärcher International
-
Marche Corporate | Home
-
KOZMETIČNI STUDIO MARIPOSA, KARMEN KRISTAN S .P . – Nega, obraza, Manikura, izdelava, umetnih, nohtov, z, akrilom, pedikura, masaža, oblikovanje, in, nega, obrvi, po, metodi, Anastasia, Beverly, Hills, Karmen, Jarc, Mariposa, kozmetični, salon, Lepota, tel
-
seconds.no
-
Cleaning equipment and pressure washers | Kärcher International
-
Dealer Search | Kärcher International
-
Home Garden Warranty Registration Karcher North America USA | Kärcher
-
Reinigungsgeräte und Hochdruckreiniger | Kärcher
-
Reinigungsgeräte und Hochdruckreiniger | Kärcher
-
Reinigungsgeräte und Hochdruckreiniger | Kärcher
-
Reinigungsgeräte und Hochdruckreiniger | Kärcher
-
Reinigungsgeräte und Hochdruckreiniger | Kärcher
-
Reinigungsgeräte und Hochdruckreiniger | Kärcher
-
Reinigungsgeräte und Hochdruckreiniger | Kärcher
-
Reinigungsgeräte und Hochdruckreiniger | Kärcher
-
Reinigungsgeräte und Hochdruckreiniger | Kärcher
-
Reinigungsgeräte und Hochdruckreiniger | Kärcher
-
Reinigungsgeräte und Hochdruckreiniger | Kärcher
-
Reinigungsgeräte und Hochdruckreiniger | Kärcher
-
Reinigungsgeräte und Hochdruckreiniger | Kärcher
-
Reinigungsgeräte und Hochdruckreiniger | Kärcher
-
Reinigungsgeräte und Hochdruckreiniger | Kärcher
-
Reinigungsgeräte und Hochdruckreiniger | Kärcher
-
Reinigungsgeräte und Hochdruckreiniger | Kärcher
-
Reinigungsgeräte und Hochdruckreiniger | Kärcher
-
Reinigungsgeräte und Hochdruckreiniger | Kärcher
-
Reinigungsgeräte und Hochdruckreiniger | Kärcher
-
Reinigungsgeräte und Hochdruckreiniger | Kärcher
-
Reinigungsgeräte und Hochdruckreiniger | Kärcher
-
Reinigungsgeräte und Hochdruckreiniger | Kärcher


