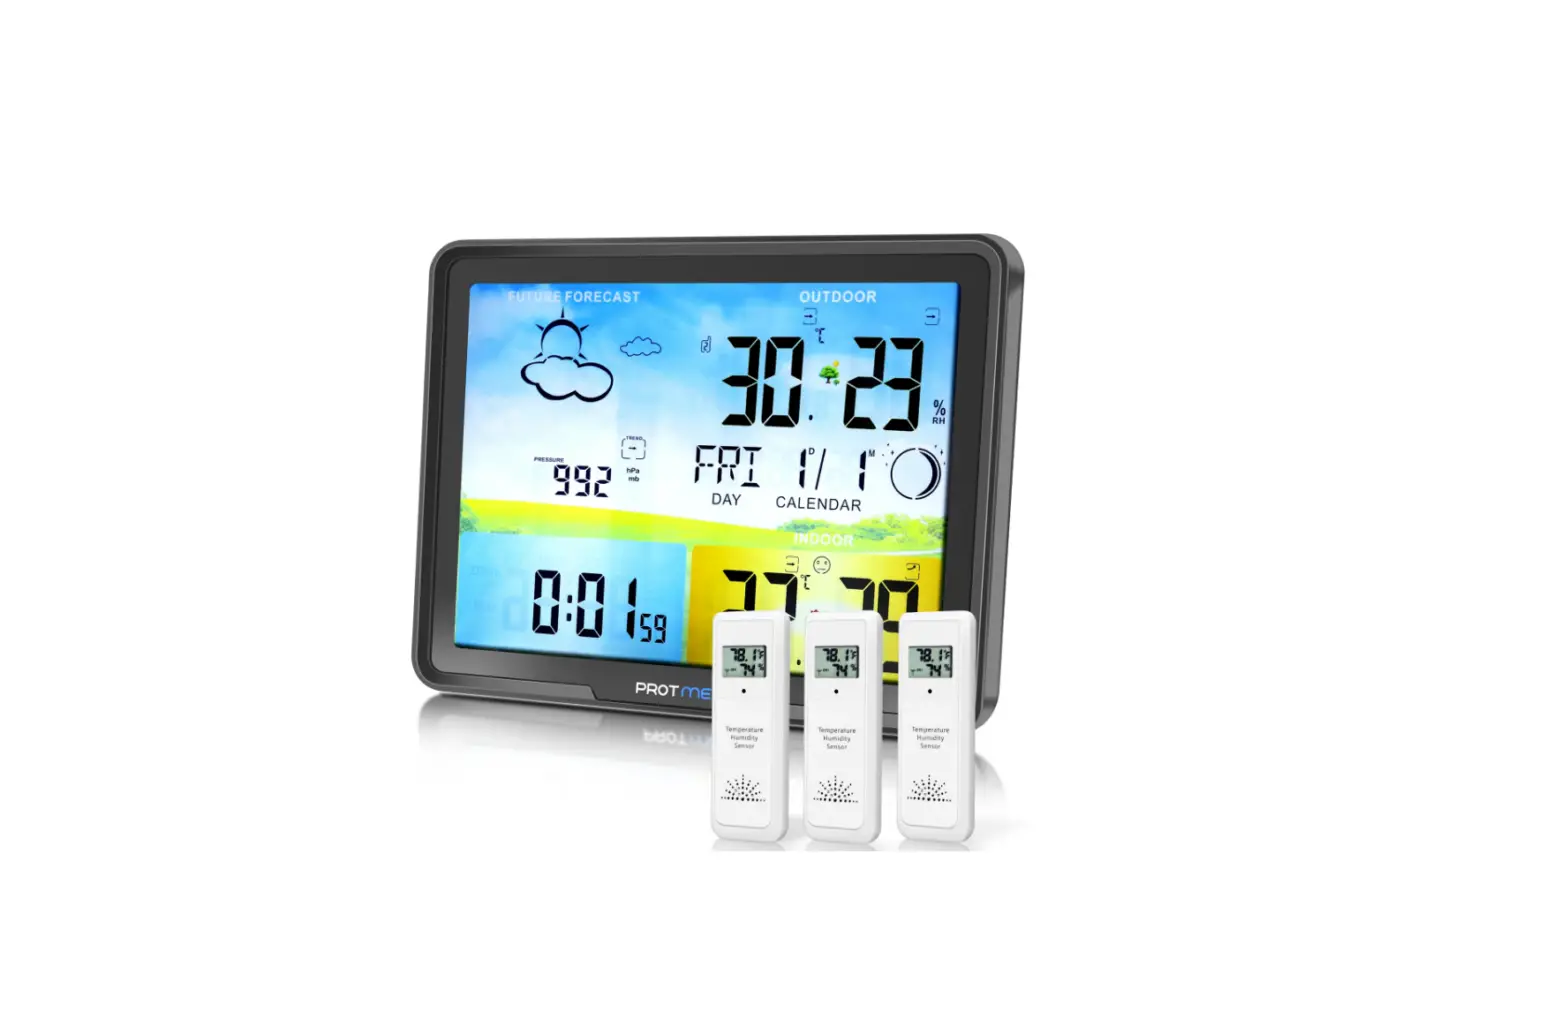
PROTMEX PT20C Weather Station Clock
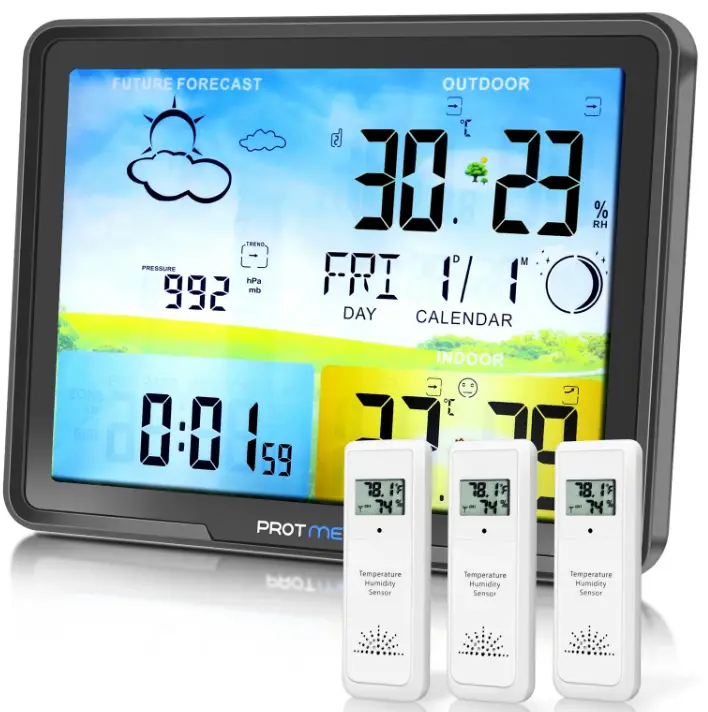
Features
- Perpetual calendar;
- RCC function (Only RCC version weather station has this function);
- Multi-time zone clock, WWVB version supports time zones is US time zone (Only for RCC version);
- Weekly display, support 7 languages (English / German / Italian / French / Spanish / Dutch / Danish);
- Personalized alarm clock, can be set to ring on weekdays, weekends or every day, and has a snooze alarm clock function;
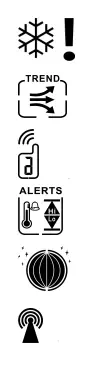
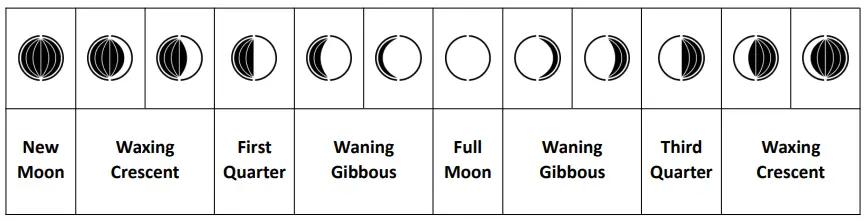
- Lunar phases;
- Weather forecast function;
- Temperature and humidity measurement function, support celsius and fahrenheit;
- The temperature measurement range of the signal receiver: -9.9℃~50℃ (14.2℉~122℉); when the temperature is higher than 50℃, the screen will display “HH.H”; when it is lower than -9.9℃, it will display “LL.L”;
- Outdoor sensor temperature measurement range: -40°C to 70°C (-40°F~158°F); when the temperature is higher than 70°C, the screen displays “HH.H”; when it is lower than -40°C, it displays “LL.L” “;
- Receiver and sensor humidity measurement range: 20 ~ 99%; when the relative humidity of the air is higher than 99%, the screen displays “HH”; when it is lower than 20%, it displays “LL”;
- Barometric pressure measurement range: 800~1100 hPa (± 2hPa), and the unit: hPa / mb / inHg / mmHg;
- Maximum and minimum temperature and humidity recording function;
- Dew point temperature;
- Frost alert function;
- Temperature alarm function;
- Heat index;
- Indoor comfort graded expressions;
- The PT20C weather station can connect up to 3 signal sensors at the same time, and display the data of each sensor on the receiver screen in a carousel mode;
- Low battery alarm;
- LCD backlight;
- Power supply:
Weather station:
3 × AAA or power supply with a specification of “DC 5V”; Wireless remote sensor: 2 × AAA .
Appearance & Screen Display Introduction
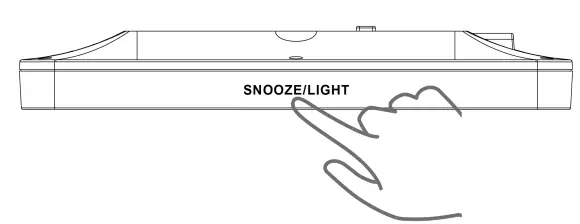
[SNOOZE/LIGHT]: Snooze alarm; Backlight on / off / level; RCC on / off (Only for RCC version)
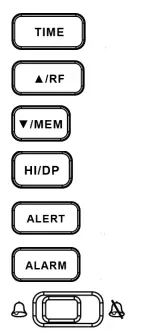 : “set” button;
: “▲/RF” button;
: “▼/MEM” button;
: “HI/DP” button
: “ALERT” button;
: “ALARM” button;
: Alarm clock switch.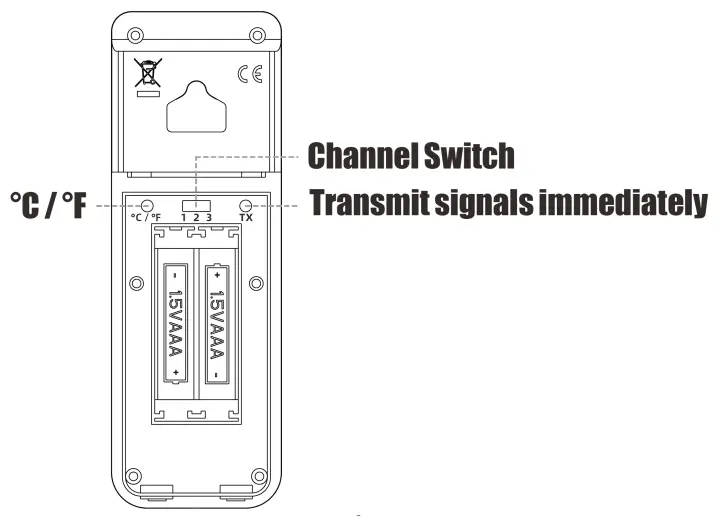
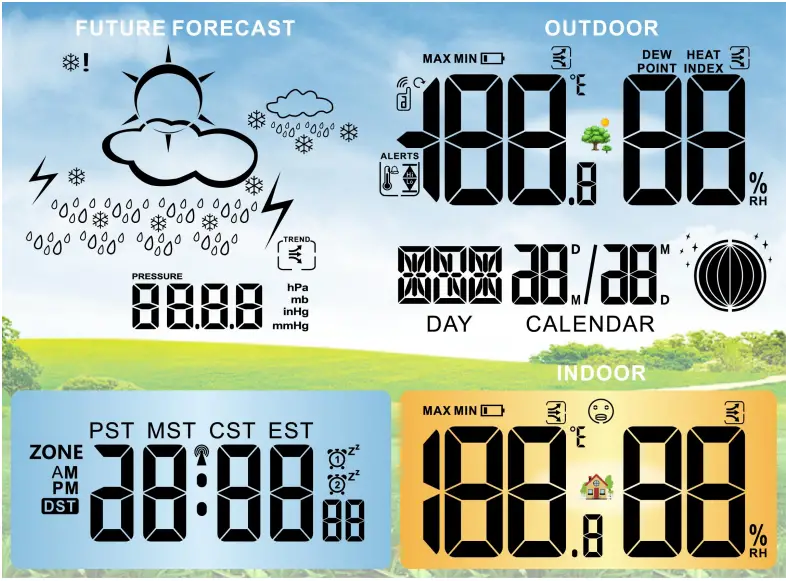
 : Frost alarm ;
: Data trend ;
: Signal channel ;
: Temperature alarm ;
: Lunar phase ;
: When the RCC is connected, the icon is displayed; When the RCC is disconnected or the function is turned off, the icon disappears ;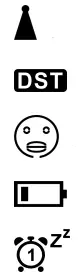 : When RCC is in the search state, the icon flashes ;
: Daylight saving time (only for WWVB version) ;
: Comfort ;
: Low battery ;
: Alarm;
PST : Pacific Standard Time ;
MST : Mountain Standard Time ;
CST : Central Standard Time
EST : Eastern Standard Time.
Note: ZONE AND DST are only for RCC version.]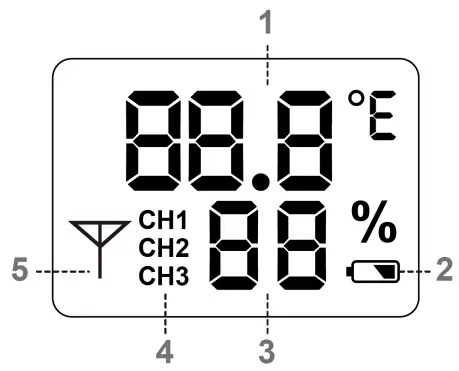
- Temperature ;
- Low battery warning ;
- Relative humidity ;
- Signal channel ;
- Transmit signals immediately.
Initial Operation
- Insert power adapter and batteries to weather station.
- Insert 3 X AAA batteries or plug in power adaptor.
- When it powers on, all the icon on the LCD display will briefly light up for 3 seconds, and you will hear a beep tone, and detect indoor temperature & humidity.
- The Weather Station will now start to make a connection to the remote sensor. This operation take about 3 minutes and is displayed by a flashing reception RF antenna symbol in the “REMOTE SENSOR” display area on the receiver.
- This now, open the remote Sensor battery compartment cover, Insert 2 X AAA batteries observing polarity [“+” and “-” marks].
- After receiver has created a connection to the remote sensor, it will then be enters the Radio control time receive mode.
Weather Forecast / RCC / Time Zone / Language / Time / Calendar Setting
- Long press “
 ” button to set:
 - Weather forecast
- RCC (only for RCC version)
- Time zone (only for RCC version)
| WWVB | Eastern – EST | (GMT -5) |
| Central – CST | (GMT -6) | |
| Mountain – MST | (GMT -7) | |
| Pacific – PST | (GMT -8) |
- Language
| Language | abbreviation | Sunday | Monday | Tuesday | Wednesday | Thursday | Friday | Saturday |
| English | EN | SUN | MON | TUE | WED | THU | FRI | SAT |
| German | DE | SON | MON | DIE | MIT | DON | FRE | SAM |
| Italian | IT | DOM | LUN | MAR | MER | GIO | VEN | SAB |
| French | FR | DIM | LUN | MAR | MER | JEU | VEN | SAM |
| Spanish | ES | DOM | LUN | MAR | MIE | JUE | VIE | SAB |
| Netherlands | NL | ZON | MAA | DIN | WOE | DON | VRI | ZAT |
| Denmark | DA | SON | MAN | TIR | ONS | TOR | FRE | LOR |
- Time
- Calender: Year / Month / Day
- Barometric Pressure unit
- DST on/off (only for RCC version)
F.Y.I.:
- Click “ ” to confirm the setting result and move to the next;
- Click “
 ” to set the item one step forward; long press for more than 2 seconds, it will advance at the speed of 8 steps per second;
 - Click “
 ” to go back one step of the setting item; long press for more than 2 seconds, it will go back at 8 steps per second;
 - No operation within 20 seconds will save the settings and exit the setting mode;
 ” to set the item one step forward; long press for more than 2 seconds, it will advance at the speed of 8 steps per second;
 ” to go back one step of the setting item; long press for more than 2 seconds, it will go back at 8 steps per second;
Alarm Setting
- Long press “
 ” to enter the alarm setting mode to set “on” or “off” the alarm and the display shows “
 “.
“. - When the alarm is on, click “ ” to confirm and set the alarm time and press “ ” again to confirm.
- Set “1-7” means daily, “1-5” means Monday to Friday ,or “6-7” means Saturday to Sunday.
 ” to enter the alarm setting mode to set “on” or “off” the alarm and the display shows “
 “.
“.F.Y.I.:
- Click “” or ” to up and down, long press these 2 buttons more than 2 seconds, the setting item will go up or down at a rate of 8 units per second;
- There are 2 alarms options ;
- Without any operation within 20 seconds, the settings are automatically saved and the setting mode is exited.
Alert Setting
- Click “
 ” to choose to on/off.
 - Long press “” to enter the temperature alert setting mode,
- Click “ ” or “” to set the upper or lower limit of temperature alarm; click “” to confirm the setting and go to the next step;
- The alarm time lasts for 2 minutes;
- When the alarm is sounding, click [SNOOZE/LIGHT] button to delay the alarm for 5 minutes, press other buttons to exit the alarm;
Backlight
- When the adaptor is powered, backlight remains bright. Touch [SNOOZE/LIGHT] on the top of weather station to change the backlight brightness 3 levels from bright to dark.
- When the battery is powered only, backlight will be light for 30 seconds and then go off. Touch [SNOOZE/LIGHT] to wake it up.
- When the alarm rings, the backlight will be turned off automatically after 30s.
- RCC Receiving (Only for RCC version).
- After power on or reset, it automatically enters RCC reception;
- Long press [SNOOZE/LIGHT] to forcibly enter or stop RCC receiving
- At 1:00 / 2:00 / 3:00 am, the clock automatically carries out the synchronization procedure with the RCC signal to correct any deviations to the exact time. If this synchronization attempt is unsuccessful (“
 ” disappears from the display), the system will automatically attempt another synchronization at the next full one hour. This procedure is repeated automatically up to total 5 times.
 - If the connection is successful, “ ” is continuously displayed;
- When the connection is unsuccessful, “ ” will disappear and RCC mode will exit.
 ” disappears from the display), the system will automatically attempt another synchronization at the next full one hour. This procedure is repeated automatically up to total 5 times.
Remote Sensor Transmission
- After installing the battery it detect the “outdoor” temperature and humidity. it will automatically enter the RF receiving for 3 minutes
- Click “ ” to change channel form 1 to 3 or recycle
- long press “ ” to forcefully clear all outdoor channel data and searching signal
- If the weather station failed to receive transmission from remote sensor (“- -” displays on the LCD),long press and hold “” for 3 seconds to receive transmission manually. the remote temperature will show an animation of the RF antenna symbol, the Station will re receive the wireless signal of the remote sensor.
- Press”TX”button inside remote sensor battery compartment to send signal
Temperature Specification
- Indoor temperature range: -9.9℃ ~ 50℃ (14.2℉ ~ 122℉); higher than 50℃ shows HH.H, lower than -9.9℃shows LL.L;
- Outdoor temperature range: -40℃ ~ 70℃ (-40℉ ~ 158℉); higher than 70℃ shows HH.H, lower than -40℃shows LL.L
- Indoor and outdoor environmental humidity range: 20-99%; higher than 99% shows HH, lower than 20% shows LL;
- Outdoor temperature and humidity: CHANNEL 1 periodically transmits 93S once; CHANNEL 2 is periodically transmitted once at 97S; CHANNEL 3 is launched once every 101s;
- Temperature and humidity maximum/minimum memory function, long press “” to clear the memory value or clear the memory value at 0 o’clock every day to the current value;
- Temperature tolerance: ± 1℃; humidity tolerance: ± 5%;
- The default highest temperature alarm value is +40℃ (+104℉), and the low temperature alarm value is -10℃(+14℉);
- When it is not the current display channel alarm, only the alarm sounds, “
 ” or
” or  ”does not flash;
 - press “” to turn off,then “
 ” can be terminated, and the temperature display will go back to the normal display.
 ” or
” or  ” can be terminated, and the temperature display will go back to the normal display.
Indoor Comfort
Frost Alert
- When the signal sensor of channel 1 is in the environment where the temperature is less than 3℃and greater than -2℃, the frost alert icon “
 ” is displayed.
Heat Index And Dew Point Temperature
- Click “
 ” to check the heat index, and then press the it again to check the dew point temperature;
 ” to check the heat index, and then press the it again to check the dew point temperature;
Lunar Phases
- The weather station has a display which automatically displays the current lunar phase.

Temperature unit ℉/℃
- Weather station : long press” HI/DP” .
- Remote sensor: press “℃/℉”button after opening battery cover.
Weather Forecast
- The weather station can display the barometric pressure trend.
- You may see the following display:
- The barometric pressure will rise ;
 The barometric pressure will remain constant ;
 The barometric pressure will fall.
 The barometric pressure will rise ;


