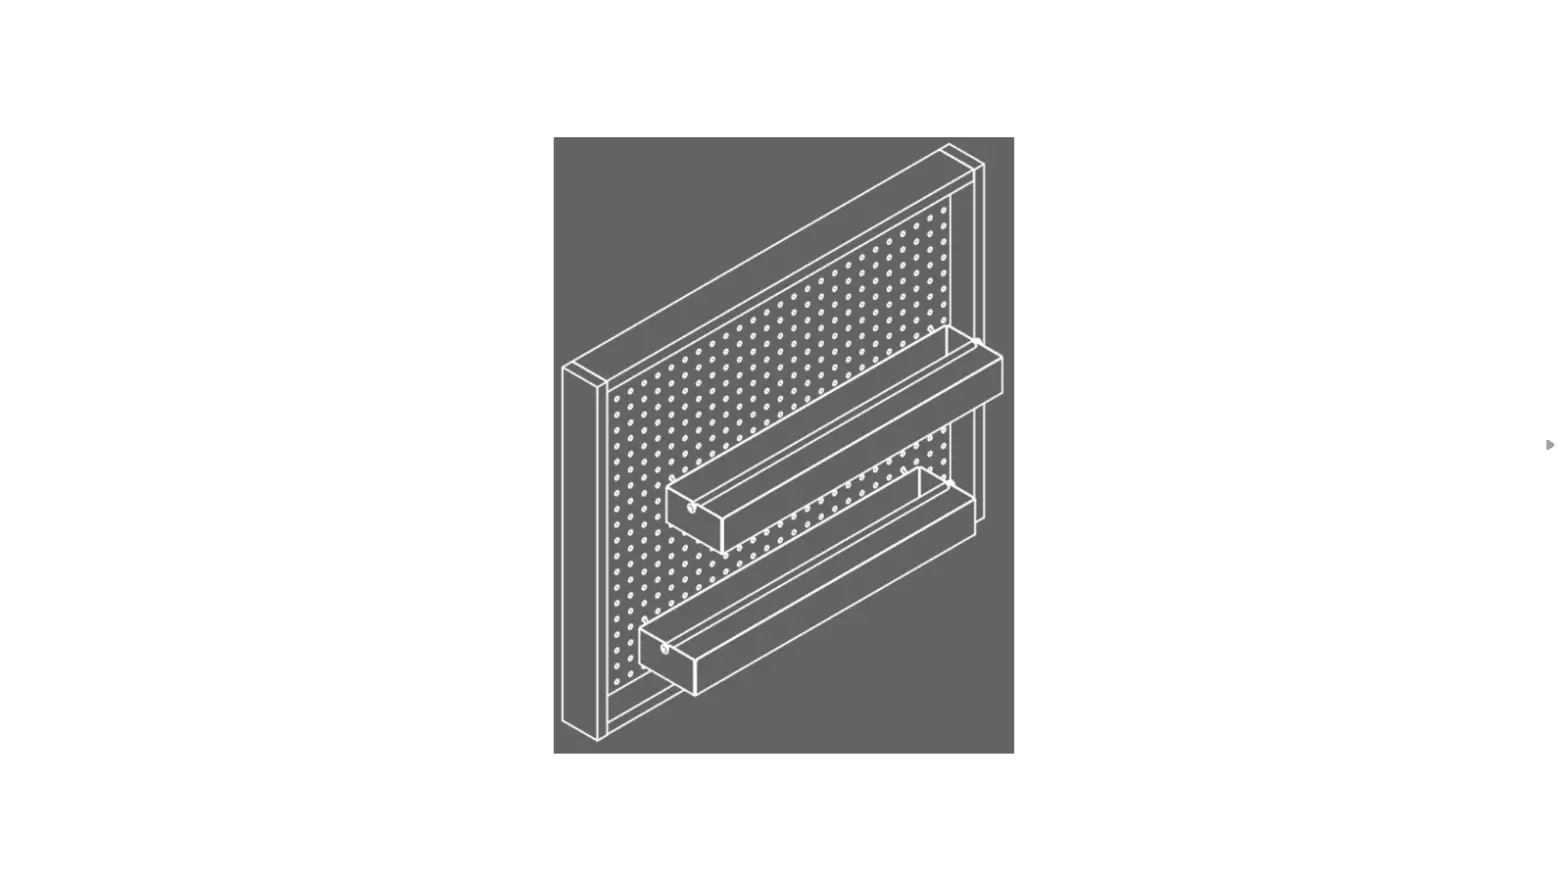
Teknik 5423411 Wall Mounted Peg Board
NOTE:
- THIS INSTRUCTION BOOKLET CONTAINS IMPORTANT SAFETY INFORMATION.
- PLEASE READ AND KEEP FOR FUTURE REFERENCE.
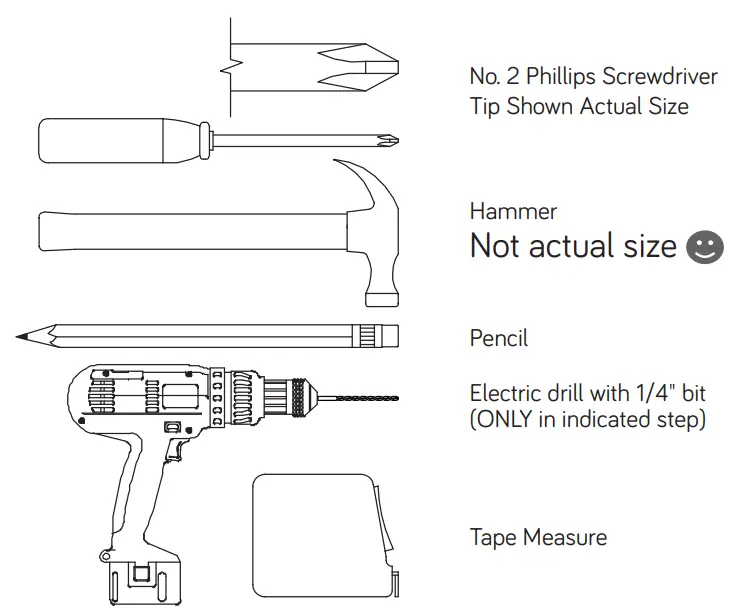
Assembly Tools Required
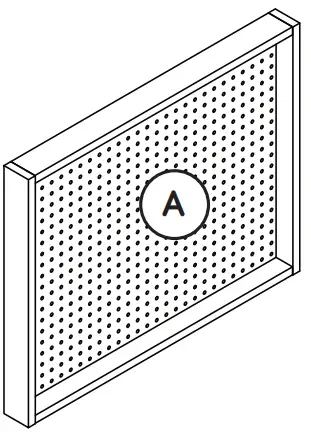
While not all parts are labeled, some of the parts will have a label or an inked letter on the edge to help distinguish similar parts from each other. Use this part identifi cation to help identify similar parts.
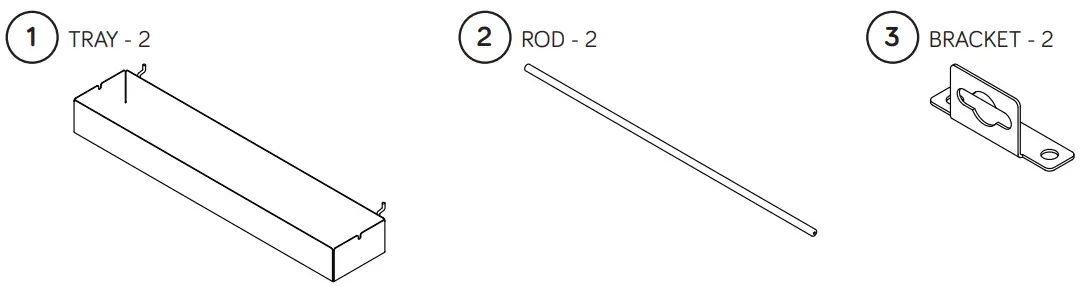
- A. UNIT (1)

Hardware Identification
Screws are shown actual size. You may receive extra hardware with your unit.


ASSEMBLING INSTRUCTION
- Step 1
- Assemble your unit on a carpeted fl oor or on the empty carton to avoid scratching your unit or the fl oor.
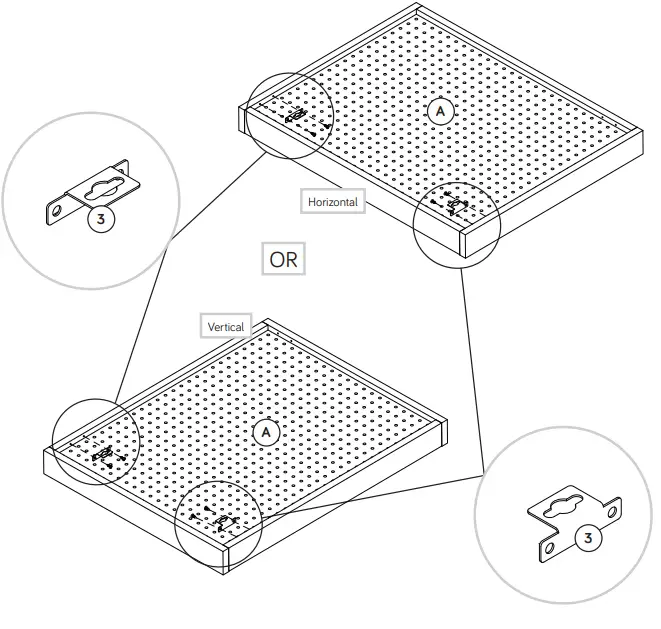
- Turn the UNIT (A) onto its front edges.
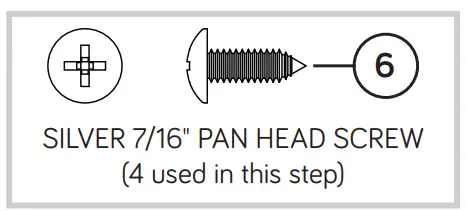
- To hang your unit horizontally, fasten the BRACKETS (3) to the short edges of the UNIT (A) exactly as shown. Use four SILVER 7/16″ PAN HEAD SCREWS (6).
- To hang your unit vertically, fasten the BRACKETS (3) to the long edges of the UNIT (A) exactly as shown. Use four SILVER 7/16″ PAN HEAD SCREWS (6).


- Step 2
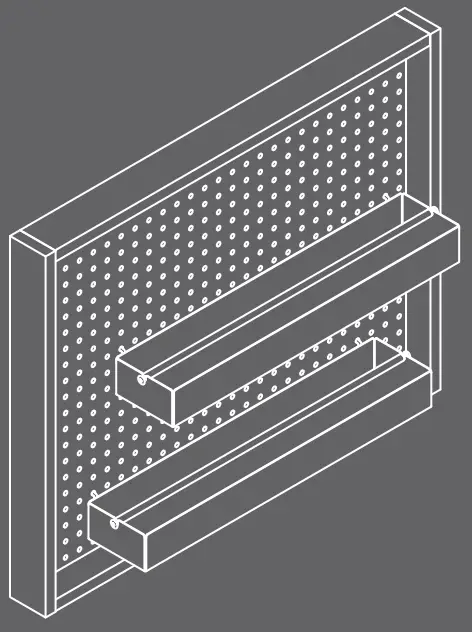
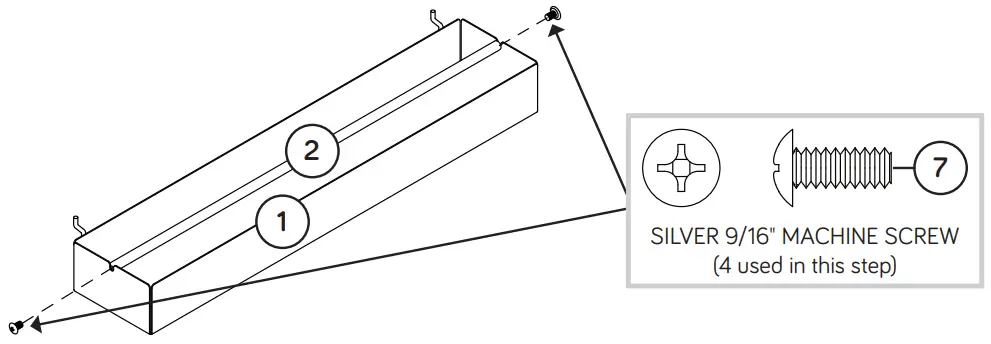
- Fasten one of the RODS (2) to one of the TRAYS (1). Tighten two SILVER 9/16″ MACHINE SCREWS (7).
- Repeat this for the other TRAY and ROD.
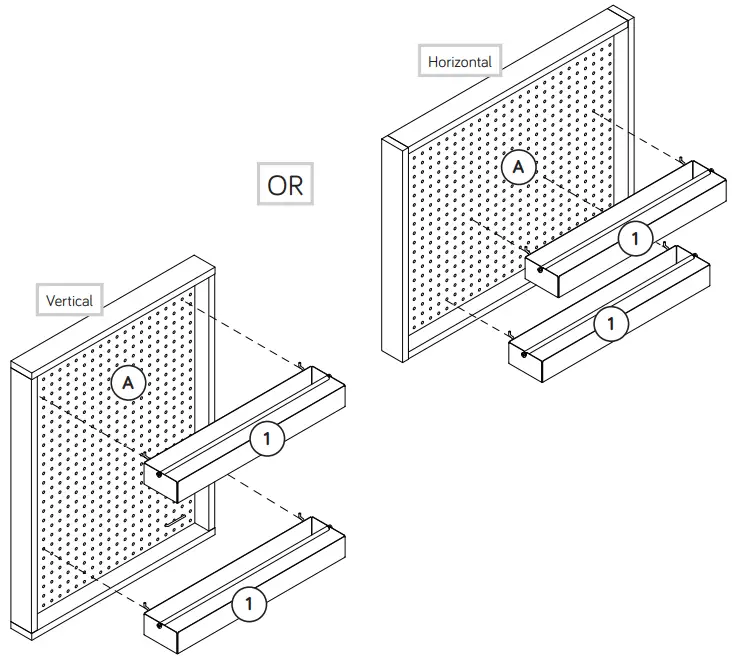
- Carefully stand your unit upright either horizontally or vertically. Insert the TRAYS (1) into the hole locations of your choice.


- Step 3
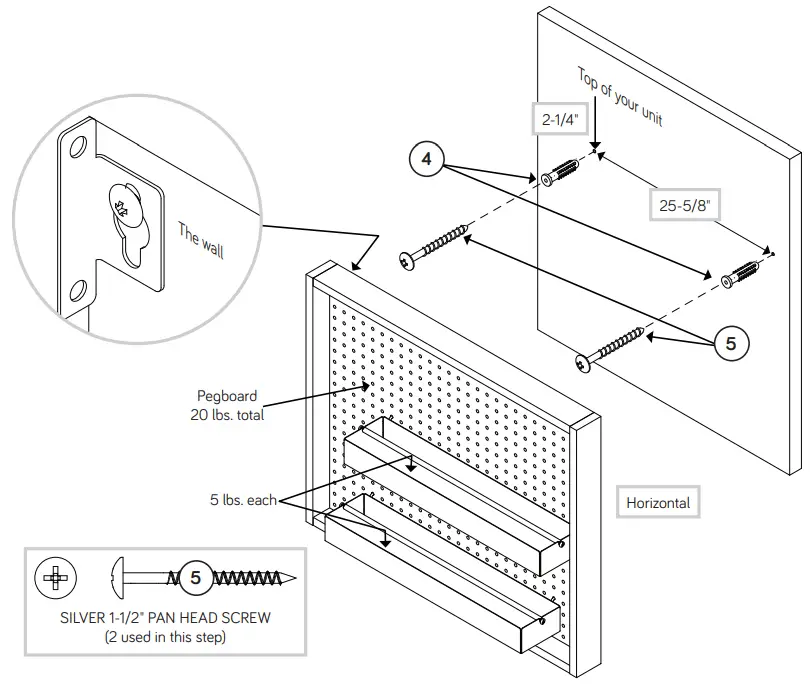
- This step shows how to hang your unit horizontally while the next step shows the unit being hung vertically.
- The centers of the BRACKETS used to hang your unit are spaced 25-5/8″ apart. With your tape measure, measure the distance on your wall. Then, mark the locations on your wall with a pencil. The marks should be 2-1/4″ down from the top of your unit.
- Next, drill the holes that are marked on the wall using a 1/4″ drill bit.
- NOTE: If attaching the Peg Board to a wall made of concrete, plaster, or other material, go to your local hardware store for proper hardware.
- Using your hammer, gently tap the WALL ANCHORS (4) into the holes in your wall. Then, turn two SILVER 1-1/2″ PAN HEAD SCREWS (5) into the WALL ANCHORS (4).
- NOTE: Do not use a power screwdriver to tighten the SCREWS.
- NOTE: Do not completely tighten the SCREWS. There should be approximately a 3/16″ gap between the SCREW and WALL ANCHOR.
- Carefully insert the SCREWS in your wall into the large holes in the brackets on the back of your unit. Then set the unit
down into place.
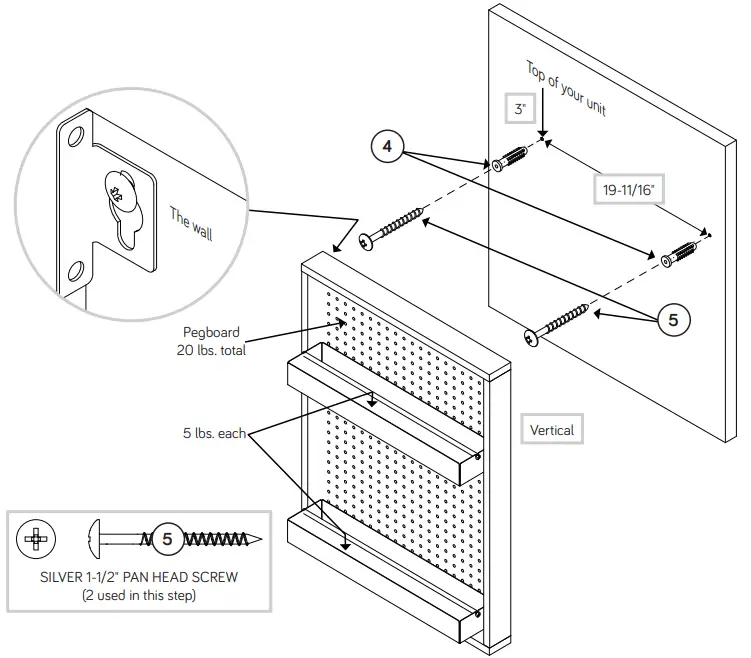
- Step 4
- The centers of the BRACKETS used to hang your unit are spaced 19-11/16″ apart. With your tape measure, measure the distance on your wall. Then, mark the locations on your wall with a pencil. The marks should be 3″ down from the top of your unit.
- Next, drill the holes that are marked on the wall using a 1/4″ drill bit.
- NOTE: If attaching the Peg Board to a wall made of concrete, plaster, or other material, go to your local hardware store for proper hardware.
- Using your hammer, gently tap the WALL ANCHORS (4) into the holes in your wall. Then, turn two SILVER 1-1/2″ PAN HEAD SCREWS (5) into the WALL ANCHORS (4).
- NOTE: Do not use a power screwdriver to tighten the SCREWS.
- NOTE: Do not completely tighten the SCREWS. There should be approximately a 3/16″ gap between the SCREW and WALL ANCHOR.
- Carefully insert the SCREWS in your wall into the large holes in the brackets on the back of your unit. Then set the unit down into place.
- NOTE: Please read the back pages of the instruction booklet for important safety information.
- This completes assembly. Clean with your favorite furniture polish or a damp cloth. Wipe dry.

TROUBLESHOOTING
| WARNING Please use your furniture correctly and safely. Improper use can cause safety hazards, or damage to your furniture or household items. Carefully read the following chart. | ||
| Look out for: | What can happen: | How to avoid the problem: |
| • Properly mounting the shelf to the wall. | • If not properly mounted, the shelf can fall from the wall and cause injury and damage. | • Carefully review and follow the mounting instructions contained in this manual. |
| • Overloaded shelves. | • Risk of injury or property damage. • Overloaded furniture can break. | • Never exceed the weight limits shown in the instructions. |
| • Improper use of furniture to support TV’s. • Placing TV’s on furniture items not intended to support them is hazardous. | • Risk of injury or death. TV’s can be very heavy. Plus the weight and location of the picture screen can make furniture tip forward. | • This product is not designed to support a television. |


