
AIDIOSM1C 2.4GHz Wireless Monitoring System

SAFTY INSTRUCTION AND WARNING
Please read and follow all instructions and warnings in this user manual before using the product.
- Strangulation Hazard – Keep the adapter cord out of the reach of children. Never place the camera or cord within 3 feet of a crib or playpen.
- Choking Hazard – This product contains small parts which may cause choking. Not for children under 3 years.
- Risk of explosion if battery is replaced by an incorrect type. Dispose of used battery according to the instructions.
- Use ONLY the power adapters and battery supplied with this product. Using other 3rd parties power adapter or battery may cause fatal damage to the product.
- Protect the adapter cord. Route cord so that they are not walked on or pinched by items or against them.
- Keep all components away from water or heat source such as a sink, bath tub, laundry tub, fire place or stove.
- Provide proper ventilation for both monitor and camera unit. Do NOT cover them with any material, such as a blanket or cloth.
- Disconnect all A/C adapters before cleaning. Do NOT immense in water. Clean it only with a dry cloth.
- Do NOT attempt to open the devices or accessories. No user serviceable part inside. Risk of electrical shock, fire or death.
- This product is NOT a substitute for direct supervision of your baby. Check your baby’s activities at regular intervals.
- This product is not a toy. Do NOT allow children to play with it.
OVERVIEW
Inside the box
Thanks for purchasing aidios M1 wireless monitoring system. It contains below components :
- Monitor unit x 1
- Camera unit x 1
- Rechargeable Lithium battery x 1
- A/C adapters x 2
- Wall mounting screw x 1
- Adhesive rubber foot (for camera stand) x 4
- User manual x 1
Specification
| RF frequency | 2400 – 2483.5 MHz |
| Type of modulation | GFSK |
| Type of spread spectrum | FHSS |
| Data rate | 4 Mbps |
| Channel width | 4 MHz |
| Transmission range | >1000 feet (LOS) |
Monitor unit
| Display | 4.3” color TFT LCD, 480×272 |
| Audio | Built-in speaker and microphone |
| Battery | 1800mAh rechargeable Lithium-ion polymer |
| Duration (Normal) | ~9 hours |
| Duration (VOX on) | ~15 hours |
| Operating voltage | 5V |
Camera unit
| Picture sensor | 1/5” Color CMOS, 640×480 |
| Optical lens | F2.4, EFL 3.7mm, FOV 70∘ |
| Night vision | 8 x 940nm IR LEDs |
| Light sensor | Built-in |
| Audio | Built-in speaker and microphone |
| Operating voltage | 5V |
| A/C adapter | Battery | |
| Mfg. | Dongguan Guanjin Electronics Technology Co., Ltd. | True Power Technology Co., Limited. |
| Model # | K05B050100 series | 505068 (1ICP5/51/68) |
| Spec. | Input 100-240V AC 50/60 Hz Output 5.0V DC 1.0A | 3.7V 1800mAh 6.66Wh |
Product Overview
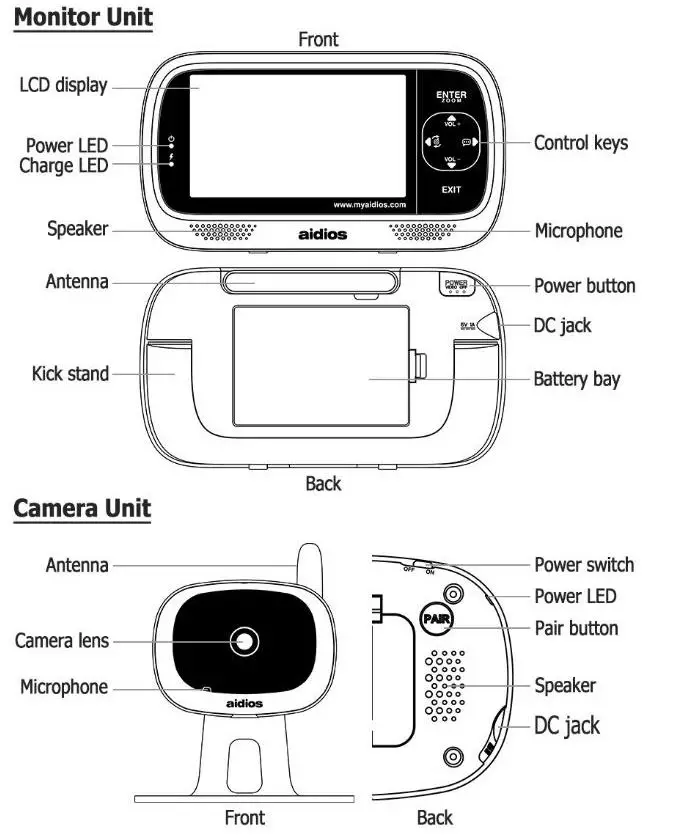
GETTING STARTED
Charging and powering monitor unit
Loosen the screw and open battery door. Plug in the battery to the battery socket as shown in pic. 1. Close the battery door and tighten the screw.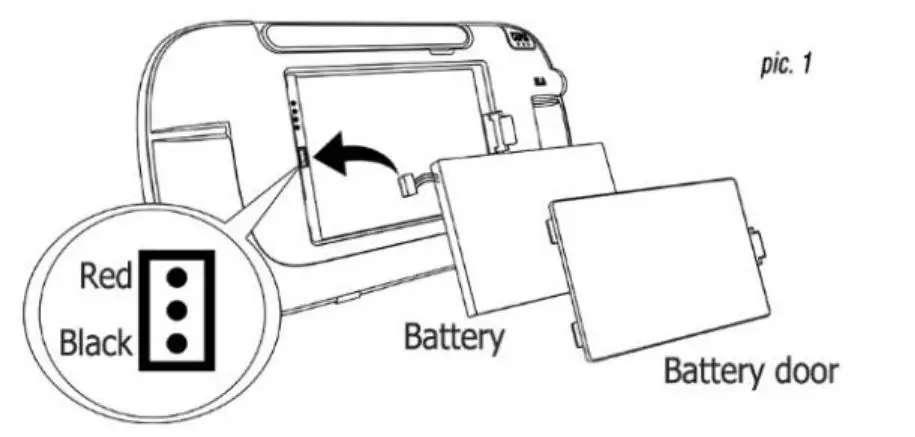
Plug the power adapter into an electrical outlet. Insert the 3.5mm plug to the power jack as shown in pic. 2. The charging process starts and charge LED indicator emits red light.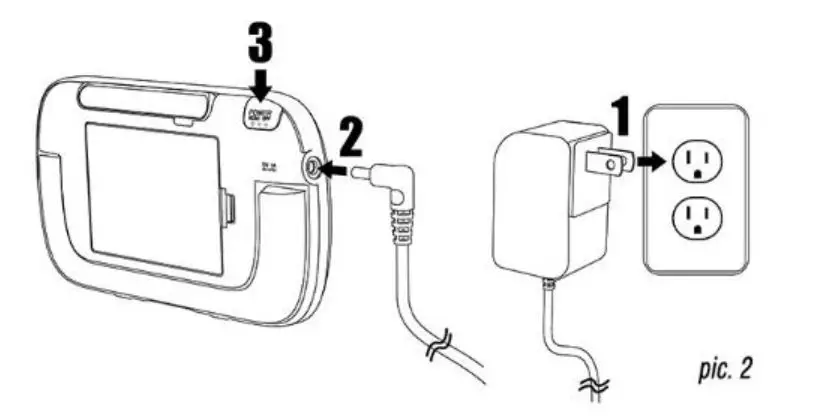
Press and hold the power button for 1 second to turn on the monitor unit. Power LED indicator emits blue light when monitor unit is turned on.
Powering camera unit
Plug the power adapter into an electrical outlet. Insert the 3.5mm plug to the power jack as shown in pic. 3. Slide the power switch to ‘ON’ position to turn on the camera unit. Power LED indicator emits blue light when camera unit is turned on.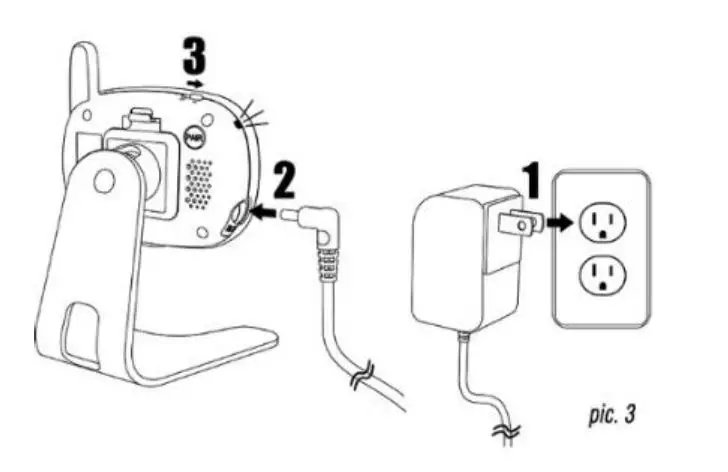
NOTE :
- Do not injest battery, Chemical Burn Hazard.
- This product contains a Lithium cell battery. If the battery is swallowed, it can cause severe internal burns in a short period and can lead to death.
- Keep new and used batteries away from children.
- If the battery compartment does not close securely, stop using the product and keep away from children.
- If you think the battery might have been swallowed and placed inside any part of the body, seek immediate medical attention.
OPERATION-GENERAL MODE
OSD icons 
Camera icons :
- Standard camera unit
- Camera unit at zoom mode
- Camera unit with pan tilt docking installed
(*) Temperature reading icon will be displayed only when pan tilt docking is installed.
Control keys
Power button
Press and hold : Power on/off
Short press : Video off mode (audio only)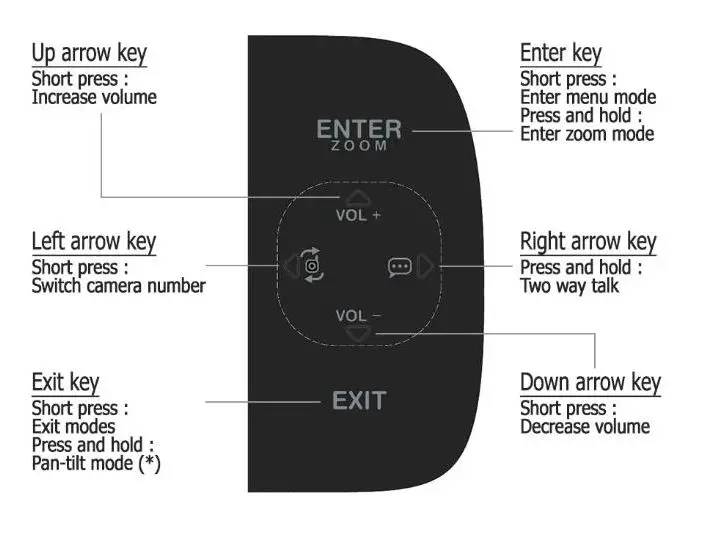
To enter menu mode, press ‘Enter’ key once. To leave menu mode, press ‘Exit’ key once. In menu mode, press arrow keys to navigate and select different options.
Video category
| Brightness | Adjust brightness of LCD screen |
| Color Saturation | Adjust saturation level of video image |
| Night vision | Select different night vision modes |
| Zoom | Display enhanced zoom image |
| Sound bar | Display sound bar on screen |
| Temperature scale | Select Celsius/Fahrenheit for temperature display (Available only with pan-tilt docking) |
| Pan tilt mode | Toggle pan-tilt mode on/off (Available only with pan-tilt docking) |
Audio category
| Camera# volume | Adjust sound output of registered camera (2 way talk, lullaby and nature sound) |
| Low battery alert | Toggle low battery alert on/off (2 beeps) |
| Out of range alert | Toggle out of range alert on/off (1 beep) |
| Auto mute | Toggle auto mute on/off (3 sensitivity levels) |
| VOX | Toggle VOX on/off (3 sensitivity levels) |
| Camera # lullaby | Toggle lullaby on/off for registered camera |
| Camera # nature sound | Toggle nature sound on/off for registered camera |
Auto mute
When auto mute is enabled, the camera unit starts to detect noise level. It turns off audio completely after a 10 seconds of continuous silence. Any noise detected afterwards will trigger the audio system back on, and repeat the noise detection.
The pre-determined level of silence can be adjusted over sensitivity setting. High sensitivity setting works better at silent condition. Low sensitivity setting works better at noisy condition.
VOX
Alike auto mute function, the camera unit starts to detect noise level when VOX is enabled. It turns off both video and audio completely after a 10 seconds of continuous silence. Any noise detected afterwards will trigger both systems back on, and repeat the noise detection.
Sensitivity setting is the same as auto mute function mentioned in 5.2.1.
Camera category
| Camera# | View, pair and or delete camera pairing for each camera |
| Auto scan | Cycle all registered cameras at an interval of 10 seconds. |
| Picture in picture | Display video from two camera units simultaneously. Video from secondary camera unit will be displayed at bottom right corner of screen. |
| Camera# night light | Toggle night light on/off at different camera units. (Available only with pan-tilt docking) |
Add a camera
- Select an ID number for your new camera and move the cursor to this camera ID number by pressing up/down arrow key.
- Press left/right arrow key and select ‘Pair’ option.
- Press ‘Enter’ key to perform pairing process.
- Press and hold the ‘Pair’ button at the back of camera unit for 1 second.The power LED of camera unit will blink to indicate pairing mode.
- Pairing process will be started automatically. Upon pairing success, the screen will display a message to indicate if the pairing process is completed.
- If unsuccessful, delete the pairing and retry above process.
Auto scan
Auto scan function automatically cycles through all registered cameras and display each camera for 10 seconds. If only one camera is registered, the screen will only display video from the registered camera
Picture in picture (PiP)
Picture in picture function allows viewing 2 camera units simultaneously. The video image of primary screen will be displayed at normal size. The video image of secondary screen will be reduced to 1/3 of its original size and displayed at lower right corner of screen. No audio will be transmitted from the camera at secondary screen.
Camera number of secondary screen can be changed by pressing ‘Left’ arrow key at general mode
To swap between primary and secondary screen, press and hold ‘Left’ arrow key for 1 second at general mode.
Note : When picture in picture is enabled, activation of VOX and auto mute function will depend on the sound level of camera at primary
TROUBLESHOOTING AND TIPS
| Problem | Solution |
| Product does not switch on | 1. Check the power adapter is properly connected to the device and wall outlets. 2. Swap the power adapter to check if the problem is caused by a defected adapter. 3. Double check if the monitor unit and camera unit is powered on. (Refer to section 3 of this user manual) |
| Screen shows ‘Signal lost ! Establishing connection’ | It indicates that the monitor unit cannot communicate with the camera unit. ‘1. Check the current camera number if it is correct. The camera number is displayed at the camera icon located at top left corner of screen. 2. If you are not sure about the camera number, press left arrow key to cycle through each camera from number 1 to 4. 3. Make sure the camera is powered on. The blue power LED should be lighted up. 4. If all fail, it may due to connection issue. Please check below column for the tips. |
| Connection issues | Below are the tips to improve the connectivity between monitor and camera unit 1. Place both monitor and camera unit 3 feet above ground. 2. Flip the antenna out of the monitor unit. |
| Connection issues (continued) | 3. Place the monitor and camera units closer, if possible. 4. Avoid large metallic objects in close proximity to the monitor or camera unit. 5. Place the monitor or camera unit at least 3 feet from any 2.4GHz device, such as WiFi router, smartphone or microwave oven. 6. Try to delete the pairing at the monitor unit, and re-pair to the camera unit. 7. Try to enable smart channeling and use different band to test connectivity. |
| Screen shows black and white image, not color image | It is normal that the system delivers black and white image at night vision mode. 1. Relocate the camera unit, so to capture correct ambient light level. 2. Select a low sensitivity night vision setting. 3. Night vision can be enabled or disabled manually in menu mode. |
| Feedback noise (shrill sound) | 1. Avoid to put monitor and camera unit too close together. 2. Decrease volume level of monitor unit. |
| Sound cut in and out | 1. Possibly due to auto mute function. Turn off auto mute function and test. 2. Unit at marginal reception condition. Try solutions in connection issues column. |
| Annoying beep alerts | There are 2 types of beep alerts, low battery and out of range. System delivers one beep every 10 seconds if the monitor cannot communicate with camera unit. System delivers two beeps every 10 seconds if the battery capacity is low. Both alerts can be enabled or disabled in user menu. |
| Battery and charging issue | For first time usage, it is always recommended to charge the battery for at least 8 hours before power on. Avoid to dry up the capacity before recharging, as it degrades the battery and shorten its life cycle. 1. During battery charging, the red charge LED should be lighted up. Check the power adapter and make sure it is properly connected to monitor unit and wall outlet. 2. Swap the power adapter to check if the problem is caused by a defected adapter. 3. Plug the power adapter to other wall outlet/power source. 4. Remove the battery from monitor unit, and re-insert it. Check the connection pins if they are in good condition. |
WARRANTY INFORMATION
We warrant to the original user that the product is free from material and workmanship defects for a period of one (1) year from the date of original purchase. If this monitoring system fails to function properly when used as directed under normal conditions within the one-year period, we will either repair or replace the product, at our discretion, free of charge. This warranty does not apply to a product which has been damaged as a result of improper maintenance, accidents, improper voltage supply, or other misuses. The warranty is also void if the owner repairs or modifies the product in any way. We are not liable for any incidental or consequential damages with regard to this product. The warranty also excludes any liability other than what is stated above. No other warranties are given. Legal rights vary from country to country. Some countries do no allow the exclusion or limitation of incidental or consequential damages, so the above limitation may not applyto you. If you experienced any problem and the troubleshooting can not help you to solve the problem, please visit our website for an updated FAQ or contact us directly. We are always pleased to serve you at the best we can.
FCC STATMENT
WARNING : Modifications not authorized by the manufacturer may void
users authority to operate this device. This device complies with part 15 of the FCC Rules. Operation is subject to the following two conditions: (1) This device may not cause harmful interference, and (2) this device must accept any interference received, including interference that may cause undesired operation. Changes or modifications not expressly approved by the party responsible for compliance could void the user’s authority to operate the equipment. This equipment has been tested and found to comply with the limits for a Class B digital device, pursuant to Part 15 of FCC Rules. These limits are designed to provide reasonable protection against harmful interference in a residential installation. This equipment generates, uses, and can radiate radio frequency energy and, if not installed and used in accordance with the instructions, may cause harmful interference to radio communications. However, there is no guarantee that interference will not occur in a particular installation. If this equipment does cause harmful interference to radio or television reception, which can be determined by turning the equipment off and on, the user is encouraged to try to correct the interference by one or more of following measures:
- Reorient or relocate the receiving antenna.
- Increase the separation between the equipment and receiver.
- Connect the equipment into an outlet on a circuit different from that to which the receiver is connected.
- Consult the dealer or an experienced radio/TV technician for help.
The camera unit shall be installed and operated with a minimum distance of 20cm between the radiator and your body.
Please refer to the appendix for the SAR statement.
DECLARATION OF CONFORMITY\OTHERS
Declaration of Conformity :
Hereby aidios Ltd., declares that the videos M1 and the series is in compliance with essential requirements and other relevant provision of Red Directive 2014/53/EU. The product had designed, tested and manufactured according the European Red Directive 2014/53/EU.
Information on waste disposal for Consumers of Electrical & Electronic Equipment.
This mark on a product and/or accompanying documents indicates that when it is to be disposed of, it must be treated as Waste Electrical & Electronic Equipment, (WEEE). Any WEEE marked products must not be mixed with general household waste, but kept separate for the treatment, recovery and recycling of the materials used. For proper treatment, recovery and recycling; please take all WEEE marked waste to your Local Authority Civic waste site, where it will be accepted free of charge. If customers dispose of Waste Electrical & Electronic Equipment correctly, they will be helping to save valuable resources and preventing any potential negative effects upon human health and the environment, of any hazardous materials that the waste may contain.
Appendix :
For Monitor:
This equipment complies with FCC radiation exposure limits set forth for an uncontrolled environment. End user must follow the specific operating instructions for satisfying RF exposure compliance. This transmitter must not be co-located or operating in conjunction with any other antenna or transmitter. The portable device is designed to meet the requirements for exposure to radio waves established by the Federal Communications Commission (USA). These requirements set a SAR limit of 1.6 W/kg averaged over one gram of tissue. The highest SAR value reported under this standard during product certification for use when properly worn on the body is 0.256 W/kg. For body operation, this device has been tested and meets FCC RF exposure guidelines when used with any accessory that contains no metal and that positions a minimum of 15mm from the body. Use of other accessories may not ensure compliance with FCC RF exposure guidelines.


