behringer SD251-BT Studio Monitoring Earphones User Guide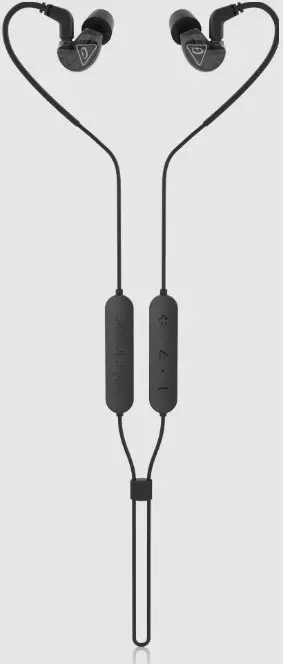
Important Safety Information
- Read these instructions.
- Keep these instructions.
- Heed all warnings.
- Follow all instructions.
- Do not use this apparatus near water.
- Clean only with dry cloth.
- Do not throw this product in the fire, to avoid explosion.
- Do not expose this product to bright sunshine for a long time.
- Do not disassemble or modify this product.
- Please store this product in a clean and dry environment.
- Charge it once a month (minimum).
- Do not leave unattended while charging.
- Operation Ambient Temperature up to 40°C.

Correct disposal of this product: This symbol indicates that this product must not be disposed of with household waste, according to the WEEE Directive (2012/19/EU) and your national law. This product should be taken to a collection center licensed for the recycling of waste electrical and electronic equipment (EEE). The mishandling of this type of waste could have a possible negative impact on the environment and human health due to potentially hazardous substances that are generally associated with EEE. At the same time, your cooperation in the correct disposal of this product will contribute to the efficient use of natural resources. For more information about where you can take your waste equipment for recycling, please contact your local city office, or your household waste collection service.
![]() Warning! To prevent possible hearing damage, do not listen at high volume levels for long periods. As a guide to setting the volume level, check that you can still hear your own voice, when speaking normally while listening with the headphones.
Warning! To prevent possible hearing damage, do not listen at high volume levels for long periods. As a guide to setting the volume level, check that you can still hear your own voice, when speaking normally while listening with the headphones.
![]() Warning!
Warning!
- Don’t replace a battery that can defeat a safeguard;
- Disposal of a battery into fire or a hot oven, or mechanically crushing or cutting of a attery, that can result in an explosion;
- Leaving a battery in an extremely high temperature surrounding environment that can result in an explosion or the leakage of flammable liquid or gas; and
- A battery subjected to extremely low air pressure that may result in an explosion or the leakage of flammable liquid or gas.
- Attention should be drawn to the environmental aspects of battery disposal
![]() Warning! Batteries (battery pack or batteries installed) shall not be exposed to excessive heat such as sunshine, fire or the like.
Warning! Batteries (battery pack or batteries installed) shall not be exposed to excessive heat such as sunshine, fire or the like.
Controls
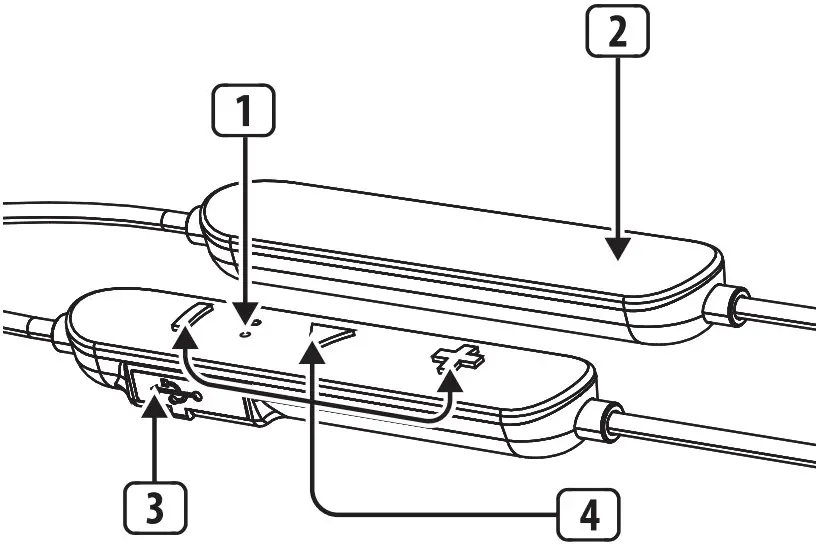
- Charging/Bluetooth LED and microphone
- Battery pod
- USB charging port
- Control buttons
Accessories List
- SD251-BT earphones x 1 pair
- Zipper case
- Silicone sleeves in 3 sizes
- USB charging cable
- Cleaning tool
- This quick start guide
Features
- Professional studio-grade monitoring earphones
- Dynamic micro-driver provides wide frequency response (20 Hz – 20 kHz) delivering full bass and detailed highs
- Bluetooth® 5.0 technology for exceptional sound quality with up to 33 ft (10 m) of wireless freedom
- Built-in CVC 8.0 isolates the user’s voice from surrounding clutter for clear phoneconversation
- Sound-isolating design blocks outside noise for detailed musical experience
- Secure, over-the-ear cable design ensures in-ear stability and comfort
- 360-degree rotating gold-plated MMCX lock-snap connector for flexibility and versatile connectivity options
- Bluetooth communication cable for seamless phone calls and effortless music controls
- Up to 7-hours of battery life – USB charging cable included
- Zipper case included to enjoy your music on-the-go
- Includes foam and silicone ear-plugs in 3 sizes to ensure a perfect fit
Getting Started
Charging
- Before use, please read this quick start guide carefully and keep it in a safe place.
- Please fully charge the earbuds before use.
- Do not leave unattended while charging.
- Please regularly charge the earbuds if you do not use them for a long time (more than 3 months).
- Please use the supplied charger cable only.
- There is built-in easy voice prompt for low battery that informs the user to recharge the device.
WARNING: Avoid the following
- Replacement of a battery that can defeat a safeguard.
- Disposal of a battery into fire or a hot oven, or mechanically crushing or cutting of a battery, that can result in an explosion.
- Leaving a battery in an extremely high temperature surrounding environment that can result in an explosion or the leakage of flammable liquid or gas.
- A battery subjected to extremely low air pressure that may result in an explosion or the leakage of flammable liquid or gas.
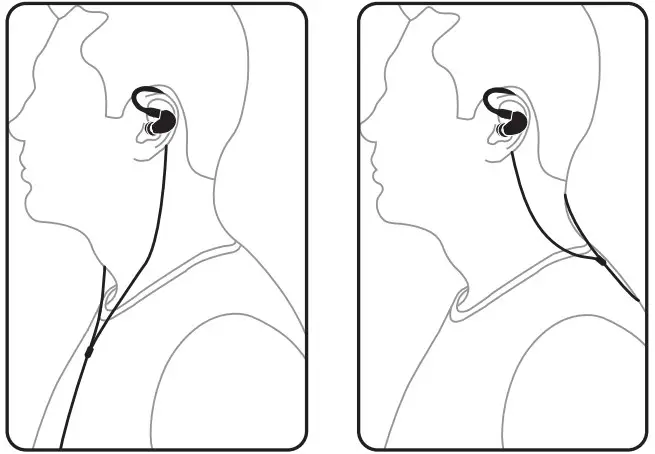
Wearing, inserting and removing the earphones
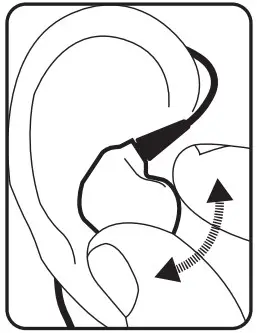
- These earphones should be worn with the cables routed over the ear. Then, the cables can be run to your monitoring system either in front or behind, similar to this illustration:

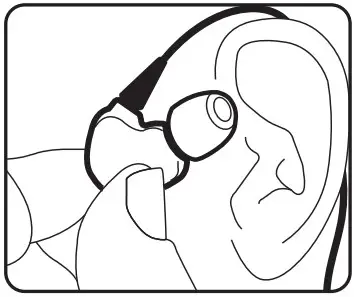
- Insert each earphone so makes a tight seal in the ear canal. A good seal with the ear canal is necessary for optimum sound quality, especially for bass frequencies.

- If you notice a loss of bass frequencies, gently push the earphone deeper into the ear canal to produce a better seal. If this adjustment does not improve the bass response, you can also switch to a different sleeve.
WARNING: Avoid pushing the earphone in beyond the ear canal. - To remove the earphones, firmly hold each earphone’s outer case between your finger and thumb and twist gently

Choosing, installing and changing sleeves
SD Series earphones come with a selection of soft sleeves in three sizes, from small to large
WARNING: Always make sure to protect your ears by muting or lowering your monitoring system’s volume down all the way before inserting the earphones.
- Choose an earphone sleeve with the best fit and the best seal to isolate your earphone mix from outside sounds.
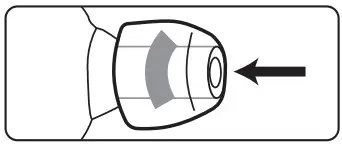
- Slide the sleeve onto each earphone’s sound nozzle. Apply light pressure, and if necessary rotate the sleeve as you go until secure.
- Make sure the sleeve completely covers the nozzle and the flared barb.

- Try inserting the earphone into your ear canal to test the fit.
- If the fit is too loose or tight, twist and pull to remove the sleeve from the nozzle and replace with a sleeve in the next appropriate size.

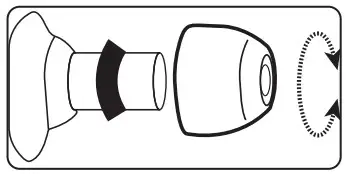
NOTE: If the barb or nozzle is exposed beneath the sleeve, the sleeve is not installed properly. Sleeves that do not fit securely over the nozzle and barb should be replaced.
Bluetooth pairing
You will hear voice prompt for pairing after power on. Please refer to function map table for other functions.
Bluetooth functions for Bluetooth-enabled earphones can be accessed from the controller pod embedded in the earphone cable:
Power ON/OFF
| Power On | Press center key for 3 seconds |
| Power Off | Press center key for 3 seconds |
Music Controls
| Play the Track | Press center key once |
| Pause the Track | Press center key once |
| Volume Up by 7% | Press “+” key |
| Volume Down by 7% | Press “-” key |
| Next Track | Long Press “+” key |
| Previous Track | Long Press “-” key |
Mic Control
Mic mute/unmute: Long press center key
Voice Assist Control
Activate Voice
Assist: Press center key three times
LED Indication
| Mode | LED color/activity |
| Charging | Red |
| Fully charged | Red light will turn off |
| Pairing mode | Red and Blue lights flashing alternately |
| Bluetooth connected | Blue |
Cleaning
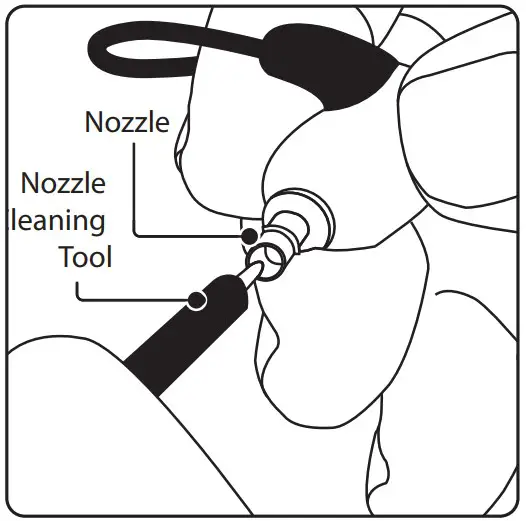
- If you notice problems with sound quality not related to the fit inside the ear canal, remove the sleeve and check the earphone nozzle for obstructions.
- If the nozzle is blocked, use the included cleaning tool to clear the block.

- Replace the sleeve onto the nozzle, and re-insert the earphones into your ear to test the sound.
Maintenance tips
- Keep the earphones and sleeves clean and dry.
- To clean, remove the sleeves from the earphone nozzle, gently rinse in warm water and allow to air dry. Sleeves should be completely dry before
- Inspect sleeves for damage and replace as necessary.
- Avoid exposing the sleeves to extreme temperatures.
- Replace sleeves that do not fit properly
Technische Daten
| Driver | 6.8 mm |
| Impedance | 22 Ω |
| Frequency responsew | 20 Hz to 20 kHz |
| Sound pressure level (SPL | 93 dB @1kHz (105 dB peak) |
| Rated power | 3 mW |
| Bluetooth* | Version 5.0 |
| Frequency range | 2402 MHz ~ 2480 MHz |
| Channel number | 79 |
| Max output power | 5 dBm |
| Bluetooth range | Up to 10 m (33 ft) in line of sight |
| CODEC support | aptX, AAC, SBC |
| Call support | CVC 8.0 |
| Mic sensitivity | -42 dB (±3 dB) @ 1 kHz,0 dB = 1 V/Pa |
| Battery type | Rechargeable lithium battery |
| Working time | Up to 7 hrs |
| Standby time | Up to 150 hrs |
| Charging time | 1 hr via USB 5 V / 500 mA |
| Cable | Shielded, detachable |
| Connector | MMCX connector, detachable |
| Cable length | 25 cm (10″) |
*Die Bluetooth®-Wortmarke und -Logos sind Eigentum der Bluetooth SIG, Inc., und jede Verwendung dieser Marken durch Music Tribe erfolgt unter Lizenz.
![]()
Hereby, Music Tribe declares that this product is in compliance with Directive 2014/53/EU, Directive 2014/30/EU, Directive 2014/35/EU, Directive 2011/65/EU and Amendment 2015/863/EU, Directive 2012/19/EU, Regulation 519/2012
REACH SVHC and Directive 1907/2006/EC.
Full text of EU DoC is available at https://community.musictribe.com/
EU Representative: Music Tribe Brands DK A/S
Address: Gammel Strand 44, DK-1202 København K, Denmark
CAN ICES-3 (B)/NMB-3(B)
UK Representative: Music Tribe Brands UK Ltd.
Address: 6 Lloyds Avenue, Unit 4CL London EC3N 3AX, United Kingdom