![]() B248Y 23.8 Inch LCD Monitor
B248Y 23.8 Inch LCD Monitor
User Guide
Important Safety Notice
Proper service and repair is important to the safe, reliable operation of all ACER Company Equipment. The service procedures recommended by ACER and described in this service manual are effective methods of performing service operations. Some of these service operations require the use of tools specially designed for the purpose. The special tools should be used when and as recommended.
It is important to note that this manual contains various CAUTIONS and NOTICES which should be carefully read in order to minimize the risk of personal injury to service personnel. The possibility exists that improper service methods may damage the equipment. It is also important to understand that these CAUTIONS and NOTICES ARE NOT EXHAUSTIVE. ACER could not possibly know, evaluate and advise the service trade of all conceivable ways in which service might be done or of the possible hazardous consequences of each way. Consequently, ACER has not undertaken any such broad evaluation. Accordingly, a servicer who uses a service procedure or tool which is not recommended by ACER must first satisfy himself thoroughly that neither his safety nor the safe operation of the equipment will be jeopardized by the service method selected.
Hereafter throughout this manual, ACER Company will be referred to as ACER.
WARNING
The use of substitute replacement parts, which do not have the same, specified safety characteristics may create shock, fire, or other hazards.
Under no circumstances should the original design be modified or altered without written permission from ACER.
ACER assumes no liability, express or implied, arising out of any unauthorized modification of design.
The servicer assumes all liability.
FOR PRODUCTS CONTAINING LASER:
DANGER-Invisible laser radiation when open. AVOID DIRECT EXPOSURE TO THE BEAM.
CAUTION-Use of controls or adjustments or performance of procedures other than those specified herein may result in hazardous radiation exposure.
CAUTION -The use of optical instruments with this product will increase eye hazards.
TO ENSURE THE CONTINUED RELIABILITY OF THIS PRODUCT, USE ONLY THE ORIGINAL MANUFACTURER’S REPLACEMENT PARTS, WHICH ARE LISTED WITH THEIR PART NUMBERS IN THE PARTS LIST SECTION OF THIS SERVICE MANUAL.
Take care during handling the LCD module with a backlight unit
- Must mount the module using mounting holes arranged in four corners.
- Do not press on the panel, or edge of the frame strongly or electric shock as this will result in damage to the screen.
- Do not scratch or press on the panel with any sharp objects, such as a pencil or pen as this may result in damage to the panel.
- Protect the module from the ESD as it may damage the electronic circuit (C-MOS).
- Make certain that the treatment person’s body is grounded through a wristband.
- Do not leave the module in high temperatures and in areas of high humidity for a long time.
- Avoid contact with water as it may a short circuit within the module.
- If the surface of the panel becomes dirty, please wipe it off with a soft material. (Cleaning with a dirty or rough cloth may damage the panel.)1.
Exploded view diagram with a list of items
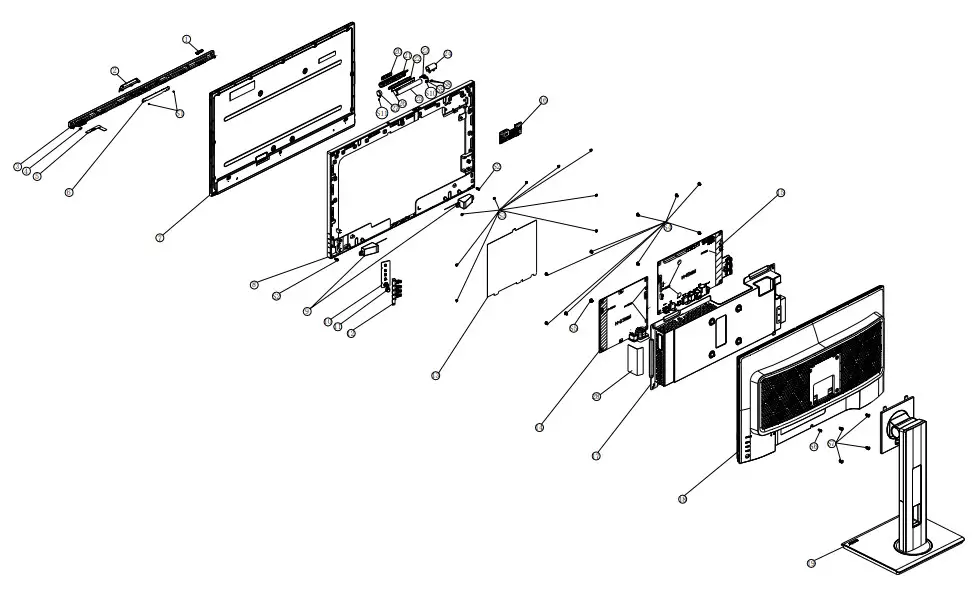
| Item | Description | TPV Part No. | ACER Part No. |
| 5 | LED BOARD | LEPCLQA3 | N/A |
| 6 | LCD M238HCA-L3E C1 NB INX | 750GBN238H3E12N000 | N/A |
| 7 | OPTION BOARD | PTPCPQB8 | N/A |
| 10 | KEYBOARD | KEPCPQB8 | N/A |
| 14 | ADAPTER BOARD | PLPCKE201IACC | N/A |
| 15 | MAINBOARD | CBPRPTOCOQ1 | N/A |
| 16 | IR BOARD | IRPCQ5 | N/A |
| 395G179030P1530000 | CABLE 30P 400MM (MB TO PANEL) | 50.TPEM2.004 |
Mechanical Instruction
Tools Required
List the type and size of the tools that would typically be used to disassemble the product to a point where components and materials requiring selective treatment can be removed.
Tool Description:
- Screwdriver (Phillip-head, Hexagonal head)
- Penknife
2.1 Disassembly Procedures:
S1. Push the button to remove the stand base assy, then unscrew the screws.
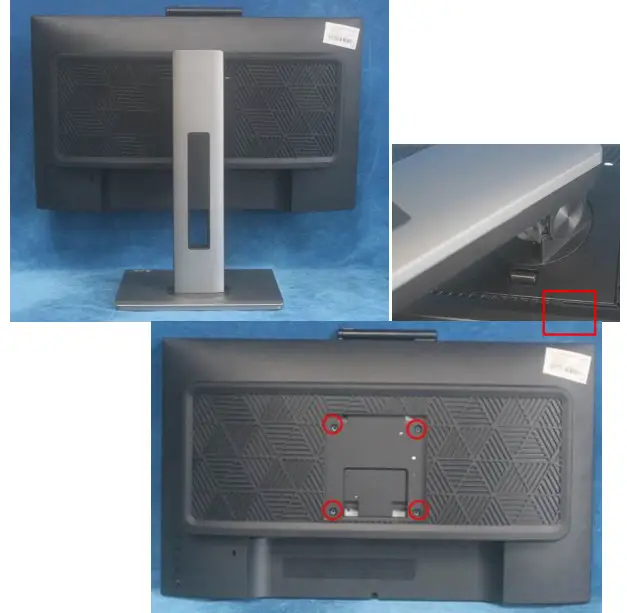
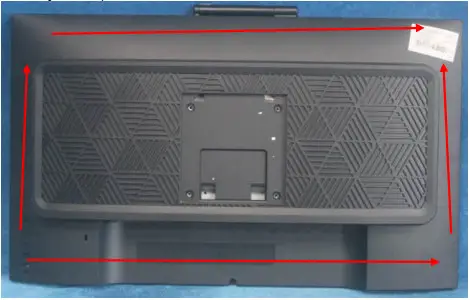
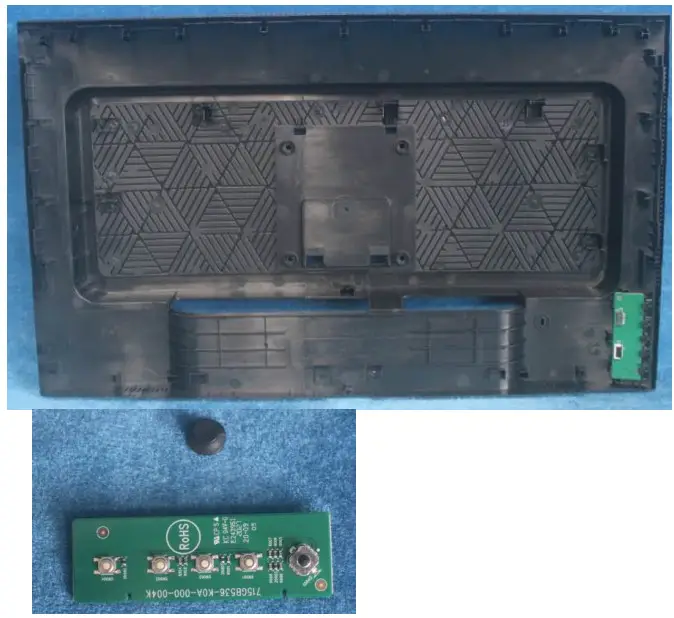
S2. Remove the REAR COVER. Use a tool (like the picture used) to open all latches. (Be careful about the position of the keyboard.)
S3. Disconnect the cables to remove the rear cover.
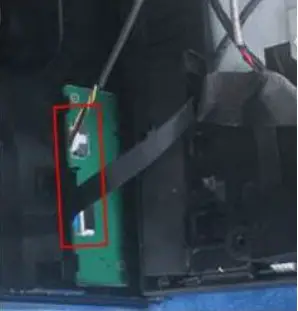
S4. Remove the keyboard

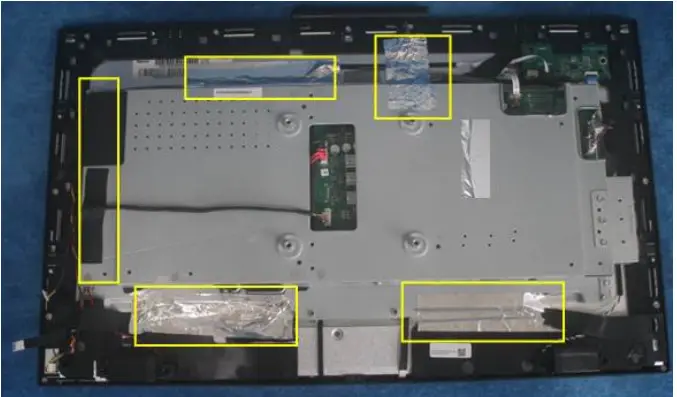
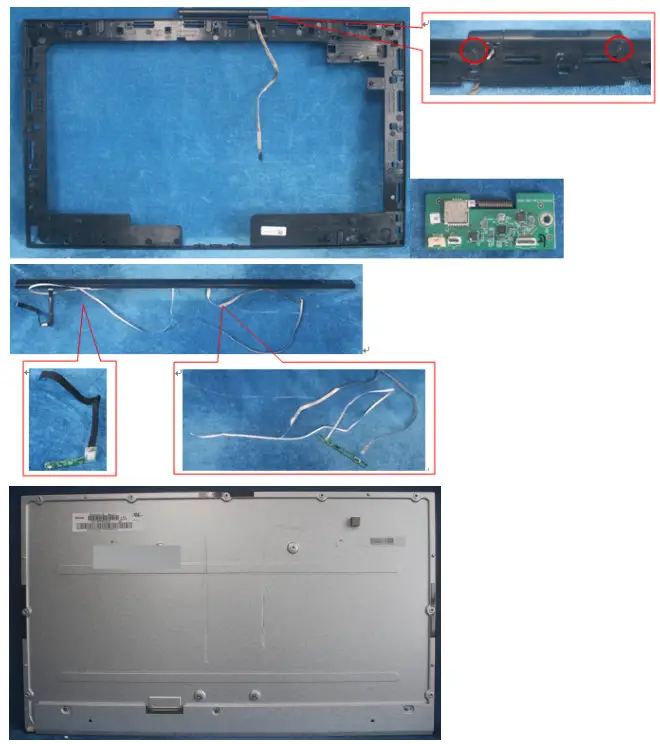
S5. Tear up all the tapes, disconnect the cables and remove the speakers.
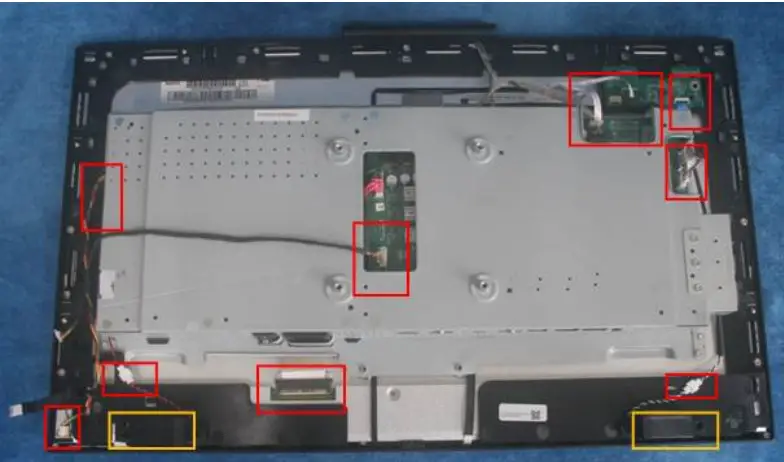
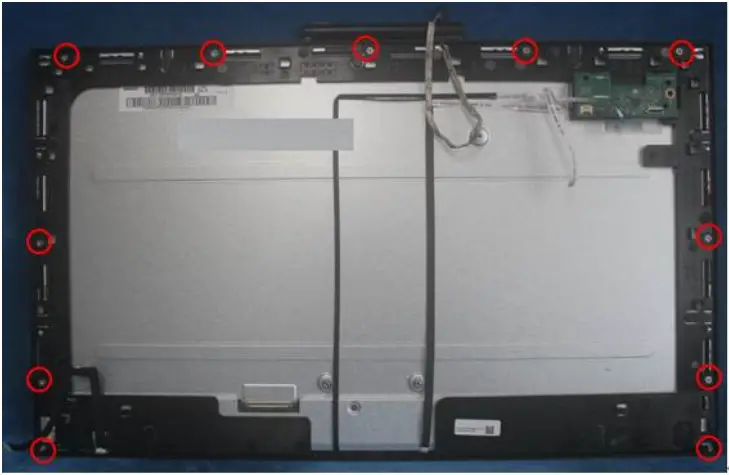
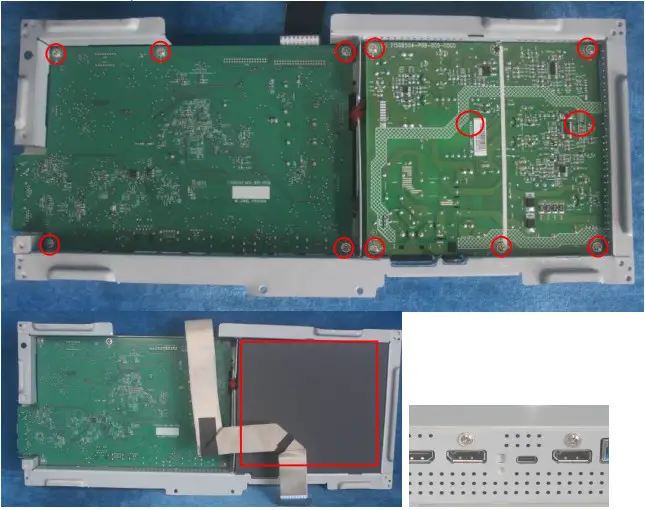
S6. Remove the screws to separate the panel and the Middle Frame/Optional Board / IR Board/ Webcam and the DECO BEZEL.
S7. Remove the Mylar sheet and all of the screws to remove the main board / Power board from the mainframe
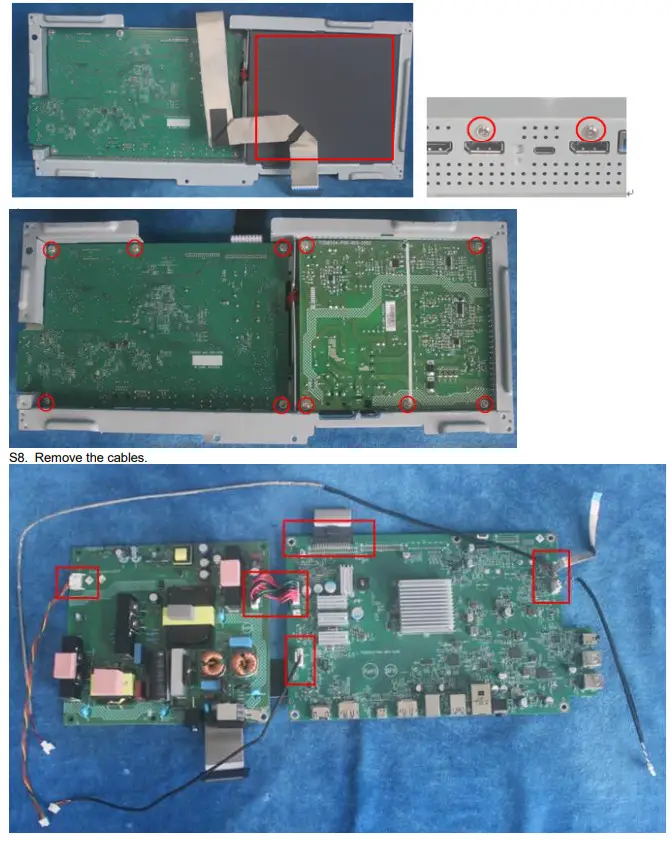
2.2 Assembly Procedures:
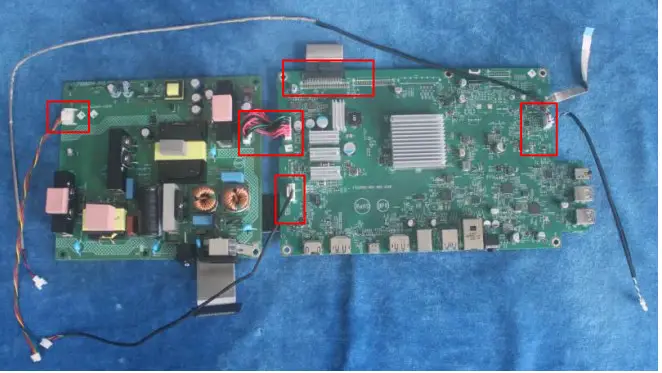
S1. Prepare the main board, a power board, and the cables, Connect the cables as below picture
S2. Use a screwdriver to tighten the screws till the boards with shield are firmly attached. Then paste the Mylar sheet on the adapter board
S3. Assemble the MIDDLE FRAME, DECO bezel, LED board, IR board, Webcam, OPTION BOARD, and the panel.
Use a screwdriver to tighten the screws.

S4. Put the main frain on the panel, and connect cables. Assemble the speakers. Pasting all tapes.

S5. Prepare a rear cover, Assemble the keyboard.
S6. Connect the pins and tighten the screws.
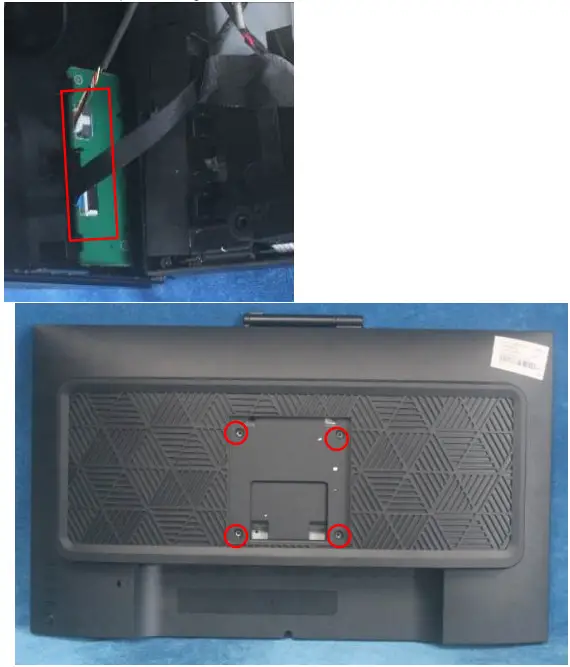
S7. Assemble the stand base ass’y.
Firmware Upgrade Process
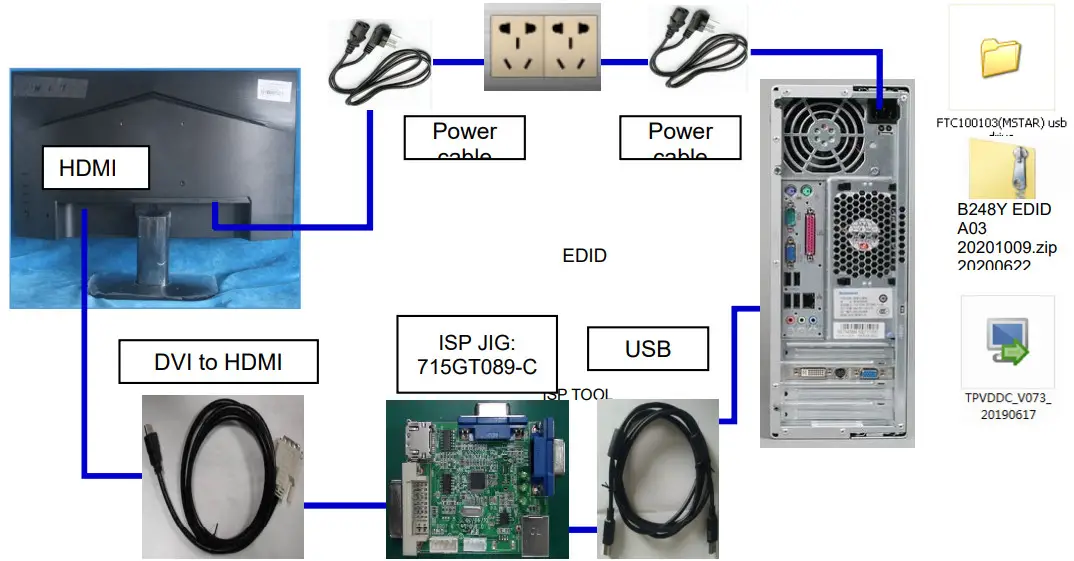
1. Materials list and connection
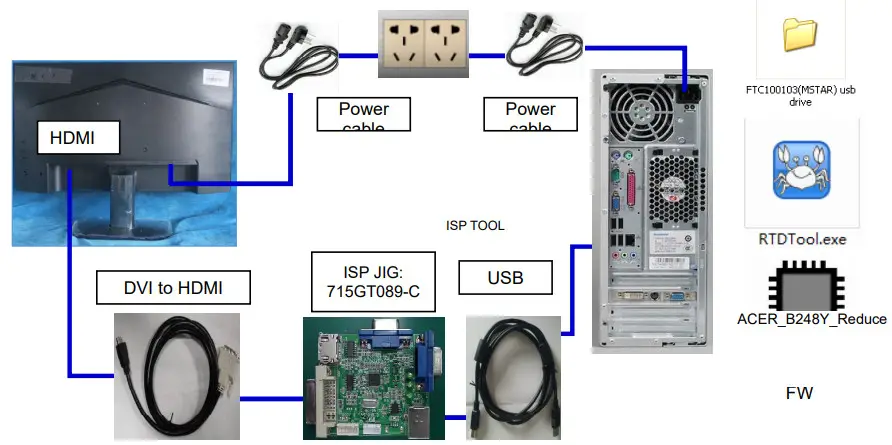
2. Install a USB driver.
When insert the USB cable to the PC USB port, will pop up Hardware Wizard to help you install the USB driver if you use this ISP board first time. it can auto-install success by itself
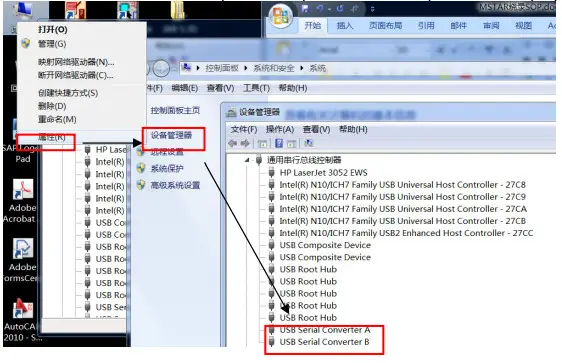
Remark: The USB driver files path: D:\FTC100103(Mstar)\FTCUSB.INF After installation the USB serial port driver, please check the port. Look at the properties of “my Computer”
3. Install the RTD tool.
Note: If the F/W Upgrade uses the same ISP tool as the EDID writing, you must close the EDID writing tool before running the F/W Upgrade tool.

3.1.![]() double- clicks the icon to run it.
double- clicks the icon to run it.
Note: Must install the driver first
3.2. Choose the FTDI USB communication way.
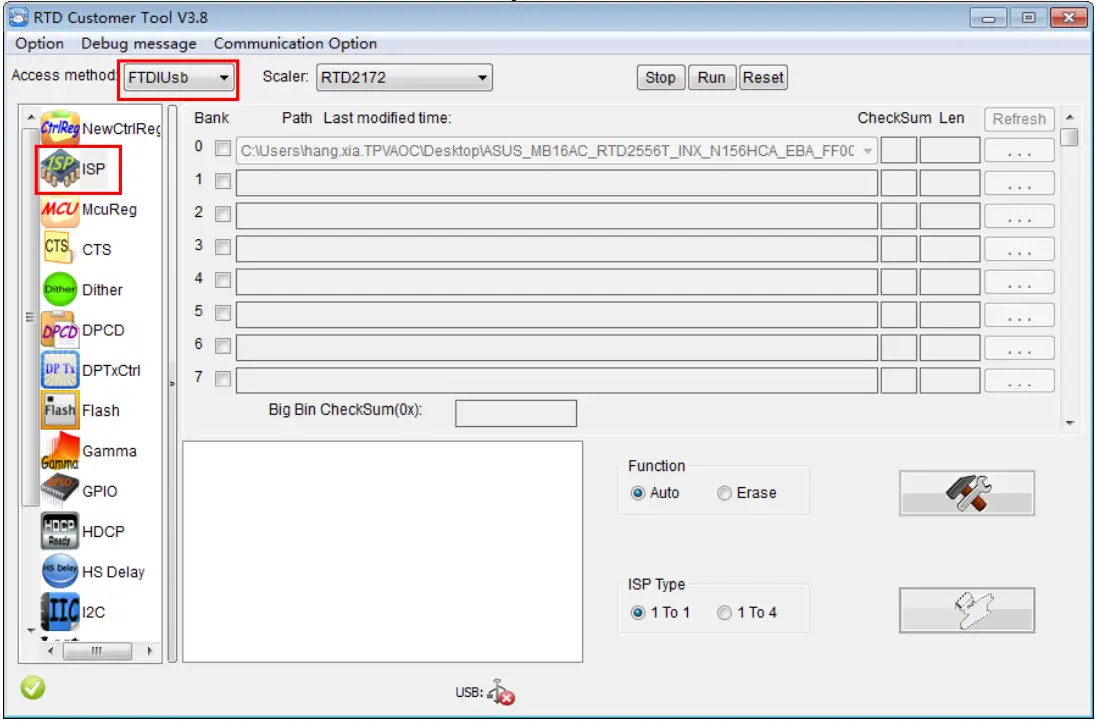
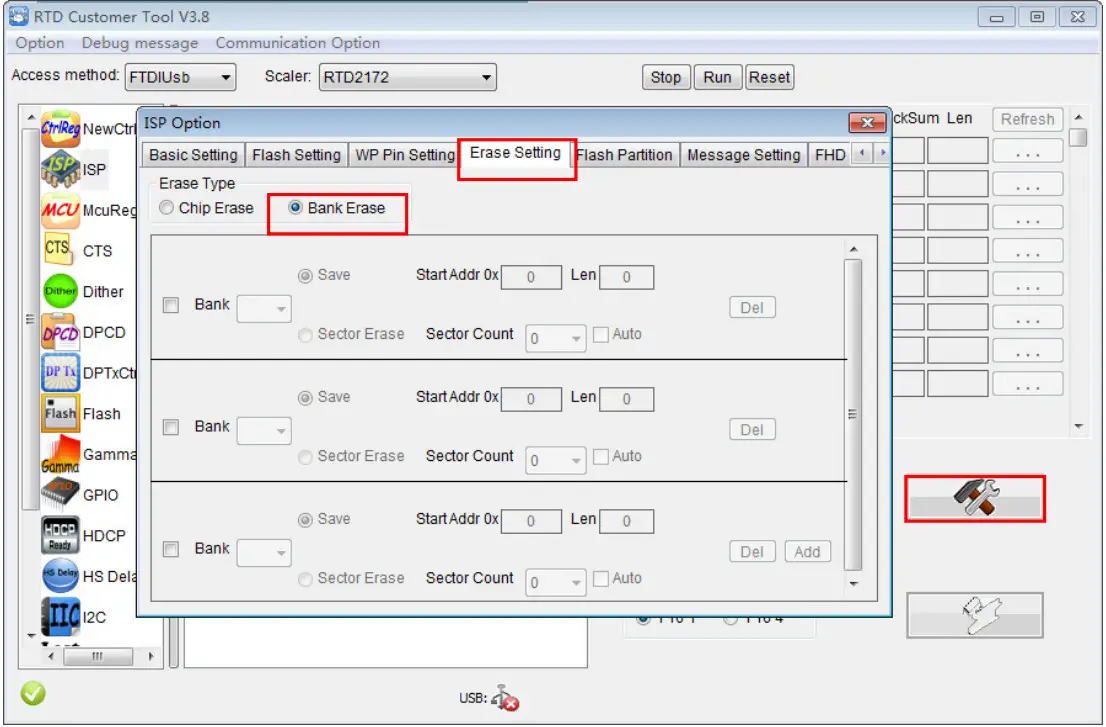
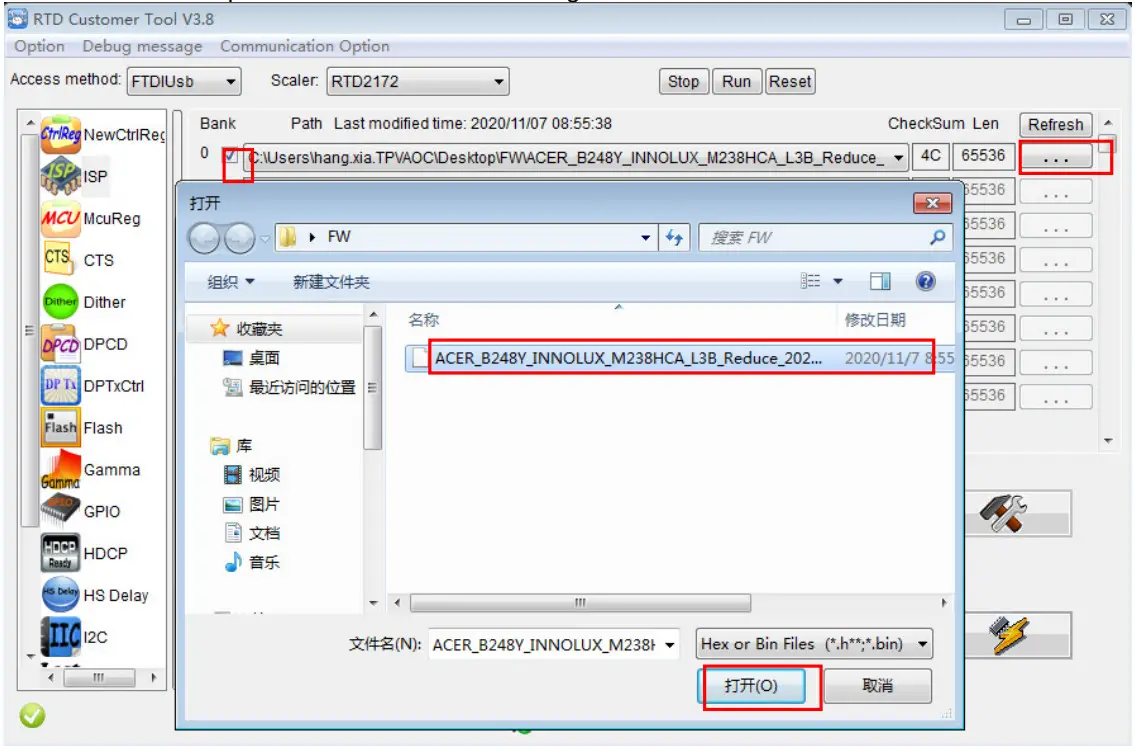
3.3 Click “ISP” and “ISP Option” to set as below. (In order to prevent HDCP KEY data loss, please must load the file name contain the “ Reduce“ of the firmware)
3.4 Close the “ISP Option” window and click the “BigBin” to load the correct F/W.
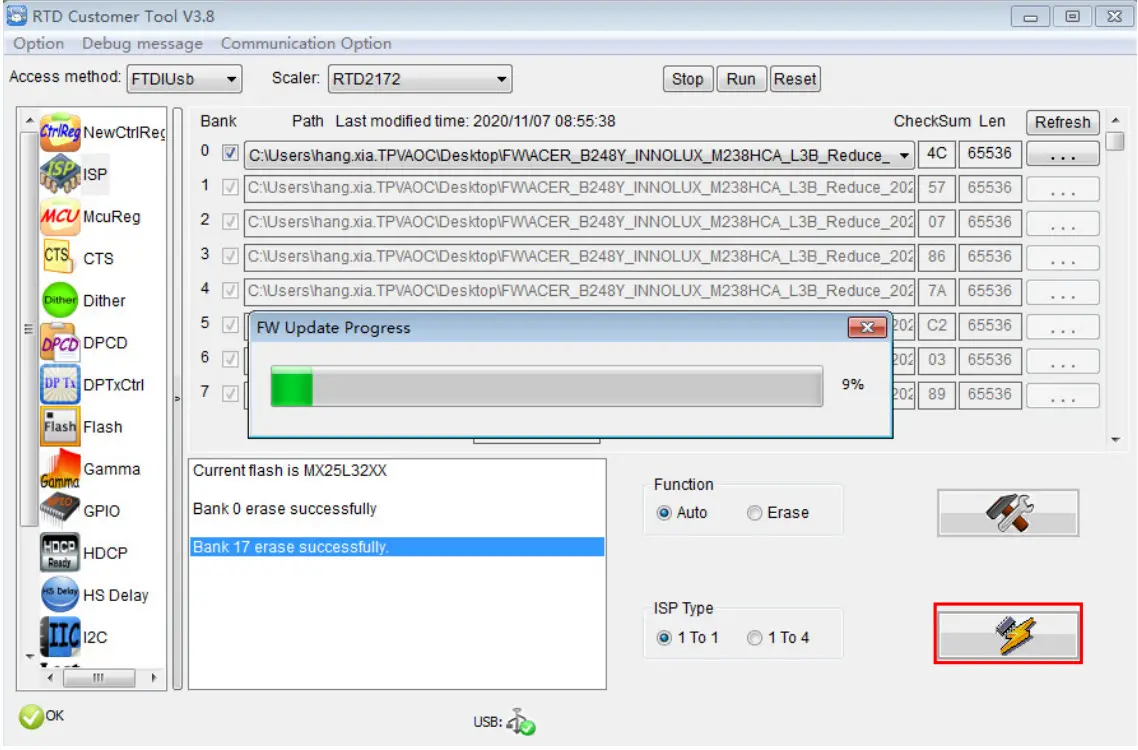
3.5 Click![]() to start programming.
to start programming.
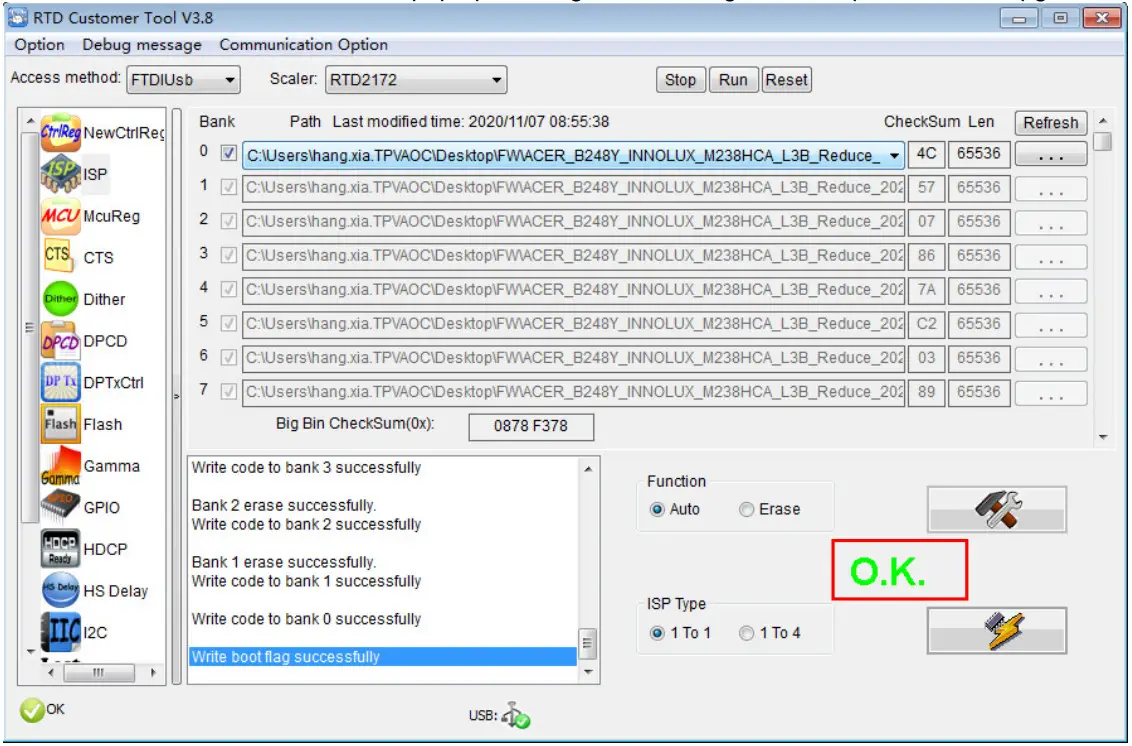
3.6 After about 20 minutes, there will pop up message as below figure which promotes the upgrade successful.
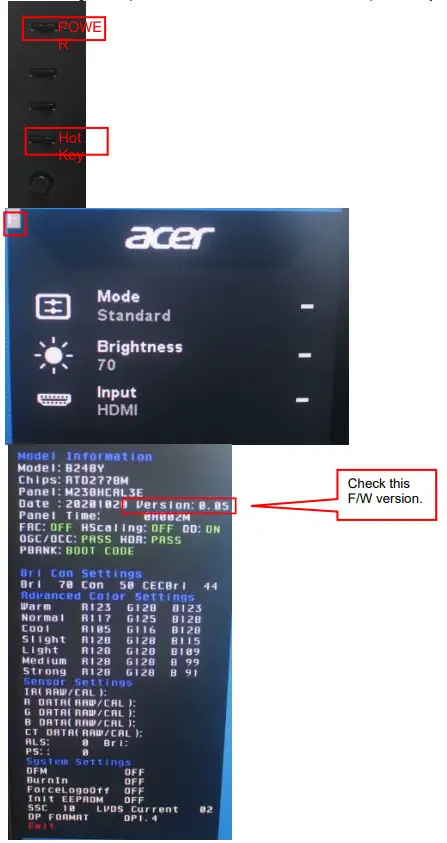
Check the FW version after the upgrade.
4.1. The way to open the factory menu.
(1) Connect the signal source to monitor and turn it on.
(2) DC off the MNT, then press the hotkey button and DC on, when the screen lights, release the key and press the left button again to open the menu with “F” and select “F” to open the factory menu.
4.2. Do a factory reset in the user menu.
(1)Restart the monitor after open the factory menu. And then open the user menu.
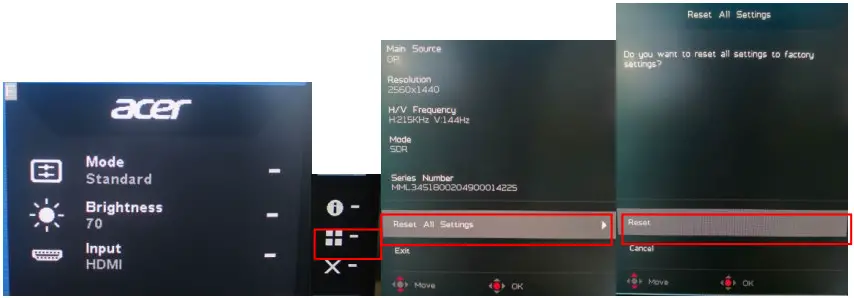
(2)Factory reset will turn off “Burn in” mode which screen color switches among red, green, blue and black.
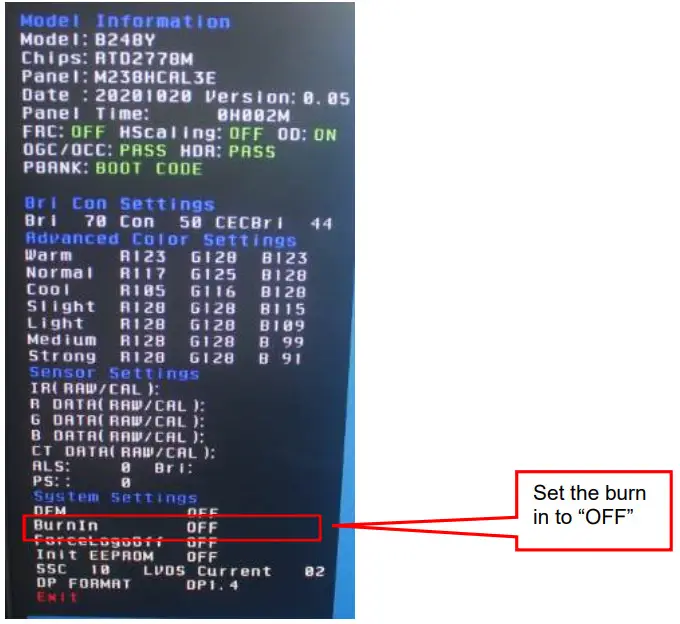
4.3 How to close the burn-in mode:
Writing EDID Process
1. Materials list and connection
2. Install a USB driver.
3. Prepare the EDID written.
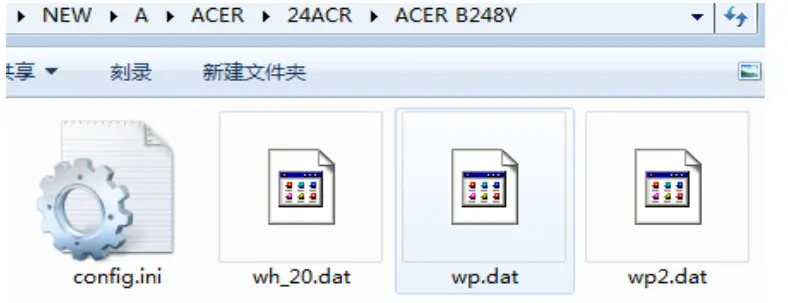
3.1. Change the EDID files name as per the below rule.
HDMI EDID→ WH_20.dat DP EDID→ WP.dat
DP EDID→ WP2.dat
3.2. Copy these files to one folder named Acer B248Y which must contain the “config.ini” file.
3.3. Copy Acer B248Y to the DDC folder and put DDC and ISP tools together.
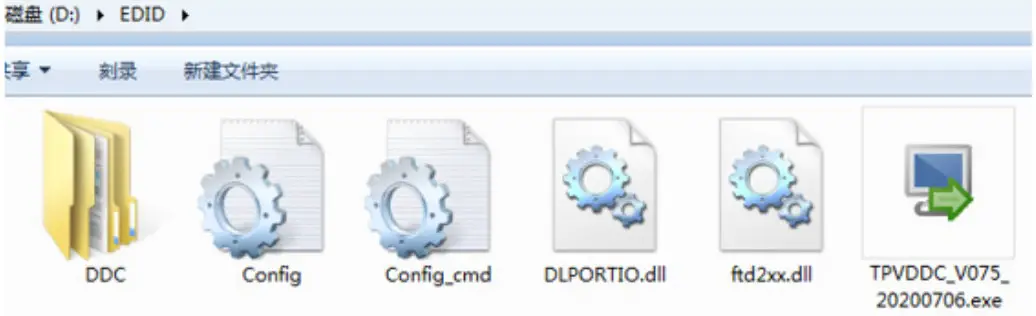
4. Run the ISP tool
Note: If the F/W Upgrade uses the same ISP tool as the EDID writing, you must close the F/W Upgrade tool before running the EDID writing tool.
4.1. Double-click the icon to open the tool.
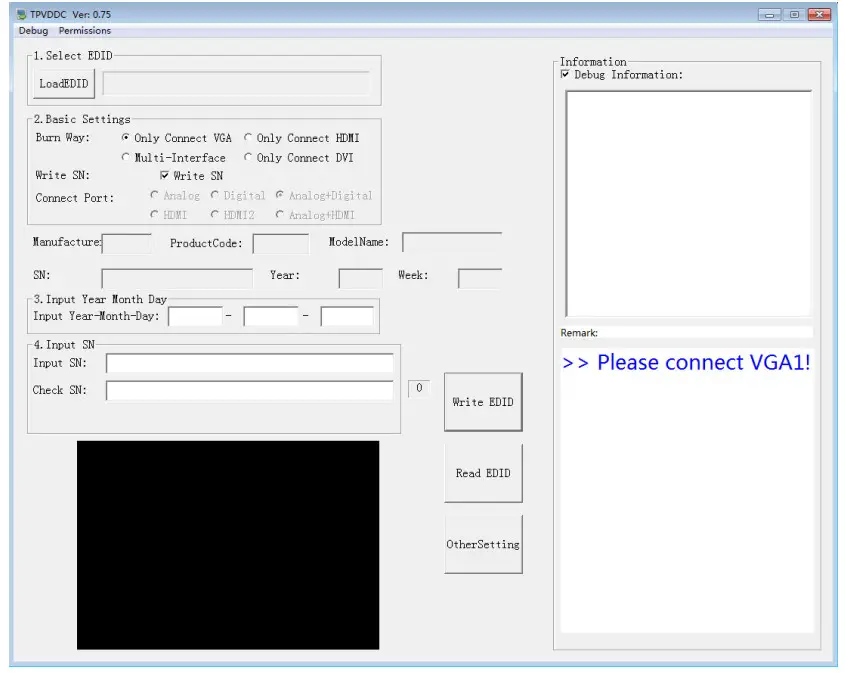
4.2. Select the EDID folder.
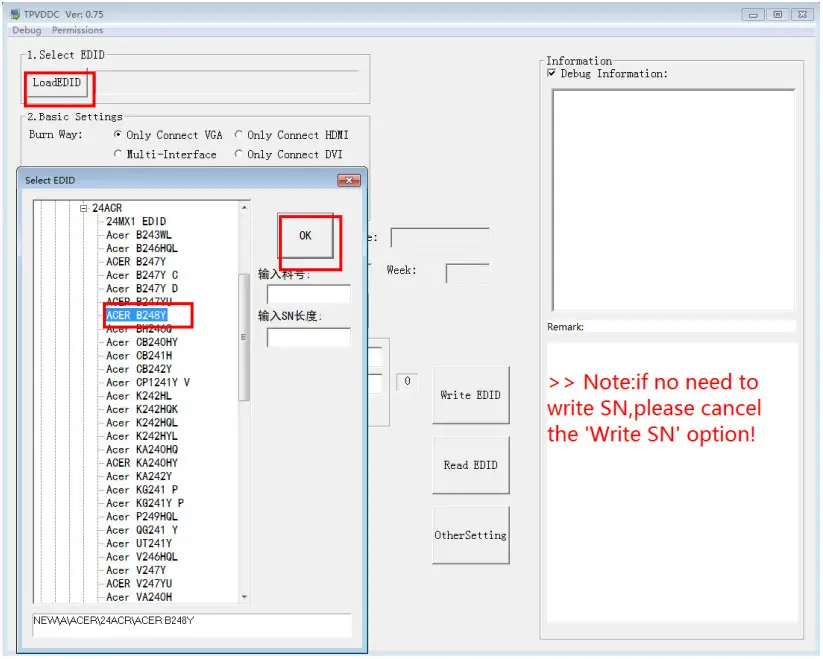
4.3. Load EDID successfully.
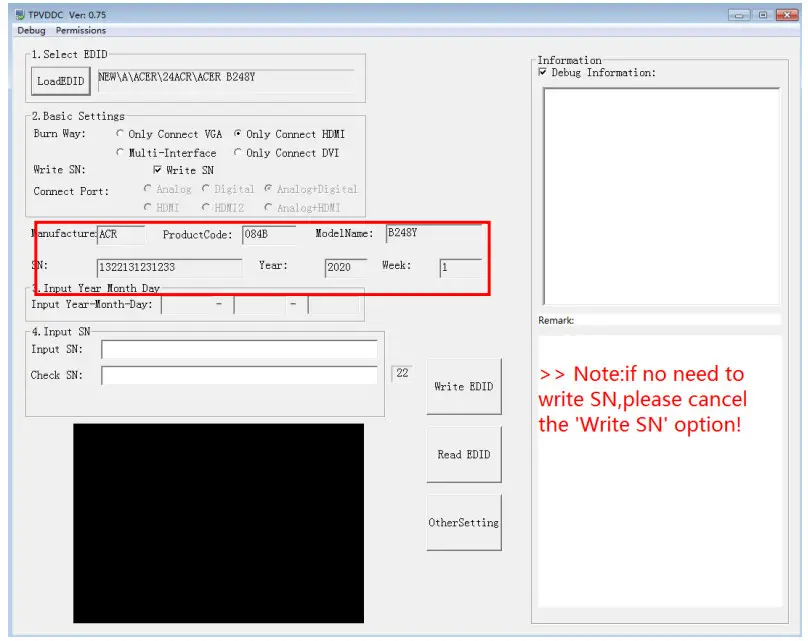
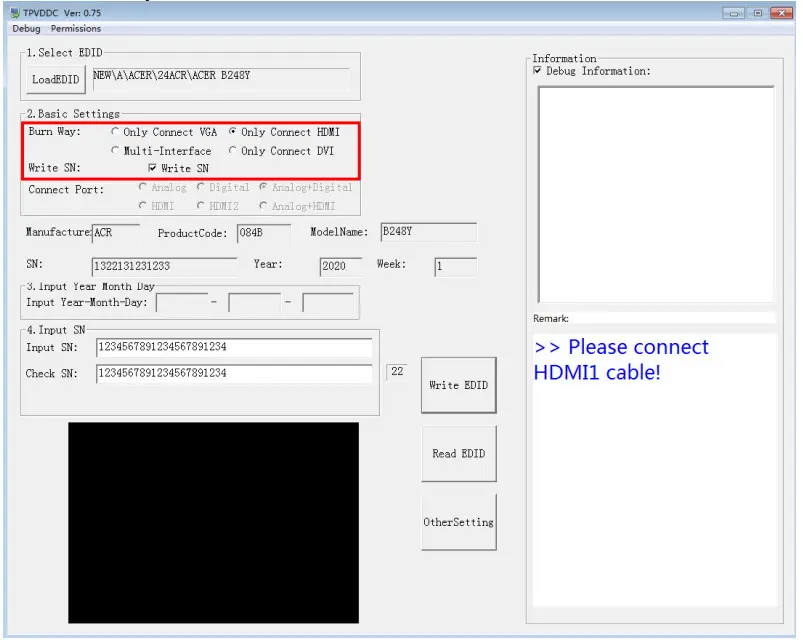
4.4 Tick the “Only connect HDMI” and “Write SN”.
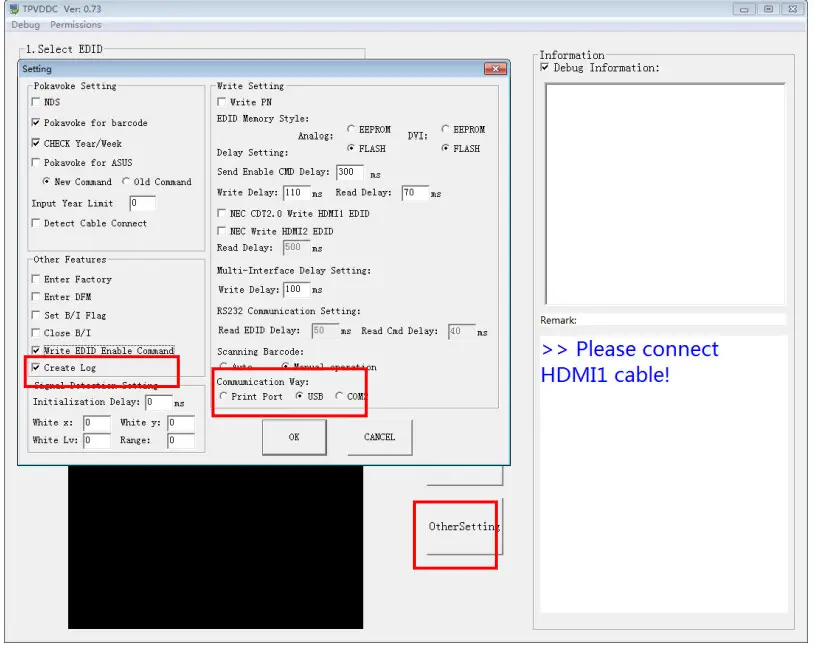
4.5 Set the other settings as below.
4.6 Type in the date and the 22 digit S/N and “Debug Information”.

4.7. Click “write EDID” to start writing. When The green “PASS” appear, the process is finished.
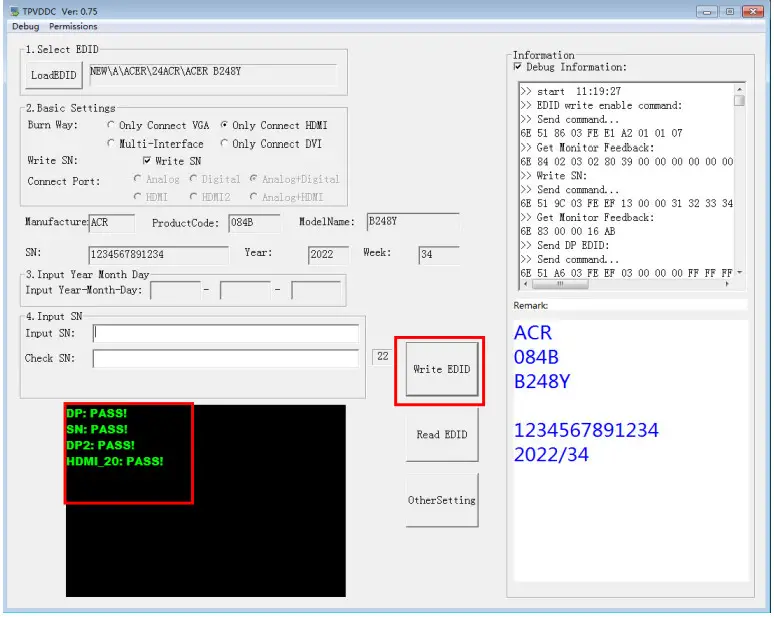
4.8 After writing the EDID pass, you must read the EDID to ensure the EDID data had been written into the monitor and chooses one of the ports to read.
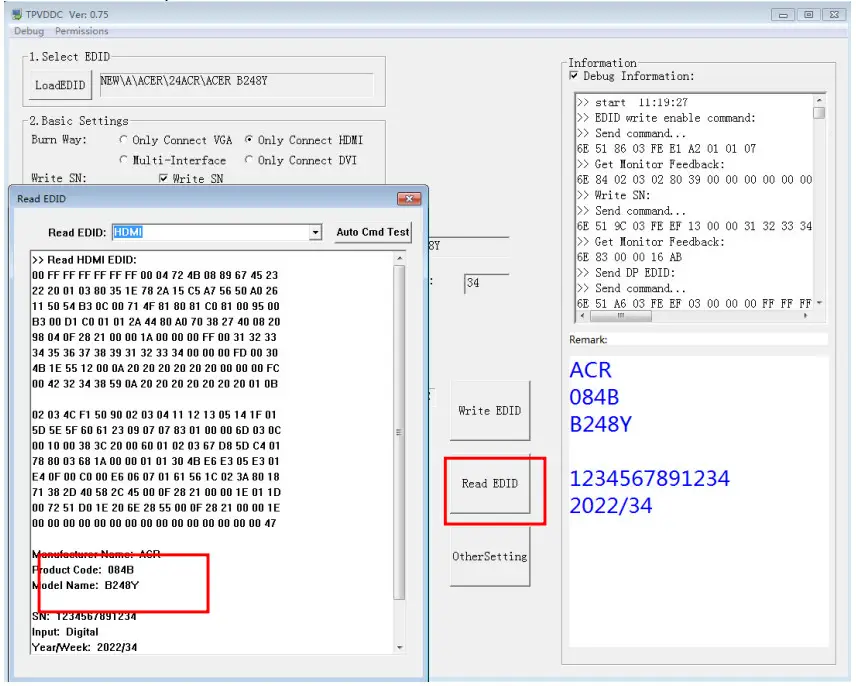
- If it appears all “00” when reading the EDID data, you need to reconnect the ISP tool or install the driver of the ISP tool again.
- If it appears all “FF”, it shows that the EDID data of the Main board is empty, you must write the EDID again.
5. Troubleshooting.
5.1. Can’t write!
- AC on the monitor and turn on it.(Restart the monitor)
- Set the Burn in on last to try again.
FRU (Field Replaceable Unit) List
This chapter gives you the FRU (Field Replaceable Unit) listing in global configurations of ACER B248Y Refer to this chapter whenever ordering parts to repair or for RMA (Return Merchandise Authorization).
Please note that WHEN ORDERING FRU P ARTS, you should check the most up-to-date information available on your regional web or channel. For whatever reason a part number change is made, it will not be noted on the printed Service Guide. For ACER AUTHORIZED SERVICE PROVIDERS, your ACER office may have a DIFFERENT part number code from those given in the FRU list of this printed Service Guide. You MUST use the local FRU list provided by your regional ACER office to order FRU parts for the repair and service of customer machines.
NOTE: To scrap or return defective parts, you should follow the local government ordinance or regulations on how to dispose it properly, or follow the rules set by your regional ACER office on how to return them.
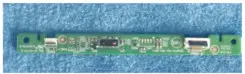
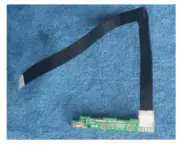
| Photo | Description | TPV PN | Acer PN |
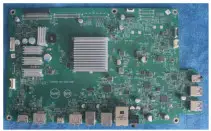 | Main board | 756GQKCBOBA131000Q | NA |
 | Power board | PLPCKE201IACC | NA |
 | Key board | KEPCPQB8 | NA |
 | LED board | LEPCLQA3 | NA |
 | OPTION BOARD | PTPCPQB8 | NA |
Trouble shooting instructions
Before sending your LCD monitor for servicing, please check the troubleshooting list below to see if you can self-diagnose the problem.
DP/HDMI Mode (Optional)
| Problem | LED status | Remedy |
| No picture visible | Blue | Using the OSD menu, adjust brightness and contrast to maximum or reset to their default setting. |
| Off | Check the power switch. Check if the AC power cord is properly connected to the monitor. | |
| Amber | Check if the video signal cable is properly connected at the back of the monitor. Check if the computer system is switched on and in power saving/standby mode. If OSD Lock is On, the LED status is set to Amber. |
![]()


