biamp MASK2 Loudspeaker Installation Guide
PRODUCT DESCRIPTION
The Desono MASK2 2.5″ surface mount loudspeaker delivers crystal clear sound for all your public address and background music needs. Available in black or white, its 2.5” paper cone woofer provides high SPL and extremely low distortion, ensuring unprecedented clarity over the entire frequency spectrum.
Brackets supplied with the MASK2 loudspeakers allow them to be mounted under various angles, in corners, or on solid surfaces such as walls or ceilings.
In combination with the compact dual coil SUBLIME subwoofer, the Desono MASK2 loudspeakers are the perfect solution for small and medium-sized rooms that demand superior speech intelligibility and full range music reproduction.
FEATURES
- One of the smallest loudspeakers on the market
- IP60 rated
- 2.5” paper cone woofer
- Innovative turn/tilt bracket
- Pairs well with Desono SUBLIME subwoofer
![]() CAUTION: Do not attempt to use MASK2 units as full range loudspeakers. They are not designed to reproduce bass frequencies and do not have overload protections. Biamp recommends using matching subwoofers (SUBLIME) and/or high-pass filter systems. Contact Support for the recommended components to use with MASK2 loudspeakers.
CAUTION: Do not attempt to use MASK2 units as full range loudspeakers. They are not designed to reproduce bass frequencies and do not have overload protections. Biamp recommends using matching subwoofers (SUBLIME) and/or high-pass filter systems. Contact Support for the recommended components to use with MASK2 loudspeakers.
MOUNTING THE SPEAKER
- Point the center of the speaker at the center of the listening area.
- Test fit the speaker on the bracket to ensure the desired angle (see Step 7) before mounting the bracket on the wall.
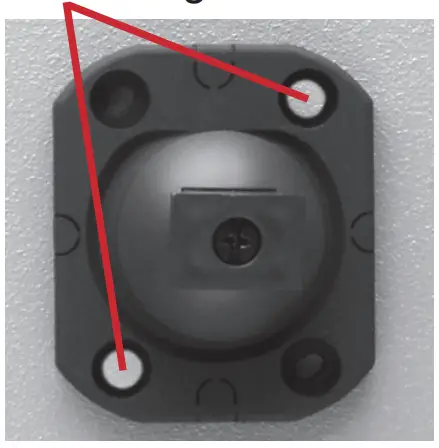
- Using the bracket as a template, drill the mounting holes as shown in Figure 1.
Mounting Holes
Figure 1. Drill mounting holes
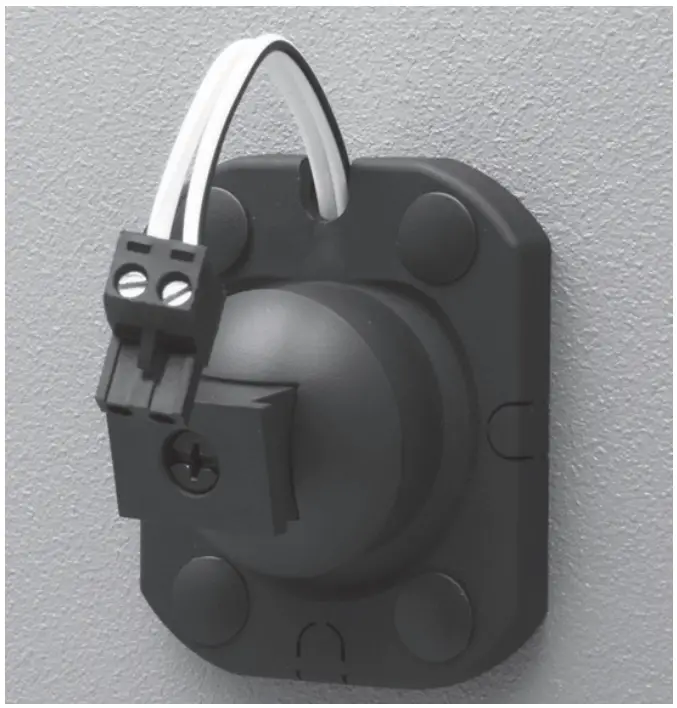
Note: The base plate may be rotated by 45 or 90 degrees to get the maximum tilt angle in the desired direction when installing in a corner. - If the speaker location is pre-wired, thread the wiring through one of the four pre-cut cable entries on the bracket base prior to mounting the bracket (Figure 2).

Figure 2.
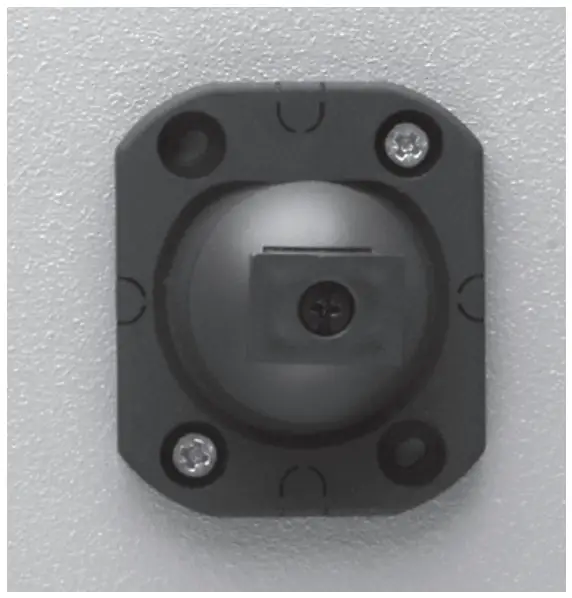
Guide speaker wiring through bracket base - Mount the bracket to the surface (Figure 3). The mounting materials for solid brick walls are included.

Figure 3.
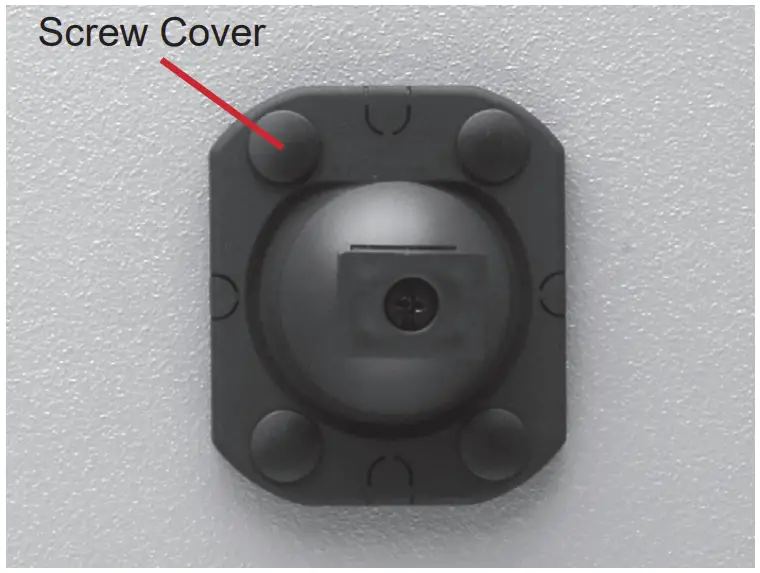
Mount the bracket - Tighten all the screws and cover with the screw covers (Figure 4).

Figure 4.
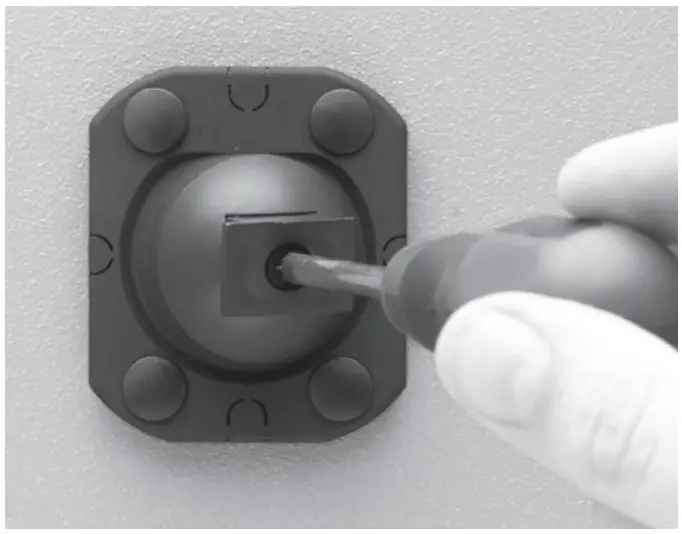
Tighten the screws and insert covers - Determine the angle of the speaker by adjusting the bracket base and the H-hook on the half-sphere ball. The H-hook can be adjusted with or without the speaker attached to the hook. Adjust the turning force of the H-hook by tightening or loosening the central screw (Figure 5).

Figure 5.
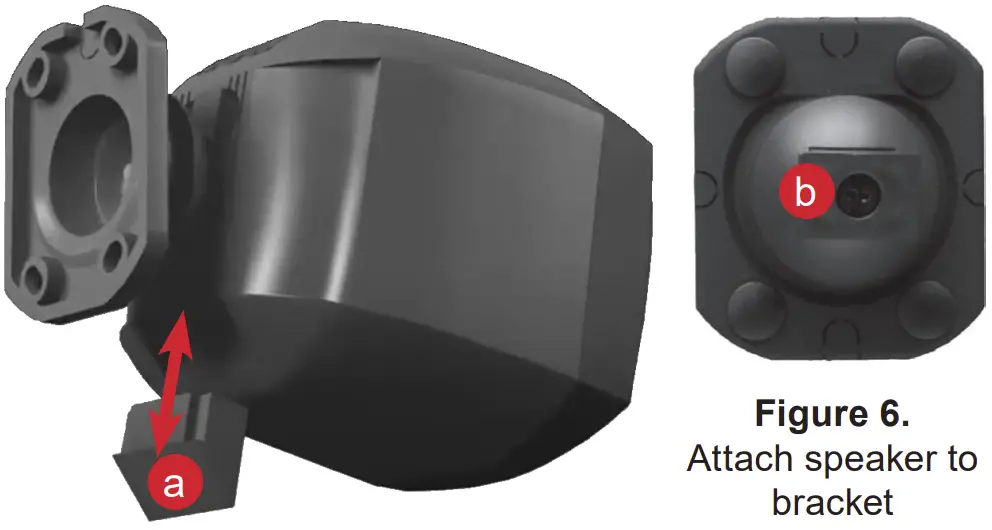
Adjust speaker and bracket - Slide the rubber security piece (a) out from the back of the speaker and slide the speaker on to the H-hook (b) on the mounting bracket. Slide the rubber piece back in place to lock and secure the cabinet (Figure 6).
Attach speaker to bracket
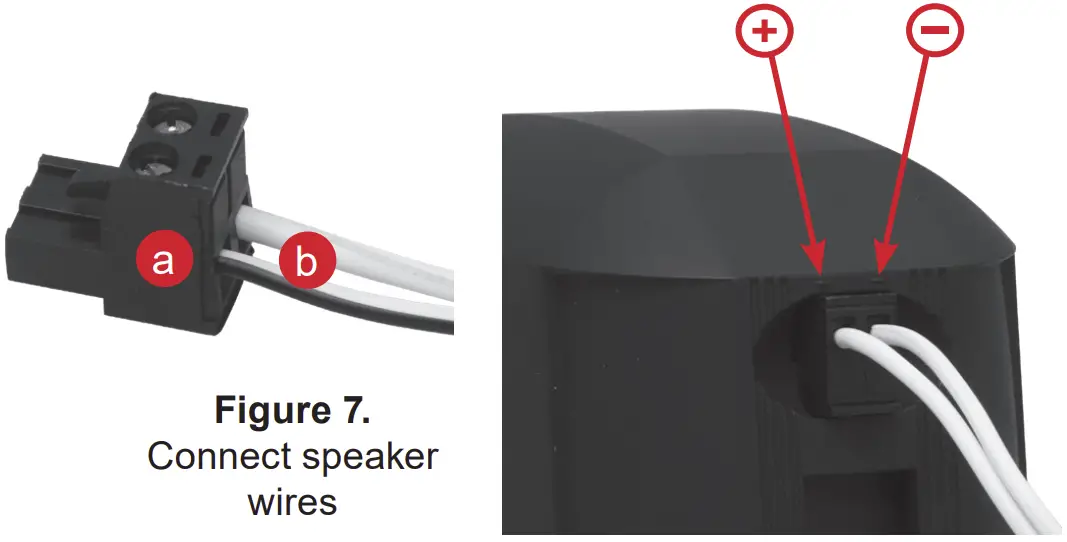
Figure 6. - Remove the euro block connector (a) from the speaker and connect the speaker wires (b) maintaining the polarity marked on the back of the speaker: + is positive, – is negative (Figure 7).

Figure 7.
Connect speaker wires
Fully insert the bare portion of each wire into the connector. Maintain the same color code for all of the sound system wiring from amplifier to loudspeakers.
Note: For distances up to 20 meters, 0.75 mm² (18AWG) speaker wire can be used without loss of performance. For longer distances use thicker wire.
CEILING MOUNTING
The MASK2CMT bracket enables installing the MASK2 loudspeaker on the ceiling.
This small metal extension piece can be installed on the existing MASK2 wall mount.
The bracket extension enables more inclination of the MASK2 speaker mounted on the ceiling.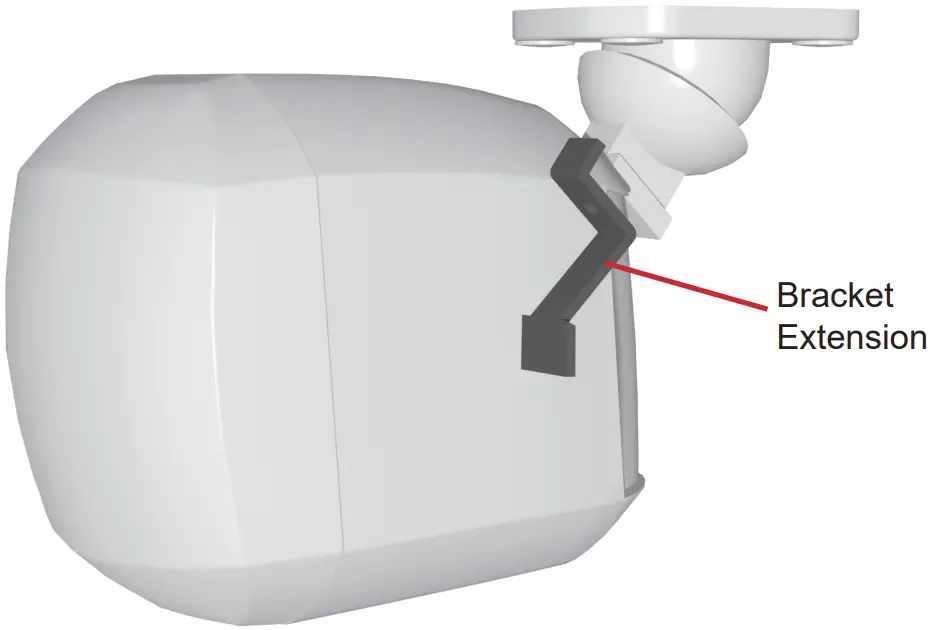
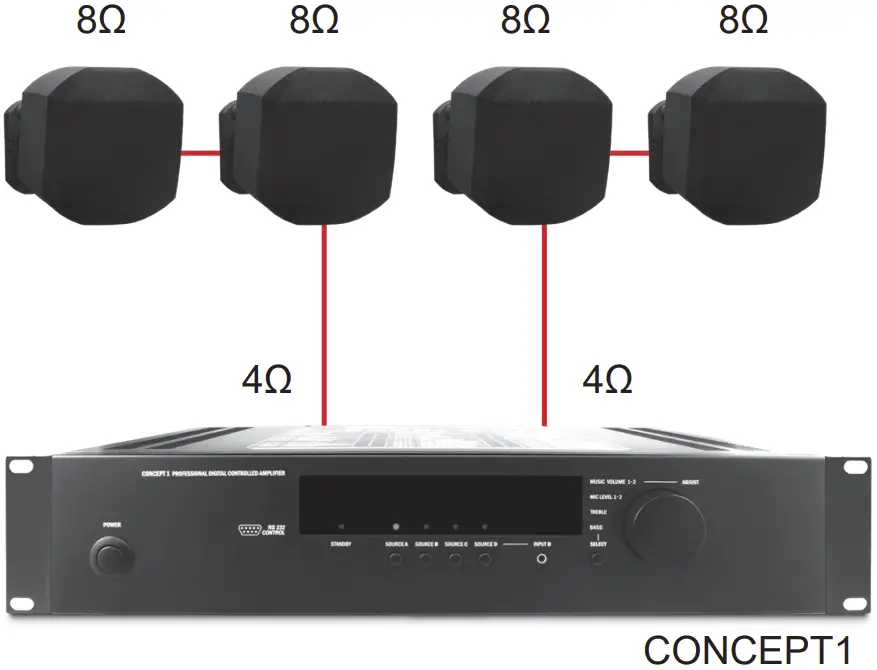
8Ω TECHNOLOGY
Features:
- dynamic high power
- stereo Hi-Fi quality
- same volume in all zones
- max four cabinets on a stereo Hi-Fi amplifier

![]() CAUTION: Do not attempt to use MASK2 units as full-range loudspeakers. They are not designed to reproduce bass frequencies and do not have overload protections. Biamp recommends using the SUBLIME subwoofers (or similar) and/or high-pass filter systems. Contact Support for the recommended components to use with MASK2 loudspeakers.
CAUTION: Do not attempt to use MASK2 units as full-range loudspeakers. They are not designed to reproduce bass frequencies and do not have overload protections. Biamp recommends using the SUBLIME subwoofers (or similar) and/or high-pass filter systems. Contact Support for the recommended components to use with MASK2 loudspeakers.
![]() CAUTION: The overload protection system is incorporated in subwoofers and amplifiers, NOT in the MASK2 speaker.
CAUTION: The overload protection system is incorporated in subwoofers and amplifiers, NOT in the MASK2 speaker.
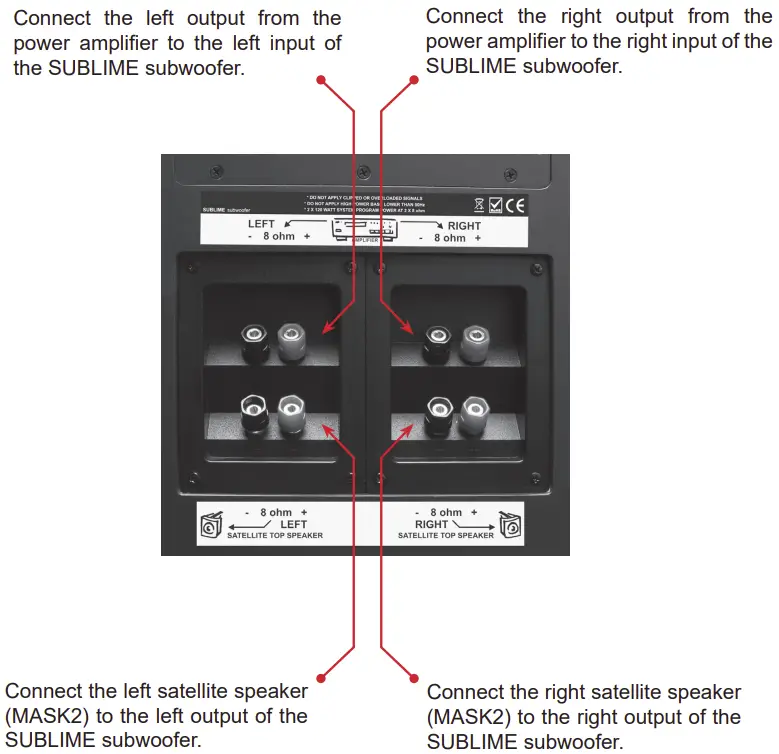
CONNECTING TO A SUBLIME SUBWOOFER
PAINTING THE LOUDSPEAKER
![]() CAUTION: Although the loudspeaker is paintable, the MASK2 grille is not removable and should not be painted.
CAUTION: Although the loudspeaker is paintable, the MASK2 grille is not removable and should not be painted.
- Fully mask the grille and loudspeaker face so that all internal components will not receive any paint. Also mask off any input, mounting connections, and safety labels. Don’t use conventional masking tape and NEVER use duct tape. These kinds of tape leave adhesive residue that is difficult to remove and may cause damage. Painter’s or other low-adhesive tape is best.
- Spray paint with two light coats. Let all components dry completely before reassembly.
- Remove all of the masking materials.
![]() CAUTION: NEVER use abrasives, gasoline, kerosene, acetone, methyl ethyl ketone (MEK), paint thinner, harsh detergents or other chemicals on the loudspeaker. These chemicals and agents may permanently damage the finish. Some are also toxic and highly flammable.
CAUTION: NEVER use abrasives, gasoline, kerosene, acetone, methyl ethyl ketone (MEK), paint thinner, harsh detergents or other chemicals on the loudspeaker. These chemicals and agents may permanently damage the finish. Some are also toxic and highly flammable.
![]() CAUTION: Blocking the grille holes with paint or getting any paint on the drivers or internal parts will affect loudspeaker performance and void the warranty.
CAUTION: Blocking the grille holes with paint or getting any paint on the drivers or internal parts will affect loudspeaker performance and void the warranty.
CONTACT US
Email: [email protected]
Web: support.biamp.com
Warranty: biamp.com/legal/warranty-information
Safety & Compliance: biamp.com/compliance


