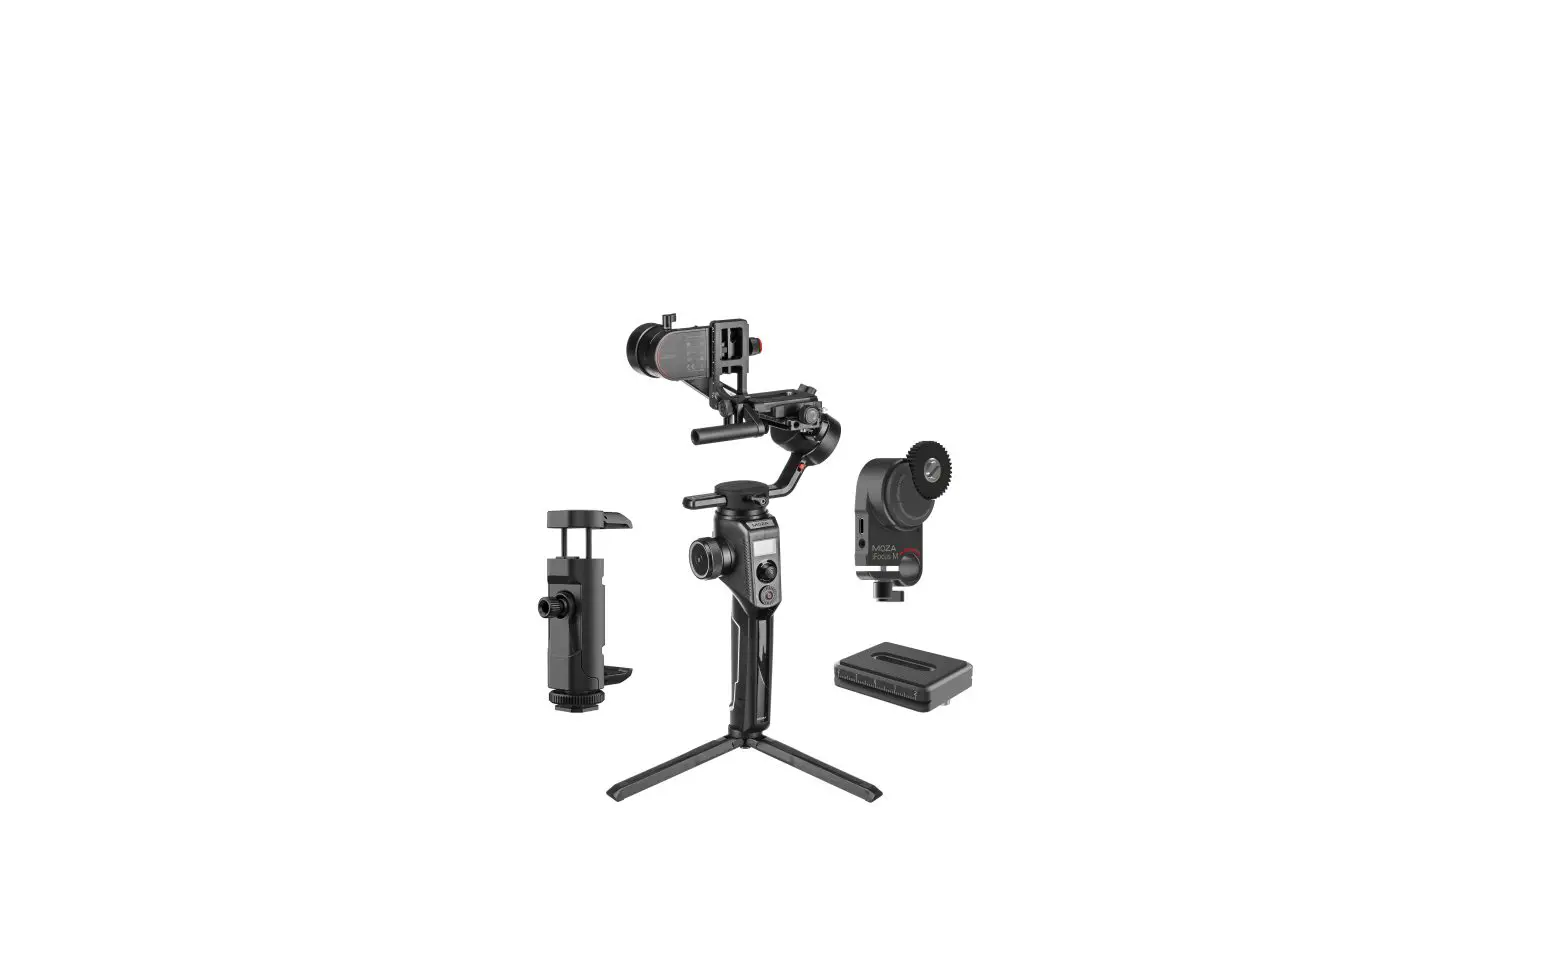
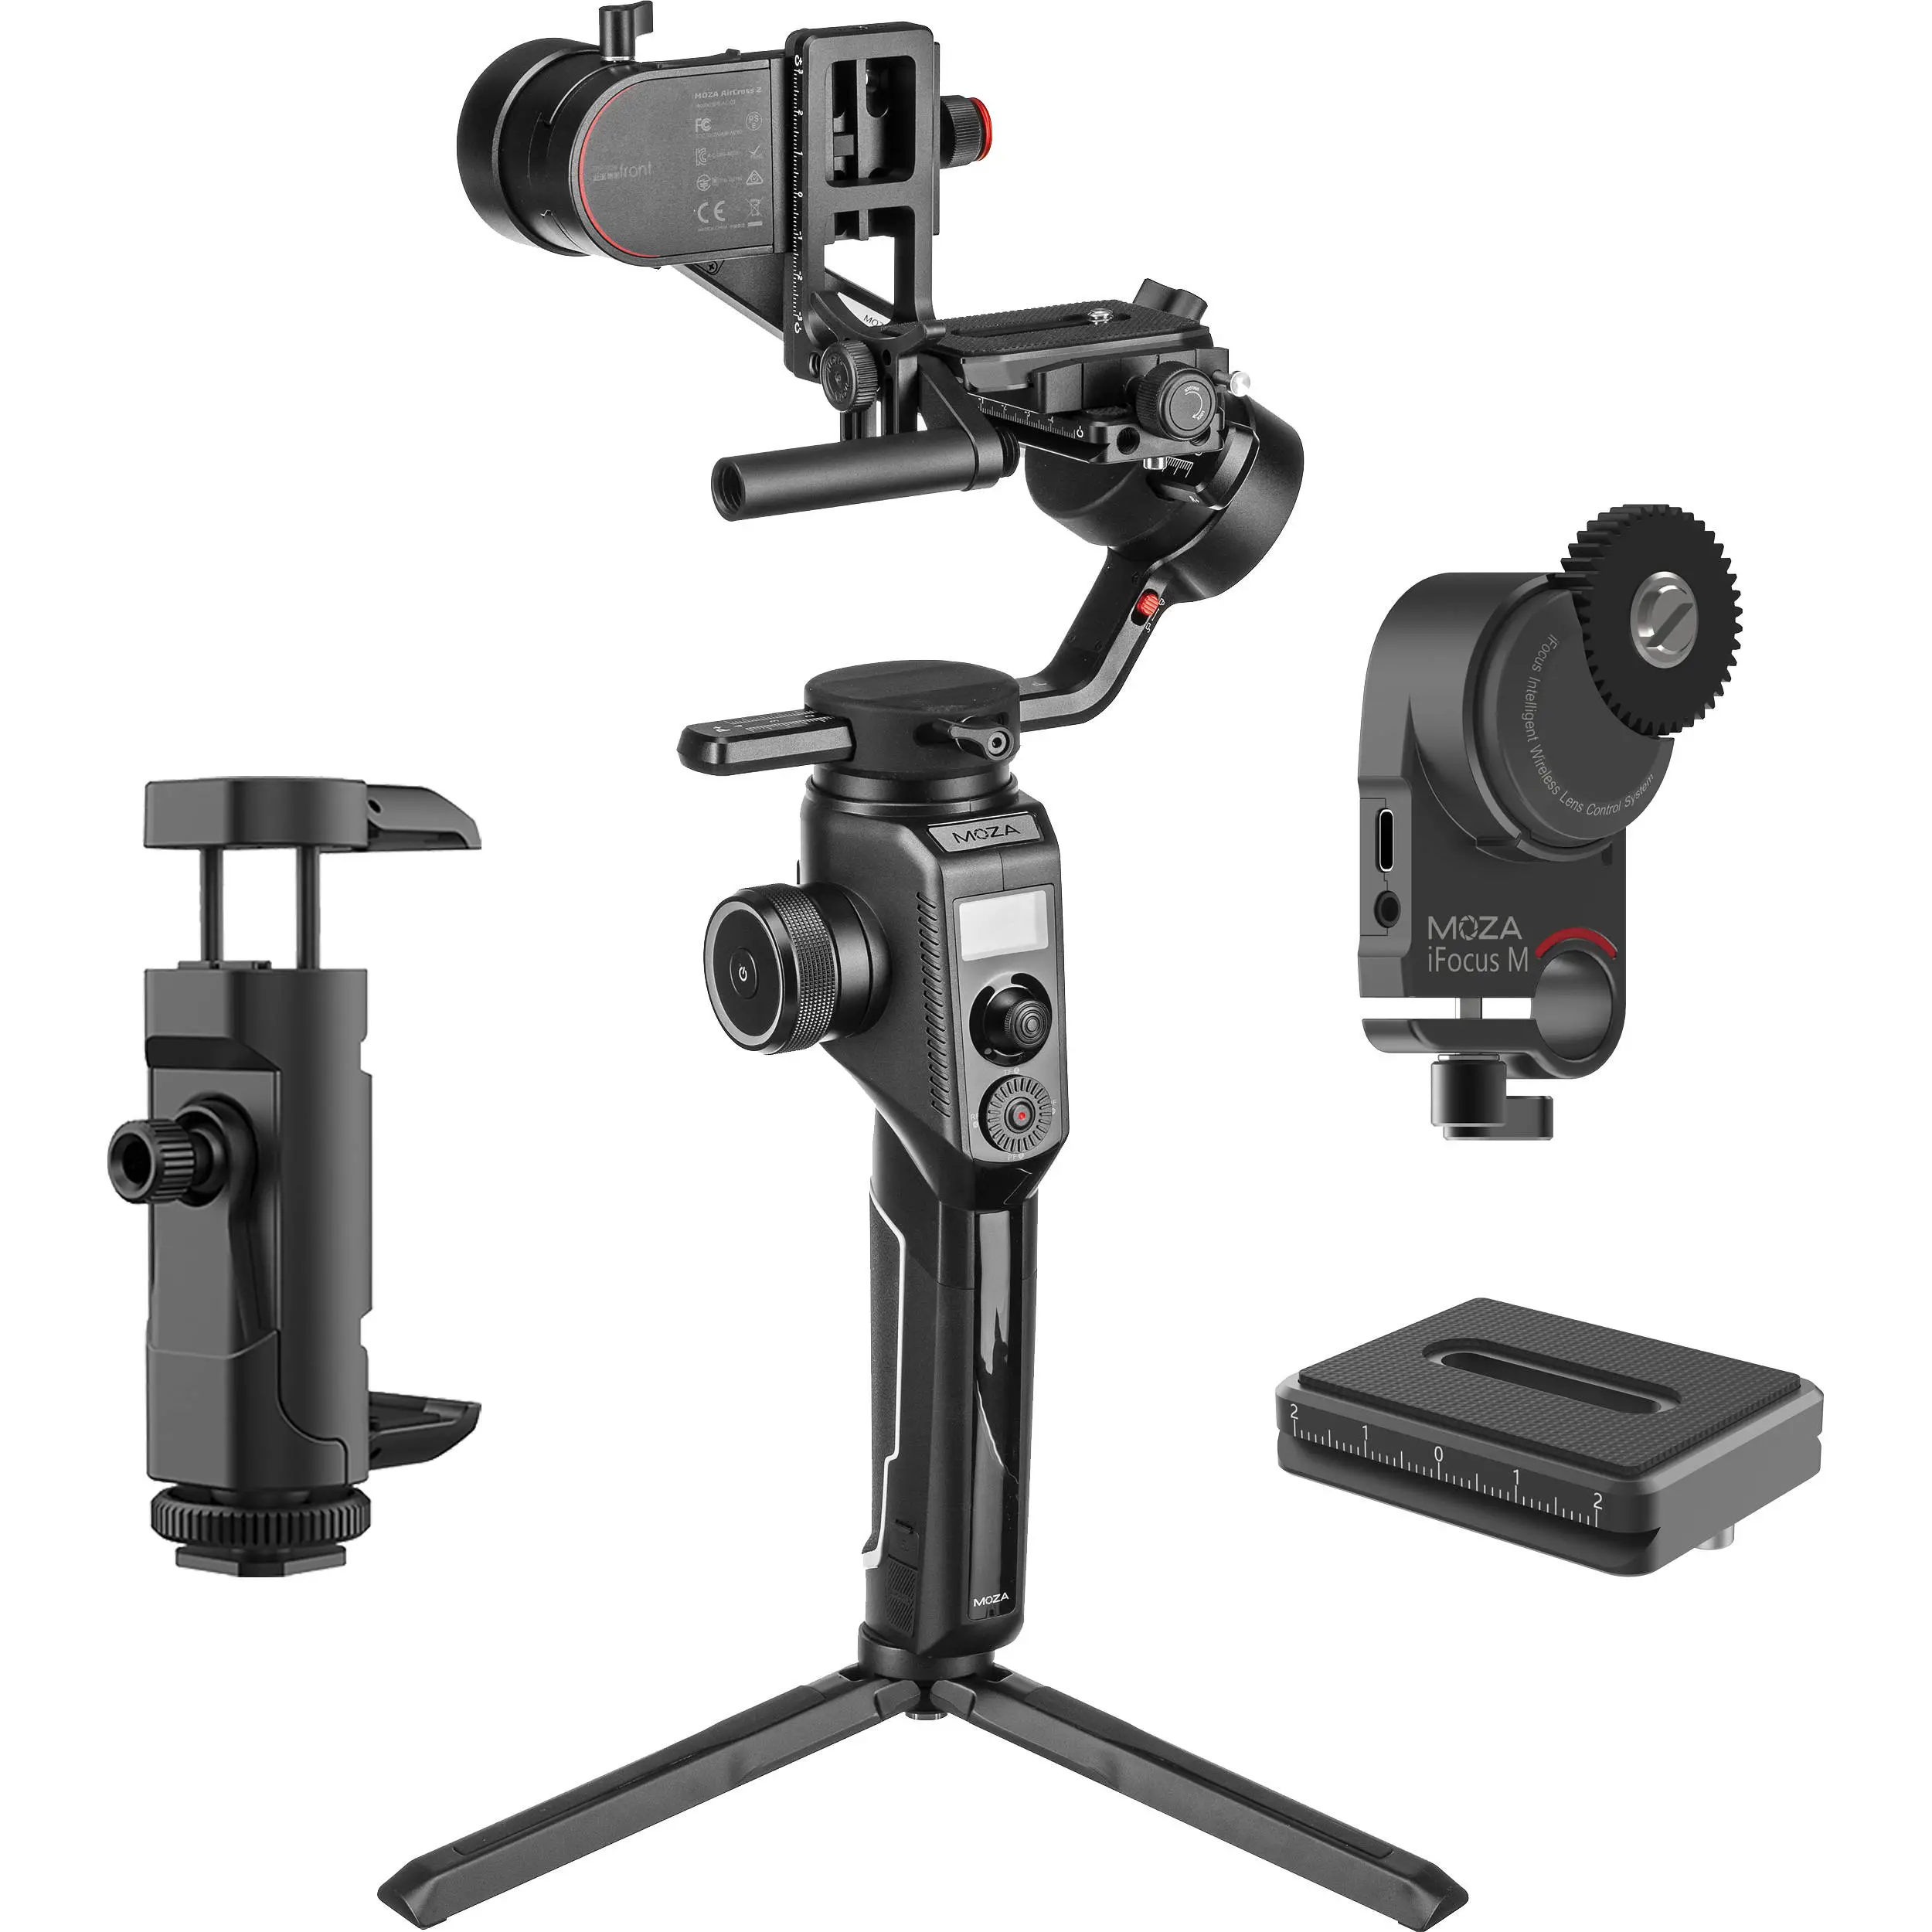
MOZA Aircross 3 Axis Handheld Gimbal Stabilizer Professional Kit
Safety Caution
- This product is powered by a built-in battery; please do not disassemble it, do not put it into liquid or fire in order to avoid damage or risk of injury.
- Before powering on the gimbal, please adjust the balance follow the instructions in this document. If the gimbal works in an unbalanced state for a long time, the surface temperature of the motor can get hot, which will seriously shorten the battery life.
- Do not let children touch and use this product, do not use fingers to obstruct the motor operation to avoid finger injury.
- This product is not waterproof or dustproof; please keep the gimbal clear of dust and water to avoid damage.
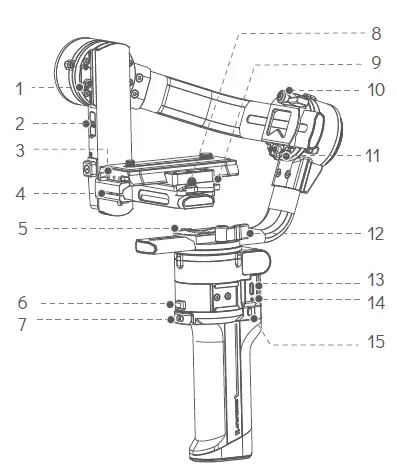
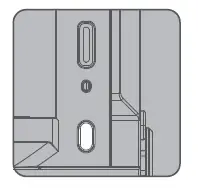
MOZA AirCross 3 Overview
- Tilt Motor Lock
- Extension Port
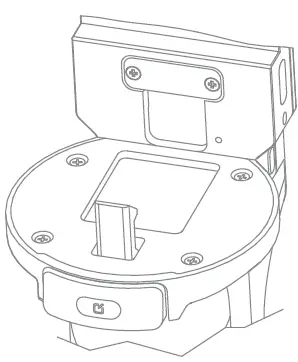
- Quick Release Plate
- Tilt Adjustment Slider
- Pan Motor Lock
- Foldable Safety Lock
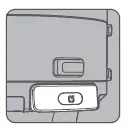
- Smart Trigger
- Quick Release Plate Knob
- Quick Release Baseplate Knob
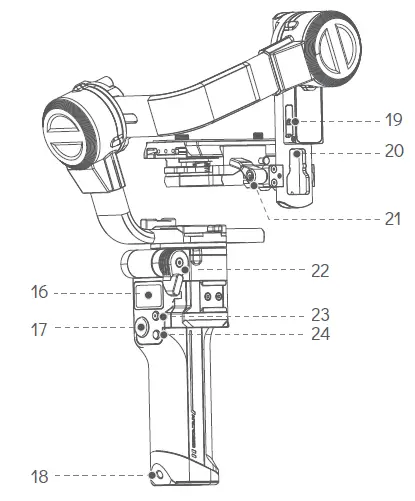
- Roll Knob
- Roll Motor Lock
- Pan Knob
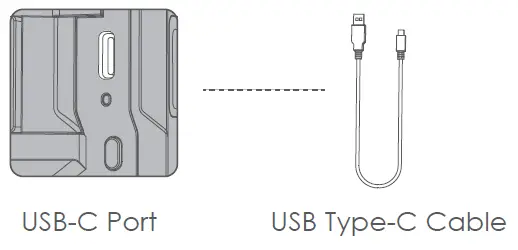
- USB-C Charging Port
- Battery Indicator Light
- Power Button

- OLED Screen
- Joystick
- 1/4’’ Extension Port
- Camera Control Port
- AI Extension Port
- Tilt Knob
- Foldable Knob
- Camera Control Button
- Function Button
Preparation
Unfold the Gimbal
- Rotate the foldable Knob;
- Unfold the handle until it is locked.
- Tighten the knob to prevent the handle from loosening.
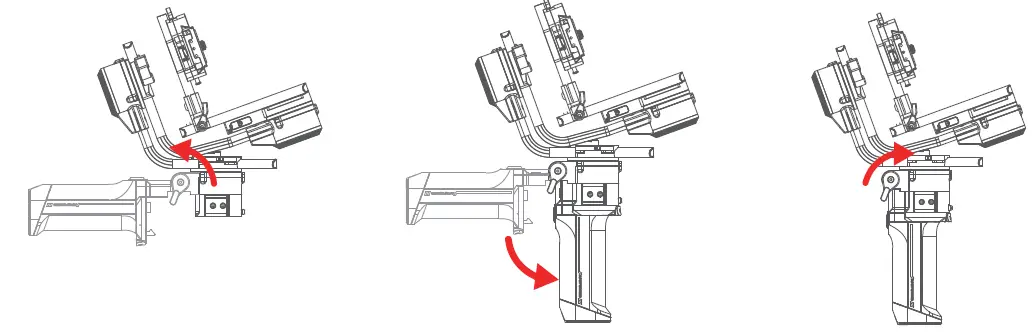
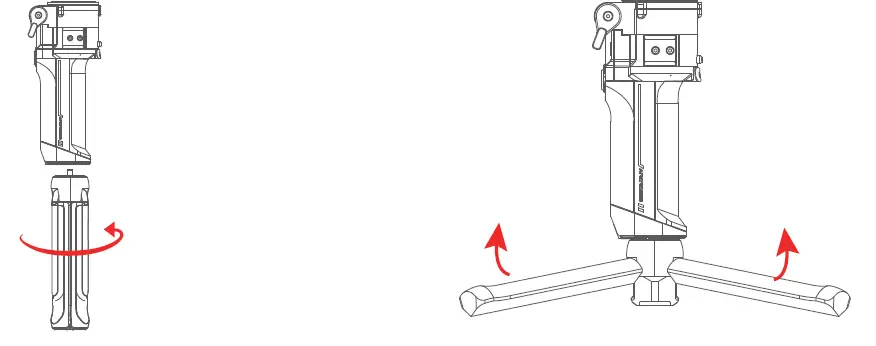
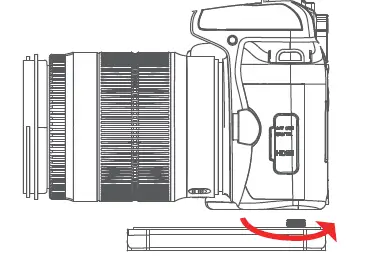
Attaching the Tripod
- Screw the mini tripod into the screw hole at the bottom of the handle.
- Expand the mini tripod
Battery Charging
Please charge the battery through the USB-C charging port using a USB-C cable (Included) and a USB adapter (Not included). It is recommended to use a USB adapter with QC2.0 or PD protocol to complete the charging quickly. The LED light below the charging port will switch off after the charging is completed.
Unlock the Gimbal
Rotate the motor lock to the unlocked position, and then each motor can rotate freely.
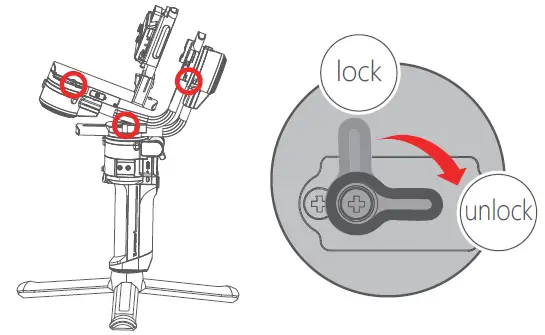
Note: Do not rotate the motor before unlocking, otherwise the motor lock may be damaged. If the gimbal is turned on before unlocking, the gimbal will enter sleep mode.
Mounting the Camera
Make sure to prepare the camera before mounting, confirm the battery is fully charged and a memory card with sufficient storage space is inserted.
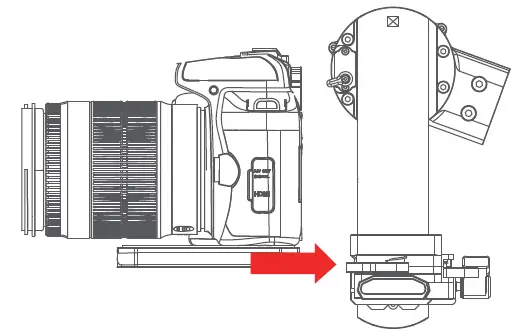
- Place the camera on the quick release plate with 1/4”or 3/8”screws and keep the camera in the center. Remove the extra screws as a spare.

- Slide the quick release plate onto the baseplate to the locked position.

- Secure the quick release plate and tighten the knob, make sure the quick release plate is locked.
 Note:
Note:
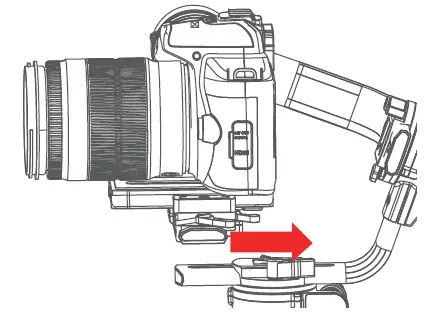
a. When installing the camera, if the right side of the camera interferes with the tilt arm caused the installation to fail, loosen the knob of the
quick-release baseplate and move it to the left until the camera can be installed successfully.
b. After the camera is installed, move the quick-re-lease baseplate to the right and make sure the camera’s right side is aligned with the tilt arm to achieve the best stability.
 Note:
Note: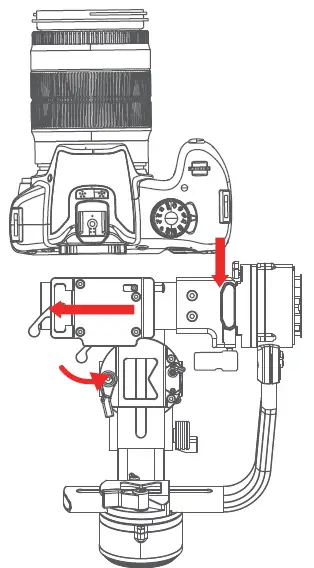
Balance Adjustment
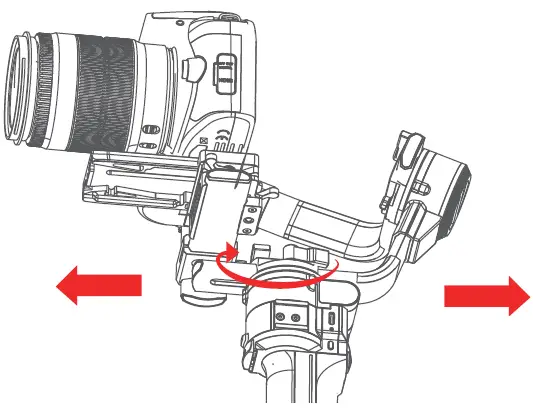
- Balancing the tilt axis vertical
a. Rotate the camera so that the lens is pointing upward
b. Unlock the tilt axis and loosen the knob, slightly adjust the position of the tilt adjustment slider.
c. The balancing is completed when the camera is steady while pointing upward, lock the tilt axis.
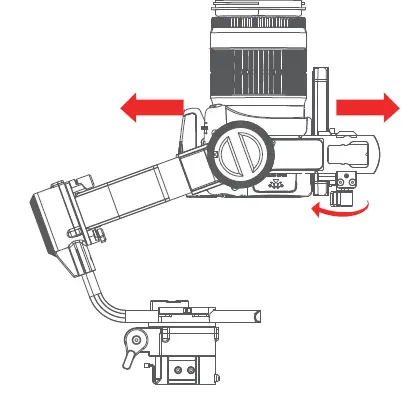
- Balancing the tilt axis horizontal
a. Rotate the camera so that the lens is pointing forward;
b. Unlock the quick release plate, slightly adjust the position of the plate;
c. The balancing is completed when the camera is steady while pointing forward, lock the quick release plate.
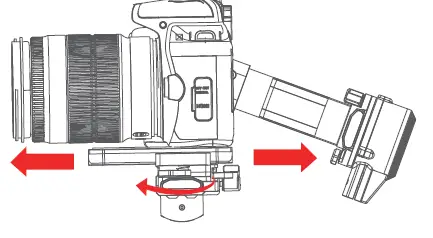
- Balancing the Roll Axis
a. Unlock the Roll axis.
b. Slightly adjust the roll arm left and right until it’s completely horizontal.
c. Lock the roll axis.
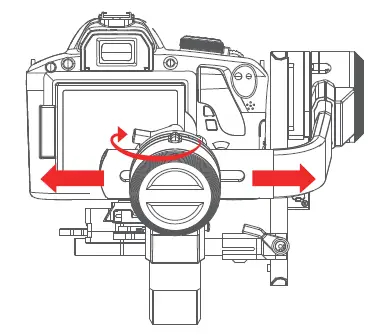
- Balancing the Pan Axis
a. Hold the gimbal at an angle of 45° horizontally, turn the pan arm to a horizontal angle.
b. Unlock the Pan axis and slightly adjust the pan arm left and right.
c. The Pan axis is balanced when the camera is steady, lock the pan axis.
Operation
Power Button
- Long Press: Power on or off
- One Click: Switch the follow speed, 5 levels from slow to fast
- Double-click:Enter or exit sleep mode.
Joystick
- Control the rotation of the gimbal
- Menu:
Top Button: Option-up
Down Button: Option-down
Camera Control Button
- Press halfway: Autofocus
- One-click:Start recording
- Press and hold for 3 seconds: take a photo
Function Button:
- One-Click: Follow mode (Pan→Pan&Tilt→FPV→All Lock) Double Click: Sport Gear Mode
- Triple Click: Inception Mode
- Long Press: Enter/Exit Menu
Trigger Button
- One-Click: Start/Stop AI Follow Mode
- Double Click: Re-center
- Triple Click: Selfie Mode
- Press and Hold: All Lock
- One-Click and Hold: Sport-Gear
Advanced Features
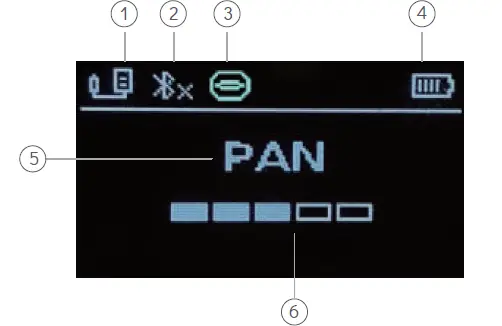
Display
- Camera Control
 Shutter
 USB(Disconnected)
  USB(Connected)
 - Bluetooth
 Disconnected
 Connected
 - 3. AI Module(Icon will display after the device is connected. If the device isn’t connected no icon will be displayed.)
- Battery Leve
- Follow Mode
- Follow Speed
The follow mode and follow speed will not display after choosing the specific function, instead only the current function will be displayed. (Ex. Inception Mode, Time-lapse.)
MENU:
| MENU: | ||
| Camera | Set the connection type of the camera | |
| Shutter | Set the connection type to universal shutter cable (Cable needs to be purchased separately.) | |
| Multi | Set the connection type to Sony-Multi port | |
| Multi/C | Set the connection type to Sony-Multi port with USB power supply | |
| Remote | Set the connection type to Panasonic-Remote port (Cable needs to be purchased separately.) | |
| USB | Set the connection type to universal USB port (Mini, micro, Type-C, etc) | |
| Power | Set motor power | |
| Autotune | Autotune set: the gimbal will set the appropriate motor power automatically | |
| Manual | Manual set: each motor can be adjusted independently (levels 1-5) | |
| Roll | Set roll motor power | |
| Tilt | Set tilt motor power | |
| Pan | Set pan motor power | |
| Joystick | Set the control habit of the joystick | |
| Sensitivity | Adjust the sensitivity: the higher the sensitivity, the faster the rotation speed of the gimbal. | |
| Reverse | Reverse: the gimbal rotates in the opposite direction to the joystick operation. | |
| Advanced | Advanced | |
| Manual-Pos | Manual-Positioning (manually turn the gimbal to the specified direction and hold it for 2 seconds) | |
| Open | Open the manual positioning | |
| Close | Close the manual positioning | |
| UART1 | External communication port (AI port) | |
| Open | Open the external communication port | |
| Close | Close the external communication port | |
| Calibrate | Calibrate the gimbal: automatically calibrate the sensor | |
| Level | Level fine-tuning: forcibly adjust the camera’s horizontal angle within ±5° | |
| System | System | |
| Language | Set display language (Language selection will pop up automatically after the first boot or reset) | |
| 简体中文 | Switch display language to simplified Chinese | |
| English | Switch display language to English | |
| Reset | Reset the gimbal: restore default parameter settings | |
| About | Check Bluetooth name, hardware and firmware version | |
Auto Tuning
- Unlock all the motors. Mount and balance the camera.
- Attach the gimbal to a tripod. Place it on a level surface. Long press the power button to power on the gimbal.
- Enter the Menu, then select Power then Autotune. Move the joystick to the right to select Autotune.
- The motor will run automatically and gradually adjust the power of each motor. The gimbal will return to normal working status once the adjustment is completed.
Gimbal Calibration
- Unlock all the motors. Mount and balance the camera.
- Attach the gimbal to a tripod. Place it on a level surface. Long press the power button to power on the gimbal.
- Enter the Menu, then select Advanced then Calibrate. Move the joystick to the right to select Calibrate.|
- The motor will automatically calibrate the sensor. Do not touch the gimbal during this process, just wait for the calibration to complete.
If the gimbal is placed on a tilt or shaky desktop then any shaking caused by touching the gimbal during this process will probably lead to failed calibration. You can try to calibrate again after making the necessary adjustments. Normally, calibration is only required if the gimbal is off tilt or drifting due to long-distance transportation, vibration, or intense temperature changes.
Level Fine-tuning
In some cases, the camera may not be fully horizontal due to installation and coordination differences between the camera and the gimbal. You will need to fine-tune the roll axis to make the camera completely horizontal.

- Mount and balance the camera, unlock all the motors.
- Attach the gimbal to a tripod. Place it on a level surface. Long press the power button to power on the gimbal.
- Turn on the camera, and bring up the built-in digital level.
- Enter the Menu, then select Advanced then Level. Move the joystick to the right to select Level to enter the fine-tuning interface.
- Keep an eye on the digital level while moving the joystick up and down. Stop tuning when the digital level completely horizontal.
Reset And Restoration
If the gimbal can be powered on and off but is not operating smoothly, possibly due to abnormal parameters, you can enter the Menu and select About then select Reset to reset the parameters.
The gimbal will automatically shut down after a reset, and it can be used normally after turning it on again. If the gimbal cannot be powered on or off normally, or cannot be started due to a firmware upgrade failure, you can use the ejection pin to press the internal restore hole to restore the parameters. Turn it on or try to upgrade the firmware again after restoration.
MOZA Master
Connection
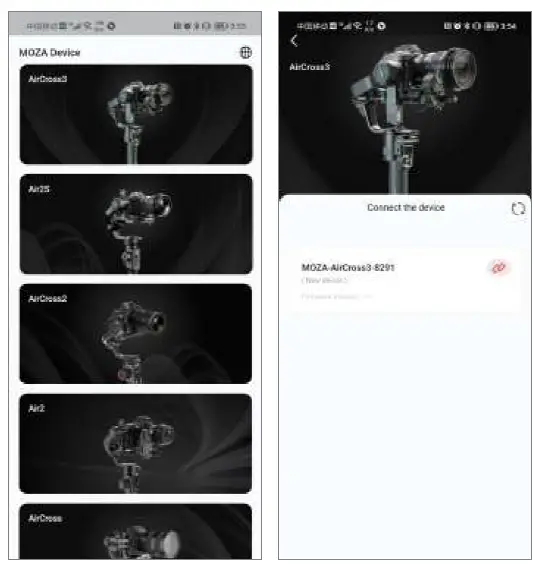
- Start MOZA Master and allow the permissions required by the App;
- Choose the AirCross 3 in the device menu.
- Click the “Connect” button behind the gimbal name;
- Wait for the Bluetooth connection to complete.

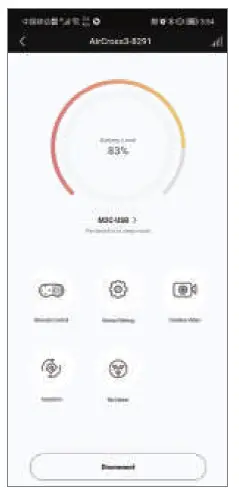
Main Interface
- Device Name
- Battery level (click to sleep/wake up the gimbal)
- Camera Type (click to open up the camera list)
- Remote Control (enter the remote control interface)
- Settings (enter to set parameters)
- Creative Videos (enter advanced functions such as time-lapse)
- Inception (enter/exit Inception Mode)
- Re-center (the gimbal returns to the starting position)
- Disconnect Bluetooth Connection
Remote Control
- Record/Stop (need to connect the camera control cable)
- Photo (need to connect the camera control cable)
- Selfie (after clicking, the gimbal pan axis will rotate 180°)
- Virtual Joystick (control the tilt and pan rotation of the gimbal)
- Remote Control Speed (Set the gimbal rotation speed controlled by the virtual joystick.)
- Re-centering (the gimbal returns to the starting position)

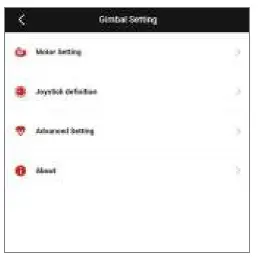
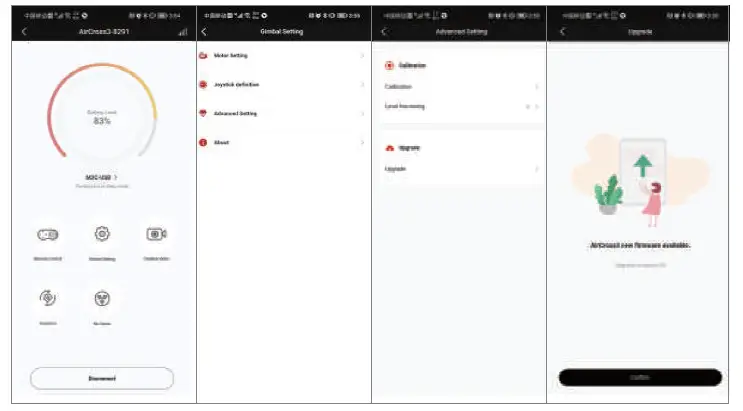
Gimbal Setting
- Motor setting, set the motor power, autotune, follow speed, follow modes, etc.
- Joystick definition , set the sensitivity and operating habits of the joystick.
- Advanced setting, sensor calibration, level fine-tuning, firmware upgrade, etc.
- About, check the firmware version and APP version.
Firmware Upgrade
After the MOZA Master app is connected to the gimbal, enter the Menu and select Gimbal Setting then Advanced Setting then Upgrade. If there is a new firmware update, clicking the Confirm button will start the upgrade process. The upgrade process takes time, please be patient. Once the upgrade is finished, the gimbal will automatically turn off and it can be used again after powering it back on.
Do not turn off the gimbal, or turn off the mobile phones Bluetooth, or disconnect the mobile phones network or exit MOZA Master during the upgrade process. Doing any of these might lead to an upgrade failure.
Specifications
| Specifications |
| Model: AirCross 3 |
| Weight: 1.3kg without tripod |
| Dimension: Unfold: 170*190*310mm, (W*D*H) folded: 52*225*270mm |
| Battery Type: Li-ion Intelligent Battery(built-in), 25.45Wh |
| Battery Capacity: 3500mAh |
| Standard Votage: 7.27V |
| Charging Votage: 5V/2A, 9V/2A |
| Working hours: 20H |
| Fast-charging time: 1.4H |
| Bluetooth: BT5.0,2.400 GHz -2.4835 GHz |
| Environmental Working temperature: -10 ℃ -50 ℃; requirements: Charging temperature: 5 ℃-40 ℃ |
Shenzhen Gudsen Technology Co., Ltd
Web: www.gudsen.com


