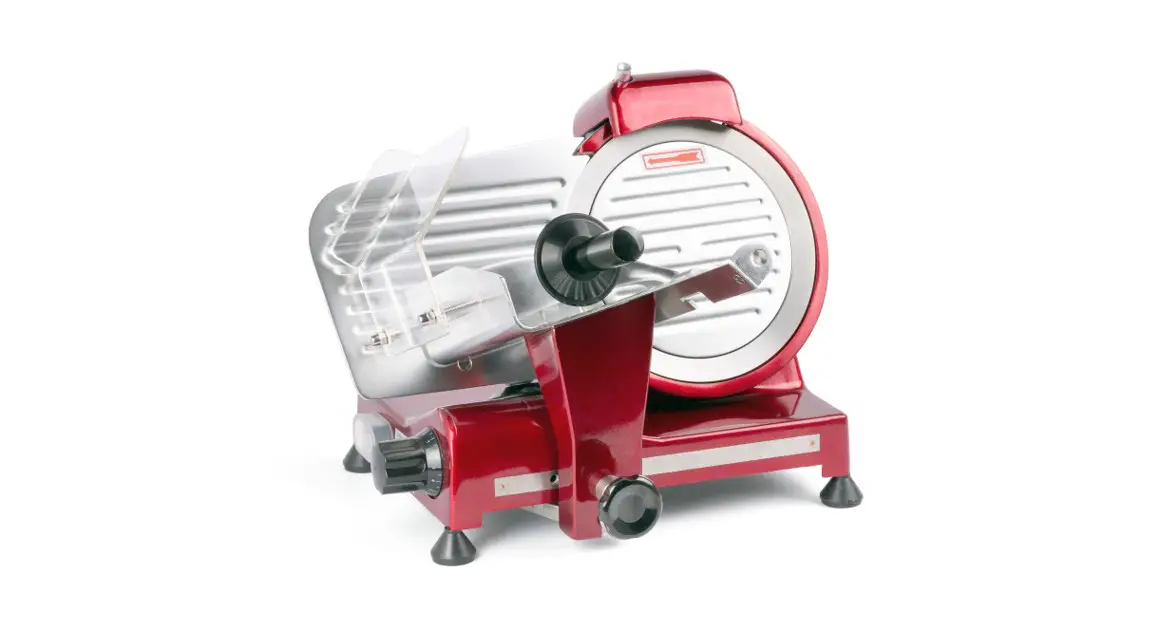
![]() SLICER PROFI LINE
SLICER PROFI LINE
210000, 210017, 210031, 210048, 210086, 970294
You should read this user manual carefully before using the appliance.

Dear Customer,
Thank you for purchasing this Hendi appliance. Read this manual carefully, paying particular attention to the safety regulations outlined below, before installing and using this appliance for the first time.
Safety regulations
- This appliance is intended for commercial use only.
- Only use the appliance for the intended purpose it was designed for as described in this manual.
- The manufacturer is not liable for any damage caused by incorrect operation and improper use.
- Keep the appliance and electrical plug away from water and other liquids. In the event, the appliance falls into water, immediately remove the power plug from the socket. Do not use the appliance until it has been checked by a certified technician. Failure to follow these instructions will cause life-threatening risks.
- Never attempt to open the housing of the appliance by yourself.
- Do not insert objects into the housing of the appliance.
- Do not touch the plug with wet or damp hands.
 Danger of electric shock! Do not attempt to repair the appliance by yourself, repairs are only to be conducted by qualified personnel.
- Never use a damaged appliance! When it’s damaged, disconnect the appliance from the socket and contact the retailer.
- Warning! Do not immerse the electrical parts of the appliance in water or other liquids.
- Never hold the appliance under running water.
- Regularly check the power plug and cord for any damage. When damaged it must be replaced by a service agent or similarly qualified person in order to avoid danger or injury.
- Make sure the cord does not come in contact with sharp or hot objects and keep it away from open fire. Never pull the power cord to unplug it from the socket, always pull the plug instead.
- Make sure that the power cord and/or extension cord do not cause a trip hazard.
- Never leave the appliance unattended during use.
- Warning! As long as the plug is in the socket the appliance is connected to the power source.
- Turn off the appliance before unplugging it from the socket.
- Connect the power plug to an easily accessible electrical socket so that in case of emergency the appliance can be unplugged immediately.
- Never carry the appliance by the cord.
- Do not use any extra devices that are not supplied together with the appliance.
- Only connect the appliance to an electrical outlet with the voltage and frequency mentioned on the appliance label.
- Never use accessories other than those recommended by the manufacturer. Failure to do so could pose a safety risk to the user and could damage the appliance. Only use original parts and accessories.
- This appliance should not be operated by persons with reduced physical, sensory or mental capabilities, or persons that have a lack of experience and knowledge.
- This appliance should, under any circumstances, not be used by children.
- Keep the appliance and its power cord out of reach of children.
- WARNING: ALWAYS switch off the appliance and unplug from the power socket before cleaning, maintenance, or storage.
Special Safety Regulations
 CAUTION! Unplug before cleaning, maintenance or repair!
 CAUTION! Two-person handling is required!
 CAUTION! Read the instruction manual before operation, cleaning or maintenance!
- The food to be sliced must be thawed, unpacked and free from bones before it can be sliced with the appliance. Do not use the appliance for slicing frozen food, vegetables or for any other purpose.
- Use the appliance only as described in the manual.
- Any other use might lead to damage to the appliance or personal injury.
- This appliance should be operated by trained personnel.
- Do not place the appliance on a heating object (gasoline, electric, charcoal cooker, etc.)
Keep the appliance away from any hot surfaces and open flames. Always operate the appliance on a level, stable, clean, heat-resistant and dry surface. - Danger of injury! Care is needed when handling the blade, especially when removing the blade for cleaning. Wear protective gloves (not supplied) if necessary.
- Caution! Securely route the power cord if necessary in order to prevent unintentional tripping over and falling.
- Do not use the appliance before it is properly assembled with the blade, blade guard, and food holder.
- Do not use the appliance near explosive or flammable materials, credit cards, magnetic discs or radios.
- Never bypass any safety interlocks on the appliance.
- WARNING: Keep all ventilation openings in the appliance clear of obstruction.
- WARNING: ALWAYS switch OFF the appliance and unplug from the electrical power supply before cleaning, maintenance or storage.
- WARNING: ALWAYS keep hands, long hair, and clothing away from the moving parts.
- Allow at least 20 cm spacing around the appliance for ventilation purposes during use.
- WARNING! Take great care when handling the cutting discs. Wear protective gloves (not supplied) if necessary.
 CAUTION! Unplug before cleaning, maintenance or repair!
 CAUTION! Two-person handling is required!
 CAUTION! Read the instruction manual before operation, cleaning or maintenance!
Intended use
- This appliance is intended for professional use.
- The appliance is designed only for slicing foodstuff, e. g. meats, cheese, bread, etc. Any other use may lead to damage to the appliance or personal injury.
- Operating the appliance for any other purpose shall be deemed a misuse of the device. The user shall be solely liable for improper use of the device.
Grounding installation
This appliance is classified as protection class I and must be connected to protective ground. Grounding reduces the risk of electric shock by providing an escape wire for the electric current.
This appliance is fitted with a power cord that has a grounding wire and grounded plug. The plug must be plugged into an outlet that is properly installed and grounded.
Information on the slicer
General precautions
- The slicer must be operated only by highly qualified people who are fully aware of the safety measures described in this manual.
- In case of personnel rotation, training is to be provided in advance.
- Although the slicer is equipped with safety devices in the dangerous points, it is recommended not to touch the blade and the moving components.
- Before starting cleaning and maintenance operations, disconnect the slicer plug from the supply.
- Assess the residual risks carefully when protection devices are removed to carry out cleaning and maintenance.
- Cleaning and maintenance require great concentration.
- Regular control of the electric supply cord is absolutely necessary; a worn-out or damaged cord can expose users to great electric shock hazard.
- If the slicer shows malfunctions, it is recommended not to use or attempt to repair the device; please call the “SERVICE CENTRE”.
- Do not use the slicer for frozen products, meat and fish with bones and any products other than foodstuffs.
- Do not use the slicer without the meat pusher when the meat is nearly finished.
- Do not place yourself in a dangerous position, the blade may cause injuries.
The manufacturer and/or the seller is not liable in the following cases:
– if the slicer has been tampered by non-authorized personnel;
– if some parts have been substituted by non-original spare parts;
– if the instructions included in this manual are not followed accurately;
– if the slicer is not cleaned and oiled with the right products.
Safety systems installed in the slicer
The slicer is equipped with:
- a micro-switch that stops the slicer in case the tie rod for blade guard is removed; the micro-switch prevents from restarting the slicer if the guard has not been set in the switch-off position.
- a relay in the control box which requires the restart of the slicer when a power cut occurs.
Even though slicers are provided with electrical and mechanical protections (when the slicer is operating and for maintenance and cleaning operations), there are still RESIDUAL RISKS that cannot be eliminated completely; these risks are specified in this manual under WARNING. The blade and other parts of the machine can cause cuts and injuries.
| Main parts of the appliance 1. Blade sharpener 2. Stop plate 3. Carriage 4. On/off switch [White (I): ON; Black (O): OFF] 5. Slice thickness dial 6. Product clamp 7. Blade guard 8. Blade 9. Carriage lock 10. Blade guard bolt (not displayed) | 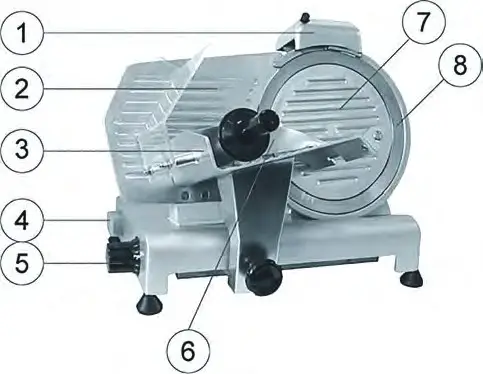 |
Preparations before using for the first time
- Check to make sure no parts are missing. If any parts are missing, contact your supplier.
- Remove all the packing material.
- Keep the packaging if you intend to store your appliance in the future.
- Check the appliance for completeness and transport damages. In case of incomplete delivery or damaged, contact the supplier immediately. DO NOT use the appliance. (See ==> Warranty).
- Clean the blade. Be careful: the blade is very sharp. (Use gloves if necessary, not included)
- Keep open space of at least 10 cm around the appliance to allow for adequate ventilation.
- Position the appliance in such a way that the plug is always accessible.
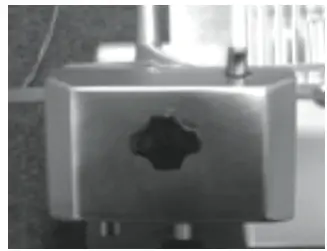
- If the sharpening device is not attached, proceed as follows:
- Top view of the appliance

- Attach the sharpening module in such a way that the blade does not move between the wheels.

- Secure the sharpening device to the machine by tightening the holder. Check to make sure that the sharpening device is well secured before using the machine.


NOTE! The sharpening device is equipped with a safety switch. If the sharpening device is not properly at- tached, you will not be able to use the appliance.
• Attach the handguard.
- Place both screws in the carriage.

- Attach the handguard.
- Place the two washers over the white bolts.
- Screw on the two dome nuts.


NOTE! You are advised not to use the appliance if the handguard is not attached as instructed! These are safety features that will prevent possible injury. If you do not attach these features, there will be a risk of injury.
Instructions for use
- Position the appliance so that the on/off switch is facing the user.
- If the blade sharpener has not been installed, proceed as follows:
– Position the blade sharpener in its support so that the blade does not extend between the gears.
– Tighten the safety screw on the blade sharpener.
– Note! The appliance is equipped with a safety switch and will turn off automatically if the sharpening device is removed) - Push the plugin the wall socket.
- Turn the dial with the graduated scale to the desired slice thickness.
- Switch ON the appliance by pressing the “WHITE (I)” button of the ON/OFF switch.
- Put the food product on the carriage and adjust the clamp to hold the product firmly in place. Make sure the product is positioned against the stop plate.
- Once the product has been sliced, switch OFF the appliance by pressing the “BLACK (O)” button of the ON/OFF switch.
- Turn the thickness dial back to “0”.
Loading and slicing of foodstuffs
WARNING: Products to be cut must be loaded on the food tray only when the dial knob is set to the “0” position. Pay attention to the blade and the sharp edges.
The procedure is as follows:
- once the product has been loaded onto the food tray and placed against the plate, stop it with the arm provided with gripping points;
- adjust the dial knob so as to obtain the desired cutting thickness;
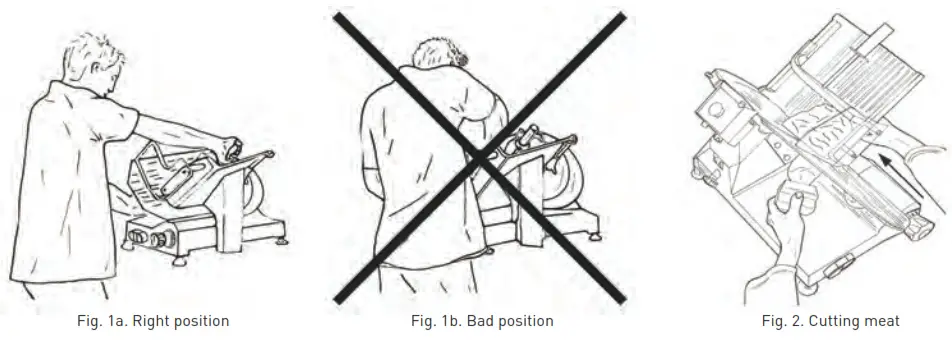
- to avoid accidents, the operator has to face the machine and adopt a correct position: put the ring hand on the meat pusher, and then the left one beside the deflector (do not touch the blade);the body must be perpendicular to the working surface (see FIG. 1a). WARNING: Pay maximum attention: no part of your body should contact the blade (see FIG. 1b);
- push the switch-on button “I”;
- smoothly push the carriage (food tray + meat pusher + stem) towards the blade without exerting pressure on foodstuffs with the meat pusher since they have their own
the force of gravity which exerts pressure on the thickness gauge. The blade will easily cut foodstuffs and slicers will be guided by the deflector onto the collecting plate (see FIG. 2); - do not operate the slicer without foodstuffs;
- once foodstuffs have been cut, set the dial knob in the “0” position and switch off the machine by setting the switch to the “0” position;
- resharpen the blade as soon as slices show a rough or frayed surface and the cutting becomes difficult (see Sharpening the blade).
WARNING: Before proceeding with blade sharpening, remain alert to the RESIDUAL RISKS (see Electrical safety system) that refer to the hazard of injury if the instructions below are not followed. The blade must be sharpened periodically and as soon as it becomes blunt; the detailed instructions below are to be followed:
- clean the blade accurately with alcohol to remove grease after the plug has been disconnected from the socket;
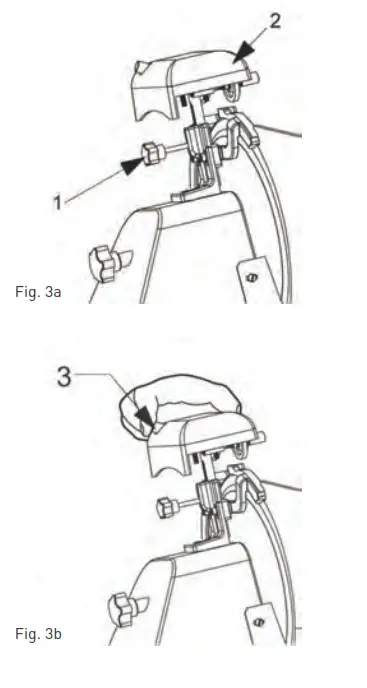
- unscrew the knob (1, Fig.3a), lift (a) the sharpener (2, Fig.3a) up to the locking position and rotate it 180°.
Then l et it moves to the end so that the blade is positioned between the two sharpeners. Lock the knob;
- switch-on the slicer by pushing the button “I” (ON);
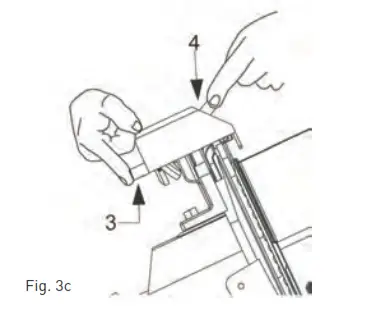
- push the small button (3, Fig. 3b), let the blade rotate against the sharpener for 30/40 sec. to produce a sharp burr on the blade edge;
- pushbuttons simultaneously for 3/4 seconds (1 and 2, Fig 3c) and then leave them simultaneously;
- it is recommended to clean the sharpeners upon the end of sharpening (see Cleaning of the sharpener);
- once sharpening has been completed, return the slice to its original setting with the reverse procedure.
- after sharpening, the blade should be cleaned (See Cleaning of the blade guard and blade)
NOTE: Do not prolong the burring operation beyond 3/4 sec. in order to prevent the dangerous twisting of the blade cutting edge.
The blade should be replaced when it cannot be sharpened any further or when the gap between the edge of the blade and the blade guard exceeds 6 mm.
Ordinary cleaning
General features
- The slicer cleaning must be carried out at least once a day or more frequently, if necessary.
- Cleaning must be extremely accurate for those parts of the slicer which are directly or indirectly in contact with foodstuffs.
- The slicer must not be cleaned with water-cleaner and high-pressure water jets; use water and neutral detergent instead. Do not use other detergents. Tools, brushes and other devices likely to damage the slicer’s surface must not be used.
Before carrying our any cleaning operation it is necessary to: - disconnect the power supply plug from the socket to isolate the slicer from the rest of the electric circuit completely;
- set the dial knob adjusting the plate to the “0” position.
WARNING: Pay attention to residual risks due to cutting and/or sharp edges. Wear protective gloves (not supplied) if necessary.
Slicer cleaning procedure
Cleaning of the food tray
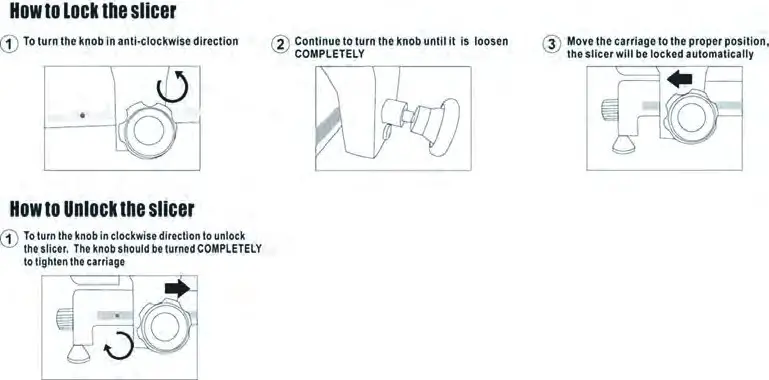
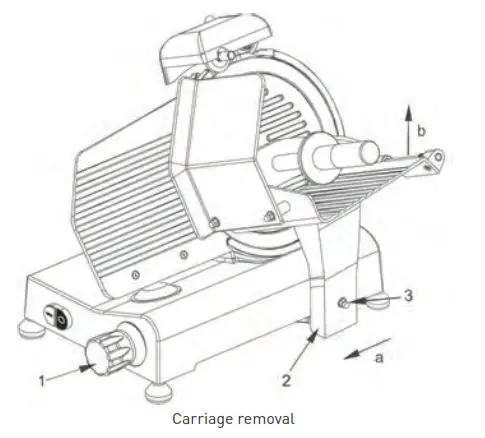
The carriage (food tray + arm + stem) is easily removable:
- set the dial knob in the “0” position (1);
- set the carriage (2) at the end of its run (a) near the controls;
- unscrew the screw (3), slide the carriage upwards (b); after having removed the carriage, it is possible to clean accurately the food tray with hot water and neutral detergent (pH 7).

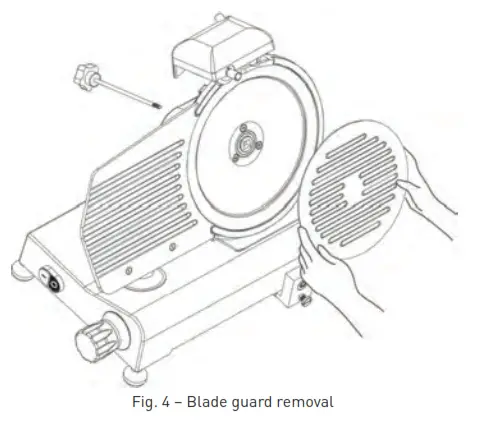
Cleaning of the blade guard and blade
- Remove the blade guard cover by unscrewing the pin at the back of the appliance (see Fig. 4).
WARNING: The blade cleaning must be carried out with a wet cloth with metal gloves on.
To clean the opposite surface of the blade it is necessary to remove the blade (see Fig. 5).
The blade is to be removed as follows: - disassemble the blade guard (see Fig. 5);
- remove the sharpener (a) and turn the thickness blade with the dial knob to make the Plexiglas blade removal tool (b) (not supplied) adhere to the blade;
- loosen the 3 or 4 screws (f) (according to the model) that fix the blade;

- lean the Plexiglas blade removal tool on the blade to obtain the coupling of the blade holes with the two screws (e), turn the blade until it reaches the correct position;
- slightly tighten the screw (e).
WARNING: The blade guard must be cleaned with hot water and neutral detergent.

Cleaning of the sharpener
The sharpener cleaning operation is carried out by rubbing the grinding moles with a brush. The moles must be placed in the safety position which means that they must be turned towards the side opposite to the blade.
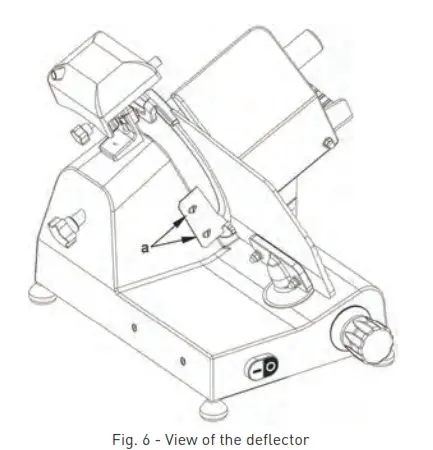
Cleaning of the deflector
To remove the deflector unscrew the two screws (a) locking the deflector (see Fig. 6).
Clean the deflector with hot water and neutral detergent.
Maintenance
General features
Before starting maintenance it is necessary to:
- Disconnect the power supply cord plug from the socket to isolate the slicer from the electric circuit completely.
- Place the dial knob adjusting the thickness plate in the “0” position.
Belt
The belt is not to be adjusted. Generally, it must be replaced after 3 or 4 years; in this case please call your authorized “SERVICE CENTER”.
Feet
Feet may deteriorate and lose elasticity, thus reducing the stability of the slicer. In this case they must be replaced. Call your authorized “SERVICE CENTER” to replace the feet.
Power supply cord
Periodically check the power supply cord for any symptoms of worn-out and, if this is the case, please call the “SERVICE CENTER” to have it replaced.
Blade
Check that the blade does not lose more than 10mm of its original diameter. To have it replaced call the “SERVICE CENTER”.
Sharpener – grinding moles
Check that the grinding moles retain their abrasive property during sharpening operations. Call the “SERVICE CENTRE” if it is necessary to replace the grinding moles to prevent blade damage.
Lubrication of sliding guides
From time to time pou some oil drops onto the round sliding guide along which the carriage moves back and forth. This operation can be performed through the opening (OIL) next to the dial knob.
Label of the push-button panel
If the labels of the push-button panel have been damaged, call the “SERVICE CENTER” for replacement.
Machine disposal
Putting the machine out of service
If for some reason there is a necessity to put the machine out of service, make sure nobody can use it: disconnect it from the mains and eliminate any electrical connections.
Storage
- Before storage, always make sure the appliance has already been disconnected from the electrical outlet and cooled down completely.
- Store the appliance in a cool, clean and dry place.
Troubleshooting
If the appliance does not function properly, please check the below table for the solution. If you are still unable to solve the problem, please contact the supplier/service provider.
| Problem | Possible cause | Solution |
| The appliance does not slice evenly | Blunt blade | Sharpen blade |
| Dirty appliance | Clean the appliance | |
| Appliance stops slicing | Overheated motor | Let the machine cool off for an extended period. The motor’s safety thermostat will reset itself automatically. |
| Carriage does not slide | Dirty slide bar | Clean the slide bar and lubricate with Vaseline |
| Some food sticks to the blade. | Switch off the appliance & unplug it. Let it come to a complete stop. Remove any blockage. Wipe the blade with a damp cloth. | |
| Blade stops when product is being cut | v-belt worn out or dirty | Contact the supplier |
When in doubt, always contact your supplier!
AC voltage input: AC220-240V 50Hz

| M: Motor T: Transformer C: Capacitor PE: Protective earthing (Grounding) L: Live N: Neutral | SB1, SB2: Switch KC: Relay HL: Indicator lamp ST: Thermal cut-out SQ1, SQ2: Microswitch |
Part list (Item no: 210000, 210031, 210048, 210086, 970294)
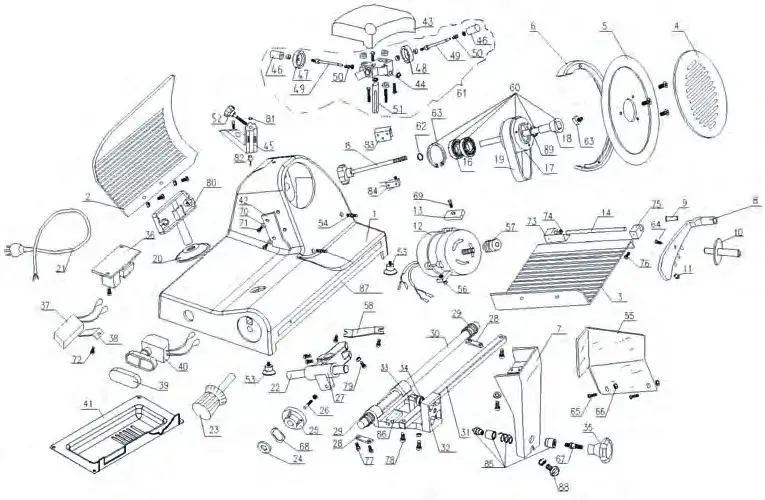
| Part no. | Part name | Quantity | Part no. | Part name | Quantity |
| 1 | Encloser | 1 | 20 | Slide mulch | 1 |
| 2 | Active clapboard | 1 | 21 | Power line | 1 |
| 3 | Food salver | 1 | 22 | Slide axle | 1 |
| 4 | Blade guard disc | 1 | 23 | Knob with scale | 1 |
| 5 | Blade | 1 | 24 | Spring gasket | 1 |
| 6 | Blade guarding ring | 1 | 25 | Cam | 1 |
| 7 | Tray bracket | 1 | 26 | Cam osculant staff | 1 |
| 8 | Food and fixed-arm | 1 | 27 | Slider | 1 |
| 9 | Fixed-arm bushing | 1 | 28 | Slide axle briquetting | 2 |
| 10 | Fixed-arm handle | 1 | 29 | Spring of towing bracket axle | 2 |
| 11 | Plastic granule | 1 | 30 | Towing bracket axle | 1 |
| 12 | Motor | 1 | 31 | Quadrate axis | 1 |
| 13 | Motor briquetting | 1 | 32 | Towing bracket | 1 |
| 14 | Fixed-arm pin 012×185 | 1 | 33 | M8x35Hexagonal screw | 1 |
| 15 | Blade guard bolts | 1 | 34 | Ball-bearing 607 | 1 |
| 16 | Ball-bearing 6202 | 2 | 35 | Towing bracket cover knob | 1 |
| 17 | Blade belt wheel 066 | 1 | 36 | Relay | 1 |
| 18 | Pin of belt wheel | 1 | 37 | Capacitor | 1 |
| 19 | BeltSV.330 | 2 | 38 | Capacitor retainer | 1 |
| Part no. | Part name | Quantity | Part no. | Part name | Quantity |
| 39 | Button mulch | 1 | 65 | Fixed-arm handle bolt | 1 |
| 40 | Button switch | 1 | 66 | Finger baffle bolt | 2 |
| 41 | Motherboard | 1 | 67 | Finger baffle nut | 2 |
| 42 | Meatscraper | 1 | 68 | Bracket knob bolt | 1 |
| 43 | Sharpener mulch | 1 | 69 | Undee spring gascket | 1 |
| 44 | Sharpener base of subassembly | 1 | 70 | Motor impacted bolt | 1 |
| 45 | Sharpener base of assembled | 1 | 71 | Meat scraping shim | 2 |
| 46 | Button of sharpener | 2 | 72 | Meat scraper bolt | 2 |
| 47 | Fine grinding wheel 045 | 1 | 73 | Capacitor fixation clamp bolt | 1 |
| 48 | Crude grinding wheel 045 | 1 | 74 | Tray bearing cover A | 1 |
| 49 | Pin of rubbing stone | 2 | 75 | Meat board bracket | 1 |
| 50 | Spring | 2 | 76 | Tray bearing cover B | 1 |
| 51 | Pin of sharpener bracket | 1 | 77 | Cross recessed countersunk head M6x12 | 2 |
| 52 | Sharpener tighten knob | 1 | 78 | Slide axle briquetting bolt | 4 |
| 53 | Active clapboard mandril | 1 | 79 | Quadrate axis locking screw | 2 |
| 54 | Rubber foot | 4 | 80 | Slider adjust bolt | 1 |
| 55 | Pin of blade guarding ring | 2 | 81 | Magnet | 1 |
| 56 | Meat blocking board | 1 | 82 | Magnet switch | 1 |
| 57 | Slide axle bracket | 2 | 83 | Aluminum block | 1 |
| 58 | Small belt wheel of a motor | 1 | 84 | Microswitch | 1 |
| 59 | Slide driver | 1 | 85 | Stainless steel lock | 1 |
| 60 | Belt wheel setting | 1 | 86 | Limited block | 1 |
| 61 | Sharpener setting | 1 | 87 | Stainless steel bar | 1 |
| 62 | 015 Spring gasket for bearing | 1 | 88 | Set screw for tray bracket | 1 |
| 63 | 015 Spring gasket for bearing | 1 | 89 | Oil seal | 1 |
| 64 | Blade guard disc square-head nut | 1 |
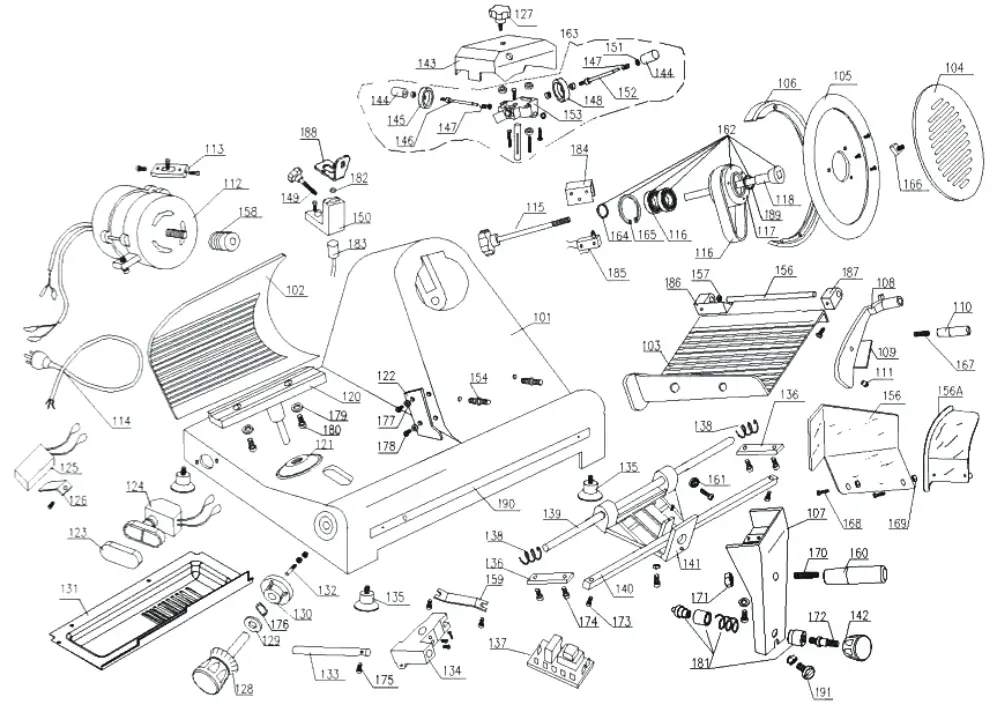
| Part no. | Part name | Quantity | Part no. | Part name | Quantity |
| 101 | Encloser | 1 | 119 | Belt SV.400 | 2 |
| 102 | Active clapboard | 1 | 120 | Supporting base | 1 |
| 103 | Food salver | 1 | 121 | Cable jacket | 1 |
| 104 | Guarding blade disc | 1 | 122 | Mearscraper | 1 |
| 105 | blade | 1 | 123 | Button mulch | 1 |
| 106 | Blade guarding ring | 1 | 124 | Button switch | 1 |
| 107 | Tray bracket | 1 | 125 | Capacitor | 1 |
| 108 | Food fixed-arm | 1 | 126 | Capacitor retainer | 1 |
| 109 | Fixed-arm bushing | 1 | 127 | The screw of oriented staff | 1 |
| 110 | Handle | 1 | 128 | Knob with scale | 1 |
| 111 | Plastic granule | 1 | 129 | Spring gasket | 1 |
| 112 | Motor | 1 | 130 | Cam 300 | 1 |
| 113 | Motor briquetting | 1 | 131 | Motherboard | 1 |
| 114 | Power line | 1 | 132 | Cam osculant pin | 1 |
| 115 | Blade guard bolts | 1 | 133 | Sliding axle | 1 |
| 116 | Ball bearing6204 | 2 | 134 | Slider | 1 |
| 117 | Belt wheel | 1 | 135 | Rubber foot | 4 |
| 118 | Pin of belt wheel | 1 | 136 | Sliding axle briquetting | 2 |
| Part no. | Part name | Quantity | Part no. | Part name | Quantity |
| 137 | Relay | 1 | 165 | 0 47 Spring gasket for hole | 1 |
| 138 | Spring of sliding axle | 2 | 166 | Blade guard disc square-head nut | 1 |
| 139 | Towing bracket sliding axle | 1 | 167 | Fixed-arm handle bolt | 1 |
| 140 | Quadrate axis | 1 | 168 | Finger baffle bolt | 2 |
| 141 | Towing bracket | 1 | 169 | Finger baffle nut | 2 |
| 142 | Button of towing bracket | 1 | 170 | Bracket knob bolt | 1 |
| 143 | Sharpener mulch | 1 | 171 | Bracket knob nut | 1 |
| 144 | Button | 2 | 172 | Bracket bottom bolt | |
| 145 | Fine grinding wheel 0 45 | 1 | 173 | Quadrate axis locking screw | |
| 166 | Pin of burr cleaning wheel | 2 | 174 | Slide axle briquetting bolt | |
| 167 | Spring of burr cleaning wheel | 2 | 175 | Slide axle bolt | 1 |
| 148 | Crude grinding wheel 0 45 | 2 | 176 | 0 12 Under spring gasket | 1 |
| 169 | Sharpener tighten knob | 1 | 177 | Meat scraping shim | 2 |
| 150 | Supporting base of the outer ring | 1 | 178 | Meat scraper bolt | 1 |
| 151 | 0 4.751 Wheel | 1 | 179 | Fulcrum bearing shim | 2 |
| 152 | Pin of rubbing stone | 1 | 180 | Fulcrum bearing bolt | 2 |
| 153 | Sharpener base of subassembly | 1 | 181 | Stainless steel lock | 1 |
| 154 | pin of blade guarding ring | 2 | 182 | Magnet | |
| 155 | Pin of food tray | 1 | 183 | Magnet switch | |
| 156/156A | Meat blocking board | 1 | 184 | Limited block | |
| 157 | Bracket of sliding axle | 1 | 185 | Microswitch | 1 |
| 158 | Small belt wheel of a motor | 1 | 186 | Tray bearing cover A | 1 |
| 159 | Slide transmitting wheel | 1 | 187 | Tray bearing cover B | 1 |
| 160 | Towing bracket handle | 1 | 188 | Fulcrum bearing shim | 1 |
| 161 | Sliding axle608 | 1 | 189 | Oil seal | |
| 162 | Belt wheel setting | 1 | 190 | Stainless steel bar | |
| 163 | Sharpener setting | 1 | 191 | Set screw for tray bracket | |
| 164 | 0 20 Spring gasket for bearing | 1 |
Technical specifications
| Item no. | 210031 | 210048 | 210000 | I 210017 | I 210086 I | 970294 |
| Operating voltage and frequency | 220-240V– / 50 Hz | |||||
| Rated input power | 200W | 280W | 320W | 420W | 320W | 280W |
| Blade diameter | 195 mm | 220 mm | 250 mm | 300 mm | 250 mm | 220 mm |
| Waterproof protection class | IP33 | |||||
| Protection class | Class I | |||||
| Noise level | < 70 dB (A) | |||||
| Dimension | 400x400x 1H1330 mm | 440x420x (H)350 mm | 485x420x 11-11395 mm | 600x480x 11-0450 mm | 485x420x 11-0395 mm | 440x420x Ih0350 mm |
| Net weight (approx) | 13.5 kg | 14 kg | 16 kg | 26 kg | 16 kg | 14 kg |
Remark: Technical specification is subjected to change without prior notification.
Warranty
Any defect affecting the functionality of the appliance which becomes apparent within one year after purchase will be repaired by free repair or replacement provided the appliance has been used and maintained in accordance with the instructions and has not been abused or misused in any way. Your statutory rights are not affected. If the appliance is claimed under warranty, a state where and when it was purchased and include proof of purchase (e.g. receipt). In line with our policy of continuous product development, we reserve the right to change the product, packaging, and documentation specifications without notice.
Discarding & Environment
When decommissioning the appliance, the product must not be disposed of with other household waste. Instead, it is your responsibility to dispose to your waste equipment by handing it over to a designated collection point. Failure to follow this rule may be penalized in accordance with applicable regulations on waste disposal. The separate collection and recycling of your waste equipment at the time of disposal will help conserve natural resources and ensure that it is recycled in a manner that protects human health and the environment.
For more information about where you can drop off your waste for recycling, please contact your local waste collection company. The manufacturers and importers do not take responsibility for recycling, treatment and ecological disposal, either directly or through a public system.
![]()
| Hendi B.V. Innovatielaan 6 6745 XW De Klomp, The Netherlands Tel: +31 317 681 040 Email: [email protected] | PKS Hendi South East Europe SA 5 Metsovou Str. 18346 Moschato, Athens, Greece Tel: +30 210 4839700 Email: [email protected] |
– Changes, printing and typesetting errors reserved.
© 2021 Hendi B.V. De Klomp – The Netherlands
Ver: 21-06-2021


