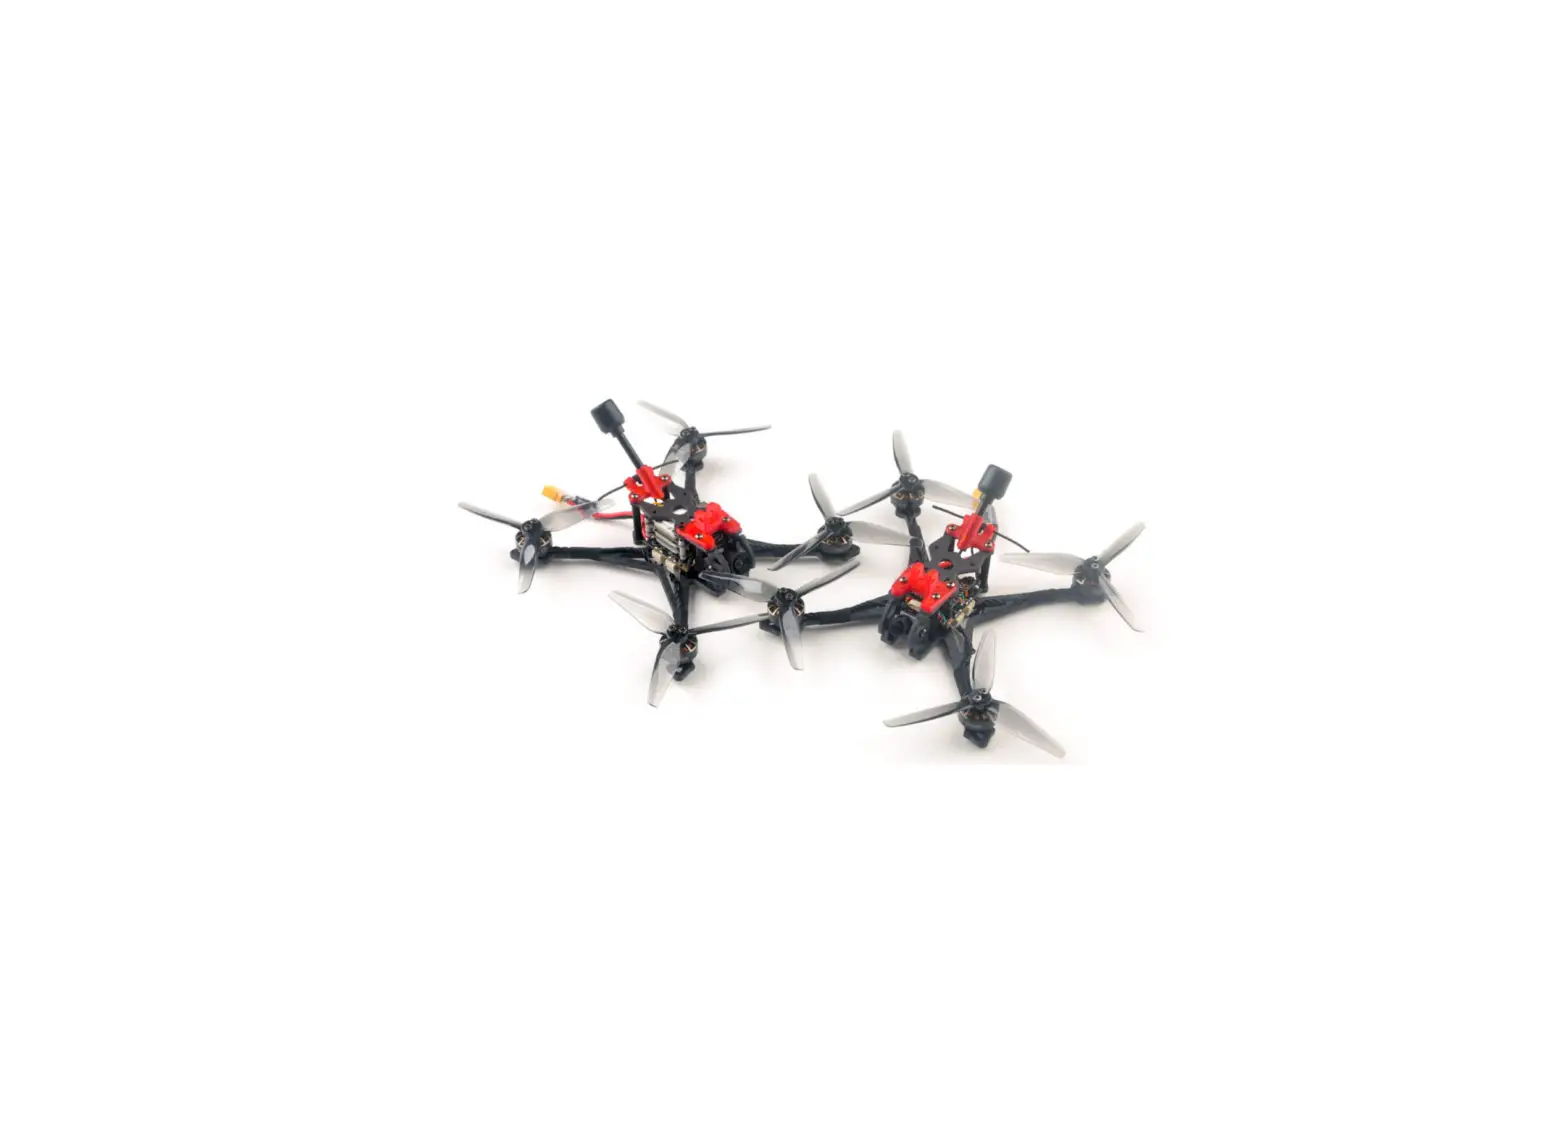
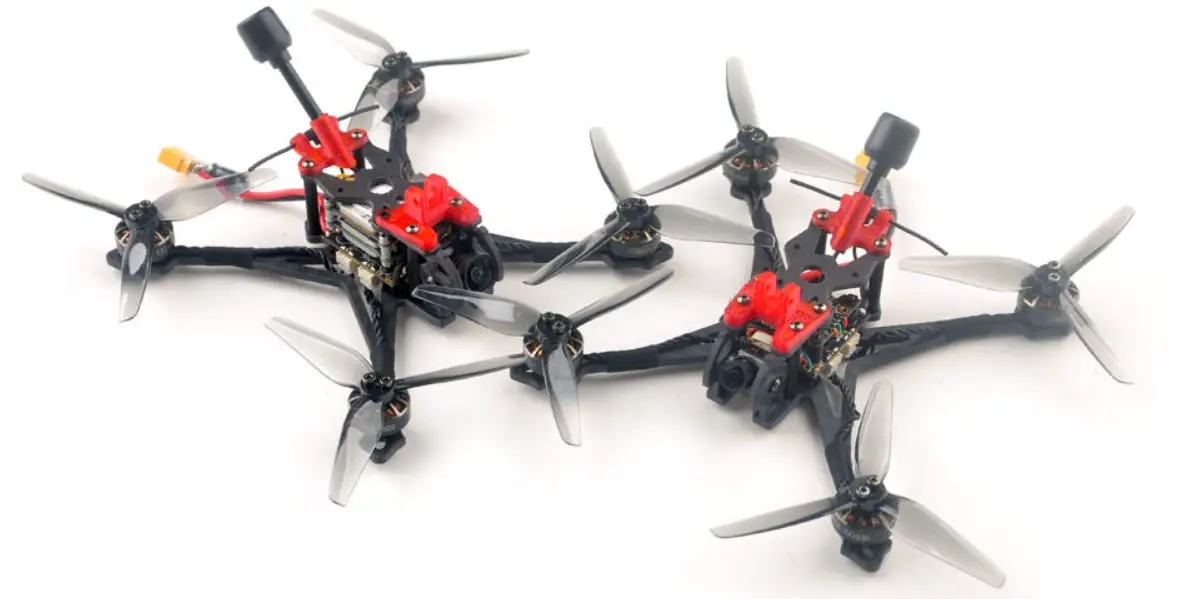
Happymodel Crux35 Crux35HD FPV Racer Drone ELRS V2
Features
| Ultra-lightweight 3.5-inch BNF FPV Freestyle Drone |
| HD video transmission and analog video transmission are optional |
| Integrated ExpressLRS UART receiver or Frsky SPI D8/D16 receiver |
| High efficiency EX1404 power system |
| Can be equipped with Naked Gopro or SMO4K |
| Support 3-4S battery 4S 750mah battery is recommended, maximum |
| support 4S 1100mah |
Specifications
| Brand: HappymodelProduct name: Crux35 / Crux35 HDZERO / Crux35 HD |
| Wheelbase: 150mm |
| Weight: Crux35 87gram Crux35 HD 108gram |
| Size: 130mmx130mmx45mm(without propellers) |
| Receiver option: UART ExpressLRS 2.4GHz |
| SPI Frsky D8/D16 (S-FHSS compatible) |
| Camera and VTX option: |
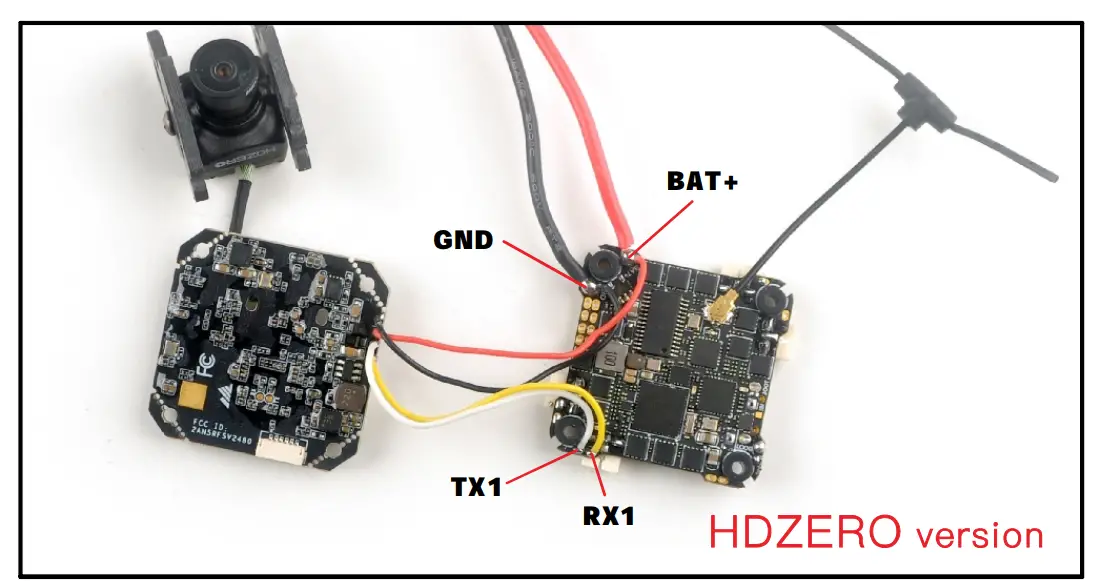
| HD DJI version Nebula+Vista or Runcam Link Wasp Nano |
| HDZERO version RunCam Nano HDZero Camera + HDZERO WHOOP VTX |
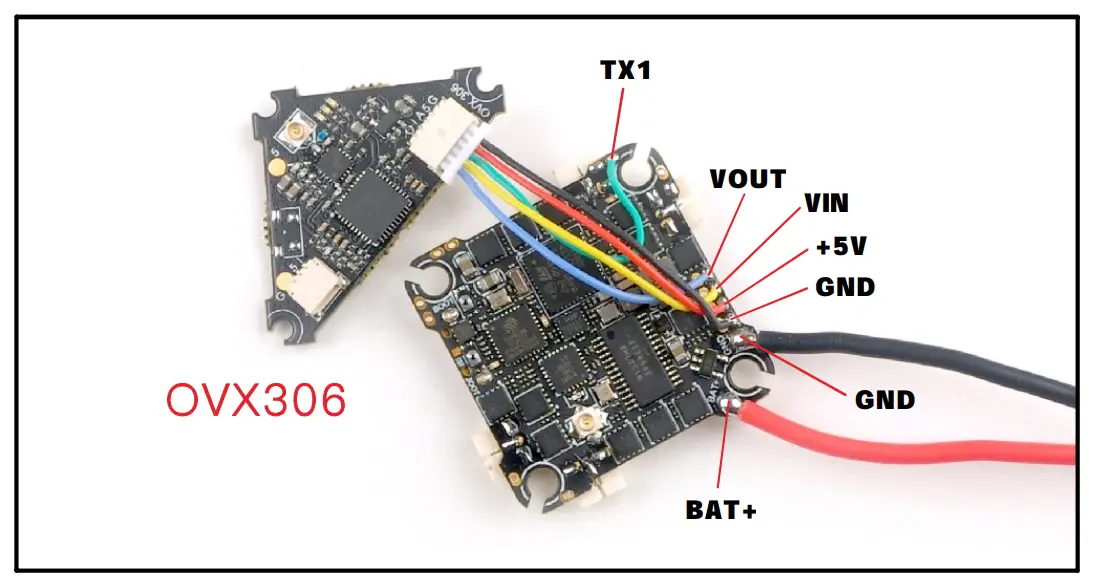
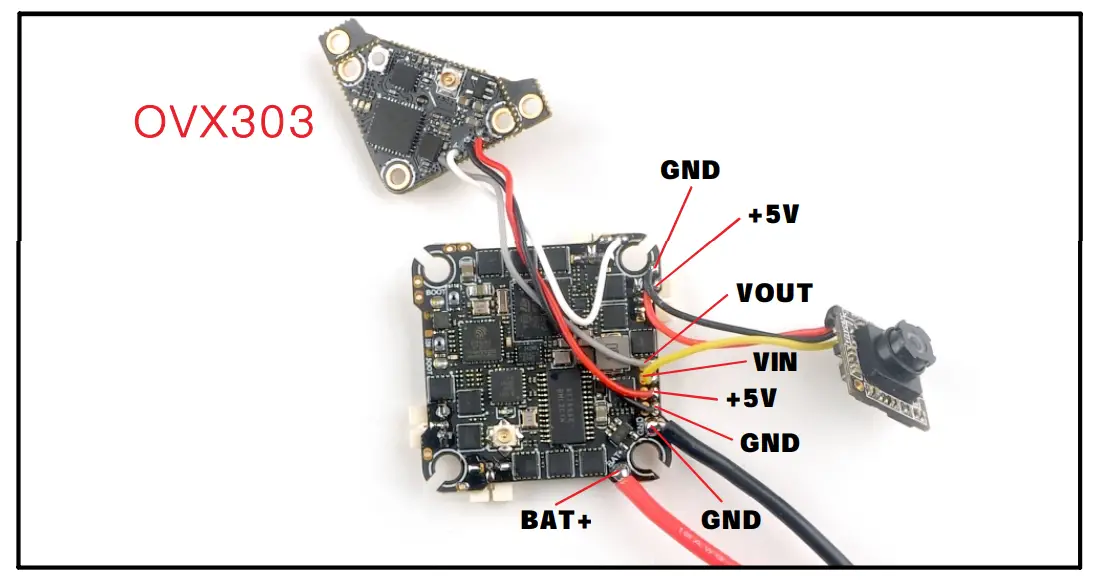
| Analog version Ant+OVX303 or OVX306 VTX |
| Flying time: 9min~15min 4s 750mah battery |
| Package includes | |||
| Item Name | Crux35 | Crux35 HDZERO | Crux35 HD DJI |
| Crux35 Frame | 1 | 1 | 1 |
| Option1: ELRS X1 FC with SPI ELRS(Discontinued) | 1 | 1 | 1 |
| Option2:CrazyF411 ELRS FC with UART ELRS | |||
| Option3: CrazyF411 FRSKY FC SPI Frsky | |||
| CaddxFPV Nebula Nano Kit Or Runcam Link Wasp Nano | 0 | 0 | 1 |
| HDZERO Whoop VTX+ Rucam HDZERO Camera | 0 | 1 | 0 |
| Analog FPV Camera Caddx Ant | 1 | 0 | 0 |
| OVX303/ OVX306 5.8G analog VTX | 1 | 0 | 0 |
| Happymodel EX1404 Kv3500 | 4 | 4 | 4 |
| HQProp T3.5X2X3Grey (4cw+4ccw) | 1 | 1 | 1 |
| Screw Driver | 1 | 1 | 1 |
| Buckle Velcro for battery | 1 | 1 | 1 |
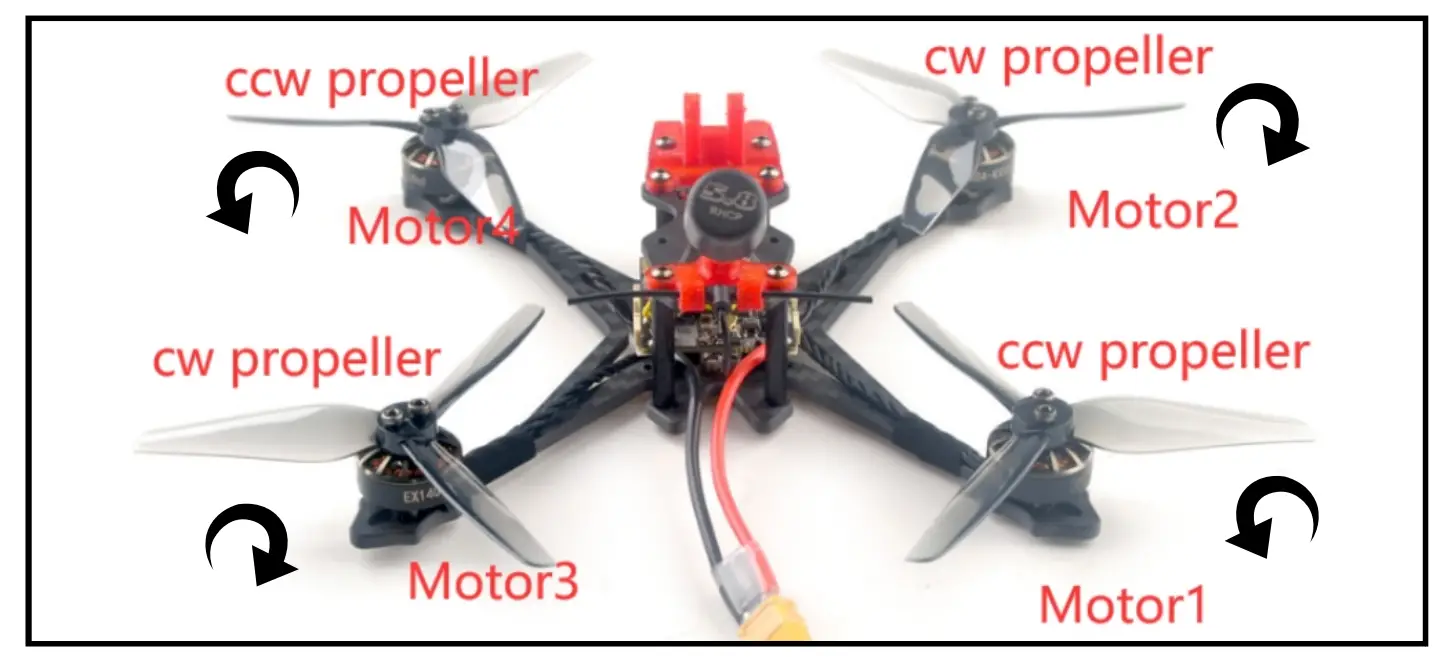
Install propeller and mount the antenna holder
Default Propeller installation of Crux35 was set to be “Prop Out”, please install CCW propeller to Motor1 and Motor4 and install CW propeller to Motor2 and Motor3, make sure you have mounted the screws tightly for the propellers.
Bind procedure
Bind procedure video for your refrence http://bit.ly/40Kr4H8
- Supply power to the flight controller by plug USB, wait until the green LED on the FC is off, immediately turn off the power, and then repeat again the above steps. When the FC is powered on for the third time, the green LED light will start to double-flash, which means that the RX enters the binding mode
- Please make sure your ExpressLRS tx module firmware is v3.x.x. And go to ExpressLRS.lua from “TOOLS” menu of your radio transmitter. Then hit [Bind] to binding with the onboard ExpressLRS receiver. The green LED should blinking slowly first then turn to solid, that means binding was successfully. If the green LED still keep double flash after binding ,please change Model Match tab value from “off” to “on” or from “on” to “off”

- Check the receiver channel map and channel value is correct after bind successful.

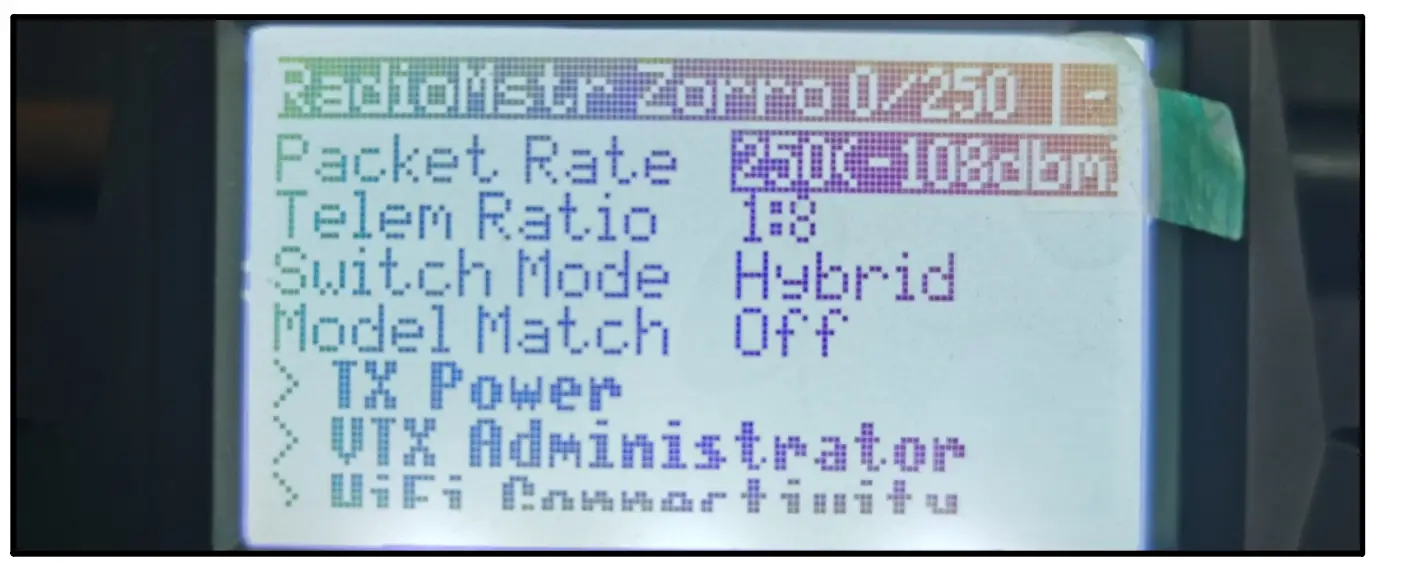
Make sure the VTX band is “OFF” from the vtx administrator, sometimes it would affect VTX or RX quality .

Arm/Disarm the Motor
- Turn on your radio transmitter and connect the battery to the Crux35. Then place Crux35 horizontally on the ground. We recommend 4S 750mah or 4S 850mah Li-po battery for Crux35 and Crux35 HD
- Prepare your goggles, and match the channel with the VTX_table

- Toggle Aux1 switch to arm the motors, the Green LED at the bottom of the flight controller would get be solid once armed, happy flying.
Flight controller connection diagram
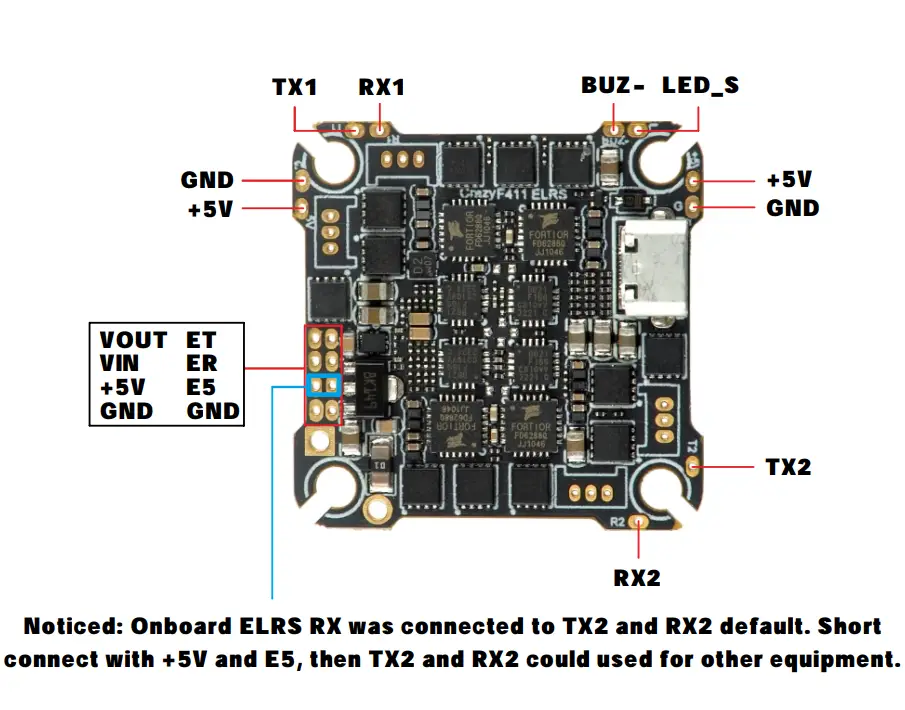
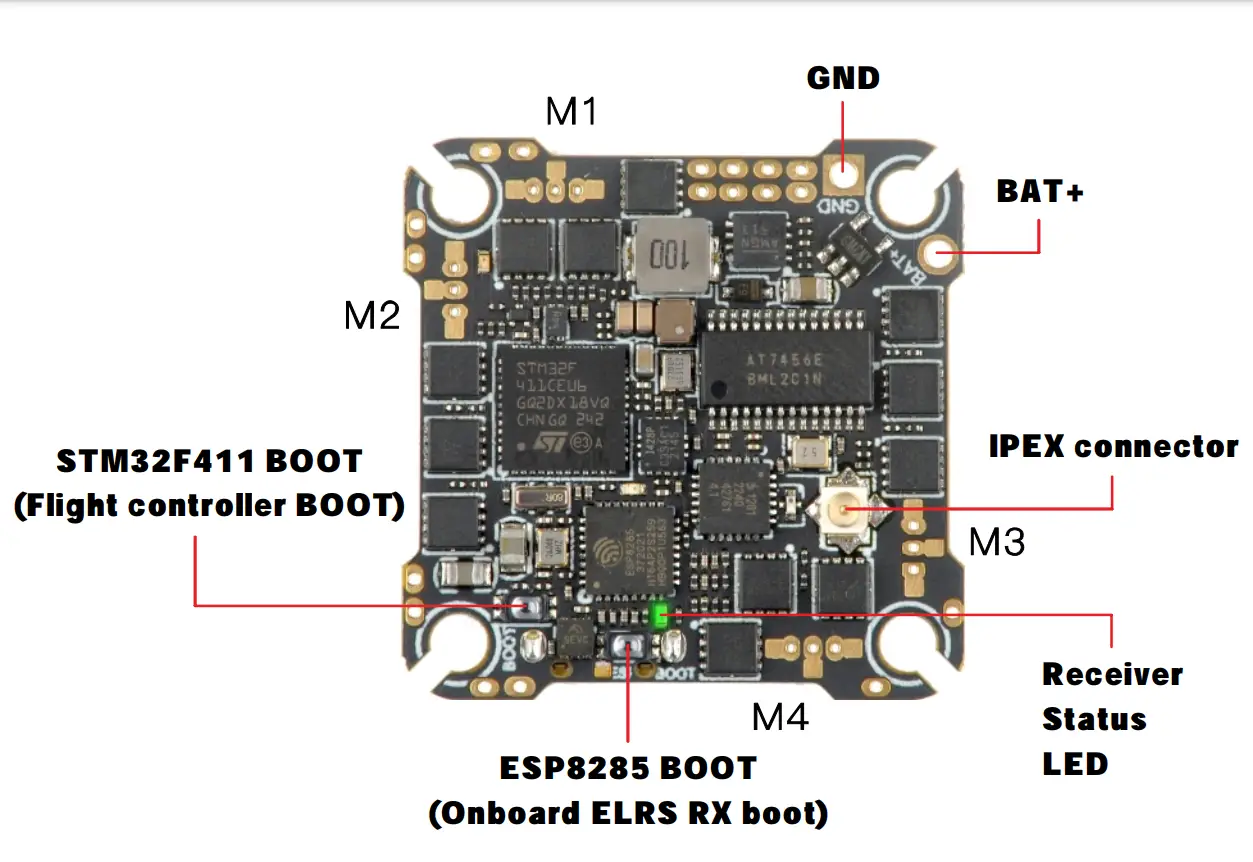
Electronic hardware connection diagram
Analog version

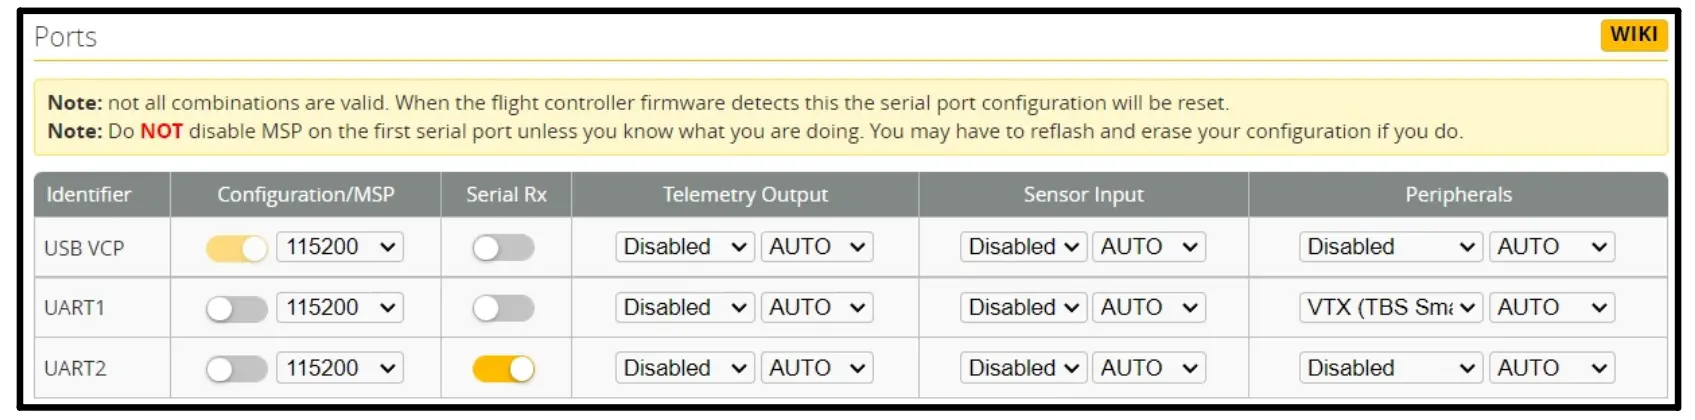
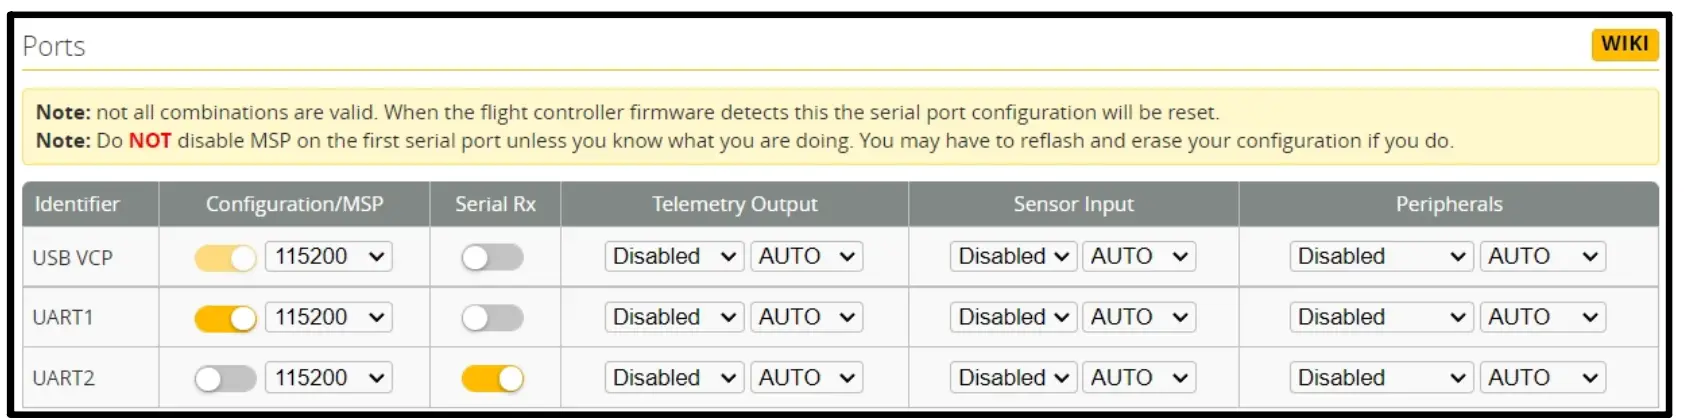
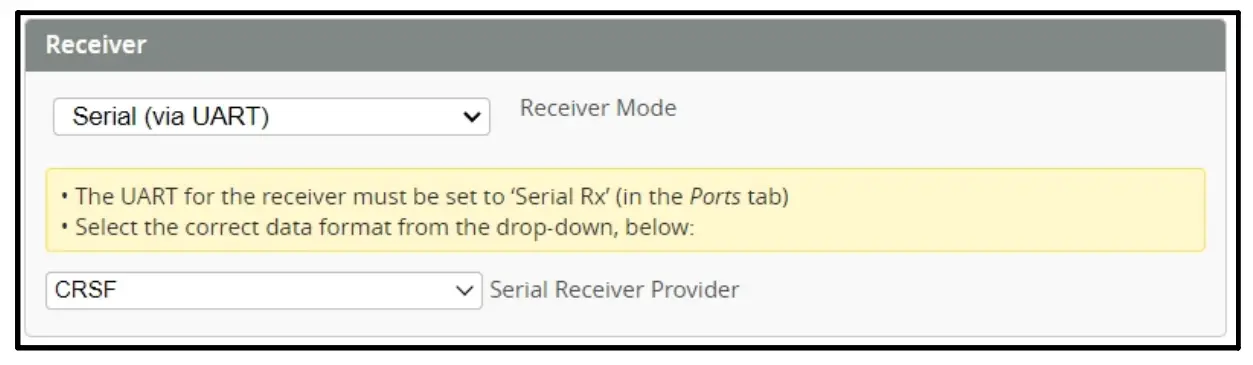
Port setting and receiver setting
Analog version
HDZERO and HD OJI version
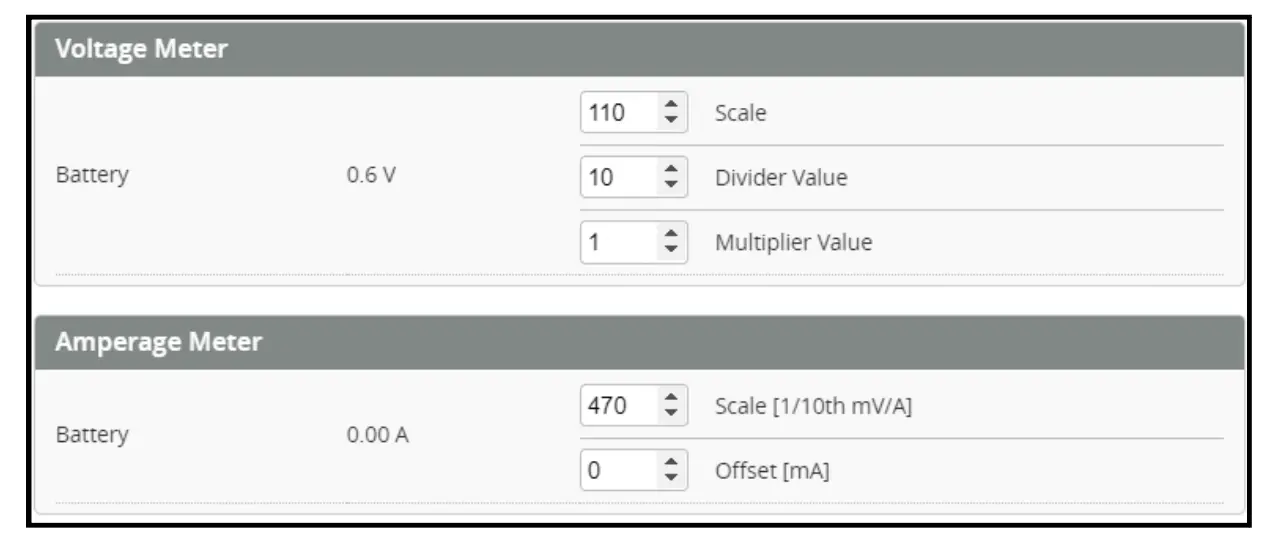
Voltage and Currents meter settings
PIO settings
Analog version
HD DJI and HDZERO version
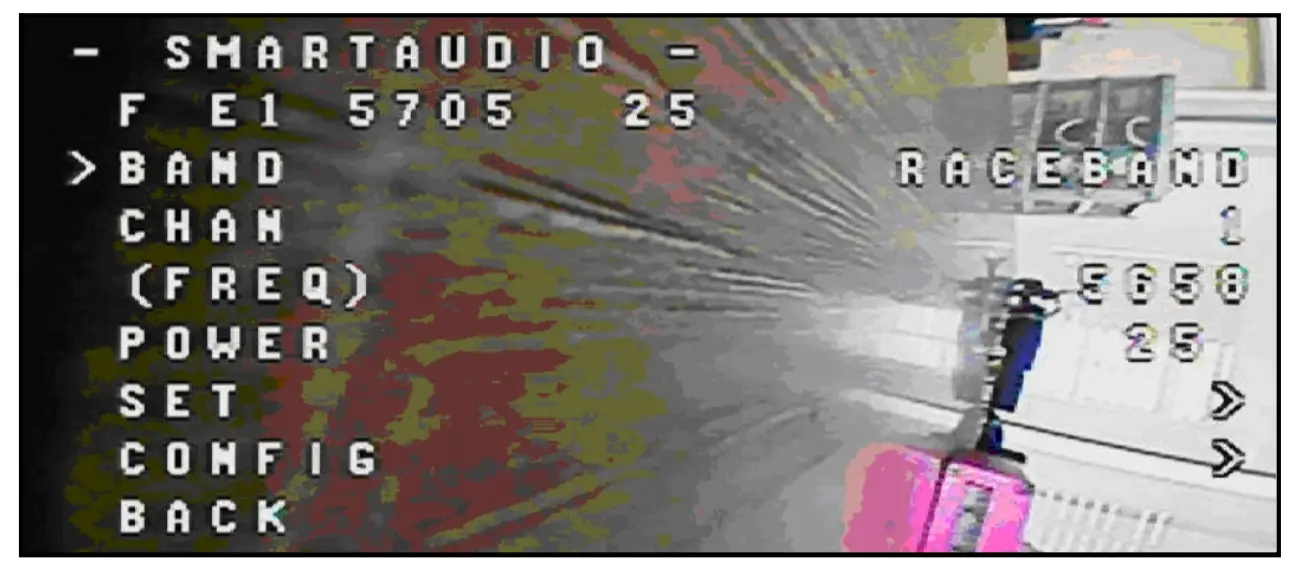
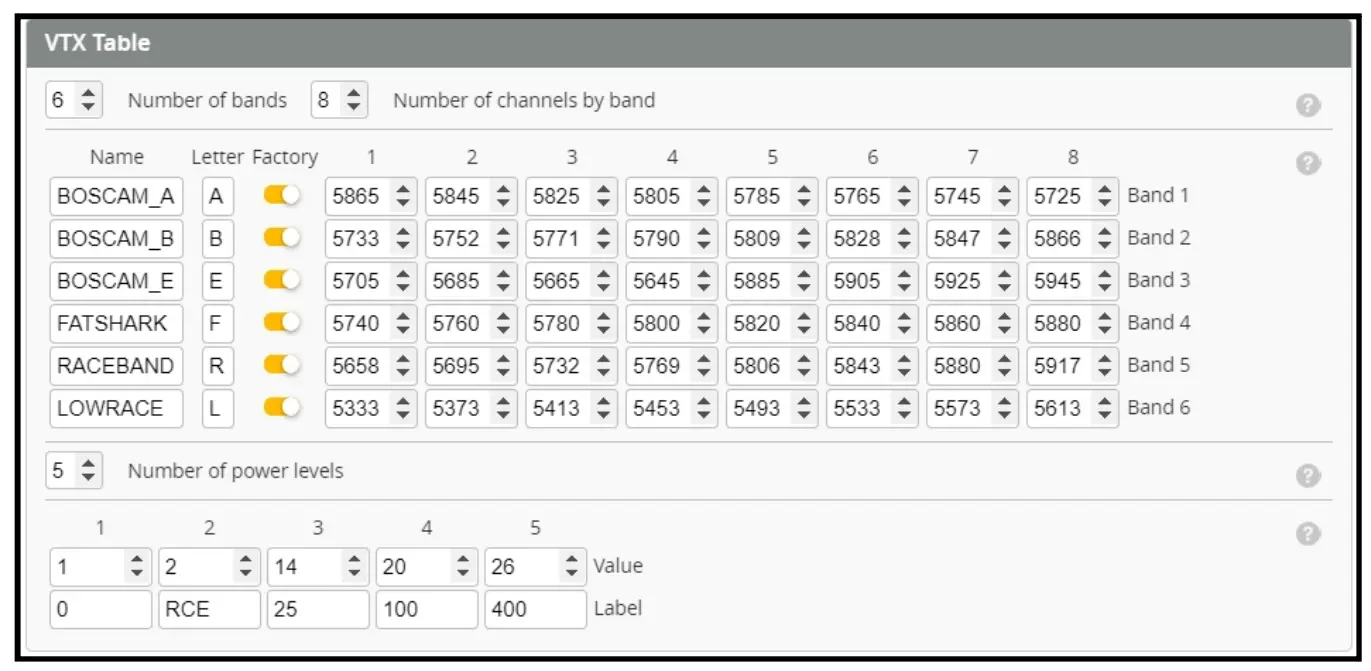
Analog version VTX Bands and Channels setup
Frequency and channel frequency table:
| FR CH | CH1 | CH2 | CH3 | CH4 | CH5 | CH6 | CH7 | CH8 |
| BOSCAM_A | 5865M | 5845M | 5825M | 5805M | 5785M | 5765M | 5745M | 5725M |
| BOSCAM_B | 5733M | 5752M | 5771M | 5790M | 5809M | 5828M | 5847M | 5866M |
| BOSCAM_E | 5705M | 5685M | 5665M | 564 5M | 5885M | 5905M | 592 5M | 594 5M |
| FATSHARK | 5740M | 5760 M | 5780M | 5800M | 5820M | 5840M | 5860M | 5880M |
| RACEBAND | 5658M | 5695M | 5732M | 5769M | 5806M | 5843M | 5880M | 5917M |
| LOWRACE | 5333M | 5373M | 5413M | 5453M | 5493M | 5533M | 5573M | 5613M |
There are 2 ways to switch the vtx channels:
- If we need to use Channel 5705 then we should Go to Betaflight CLI,type the command:
Set VTX_band=3
Set VTX_channel=1 save - Disarm the Crux35 and then move the stick of the transmitter (THR MID+YAW LEFT+PITCH UP)to enter OSD Menu,Enter to Features,then enter to VTX SA to set VTX Band and channel