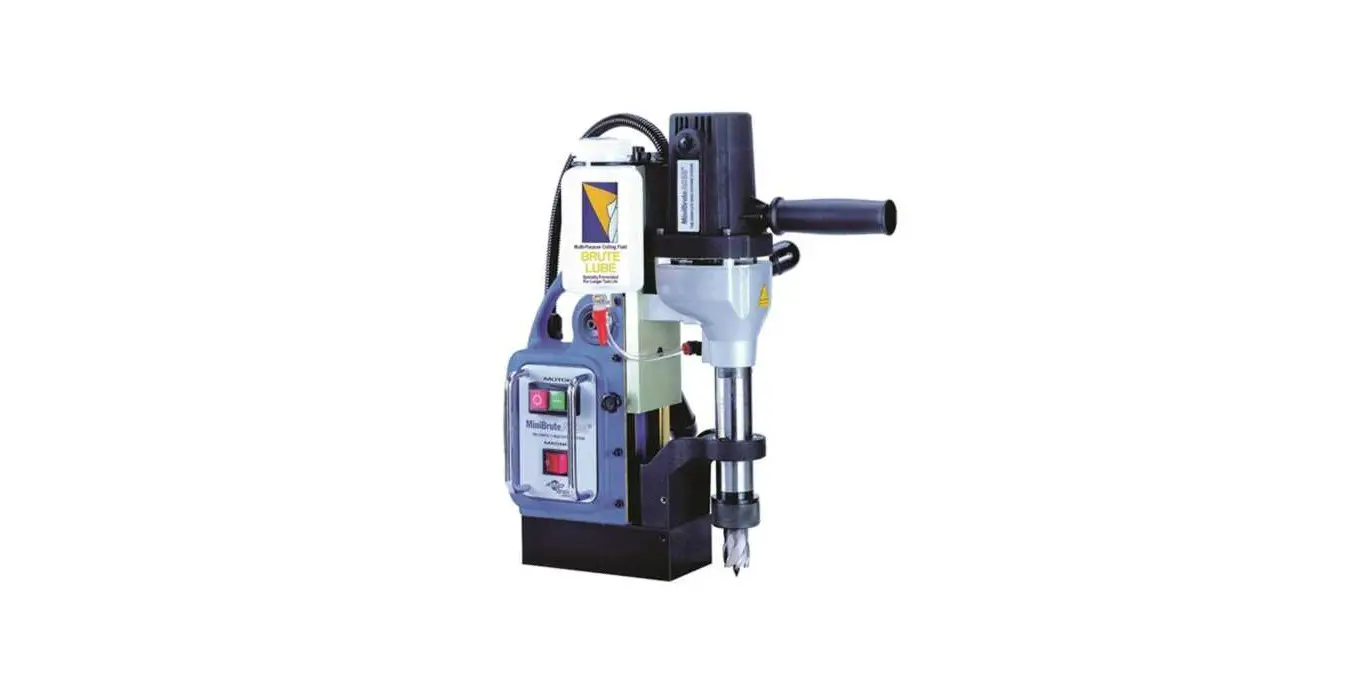
ROTO Brute AC35 Portable Magnetic Drill Press User Guide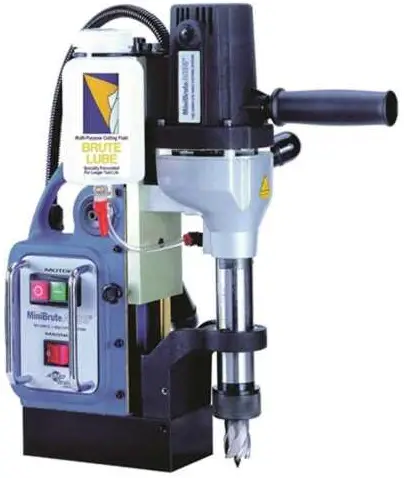
Content
- Drills
- Reamers
- Tool Bits
- End Mills
- Wood Bits
- Taps & Dies
- Countersinks
- Carbide Burs
- Annular Cutters
- Magnetic Drill Presses
- Hammer Bits & Chisels
Specification
- 1-3/8” Cutter Capacity
- 1200 Watt Motor
- 110 / 115 v
Operating Instructions
IMPORTANT
Please read these operating and safety instructions carefully and completely. For your own safety, before using this equipment check that the voltage is correct and that all handles and parts are firmly secured. If you are uncertain about any aspect of using this equipment, contact your distributor.
PlEASE KEEP THESE INSTRUCTIONS
Model AC35 Specifications
- Motor (115v 50/60 Hz) (Watts): 1200
- Amp: 8
- Maximum Cutter Diameter (inch): 1-3/8”
- Maximum Cutting Depth (inch): 2”
- No Load Speed (RPM): 600
- Sound Power Level (Under Load) (dB (A)): 90
- Net Weight (lb): 23
- Magnet Dimensions (in): H 1-7/8” x W 3-5/32” D 6-5/16”
- Magnetic Adhesion (lbs): 2200
- Arbor Internal Diameter: 3/4” weldon style
Contents: 1 Coolant Tank, 1 Coolant Tube, 1 Safety Guard, 1 Hex key 4mm, 1 Hex key 2.5mm, 1 Wrench 8mm, 3 Handles, 2 Butterfly Screws, 2 Spring Washers,1 Safety Chain, Plastic Carrying Case.
Ear and eye protection MUST be worn during operating of this equipment. Do NOT touch the cutter while it is in motion. Always follow the Personal Protection Equipment (PPE) recommendations while operating this tool.
This machine is designed specifically for drilling holes in steel using annular cutters or with twist drills when using the optional drill chuck. We recommend Champion® Rotobrute™ annular cutters. Please consult your Champion authorized distributor for a complete range of sizes. DO NOT modify and / or use your Rotobrute™ Magnetic Drill Press for any application other than, for which it is intended.
Always ensure that the total work area can be viewed from the operating position. Do not operate the drill press in explosive environments – power tools create sparks that may ignite flammable materials or gases. Do not operate the drill press in damp or wet conditions, as electric shocks may result. Always use both hands to operate the drill press. Be careful to ensure that the material you are working on is securely clamped.
- This drill press is equipped with an approved grounded cord and plug for its use.
- Unplug the drill press from the electrical connection before replacement of the cutter, making adjustments or other maintenance work.
- We recommend the use of genuine RotoBrute™ annular cutters
- Inspect the machine and cutter before each use and do not use worn or damaged cutters.
- Ensure the cutter is correctly mounted and do not stop by hand.
- Always keep the power cord away from moving parts of the drill press and cutter.
- Never use the tool without the safety guard in place.
Mounting Annular Cutters Using The Quick-Release Arbor:
All AC35 machines come equipped with a quick-change arbor. The quickchange arbor allows users to install cutters and twist drills in seconds. First, insert the piolt pin into the cutter. Then, rotate the knurled collar to the left (clockwise when viewed from above) and insert the cutter. Ensure that the cutter is engaged on its flat in the tool holder. Then rotate the knurled collar to the right by hand to fully tighten. No tools are needed.
Magnetic Drill Safety
The drill’s magnetic adhesion depends on the thickness of the work-piece. 1/2” (13mm) is the minimum thickness for safe operation. Keep the magnet clean of metal chips and other dirt and debris. These will seriously reduce the magnetic adhesion. Ensure that the magnet has adhered to the work-piece firmly before switching on the drill. The drill must be operated on its own electrical outlet. Always use the supplied safety strap or chain. An electrical overload can result in loss of adhesion. Check that the coolant level to be is sufficient for use. Never operate without cutting fluid.
Adjusting Dovetail Slides
Slowly adjust the hex screws while moving the handle up and down. Adjust so there is no free play or no binding anywhere through its range of travel. Periodically check, lubricate, and adjust as necessary.
Recommended Operating Procedures
- Position the machine using the pilot pin as an aid in locating the center of the cut.
- Switch on the magnet and check that the cutter is in the correct position and the machine is securely held to the work-piece.
- With the motor head in the raised position, switch on the motor.
- Turn the traverse handles to begin cutting. Use light pressure at first to keep cutter from wandering, and then continue with normal pressure. Do not force the tool. Let the speed of the cutter do the work. Cutting performance will not improve by applying more pressure on the tool, as cutter and motor life will be reduced.
- Adjusting the coolant feed tap regulates the flow of cutting oil (#43).
- Use less pressure as the cutter exits through the material. Always provide a method of catching the slug, as the ejected slug may cause injury.
CAUTION: The slug ejects at end of cut and is very hot.- Note: Always lock the slide lock (on the side of the machine) in the fully raised position when at rest to prevent the slide from accidentally falling down; remember to unlock it again before commencing drilling
WARNING: Do not attempt to drill a work-piece, which is thicker than the maximum cutting depth of the cutter being used. Never exceed 1-3/8” (35mm) cutter diameter.
Maintenance and Troubleshooting
Keep the drill press and the cord clean. In case of electrical or mechanical
malfunction, immediately switch off the tool and disconnect the plug. Excessive sparking generally indicates the presence of dirt in the motor or worn out carbon brushes. Periodically check brushes for wear and replace when they reach 1/4” (6mm). Also check that the machine is well lubricated. For all other service and maintenance, please contact a Champion® authorized service center.
AC35 Magnetic Drill Press
Spare Parts Diagram
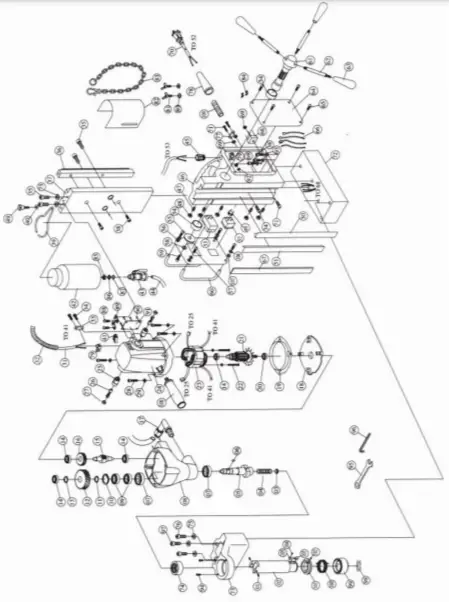
| Fig # | Description | Part # | Qty |
| 1 | Set Screw M5X6 | AC3501Th | 2 |
| 2 | Cutter Arbor | AC3502L0 | 1 |
| 3 | * Water Seal | AC35030 | 1 |
| 4 | *Arbor Spring | AC35040 | 1 |
| 5 | *Main Drive Spindle | AC35050 | 1 |
| 6 | *Woodruff Key M5x5x10 | AC3506Q | 1 |
| 7 | *Oil Seal 22x32x7 | AC35070 | 1 |
| 8 | Gearbox Housing | AC35080 | 2 |
| 9 | Ball Bearing 6003zz | AC35090 | 1 |
| 10 | Retaining Ring R-35 | AC35100 | 2 |
| 11 | Bearing Ring | AC35110 | 1 |
| 12 | Final Drive Gear | AC35120 | 1 |
| 13 | Motor Nut M14 | AC35130 | 1 |
| 14 | Ball Bearing 608u | AC3514Q | 4 |
| 15 | Gear Pinion | AC35150 | 1 |
| 16 | 1st Drive Gear 43T | AC35160 | 1 |
| 17 | Coolant Elbow Connector | AC35170 | 1 |
| 18 | Inner Gear Cover | AC35180 | 1 |
| 19 | Fan Guide | AC35190 | 1 |
| 20 | Ball Bearing 609 2RS | AC35200 | 2 |
| 21B | Armature 110V | AC3521B0 | 1 |
| 22 | Stator Screw M5x55 | AC35220 | 2 |
| 23B | Stator Armature 120V | AC3523BQ | 1 |
| 24 | Motor Housing | AC35240 | 1 |
| 25 | Brush Holder | AC35250 | 2 |
| 26 | Carbon Brush (pair) | AC3526Q | 2 |
| 27 | Brush Cover | AC35270 | 2 |
| 28 | Motor Housing Screw M5x40 | AC35280 | 2 |
| 29 | Motor Housing Washer M4 | AC35290 | 2 |
| 30 | N/A | ||
| 31 | Motor Cord to Stand | AC35310 | 2 |
| 32 | Conduit Lead Sheath | AC35320 | 1 |
| 33 | Conduit Lead Clip | AC35330 | 1 |
| 34 | Conduit Lead Screw M4x12 | AC3534Q | 2 |
| 35 | Motor Mounting Screw M8 X 1 6 | AC35350 | 4 |
| 36 | Machine Rack | AC35360 | 1 |
| 37 | Dovetail Slide | AC3537Q | 1 |
| 38 | Dovetail Screw M6x20 | AC35380 | 2 |
| 39 | Coolant Bottle Bracket | AC35390 | 1 |
| 40 | Coolant Bottle Washer M5 | AC35400 | 2 |
| 41 | Coolant Bottle Screw M5 x 15 | AC35410 | 2 |
| 42 | Coolant Bottle | AC3542Q | 1 |
| 43 | Coolant Bottle TAP (connector) | AC35430 | 1 |
| 44 | Plastic Coolant Tube | AC35440 | 1 |
| 45 | Cable Gland (Stand) | AC3545Q | 1 |
| 46 | Main Body Casting | AC3546Q | 1 |
| 47 | Adjustment Screw M5X20 for GIBE | AC3547Q | 5 |
| 48 | Adjustment Screw Nut M5 | AC35480 | 5 |
| 49 | Guide Lock Knob M5 x 16 | AC35490 | 1 |
| 50 | Steel Strip Tensioner | AC3550Q | 1 |
| 51 | Brass Guides (Pair) | AC35510 | 2 |
| 52 | Magnet Switch | AC3552Q | 1 |
| 53b | Stop/Start Switch (Relayed) 115v | AC3553bQ | 1 |
| 54 | Pinion Bushing | AC35540 | 2 |
| 55 | Pinion Washer 38x10x2T | AC35550 | 1 |
| 56 | Switch Panel | AC35560 | 1 |
| 57 | Panel Screw M4 x 12 | AC35570 | 4 |
| 58 | Panel Washer M6 | AC35580 | 1 |
| 59 | Pinion Hex Head Screw M6 x 16 | AC3559Q | 1 |
| 60 | Switch Plate Bar | AC3560Q | 2 |
| 61 | Pinion | AC3561 0 | 1 |
| 62 | Handle | AC3562Q | 3 |
| 63 | Handle Knob | AC3563Q | 3 |
| 64 | Side Panel | AC35640 | 1 |
| 65 | Side Panel Screw M4x8 | AC35650 | 4 |
| 66 | Wire Lead 16 AWG | AC3566Q | 3 |
| 67 | Wire Lead 16 AWG | AC3567Q | 1 |
| 68 | Main Rectifier Unit | AC35680 | 1 |
| 69 | Rectifier Nut M4 | AC35690 | 1 |
| 70 | Power Cord | AC35700 | 1 |
| 71 | Rectifier Screw M4x20 | AC3571C1 | 1 |
| 72 | Magnet | AC35720 | 1 |
| 73 | Arbor Support Bracket | AC3573 | 1 |
| 74 | Spindle Bush | AC3574 | 1 |
| 75 | Arbor Support Washer M8 | AC3575 | 3 |
| 76 | Arbor Support Screw M8x20 | AC3576 | 3 |
| 77 | Spanner Wrench M8 | AC3577 | 1 |
| 78 | Hex Key M2.5 | AC3578 | 1 |
| 79 | Hex Key M2.5 | AC3579 | 1 |
| 80 | Safety Guard Washer M6 | AC3580 | 2 |
| 81 | Safety Guard Butterfly Screw M6x8 | AC3581C | 2 |
| 82 | Safety Guard | AC3582 | 1 |
| 83 | Safety Chain (Strap) | AC3583 | 1 |
| 84 | Electrical Connector | AC35840 | 1 |
| 85 | Coolant Bottle Brass Nut | AC3585CQ | 1 |
| 86 | Coolant Bottle Washer 10x23x2 | AC3586C0 | 1 |
| 87 | Coolant Bottle 0-Ring 10.7×2 | AC3587C0 | 1 |
| 88 | Motor Fixing Plate Screw M5x10 | AC3588C0 | 2 |
| 89 | Motor Fixing Plate | AC3589CO | 1 |
| 90 | Flat Head Screw M4x6 | AC359000 | 4 |
| 91 | Motor Back Cover Plate | AC3591C0 | 1 |
| 92 | Sun Washer | AC3592C0 | 1 |
| 93 | Spring Washer MG | AC3593CQ | 4 |
| 94 | Screw M4x6 | AC3594C0 | 2 |
| 95 | Wrench M8 | AC3595C0 | 1 |
| 96 | Hex Key M2.5 | AC3596C0 | 1 |
| 97 | Arbor Support Screw M8x70 | AC3597CQ | 2 |
| 98 | Snap Ring S-28 | AC3598L0 | 1 |
| 99 | Collar | AC3599L0 | 1 |
| 100 | Return Spring | AC3510011) | 1 |
| 101 | Retaining Ring | AC35101LQ | 1 |
| 102 | Set Screw M4x4 | AC35102L0 | 1 |
| 103 | Lock Pin HRC63 | AC35103L0 | 1 |
| 104 | Screw M3x6 | AC35104L0 | 1 |
| 105 | Flat Spring | AC35105LQ | 1 |
| 106 | Spring Washer M4 | AC35106C0 | 3 |
| 107 | Flat Washer M4 | AC35107C0 | 3 |
| 108 | Handle | AC35108C0 | 1 |
| 109 | Cord Protector Sleeve | AC35109CQ | 1 |
Additional Parts for AC35
| List | Description |
| AC35-1220 | 1/2” Drill Chuck for AC35-451220/AC35-461220 |
| AC35-451220 | Drill Chuck Adaptor use with chuck AC35-1220 |
| AC35-461220 | Quick-Change Adaptor use with chuck AC35-1220 |
CUSTOMER SERVICE

P.O. Box 368
Rockville Centre, NY 11570
516-536-8200
Fax: 516-536-8186
www.championcuttingtool.com


