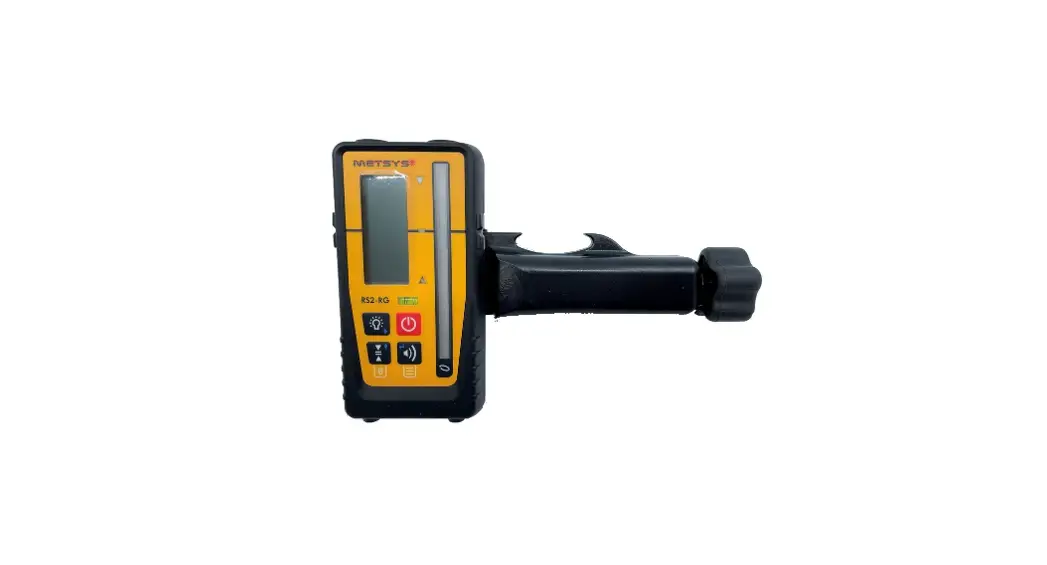
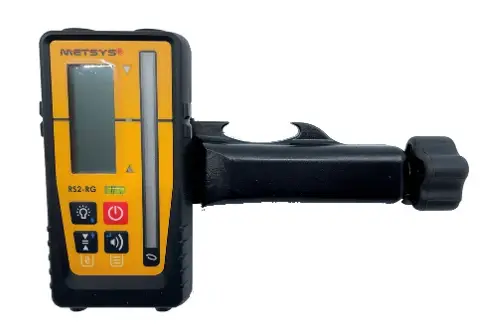
![]() MM Receiver
MM Receiver
Instruction Manual
INTRODUCTION
The receiver detects the laser beams of rotating laser transmitters emitting red or green laser light. Any other use than the described above shall be deemed to beimproper use.
The user is liable for damage resulting from improper use.
MAINTENANCE AND CARE
Keep the device always clean, especially the laser-sensitive area!
- Do not use aggressive cleaning solvents.
- If soiled heavily, the device can be cleaned under running water.
- Do not use high-pressure cleaners.
- Allow the device to dry completely before storing it in a closed container. Residual moisture can result in corrosion of the battery contacts. In this case our warranty expires.
- In the unlikely event of a failure or defect, have the appliance examined and repaired by Metsys.
- In all your queries and spare part orders, always quote the 8-digit serial number (see type plate) of your device.
FIGURES AND ICONS
 CAUTION
Prior to the first start-up, it is definitely necessary to carefully read the Safety instructions!
CAUTION
Do not modify the device. Modifications can cause injuries and malfunctions.
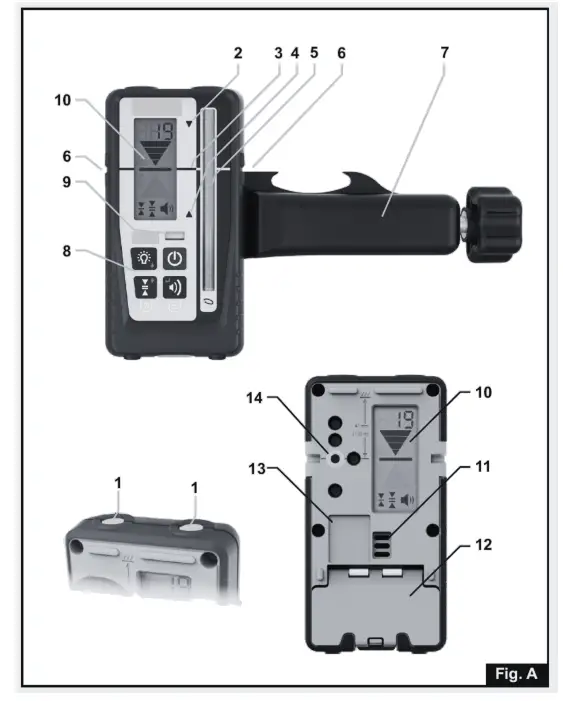
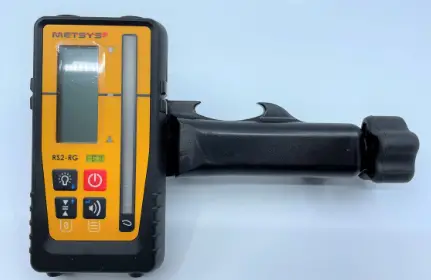
DEVICE ELEMENTS (FIGURE A)
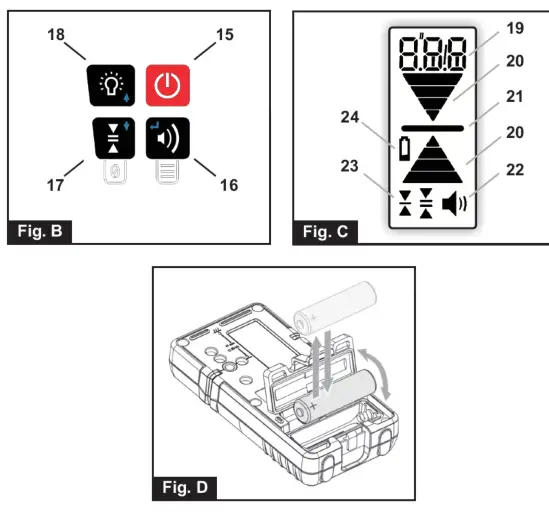
| 1 Magnet 2 LED grade indicators (yellow) 3 LED grade indicator (green) 4 LED grade indicator (red) 5 Laser-sensitive area 6 Marking notch 7 Clamp 8 Keypad 9 Bubble vial 10 Display 11 Beeper 12 Battery door and latch | 13 Type plate with serial number 14 Fixing thread for the clamp 15 On/Off 16 Beeper volume 17 Accuracy (Dead band) 18 Grade LEDs 19 Numeric digits / text display 20 Grade indication arrows 21 On grade indicator 22 Beeper volume 23 Accuracy (Dead band) 24 Low battery |
Numeric digits/text display
Three digits display either the numeric elevation or simple text messages. Numeric elevation can be displayed in mm, cm, an inch or fractional inch. Resolution and decimal point will be determined by the units of measure and the accuracy selected.
Grade indication arrows
Four individual levels of grade information for above and below grade. Arrow size increases, as the distance from on-grade increases. Arrow bars represent the steps of the selected dead band. The horizontal bar indicates on grade. Out-of-beam display: A sequence of arrows indicates if the receiver has moved beyond the vertical reception range and will indicate in which direction to move to get back to the laser beam.
SAFETY IN INSTRUCTIONS
Please read this instruction manual before using the device for the first time and comply with it. Retain this instruction manual for future reference or for subsequent owners. Failure to adhere to this instruction manual and the safety instructions may result in damage to the device and cause dangerous situations for the operator and other people. In case of transport damage please inform your vendor immediately.
- Only authorized and trained personnel are allowed to repair the device. Only use genuine spare parts from Metsys This ensures continuous device safety.
- Do not look directly into the laser beam.
- Laser receivers should not be used in the vicinity of pacemakers. The magnets produce a field that can affect the function of the pacemaker.
- Keep the laser receiver away from data media and devices that reacsensitive to magnetic force. Exposure to magnets can result in irreversible data loss.
- Noise emission The a-rated sound pressure level of the acoustic signal is >80 db (A) at a distance of one meter.
- Do not hold the laser receiver directly to your ear!
- Keep the laser receiver away from children.
- Do not use the laser receiver in explosive atmospheres or near flammable liquids, gases, or dust. The device may produce sparks that can ignite vapors or dust.
- Please remove the battery if the device is not in use for a prolonged period of time.
- Use only genuine Metsys accessories. When using non-recommended accessories, you may receive incorrect measuring values.
OPERATING
NOTE: Make sure that the device is in a vertical position and that the laser-sensitive area [5] is not partially covered during measurement. This can entail false measuring results.
Switching the device on/off Press the On / Off button [15] Adjusting the volume Pressing the beeper volume button [16] cycles Low / High / Off > High: Beeper symbol ermanently displayed; text “Hi” for one second >Low: Beeper symbol permanently displayed; text “LOW” for one second
> Off: No Beeper symbol displayed; text “OFF” for one second Adjusting the accuracy
Press the accuracy button [17] once to numerically display the current accuracy setting on the LCD. Press again, while the accuracy is displayed (within one second), to change the current selection. Subsequent presses will cycle through four accuracy options Fine / Medium / Coarse / Ultra coarse.
| mm I’m | inch | Vtactin. | Display | ||
| Fine | 1.0 | 0.1 | non-flash. | ||
| 0.05 | 1/8 | ||||
| Medium | 2.0 | 0.2 | 0.1 | 1/4 | non-flash. |
| Coarse | 5.0 | 0.5 | 0.2 | 1/2 | non-flash. |
| Ultra coarse | 10.0 | 1.0 | 0.5 | – | Flashing |
Activate / deactivate LEDs
Press the LED button [18] to change the LED display. If activated, the measurements are shown by the LEDs in addition to the display.
User-defined on-grade level: An arbitrary level within -10 and +40mm around the marking notch can be used as an on-grade level. The user-defined on-grade level is set by pressing the accuracy button [17] for two seconds while the device is in the laser beam. If successful, you will hear a confirmation beep and an asymmetric arrow symbol is shown on the display. Outside the allowed area you will hear an error beep and error code E30 is shown. When the accuracy button [17] is pressed for two seconds while out of the beam, the on-grade level is reset to default. If the device is switched off, the on-grade level is automatically reset to default. If you want to save the user-defined on-grade level permanently, you can choose this option in the menu (see Menu Entries . OFS).
Using the menu
The menu functions can be used to edit various options. For most applications, factory defaults are the best choice. We recommend changing settings only in special applications.
- Pressing the volume [16] key for more than two seconds enters the menu functions.
- Menu items (e.g. SEn are shown as non-flashing and may be browsed by using the ARROW keys [17] and [18].
- Menu items are selected by pressing the ENTER key [16]
- Item values (e.g. On) are shown flashing and may be browsed by using the ARROW keys [17] and [18].
- Exit the Menu by pressing the ESC key [15].
Menu Entries:
- Sen – Sensitivity: Hi(gh)/Low
> Default: High. Set it to Low if you have problems with disturbing sources like fluorescent or strobe lights.
Avg – Averaging: Hi(gh) / Low
> Default: Low. Set it to High if you need to have more stable readings under difficult atmospheric conditions.
Unt – Unit: mm / cm / in(ch) / f(ract). in(ch)
> Default: mm. Choose desired numeric elevation display unit. - o.o.b – Out of beam display: On/OFF
> Default: OFF. Switch the Out-of-beam display on and off. For a description see chapter Display.
User-defined on-grade level: OFF / tmp (temporary) / PEr(manent)
> Default: temporary. To deactivate the function, choose
OFF. To save the user-defined on-grade level permanently, choose PEr. - IMF – Device Information Find Information about Firmware Version (FW), Device Code (dc), and Serial Number (Sn) here.
NOTE: All menu settings will be retained when the receiver is turned off.
PRODUCT SPECIFICATIONS
| FEATURE | SPEC’S |
| Capture Height | 90mm |
| Numeric Readout Height | 80mm |
| Reception Angle | ± 45° |
| Detectable Spectrum | 450nm to 800nm |
| Working Radius | 300m (depending |
| Accuracy (Dead band) | on laser transmitter |
| Beeper Volumes | See page 2. Table |
| High | > 100 dBA |
| – Low | > 75 dBA / off |
| Automatic Shutoff | After 30 min |
| Filter Against | Flash / sunlight /LED / fluorescent lamp |
| Marking Notch | 41 mm / Top edge |
| Physical Dimensions | 135 x 69 x 25 (mm) |
| Weight without clamp | 0.19 KG |
| Protection Class | IP 67 (waterproof) |
| Power Supply | 1 x AA battery |
| Battery Life | > 45h |
| Operating Temperature | -10°C to +50°C |
| Storage Temperature | -40°C to +70°C |
BATTERY
Inserting/changing the battery
- Change the battery if is displayed.
- Open the battery compartment by unlatching the battery door [12]
- Remove the battery and insert a new one (observe correct polarity
- disposed of the used battery (see chapter on environmental protection).
Note: Appearance and specifications may differ due to product improvement. Working distance varies depending on the operating environment. Battery life depends on battery capacity and quality, it is recommended to use a large capacity battery.
ENVIRONMENTAL PROTECTION
Do not dispose of the device with domestic waste. Has the device been disposed of by an authorized waste management company or your municipal waste management organization? Adhere to the applicable regulations. In case of doubt contact your waste management organization. Recycle all packaging material in an environmentally friendly manner.
Batteries: Do not dispose of batteries with domestic waste, do not expose them to fire or water. Collect and recycle batteries or dispose of them with due care for the environment.
PRODUCT INCLUSIONS
- MM Receiver
- Clamp suited to MM receiver
WARRANTY
All Metsys mm receivers have a Warranty for up to 1 year,
CONTACT US
ADDRESS 14 STEPHENSON ROAD, BAYSWATER NORTH, VICTORIA 3153
PHONE: 03 9720 6222
EMAIL: [email protected]
PRODUCT DESIGNER
Justin Davis
PURCHASE ONLINE
www.lightwavetechnology.com.au
EXTENDED WARRANTY SUBMISSIONS
httpliwww.metsys.com.au/warranty/4594309423
![]() FOLLOW US
FOLLOW US![]() METSYS_LASERS
METSYS_LASERS![]() @METSYSLASERS
@METSYSLASERS


