LIV Smart Mosquito Repellent System User Manual
Important Safety Information
bTo reduce the risk of injury or damage, read and follow the safety precautions when setting up, using and maintaining your mosquito repellent system.
SAVE THESE INSTRUCTIONS
WARNING: When using an electrical appliance, basic precautions should always be followed, including the following:
READ ALL INSTRUCTIONS
WARNING: To reduce the risk of injury or damage, read and follow the safety precautions when setting up, using and maintaining your mosquito repellent system.
This is the safety alert symbol. It is used to alert you to potential physical injury hazards. Obey all safety messages that follow this symbol to avoid possible injury or death.

WARNING: Indicates a hazardous situation that, if not avoided, could result in death or serious injury.
CAUTION: Indicates a hazardous situation that, if not avoided, could result in minor or moderate injury.
NOTICE: Indicates a hazardous situation that, if not avoided, could result in property damage.
WARNING
- Your mosquito repellent system is not a toy. Small childr en and pets should be supervised when your system is operating.
- Do not sit or stand on repellers or smart hub.
- This appliance is not intended for use by persons (including children) with reduced physical, sensory or mental capabilities, or lack of experience and knowledge, unless they have been given supervision or instruction concerning use of the appliance by a person responsible for their safey.
- Your smart hub comes with a region approved power supply co rd. and is designed to be plugged into an outdoor GFCI power outlet only. Do not use any other power supply cord. If the supply cord is damaged, it must be replaced by the manufacturer, its service agent or similarly qualified persons in order to avoid a hazard.
- Do not open your smart hub or repellers, except to change cartridges.
- There are no user serviceable parts inside. Refer servicing to qualified service personnel.
- Risk of electric shock, do not use with extension cords or power strips.
- Store your repellent cartridges away from children and pets in dry, room temperature environments only.
CAUTION
- If connecting cables are exposed, there is a chance that it will be a trip hazard, or exposed to sharp object such as lawnmowers. Before using this device, ensure that all cables are tucked out of the way, or buried under grass or mulch.
NOTICE
- This product is intended for outdoor use only. Do not use t his device indoors. Do not allow your repellers to initialize indoors
- Do not place anything on top of your repellers.
- The failure to maintain cleanliness of repellers and smart hub could result in diminished ability to perform as designed.
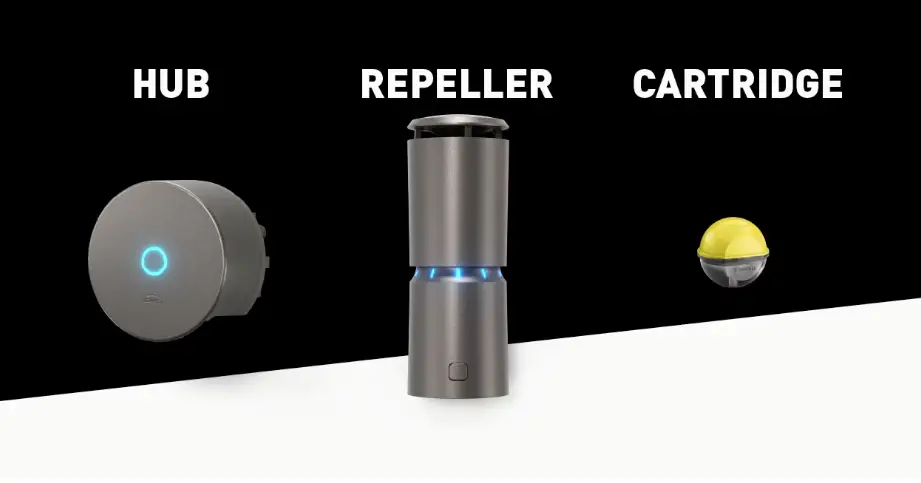
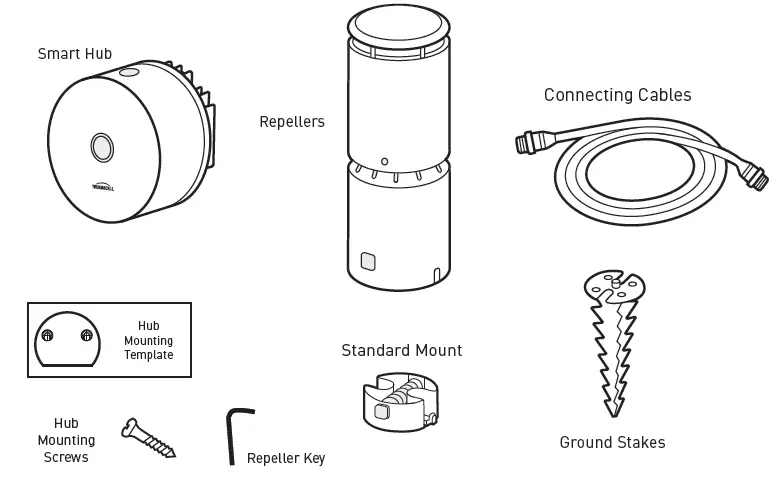
SYSTEM COMPONENTS
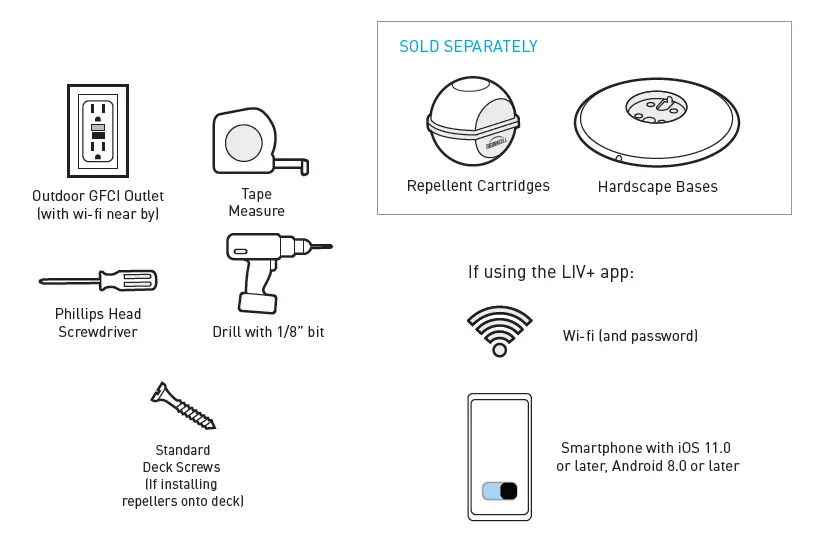
WHAT YOU NEED
Let’s get started!
Just follow the step-by-step instructions and remember —we’re always here to answer any questions.
HOW IT WORKS
LIV uses a Smart Hub to power a series of on-demand repellers installed throughout your outdoor space. When turned on, each repeller continually releases repellent to provide complete area protection from mosquitoes and other flying insects, when and where you need it.
With the LIV+ app, you can control your system from anywhere, set schedules and timers, and more.

Identify areas you use the most and want to feel protection from mosquitoes. e.g., perimeter around an entire patio, or important areas like the grill, seating area, playground, etc.
The repellers should be placed near those areas, within 10 feet of the zones you want to protect, and for continuous protection, up to 20 feet apart from each other.
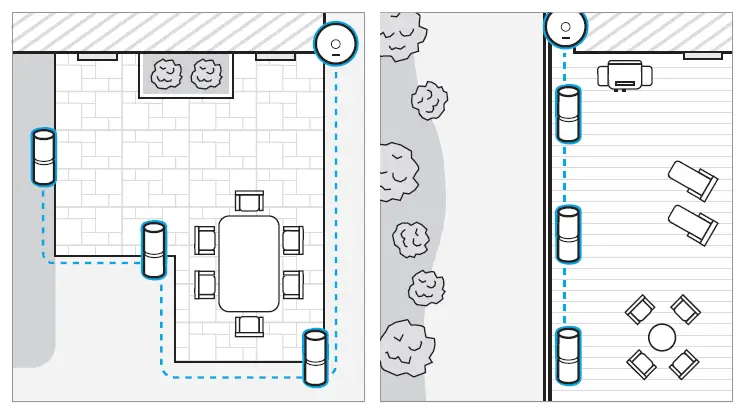
1. MAP IT OUT
Feeling inspired? Use the grid below to map your install. Consider outlet location, repeller placement and mounting preference, and cable pathways.
Note: Repellers provide 360 degrees of protection; for best results, place a repeller within 10 feet of the areas most commonly used, like patio chairs, grills, tables, walkways, etc. For continuous area protection, space repellers 20 feet apart.
2. MOUNT THE HUB
The Smart Hub should be located near an outdoor outlet in an area with strong Wi-Fi signal. Check Wi-Fi signal on your phone before installing any components. Once adequate signal is confirmed, prepare to mount the hub to a wall, post, or stake no more than 6 feet from the power outlet and at least 30 inches off the ground to avoid exposure to water and snow. Use the template provided to drill the 2 mounting screws and hang the hub in place.

Note: If mounting onto brick or other masonry, concrete anchors and an appropriate drill bit will be required.
3. LAY IT ALL OUT
Lay each repeller according to your plan outlined in Step 1. Lay the cables between repellers to ensure you have enough cable length to route around any obstacles.
4. MOUNT THE REPELLERS
Depending on your installation and selected hardware, follow the appropriate step below to attach repeller.
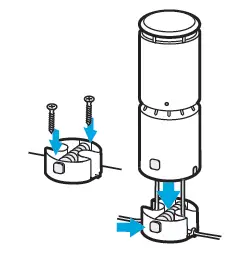
Use the Standard Mount to install directly to a firm surface.
Hold the mount in place and mark the hole locations. Pre-drill at least two holes and attach the mount with standard deck screws*. Pass the cable through the cutouts and install the repeller onto the mount by squeezing the quick-connect tabs.
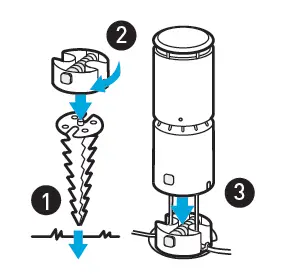
Use a Ground Stake on soft ground like grass or mulch.
To install, press the stake into the ground until it is flush or just above ground level. Twist on the standard mount. Pass the cable through the cutouts, and attach the repeller by squeezing the quick-connect tabs.
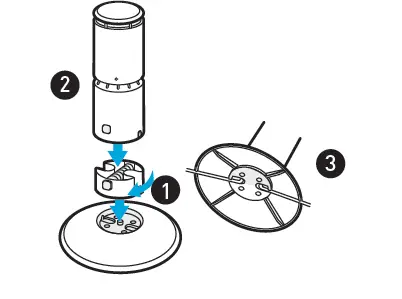
Use a Hardscape Base on stone, paver, decking, or other hard surfaces where drilling is not desired.
To install, thread the standard mount to the base until secure. Pass the leads from the repeller through the center of the base and install the repeller by squeezing the quick-connect tabs. Route the pigtail connectors on the underside of the base so they sit in the cutouts.
5. CONNECT THE CABLES
First, connect a cable to the smart hub. Remove the cap from the ends of cable leads on the first repeller. Connect the corresponding end of the first cable to the repeller. Connect each subse-quent repeller in the same fashion. Leave the cap plug on the remaining cable pigtail of the final repeller in the chain.
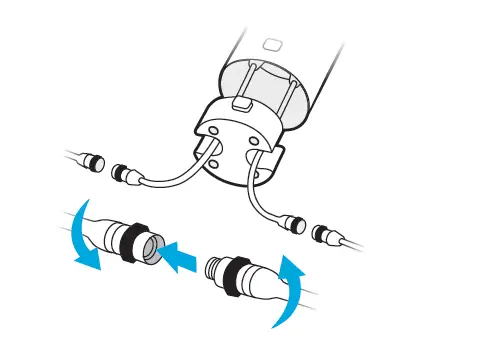
Note: The connectors should be threaded finger tight — do not over-tighten.
6. TEST YOUR SYSTEM
Plug in the hub and check the underside: the Status LED should be blinking blue if connect-ed to power. Press the center power button and make sure the ring around the button illuminates. Check each repeller to confirm the lights begin to flash in a chasing pattern. Within 5 minutes, the lights should change to solid blue.
Turn off the system by pressing the power button. Continue with final installation of cables.

7. SECURE THE CABLES
Finish your installation by routing and securing your cables to prevent damage, avoid tripping hazards, and provide a profes-sional installed appearance.
Common installation methods include:
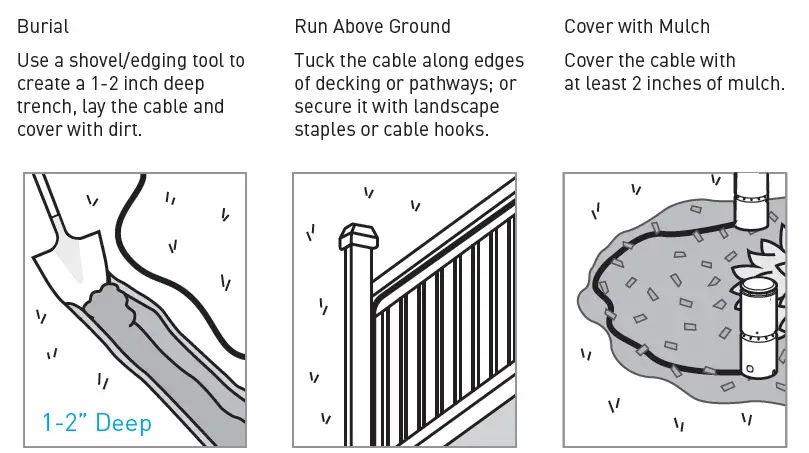
*Be sure to locate any pipes, cables, irrigation, or gas lines prior to digging in your yard. Call Dig Safe before you dig.
8. INSERT THE REPELLENT CARTRIDGES
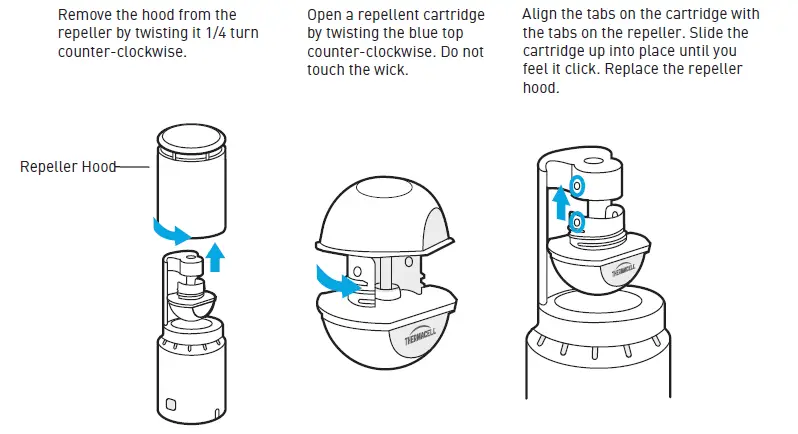
Note: The repeller has a set screw at the bottom of the repeller hood which can be used to lock the hood to the repeller and prevent unintended access to a cartridge. Use a 1.5mm allen wrench to back out the screw just enough to lock in place.
9. DOWNLOAD THE APP
Get the most out of your system by downloading the LIV+ app. The app lets you connect your system to your home’s Wi-Fi network and then control your system from almost anywhere, schedule automatic on and off times, customize the repeller lights and more. Connect with your smart home system to use voice commands.
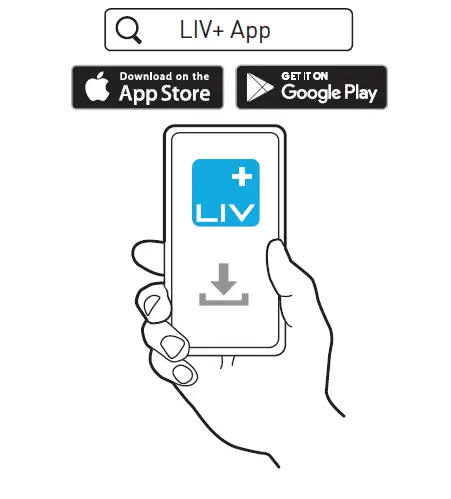
Download
LIV Smart Mosquito Repellent System User Manual – [ Download PDF ]


