
TESLA 27MC925BQ LCD Monitor
NOTE
This device is intended for household use exclusively. Professional and/or commercial use of a device intended for household purposes shortens its working life and has a negative effect on the device’s performance characteristics.
IMPORTANT SAFETY INSTRUCTIONS
- Read these instructions carefully before using this equipment and keep them for future reference.
- Always handle the monitor with care when moving it.
- This appliance is intended for domestic household use only and should not be used for any other purpose or in any other application, such as for non-domestic use or in a commercial environment.
- Allow at least a 10 cm gap all around the product.
- Place the monitor in a well-ventilated area. Do not place anything on the monitor that prevents heat dissipation.
- Avoid exposing the monitor to direct sunlight or another heat source. Turn the screen away from direct sunlight to reduce glare.
- Store the LCD display in a room with a temperature between -20°C – 60°C (-4°F – 140°F). Permanent damage may result if the LCD display is stored outside of this range.
- Do not install near heat sources such as radiators, heat registers, stoves, or other devices that produce heat.
- Do not place the LCD display near a window. Exposure to rain, moisture, or direct sunlight can cause serious damage to when the device.
- Do not press on the LCD screen. Excessively forceful pressing can cause permanent damage to the display.
- Do not remove the case or attempt to repair the machine by yourself. All maintenance tasks should be performed by an authorized technician.
- Avoid touching the screen. Skin oils are difficult to remove.
- If smoke, an abnormal noise, or a strange odor is present, immediately switch the monitor off.
- Protect the power cord from being tread upon or pinched, particularly at the plug. Be sure that the power outlet is located near the monitor so that it is easily accessible.
- Only use attachments/accessories specified by the manufacturer.
- To prevent possible hearing damage, do not listen at high volume levels for long periods.
- For indoor use only
- To reduce the risk of electrical shock, do not open the unit. No user-serviceable parts inside. Refer servicing to qualified service personnel.
- This symbol indicates that a dangerous voltage constitutes a risk of electric shock present within this unit.
- This symbol indicates that there are important operating and maintenance instructions in the literature accompanying this unit.
PACKAGE CONTENTS
Please check the following items are present when you unpack the box and save the packing materials in case you need to transport the monitor in the future.
- LCD monitor
- Stand base + Stand body
- Warranty card
- Cover plate
- Power adapter
- AC power cable
- HDMI cable
- Screws
- User manual
ASSEMBLING THE STAND
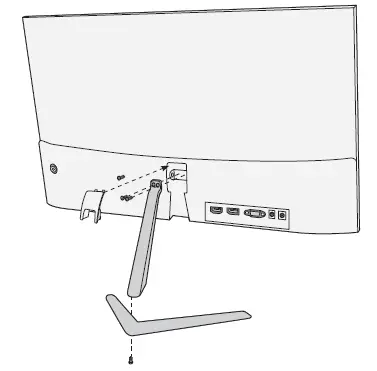
- Lay the monitor on a cloth with the LCD panel facing down to prevent the LCD panel from being damaged. Fix the stand body to the back of the monitor with the screws.
- Fix the stand base to the stand body by tightening the screw.
- Attach the cover plate by pressing it onto the stand body.
CONNECTIONS
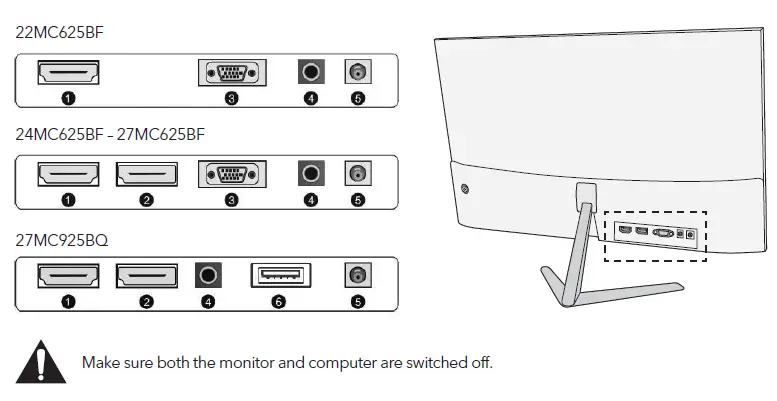
Make sure both the monitor and computer are switched off.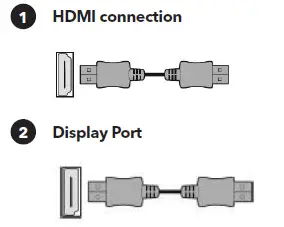
- Connect your PC to the monitor using the supplied HDM cable. The connection transmits digital video and audio signals from your PC to the monitor.
- Connect your PC to the monitor using the DisplayPort cable. The connection transmits digital video and audio signals from your PC to the monitor. Display Port cable is not included.
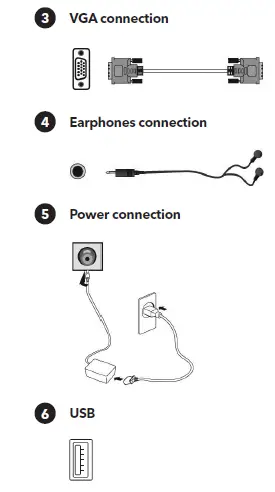
- Connect your PC to the monitor using a D-Sub (15-pin) cable. This cable is not included.
- You can connect your earphones to the earphone socket of the monitor. The earphones are not included.
- The illustration is for your reference only.
- Connect the supplied power cord to the adapter.
- Insert one end into the power jack on the back of the monitor.
- Plug the other end of the adapter into the main socket.
ADJUSTING THE ANGLE
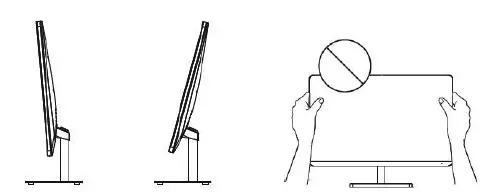
- Drawings are for reference only and please refer to the actual monitor.
- The angle of the screen can be adjusted forward 5° or backward 15° for a comfortable viewing experience.
- Be careful not to touch or press the screen area when adjusting the angle of the monitor.
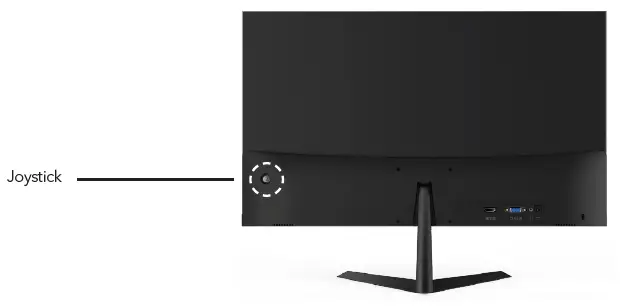
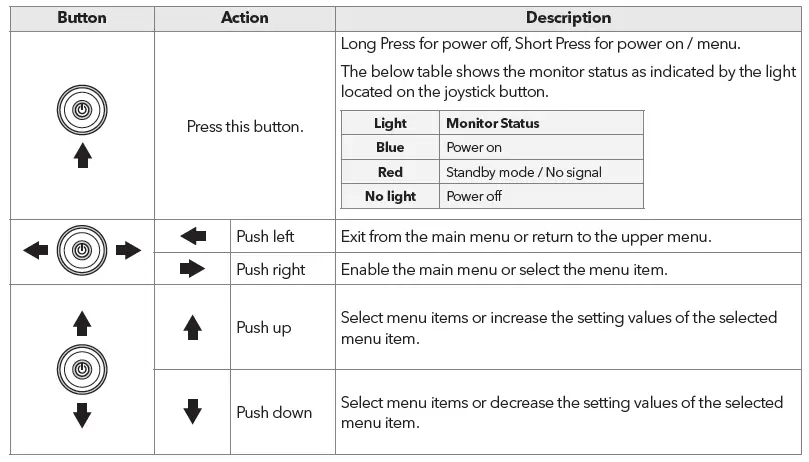
USERS CONTROLS
- To view the OSD menu, press the joystick button at the back of the monitor.
- Configure the options by moving the joystick up/down/left/right.
| Menu | Description | |
| Input Source | VGA | Changes input signal to VGA HDMI or DP. |
| HDMI | ||
| DP | ||
|
Brightness/ contrast | Brightness | Adjusts the color contrast and brightness of the screen. |
| Contrast | Adjusts display contrast | |
| Black Level | Adjust display black level | |
| Sharpness | Set display sharpness | |
| Picture Mode | Preset color modes | |
| DCR | DCR is the ratio between the brightest white and the darkest black produced by a monitor display. DCR increases contrast ratio by automatically adjusting the backlight based on image content. | |
| Menu | Description | |
| Color Setting | Color Temperature | Select color temperature mode or allow manual color configuration |
|
Picture Quality Setting | Saturation | Adjust display saturation |
| Low Blue Light | Blue light reduction adjustment | |
| Gamma | Set gamma | |
| Color gamut | DCIP3/Adobe/sRGB | |
| HDR | Auto/HDR 2084/OFF | |
| Display | Aspect Ratio | Set screen aspect ratio |
| AMD FreeSync | Turn AMD FreeSync on/off | |
| Overdrive | Adjusts the response time. The image can be blurred if the user turns on the Overdrive. | |
| Audio | Mute | Turn mute mode on/off |
| Volume | Adjusts the volume of earphones output. | |
|
Image setup | Auto config. | / |
| Auto color | / | |
| H-Position | 0 – 100 | |
| V-Position | 0 – 100 | |
| Clock | 0 – 100 | |
| Phase | 0 – 100 | |
|
OSD | Language | Allow users to choose from available languages |
| OSD H-position | Horizontally adjusts the OSD position. | |
| OSD V-position | Vertically adjusts the OSD position. | |
| OSD Transparency | Adjusts the OSD transparency value. | |
| OSD Time out | Automatically turns off On Screen Display (OSD) after a preset period of time. | |
| Other | Off Timer | The monitor will automatically power off after a preset period of time (1 ~ 24 hours). The default off time is 4 hours. To disable this feature, select the value Off. |
| Reset | Restores the default settings. | |
TROUBLESHOOTING
If you have problems with your monitor, please check the table below for a possible solutions.
| Problem | Possible Solution |
| No picture visible | • Check if the monitor is turned on. • Check if the power cord is properly connected to the monitor. • Check if the signal cable is properly connected at the back of the monitor. • Check if the computer system is switched on and in power saving/standby mode. • Using the OSD menu, adjust brightness and contrast. |
| Wrong or abnormal colors | • If any color (red, green, blue) is missing, check the signal cable to make sure it is securely connected. Loose or broken pins in the cable connector could cause an improper connection. • Connect the monitor to another computer. |
CLEANING AND MAINTENANCE
Cleaning the LCD monitor screen:
- Turn off the LCD monitor and unplug the power cord.
- Spray a non-soluble cleaning solution onto a cloth and gently wipe the screen.
- Never spill any liquid directly onto or into the screen or its case.
- Do not use any ammonia- or alcohol-based cleaners on the LCD monitor screen or case.
- We didn’t responsible for damage caused by the use of any ammonia or alcohol-based cleaners.
ABANDONMENT OF WASTE EQUIPMENT FOR EU HOUSEHOLD USERS
This symbol on the product or on its packaging indicates that the product must not be disposed of with other household waste. When disposing of used devices, it is your responsibility to bring it to a collection point that recycles used electrical and electronic equipment. The separate collection and recycling of used devices at the time of disposal helps to conserve natural resources and ensures that they are recycled in a manner that protects human health and the environment. For more information about recycling points for used devices, please contact your local city office, household waste disposal service, or the shop where you purchased the product.


