
![]() Create reality, achive dreams
Create reality, achive dreams
Ender-2 Pro
3D Printer User Manual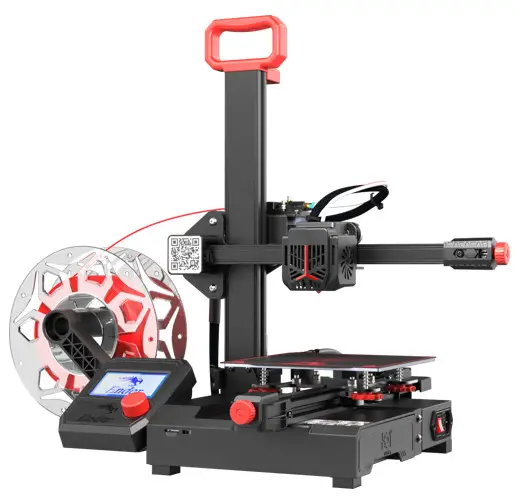
2 Pro 3D Printer
Dear Consumers,
Thank you for choosing our products. For the best experience, please read the instructions before operating the printer. Our teams will always be ready to provide you the best services. Please contact us via the phone number or e-mail address provided at the end when you encounter any problem with the printer.
For a better experience in using our products, you can also learn how to use the printer in the following ways:
View the accompanied instructions and videos in the storage card.
Visit our official website www.creality.com to find relevant software/hardware information, contact details, operation maintenance instructions.
Firmware Upgrade
Please login the official website https://www.creality.com/download, switch the language and select the relevant printer and model and download the required firmware.
NOTES
- Do not use the printer any way other than described herein in order to avoid personal injury or property damage.
- Do not place the printer near any heat source or flammable or explosive objects. We suggest placing it in a cool and dustless environment.
- Do not expose the printer to violent vibration or any unstable environment, as this may cause poor print quality.
- Please use recommended resin to in case damage of machine.
- Do not use any other power cable except the one supplied. Always use a grounded three-prong power outlet.
- Do not disassemble the printer while operating the printer, so as not to affect printing.
- Do not wear cotton gloves when operating the printer. Such cloths may become tangled in the printers moving parts leading to burns, possible bodily injury, or printer damage.
- When cleaning debris from the printer hotend, always use the provided tools. Do not touch the nozzle directly when heated. This can cause personal injury.
- Clean the body of the printer with dry cloth to remove dust and bonded printing materials.
- Children under 10 years old should not use the printer without supervision.
- Don’t manually move the nozzle or printing platform quickly under the power-on state; otherwise, malfunction may be caused, leading to failure of operation.
- Users should comply with the laws and regulations of the corresponding countries and regions where the equipment is located (used), abide by professional ethics, pay attention to safety obligations, and strictly prohibit the use of our products or equipment for any illegal purposes. Creality will not be responsible for any violators’ legal liability under any circustance.
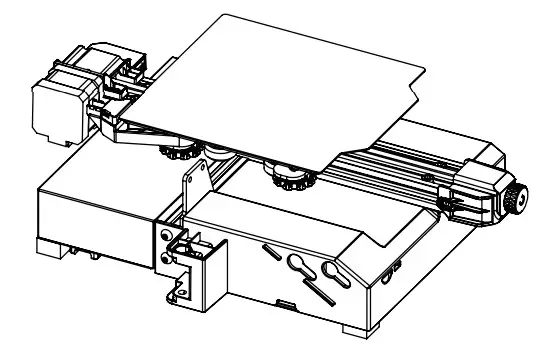
Introduction
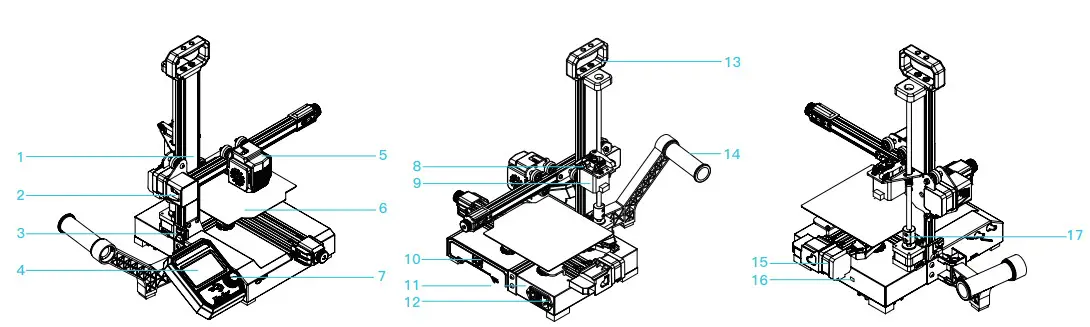
| 1 XZ-axis kit 2 X-axis limit switch 3 Z-axis limit switch 4 Screen 5 Nozzle kit 6 Print platform | 7 Knob 8 Extruder 9 E-axis motor 10 Tool box 11 Power 12 Power outlet | 13 Handle 14 Material rack and material tube 15 Y-axis motor 16 Toggle switch 17 Coupling |
Equipment Parameters
Basic Parameters
| Model | Ender-2 Pro |
| Printing Size | 165*165*180mm |
| Molding Tech | FDM |
| Nozzle Number | 1 |
| Slice Thickness | 0.1mm-0.4mm |
| Nozzle Diameter | Standard 0.4mm |
| Precision | 士0.1mm |
| Filament | PLA/TPU/Wood |
| File Format | STL/OBJ/AMF |
| Working Mode | USB or storage card |
| Slice Software | Cura/Repetier-Host/Simplify3D |
| Rated Voltage | 115/230V.ac 50/60Hz |
| Rated Power | 150W |
| Bed Temp | ≤80℃ |
| Nozzle Temp | 260℃ |
| Resume Print | Yes |
| Filament Detector | No |
| Auto Leveing | No |
| Language Selection | English |
| Operating System | WIN/XP/MAC/Linux/Vista |
| Printing Speed | 30-100mm/s |
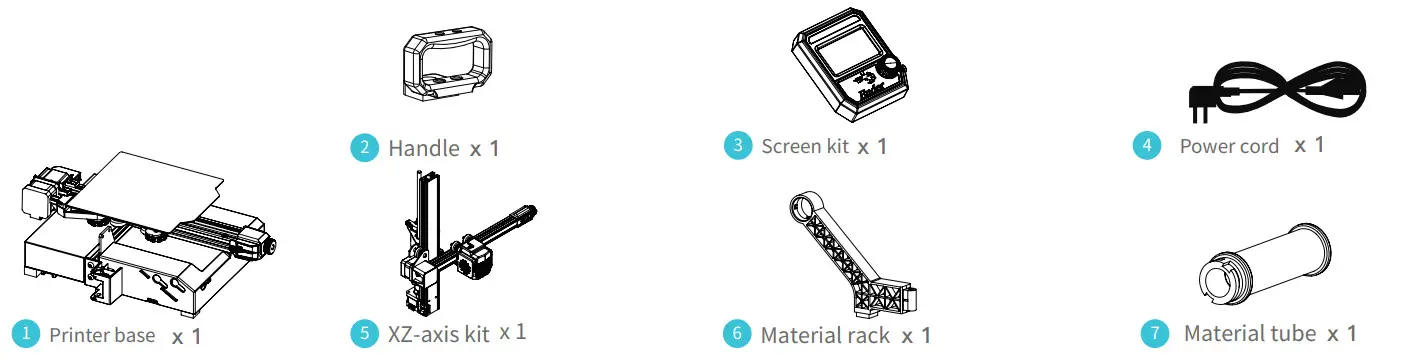
Package Content
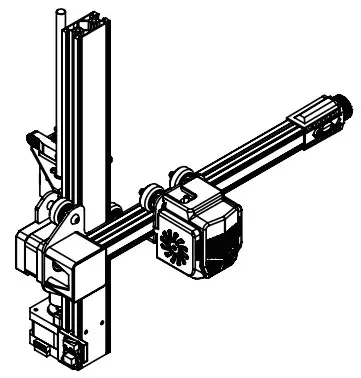
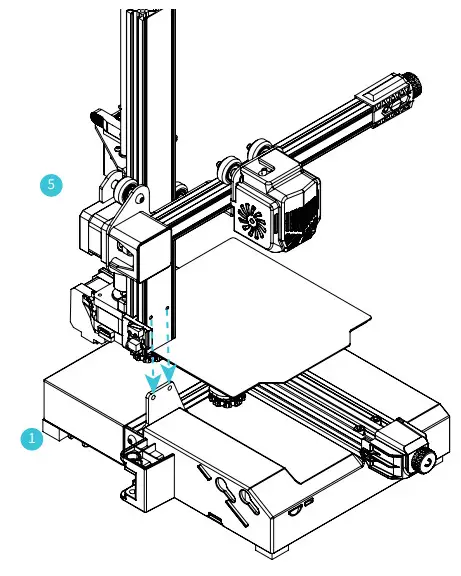
Assemble XZ-axis Kit
XZ-axis kit are vertically installed on the base. (As shown in the figure)
| 1 Printer base x 1 | 5 XZ-axis kit x 1 |
 |  |
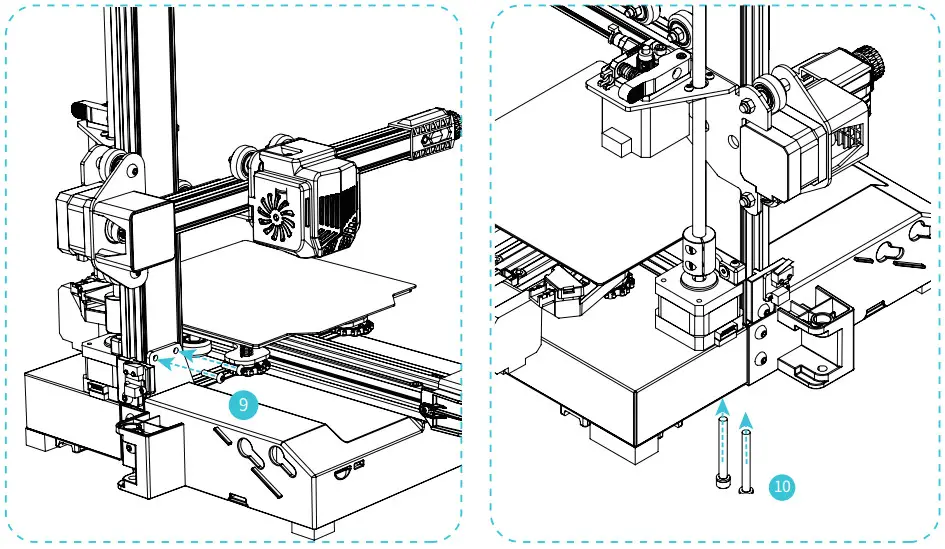
Fix XZ-axis Kit
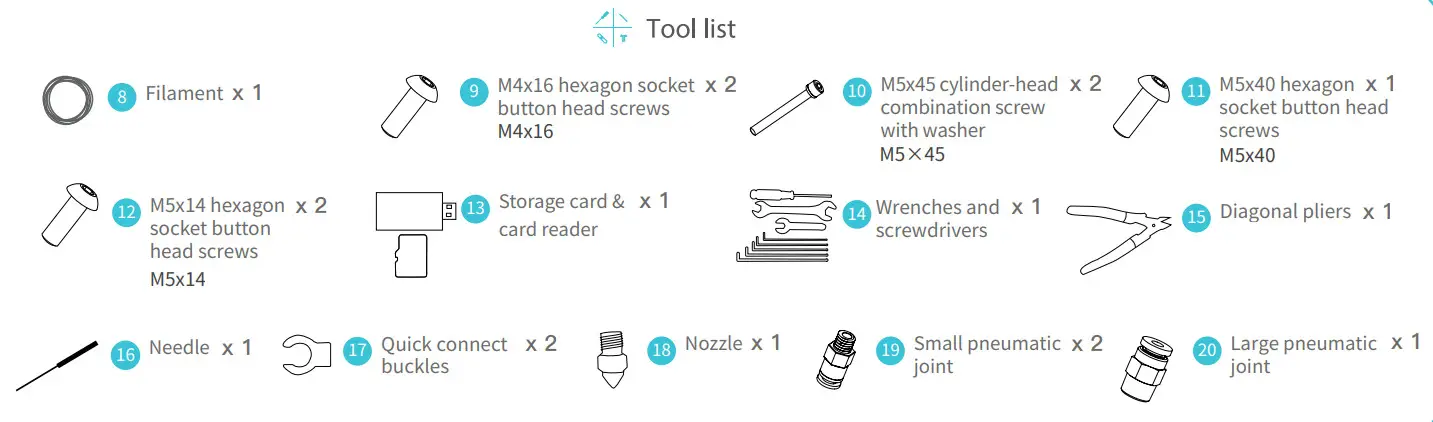
A.Screw up two M4x16 hexagonal socket button head cap screws from the front.
B.Tighten and secure it with two M5x45 cylinder-head combination screws with washer from the bottom.
| 9 M4x16 hexagon socket x 2 button head screws M4x16 | 10 M5 x 45 cylinder-head combination screw with washer x 2 M5×45 |
 |
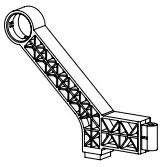
Install the Rack
Fix the threaded end of the material tube on the rack, then align the screw hole of the rack with the position of the base, and finally fix it with one M5x40 hexagonal socket button head cap screw. (As shown in the figure)
| 6 Rack x 1 | 7 Spool x 1 | 11 M5x40 hexagon socket button head screws x 1 M5x40 |
 |  |  |
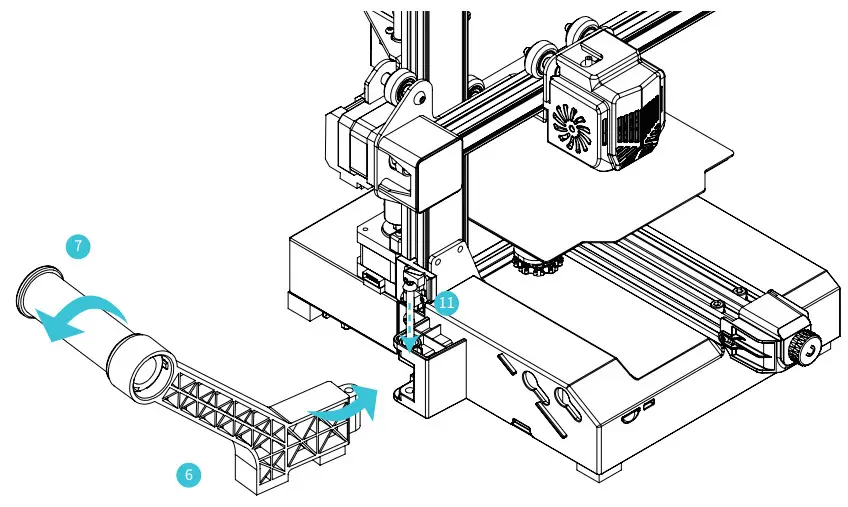
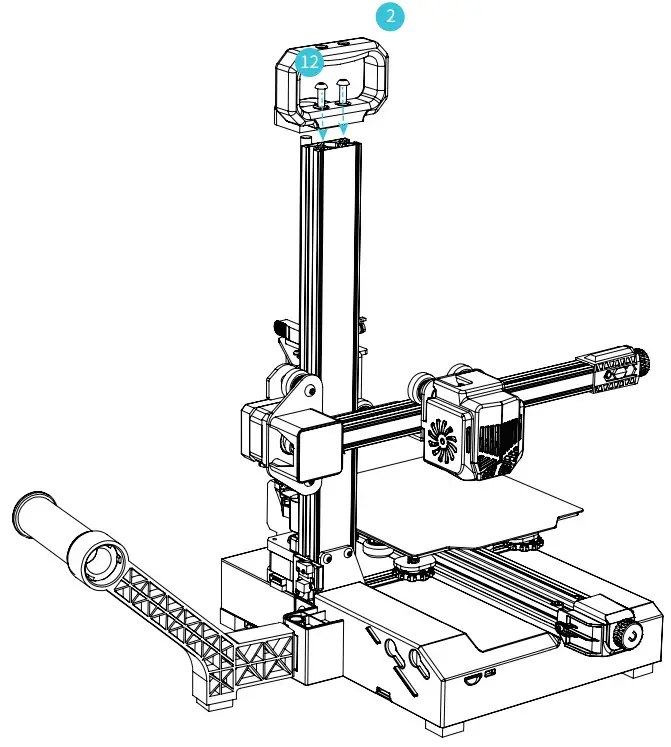
Assemble Handle
A. Overlap the bottom of the handle with the top surface of the profile.
B. Fix it with two M5x14 hexagonal socket button head cap screws.
| 2 Handle x 1 | 12 M5x14 hexagon x 2 socket button head screws M5x14 |
 |  |
Cable Connection
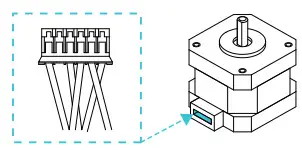
A.Connect X, E, Z-axis motor wires according to the yellow label on the 6-pin (5 wires) port.
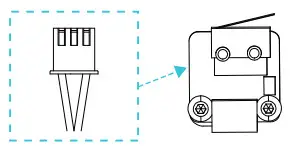
B.Connect X, Z-axis limit switch wires according to the yellow label on the 3-pin (2wires) port.
| X、E、Z -axis motor port | X、Z-axis limit switch |
 |  |
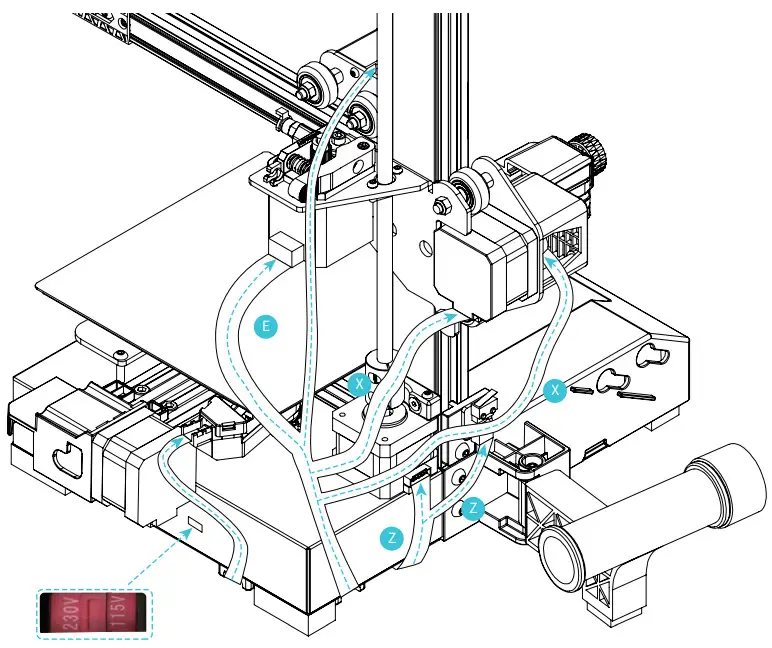
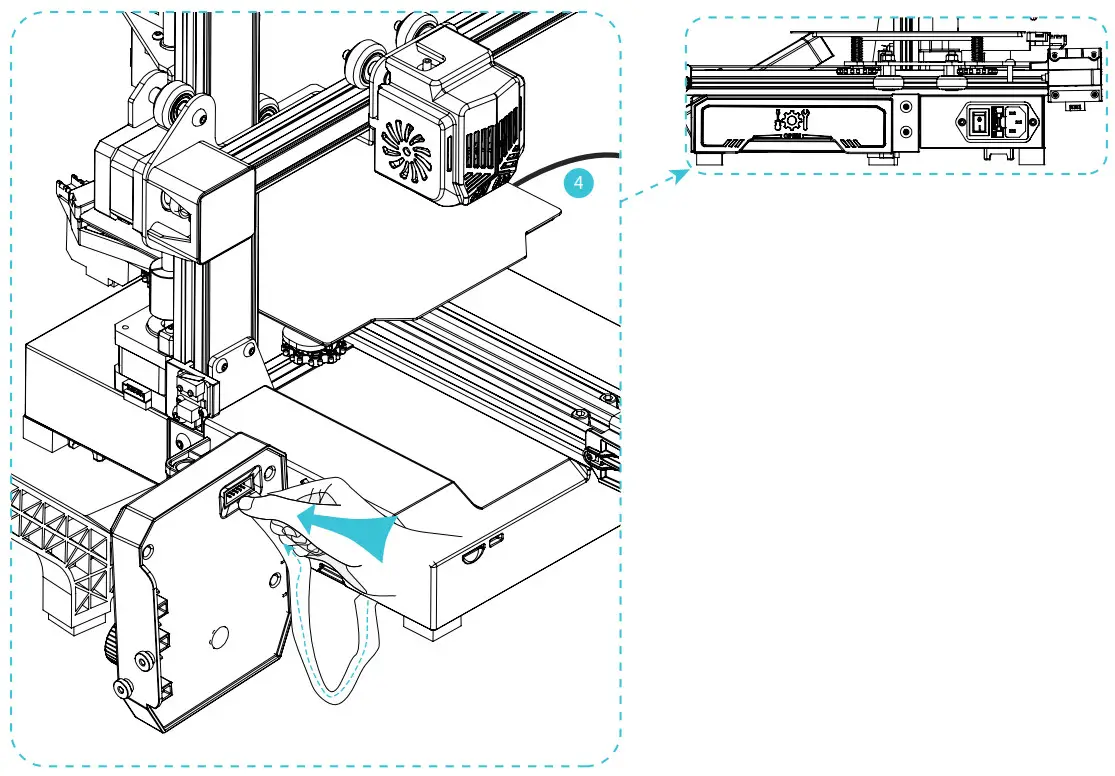
A.Align the flat cable socker with the slot at the back of display,and then insert it.
B.Plug in the power cord.
4 Power cord x 1

![]() Caution
Caution
- Select the correct input voltage to match your local mains (115/230V)
- Damage can occur if voltage is set incorrectly.
- Connect the power cord and turn the power switch to 1 to turn it on.
Do not connect or disconnect the cables when the machine is powered on.
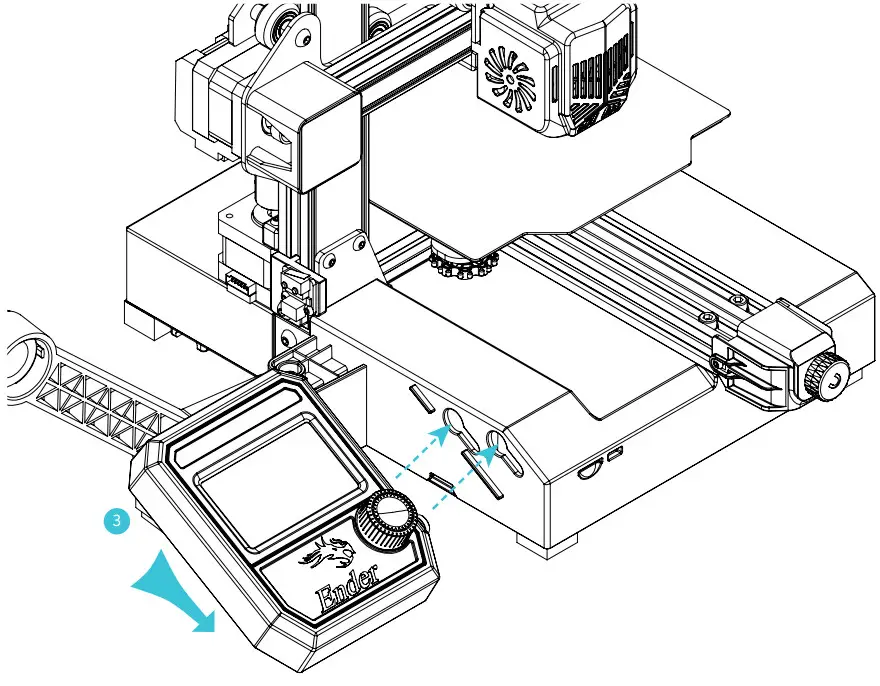
Install Display Screen
Align the two posts on the right side of the display screen with the slots of the base, and move them down to fix. (As shown in the figure)
3 Screen kit x 1
Solution for V-wheel Jamming
X/Y/Z axis V-wheel adjustment: After the machine is assembled gently dial the wheel to check whether it is idling or stuck. If this phenomenon occurs, use an open-end wrench to adjust the hexagonal eccentric isolation column to make it rotate smoothly.
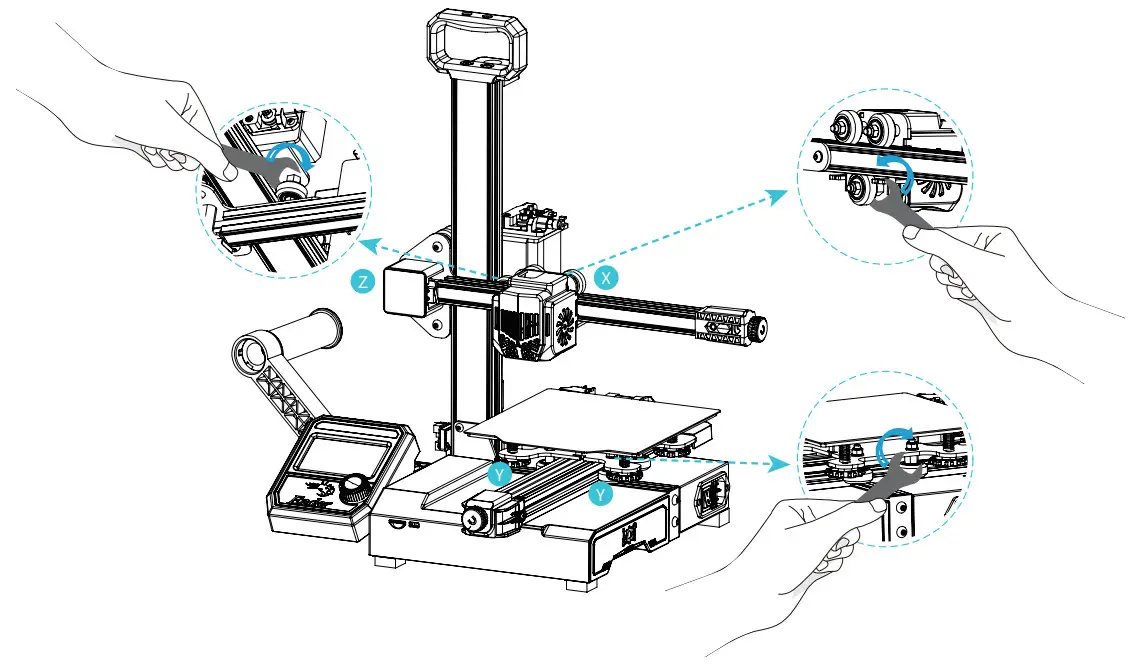
Hexagonal eccentric isolation column
Bed Leveling
Motion →Auto Home→ Disable Steppers (Release the motor).

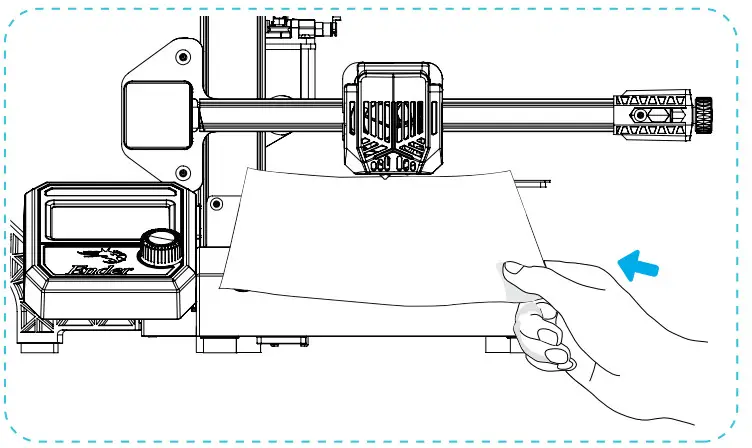
Move the nozzle the front/left leveling screw and adjust the platform height by turning the knob underneath (The thickness of a piece of A4 paper). Use a piece of A4 paper (standard printer paper) to assist with the adjustment, making sure that the nozzle lightly scratches the paper. Complete the adjustment of the screw on all 4 corners.Repeat above steps 1-2 times if necessary.Keep adjusting until there is slight resistance on the A4 paper from the nozzle.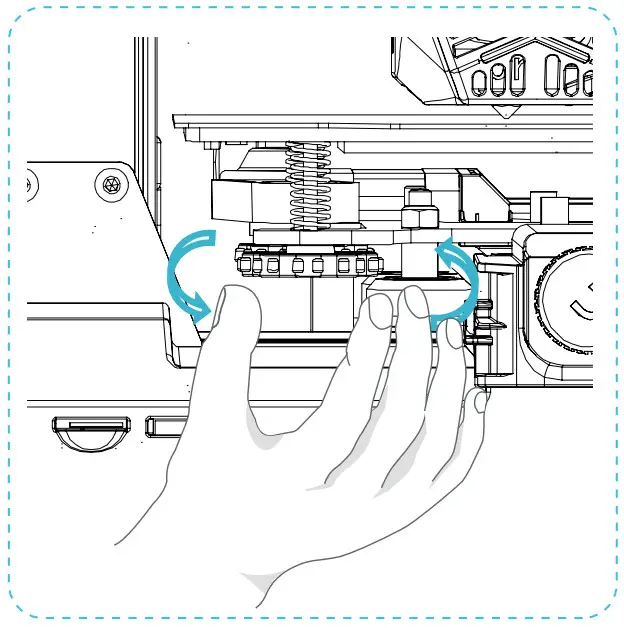
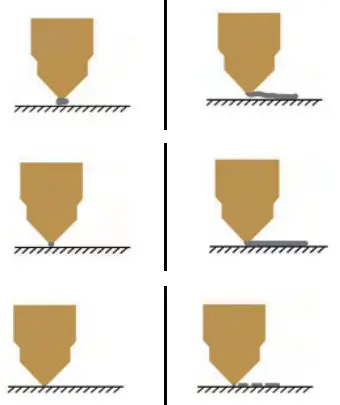 | |
 Filament are extruded evenly, just sticking on the platform. Filament are extruded evenly, just sticking on the platform. | |
Preheating


When you wait for the temperature to rise, hang the filament over the filament holder.
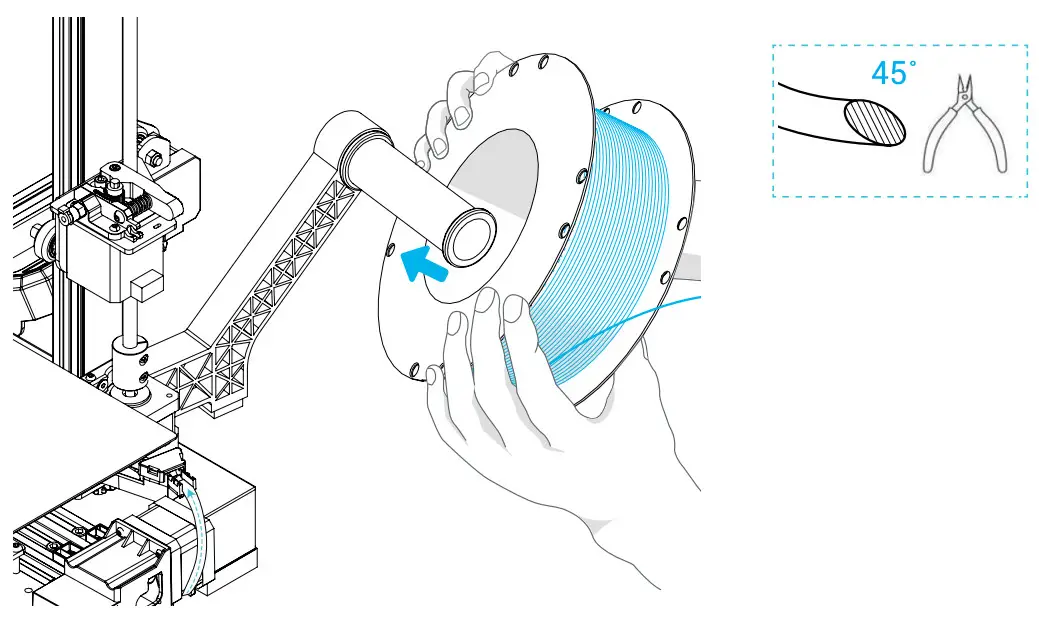
![]() For smoother printing, the end of the filament should be cut as shown above.
For smoother printing, the end of the filament should be cut as shown above.
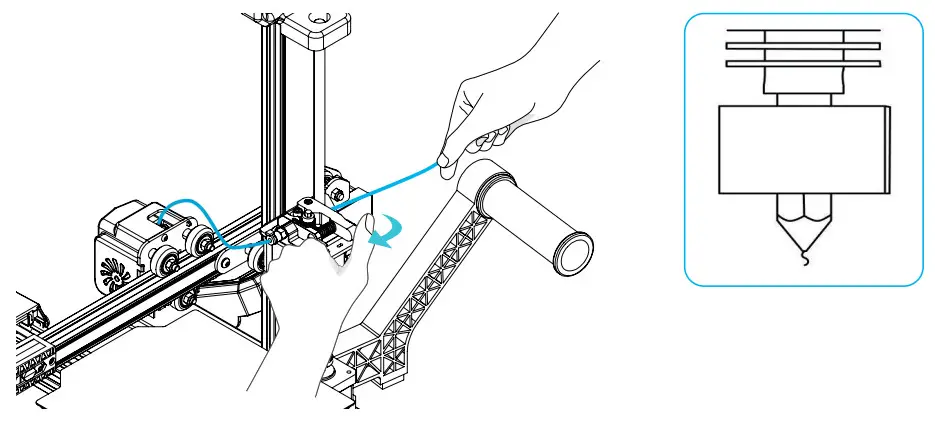
Load Filament
When target temperature is reached, hold the extruding clamp by hand and insert filament into the small hole of the extruder until the nozzle position. When filaments flow out of the nozzle, meaning that the filaments have been loaded.
![]() Tips: How to Replace the Filament? 1,Cutting filament near the Extruder and slowly feed new filament until they are fed into the new filament. 2, Withdrawing the filament quickly and feeding the new faliment after nozzle preheated and filament pushed a little forward.
Tips: How to Replace the Filament? 1,Cutting filament near the Extruder and slowly feed new filament until they are fed into the new filament. 2, Withdrawing the filament quickly and feeding the new faliment after nozzle preheated and filament pushed a little forward.
Start Printing

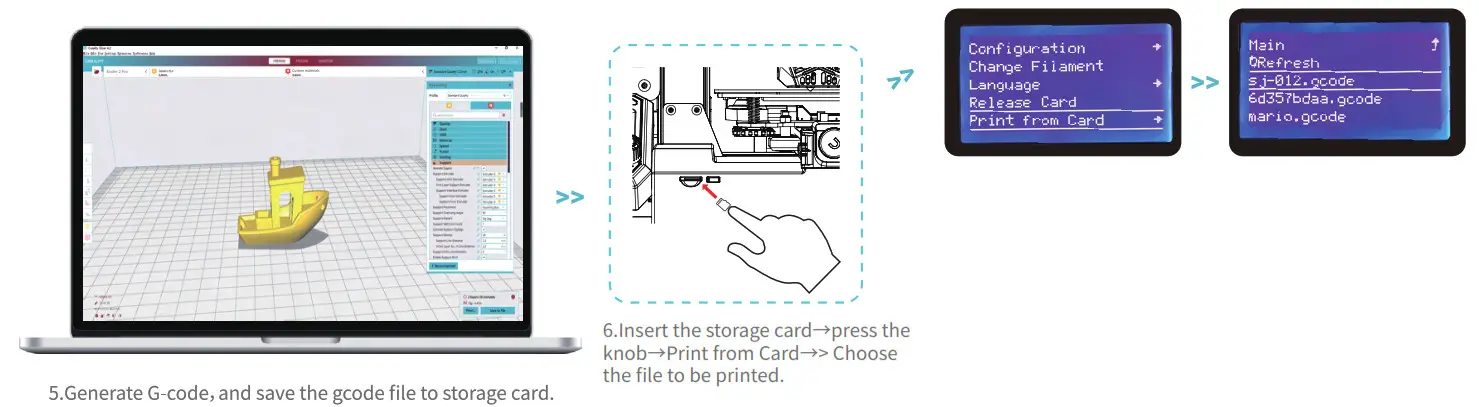
![]() File names must be Latin letters or numbers, not Chinese characters or other special symbols.
File names must be Latin letters or numbers, not Chinese characters or other special symbols.![]() Notes: For details on the software instructions, please refer to the slicing software manual in the storage card.
Notes: For details on the software instructions, please refer to the slicing software manual in the storage card.![]() Please don’t insert or remove the storage card during printing.
Please don’t insert or remove the storage card during printing.
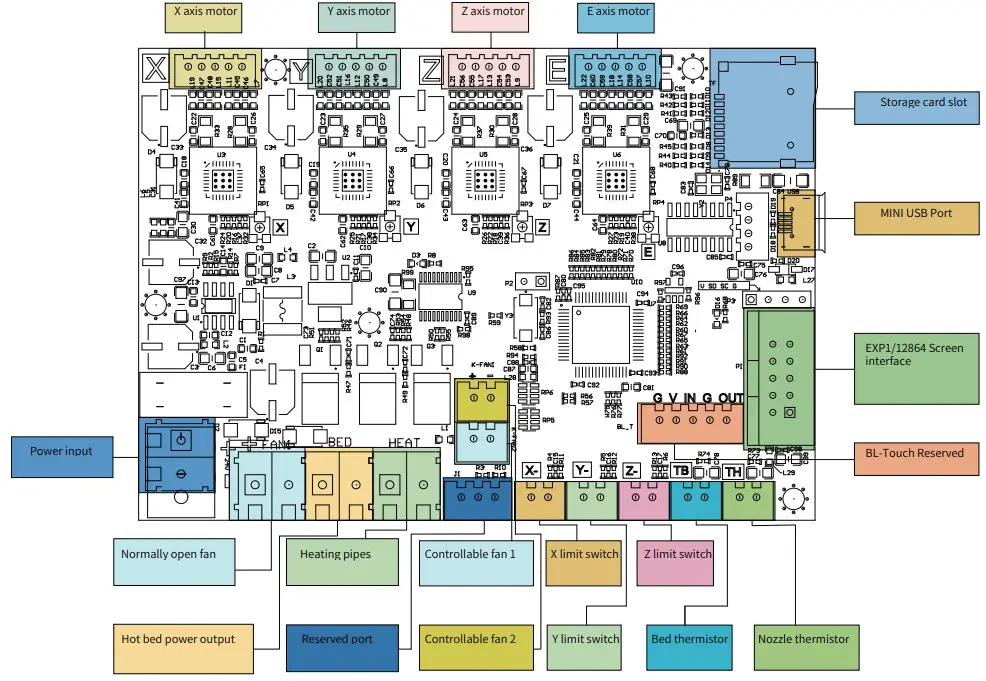
Circuit Wiring
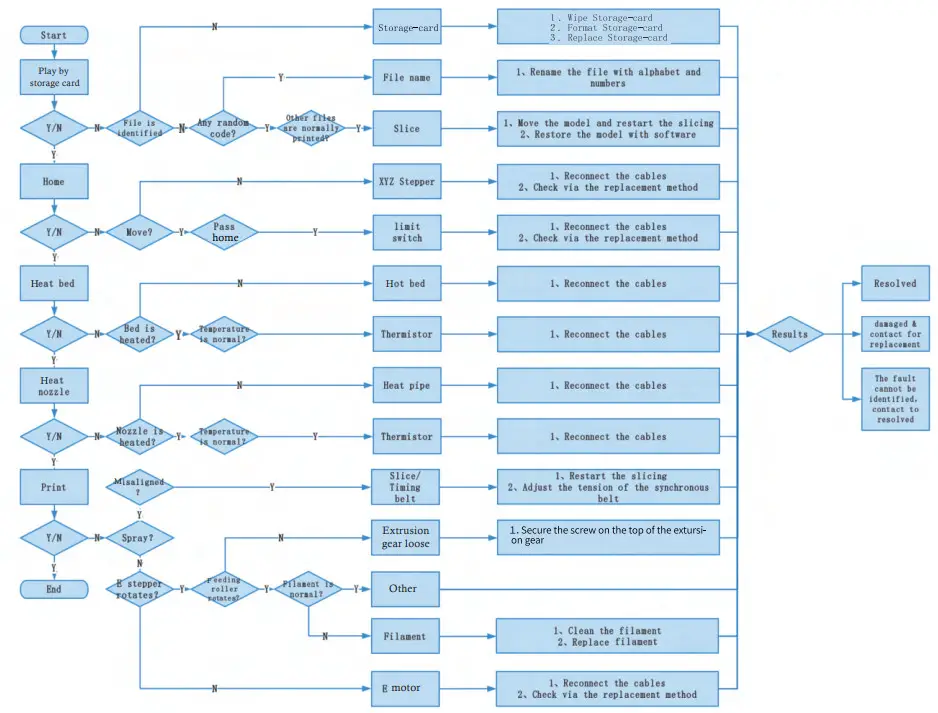
Trouble-shooting
FDM 3D PRINT FILAMENTS
FDM 3D PRINTING FILAMENTS
| Upgraded environmentally friendly formula, matte effect, high toughness, and fine printing. The raw materials are imported from the United States, besides, there are rich colors for customers to choose. | Ender series is widely applied to general FDM printer design, which meet customers’ needs of daily design and different prototyping needs. |
 HP-PLA HP-PLA |  EN-PLA EN-PETG EN-PLA EN-PETGEN-ABS EN-TPU |
| Targeting at mid-end users, CR series is with transparent tray plus black-white color box design. lts slight tolerance in wire diameter contributes to stable printing quality. CR series meets your demands of daily design and prototype making. | HC series is cost-efficient. It’s widely applicable to general FDM printer product designs on the market to meet your daily design and different prototyping needs. |
 CR-PLA CR-PETG CR-PLA CR-PETGCR-ABS CR-TPU |  HC-PLA HC-PETG HC-PLA HC-PETGHC-ABS HC-TPU |
Filaments Parameter Information
| Material | Print Temp (°C) | Bed Temp (°C) | Difficulty | Flexibility | Shrinkage | Ductility | Applicable Models | |
| PLA Series | HP-PLA | 190-220 | 50-60 | • | •• | • | ••• | Suitable for 990/0 FDM models |
| HP-PLAx3 | 190-220 | 50-60 | • | •• | • | ••• | Suitable for 99% FDM models | |
| CR-PLA | 190-220 | 50-60 | • | •• | • | ••• | Suitable for 99% FDM models | |
| HC/EN-PLA | 190-220 | 50-60 | • | •• | • | •• | Suitable for 990/0 FDM models | |
| ABS | 220-260 | 90-110 | •••• | •• | ••• | ••• | Hot bed is needed, and Creality printer enclosure is recommended for DIY machine | |
| PETG | 230-250 | 60-100 | •••• | •••• | •••• | •••• | Hot bed is needed, and Creality printer enclosure is recommended for DIY machine | |
| TPU | 210-240 | 50 | •• | ••••• | • | •••• | Direct extrusion models | |
| Silk | 190-220 | 50-60 | • | •• | • | •• | Suitable for 990/0 FDM models | |
| Nylon | 230-260 | 80-90 | ••••• | ••• | •••• | •••• | Hot bed is needed, and Creality printer enclosure is recommended for DIY machine | |
| Carbon (Ordinary type) | 190-220 | 50-60 | • | • | • | •• | Suitable for 99% FDM models | |
| PDS Advertising word filament-PLA | 190-220 | 50-60 | • | •• | • | •• | Creality K5, K8, T5 | |
| Low temperature filament-PCL | 60-100 | – | • | ••• | • | •••• | Low temperature 3D printing pen | |
Due to the differences between different machine models, the physical objects and the final images can differ.The final explanation rights shall be reserved by Shenzhen Creality 3D Technology Co., Ltd.
Scan To Learn More https://qr.creality.com
SHENZHEN CREALITY 3D TECHNOLOGY CO., LTD.
Add:18F, JinXiuHongDu Building, Meilong Blvd., Longhua Dist., Shenzhen, China 518131
Official Website: www.creality.com
Tel: +86 755-8523 4565
E-mail: [email protected] [email protected] 


