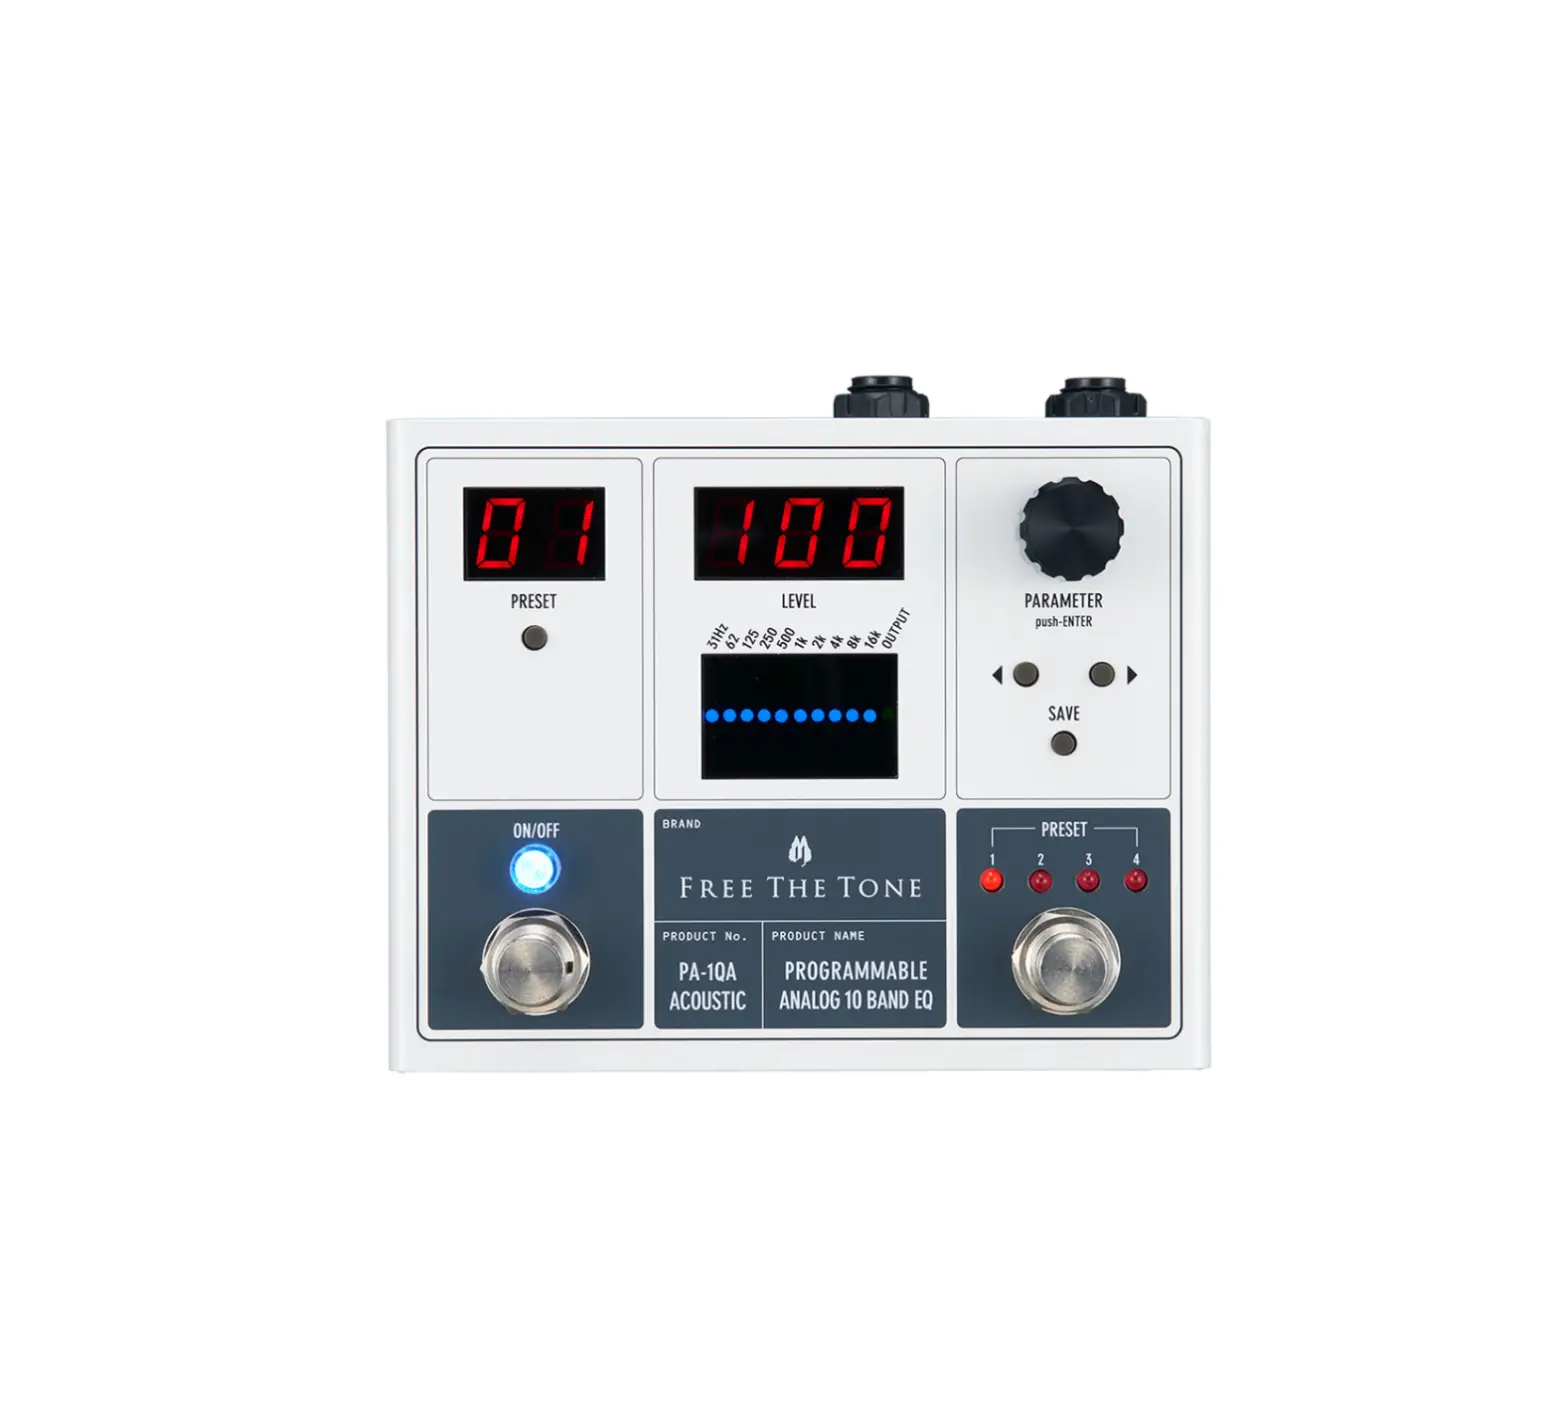
FREE THE TONE PA-1QA Programmable Analog 10 Band EQ Graphic Equalizer
Introduction
Thank you for choosing a Free The Tone product. In order to take full advantage of the features and performance it provides, please read this owner’s manual thoroughly and keep it in a safe place for future reference.
Handling Precautions
- Never connect or disconnect plugs to/from the input/output terminals on the this unit when the external device that drives speakers is powered. Doing so can cause noises and damage the speakers.
- Avoid applying excessive force to the footswitches, tact switches, and DIN connector on the this unit.
- If the unit malfunctions or behaves erratically, cease operation at once and contact your local dealer or Free The
Tone directly.
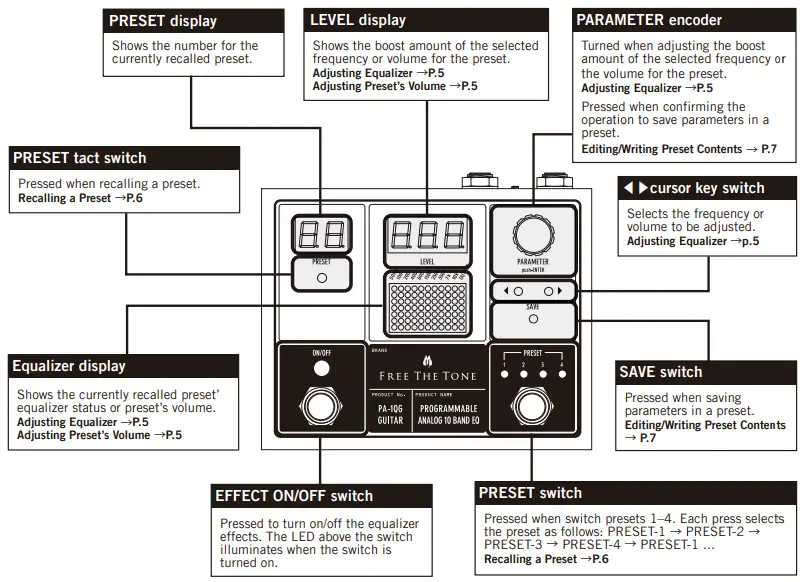
Controls and indicators
Front panel
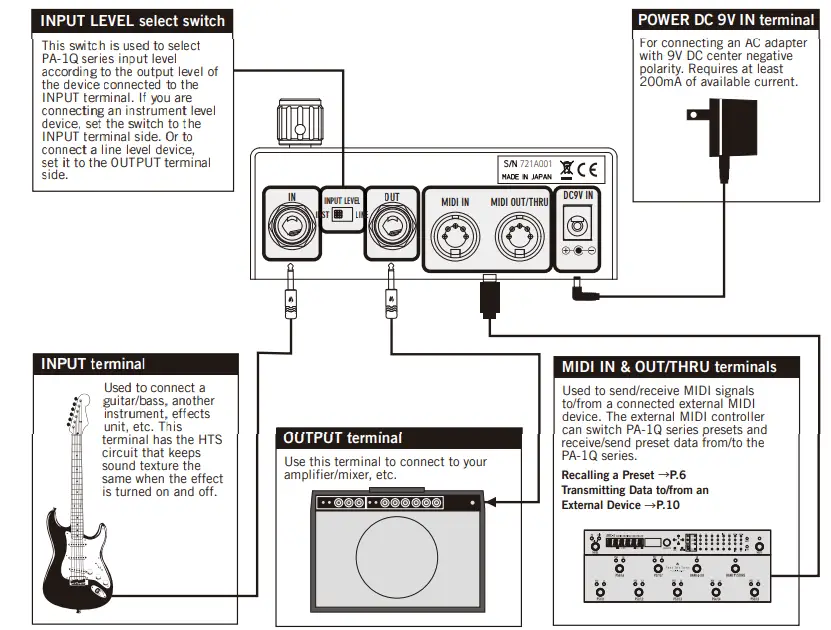
Rear Panel
Adjusting Equalizer
You can create your favorite tone by adjusting various parameters
Adjusting the equalizer
- Press the ON/OFF switch to turn on the LED above it.
- . Press the ◀▶ cursor key switch to select the frequency to be adjusted (blue dot) in the equalizer display.
- Turn the PARAMETER encoder to adjust the boost amount of the selected frequency.
NOTE
The boost amount of the selected frequency is adjustable in the range of ±12 dB. The selected frequency is shown in the equalizer display. The boost amount for the selected frequency is shown in the LEVEL display.
Double-clicking the PARAMETER encoder resets the boost amount of the selected frequency to zero. The previous value returns by double-clicking the encoder again.
Adjusting a preset’s volume
- Press the ON/OFF switch to turn on the LED above it.
- Press the ◀▶ cursor key switch to select the frequency to be adjusted (blue dot) in the equalizer display.
- Turn the PARAMETER encoder to adjust the volume for the preset.
NOTE
The preset’s volume is adjustable from 0 to 127. The preset’s volume is shown in the LEVEL display. When all of the frequencies of the equalizer are set to boost amount 0, unity level is obtained with the LEVEL value 100, and when the value is 127, the volume can be increased up to +12 dB. Double-clicking the PARAMETER encoder resets the volume back to 100. The previous value returns by doubleclicking the encoder again.
Recalling a Preset
The PA-1Q series can use up to 99 presets that can be recalled in various ways.
Switching between presets 1-4
- Press the ON/OFF switch to turn on the LED above it.
- Press the PRESET switch to switch the presets.
NOTE
Each press of the PRESET switch changes the presets as follows: PRESET 1 → PRESET 2 → PRESET 3 →
PRESET 4 → PRESET 1, …
Switching between presets 1-99
- Press the ON/OFF switch to turn on the LED above it.
- Press the PRESET tact switch to flash the PRESET display.
- Turn the PARAMETER encoder to show the preset to be recalled.
- Press the PARAMETER encoder to recall the selected preset.
Switching presets via MIDI
- Connect an external MIDI controller to the MIDI IN terminal on the PA-1Q series rear panel.
- Press the PA-1Q series ON/OFF switch to illuminate the LED above it.
- From the external MIDI controller, send the MIDI program change number corresponding to the preset to be
recalled.
NOTE
Be sure to set the same MIDI program change number on the sending device’s MIDI channel and the PA-1Q series MIDI channel.
Setting a MIDI receiving channels → P.7
Correspondence between presets and MIDI program change numbers → P.8
Changing/writing preset contents
- Press the ON/OFF switch to turn on the LED above it.
- Press the ◀▶ cursor key switch to select the parameter to be adjusted.
- Turn the PARAMETER encoder to adjust the selected parameter.
- Press the SAVE switch.
- The LEVEL display shows the destination preset number.
- Turn the PARAMETER encoder to select the desired preset number.
- Press the PARAMETER encoder to store the preset to the selected numbered location
NOTE
When a preset’s parameter is changed, the dot at the PRESET display’s lower right corner illuminates. This dot turns off when the save operation is confirmed by pressing the PARAMETER encoder and the parameters are written to the preset.
If the SAVE switch is pressed again after pressing it, then the write operation is canceled.
Configuring MIDI settings
The PA-1Q series can receive MIDI signals sent from an external controller to switch presets and edit parameters.
Setting a MIDI receiving channels
- Turn on the power to the PA-1Q series while holding down the PRESET switch.
- The PRESET display shows “ch”.
- The LEVEL display shows the number of the MIDI receiving channel.
- Turn the PARAMETER encoder to show the desired MIDI receiving channel.
- Press the PARAMETER encoder to confirm the selected MIDI receiving channel.
NOTE
User editable parameters: ALL (Omni mode), 1–16 (MIDI receiving channel), OFF [ PRESET ] switch means the footswitch on the lower right of the front panel.
Receivable MIDI Messages
The PA-1Q series can switch presets or change all of the parameters via MIDI signals sent from an external device. MIDI signals assigned to controllable functions are listed below.
Correspondence between presets and MIDI program change numbers
| PRESET Number | Program Change Number |
| PRESET-1 | 001 |
| PRESET-2 | 002 |
| PRESET-3 | 003 |
| PRESET-4 | 004 |
When the PA-1Q series receives a MIDI program change number 001-004, the corresponding LED 1-4 above
the PRESET switch illuminates and the PRESET display shows the corresponding preset number. If a MIDI
program change number 005 or later is received, then the LEDs 1-4 above the PRESET switch will not
illuminate but the PRESET display shows the corresponding preset number.
Correspondence between parameters and MIDI control change numbers
| Controls | MIDI CC Numbers | Value Range | ||
| PA-1QG | PA-1QB | PA-1QA | Common to PA-1Q series | Common to PA-1Q series |
| 50Hz | 40Hz | 31Hz | 97 | 0-127 |
| 100 | 80 | 62 | 98 | 0-127 |
| 200 | 125 | 125 | 99 | 0-127 |
| 400 | 250 | 250 | 100 | 0-127 |
| 800 | 500 | 500 | 101 | 0-127 |
| 1500 | 800 | 1K | 102 | 0-127 |
| 2500 | 1200 | 2K | 103 | 0-127 |
| 3500 | 2400 | 4k | 104 | 0-127 |
| 7K | 4500 | 8k | 105 | 0-127 |
| 10K | 8K | 16k | 106 | 0-127 |
| OUTPUT LEVEL | 107 | 0-127 | ||
| EFFECT ON/OFF | 66 | Off=0, On=127 |
| EQ LEVEL | Value Range |
| +12 | 122 ~ 127 |
| +11 | 117 ~ 121 |
| +10 | 112 ~ 116 |
| +9 | 107 ~ 111 |
| +8 | 102 ~ 106 |
| +7 | 97 ~ 101 |
| +6 | 92 ~ 96 |
| +5 | 87 ~ 91 |
| +4 | 82 ~ 86 |
| +3 | 77 ~ 81 |
| +2 | 72 ~ 76 |
| +1 | 67 ~ 71 |
| 0 | 61 ~ 66 |
| EQ LEVEL | Value Range |
| −1 | 56 ~ 60 |
| −2 | 51 ~ 55 |
| −3 | 46 ~ 50 |
| −4 | 41 ~ 45 |
| −5 | 36 ~ 40 |
| −6 | 31 ~ 35 |
| −7 | 26 ~ 30 |
| −8 | 21 ~ 25 |
| −9 | 16 ~ 20 |
| −10 | 11 ~ 15 |
| −11 | 6 ~ 10 |
| −12 | 0 ~ 5 |
Initializing
- Turn on the power to the unit while holding down the ◀ cursor key switch and PRESET switch.
- The LEVEL display shows “1n t”.
- Press the PARAMETER encoder to execute the initialization.
- The PRESET display counts up from 01 to 99.
- The LEVEL display shows the firmware version
- All of the presets are returned to their factory default settings and usual operation resumes.
NOTE
This operation clears all of the presets and resets all of the settings to the default status as shipped from the factory.
Transmitting Data to/from an External Device
The PA-1Q series can save or recall preset contents to/from a personal computer. For connection and setup procedures, please confirm with the product or support page of the Free The Tone website.
Updating Firmware
The PA-1Q series can update its firmware. For the latest firmware or connection and setup procedures, please confirm with the product or support page of the Free The Tone website.
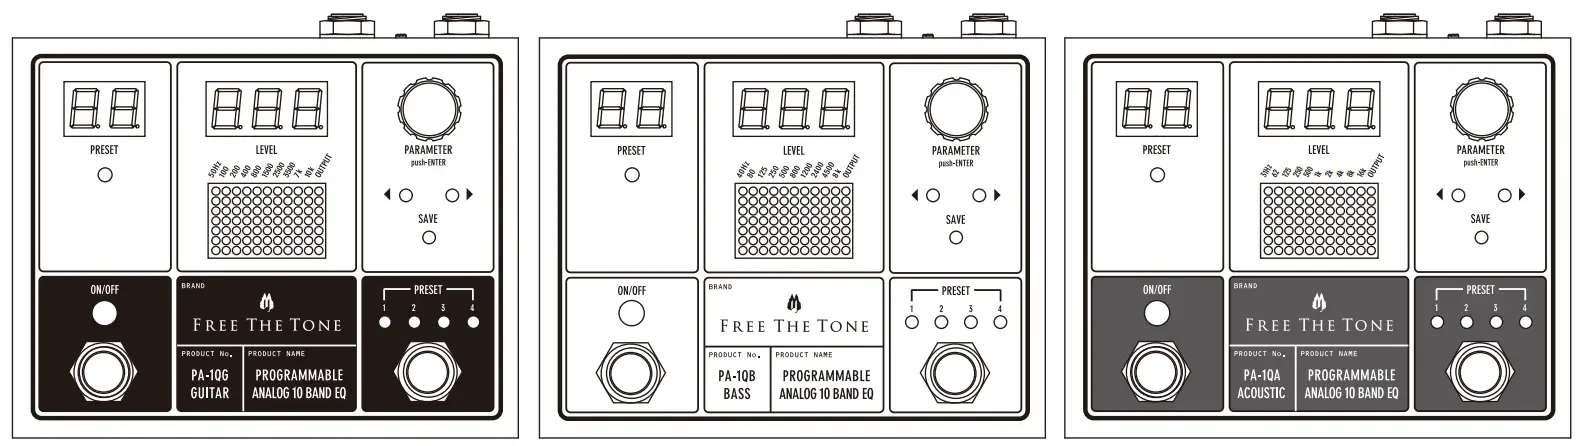
PA-1QG (for Guitar) Factory Presets
Preset 1: Fat sound with emphasized mid-low frequencies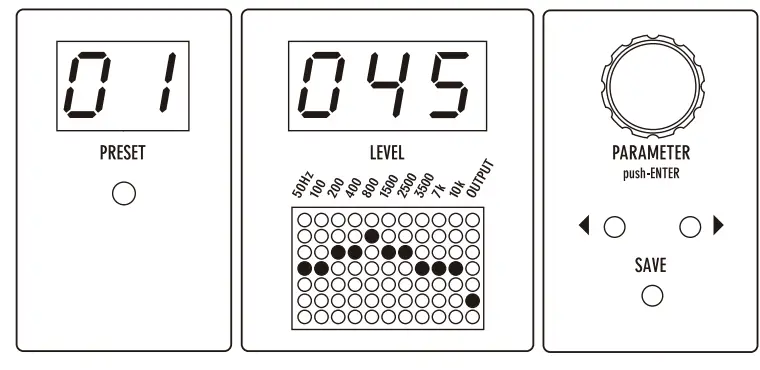
50Hz | 100 | 200 | 400 | 800 | 1500 | 2500 | 3500 | 7K | 10K | OUT |
| 00 | 00 | 03 | 04 | 05 | 04 | 01 | 00 | 00 | 00 | 45 |
Preset 2: Sound for arpeggio with reduced mid range leve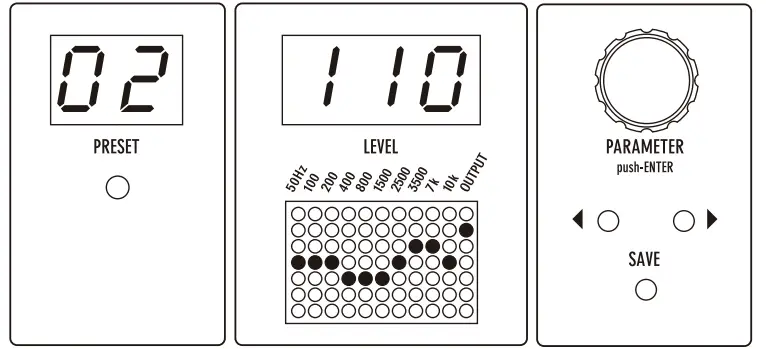
50Hz | 100 | 200 | 400 | 800 | 1500 | 2500 | 3500 | 7K | 10K | OUT |
| 00 | 00 | 00 | -02 | -02 | -02 | 00 | 01 | 01 | 00 | 110 |
Preset 3: Sound for jazz play with reduced high frequency level
50Hz | 100 | 200 | 400 | 800 | 1500 | 2500 | 3500 | 7K | 10K | OUT |
| -04 | 00 | 00 | 04 | 04 | 00 | 00 | 00 | -03 | -07 | 100 |
Preset 4: Sound with flat EQ but boosted volume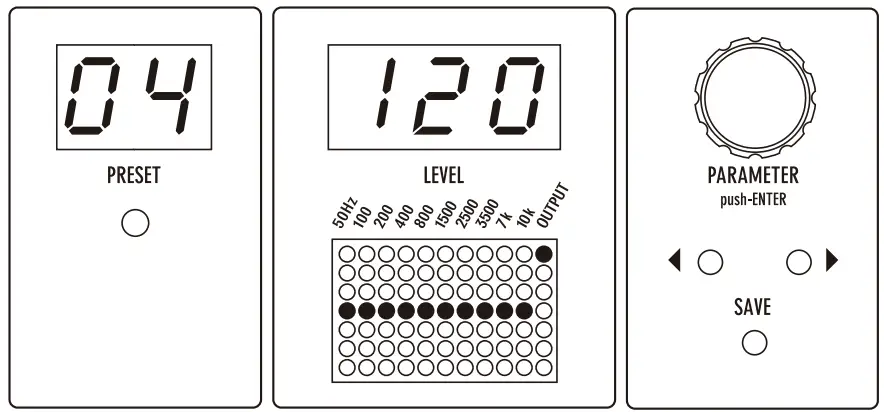
50Hz | 100 | 200 | 400 | 800 | 1500 | 2500 | 3500 | 7K | 10K | OUT |
| 00 | 00 | 00 | 00 | 00 | 00 | 00 | 00 | 00 | 00 | 120 |
PA-1QB (for Bass) Factory Presets
Preset 1: Sound for finger picking with reduced high frequencies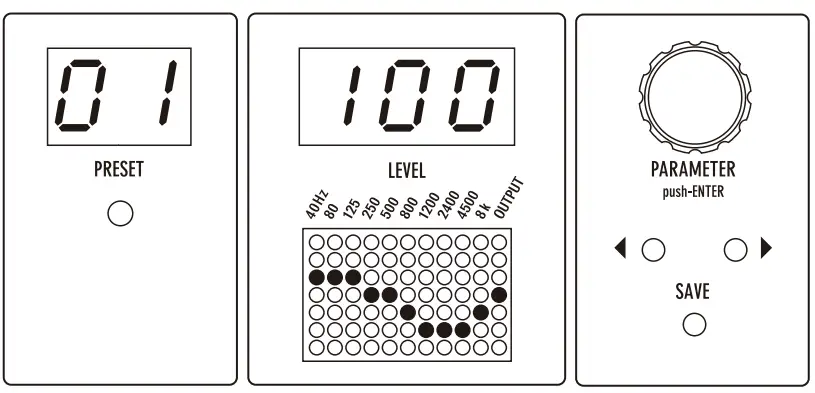
| 40Hz | 80 | 125 | 250 | 500 | 800 | 1200 | 2400 | 4500 | 8K | OUT |
| 01 | 01 | 01 | 00 | 00 | -01 | -05 | -05 | -05 | -03 | 100 |
Preset 2: Sound for plectrum picking with emphasized attacks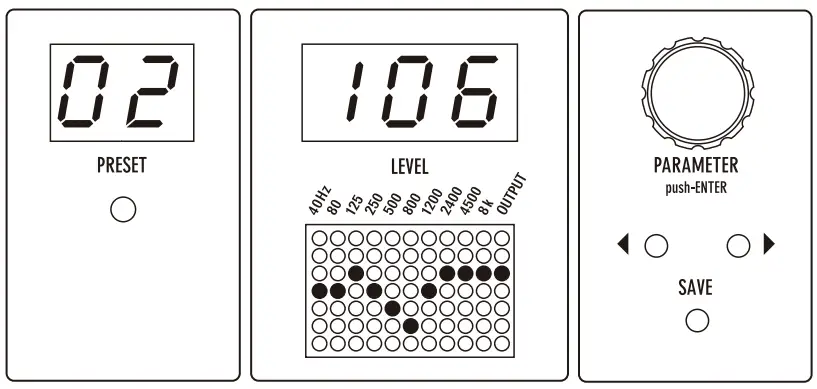
| 40Hz | 80 | 125 | 250 | 500 | 800 | 1200 | 2400 | 4500 | 8K | OUT |
| 00 | 00 | 01 | 00 | -04 | -06 | 00 | 03 | 03 | 04 | 106 |
Preset 3: sound for slapping with reduced mid range|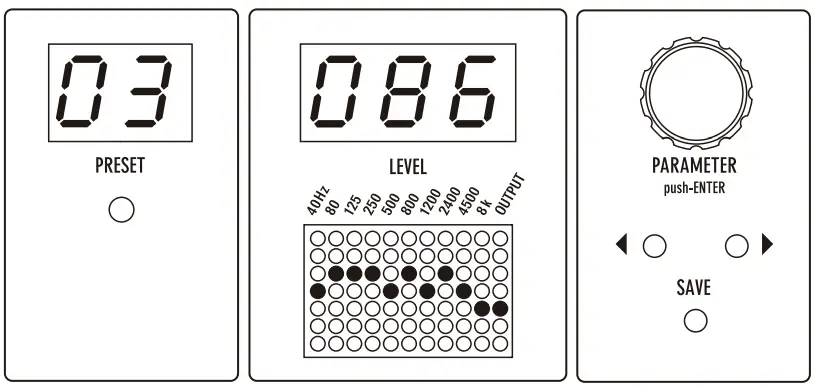
| 40Hz | 80 | 125 | 250 | 500 | 800 | 1200 | 2400 | 4500 | 8K | OUT |
| 00 | 01 | 01 | 01 | 00 | 01 | 00 | 01 | 00 | -04 | 86 |
Preset 4: Sound with reduced low frequencies and boosted volume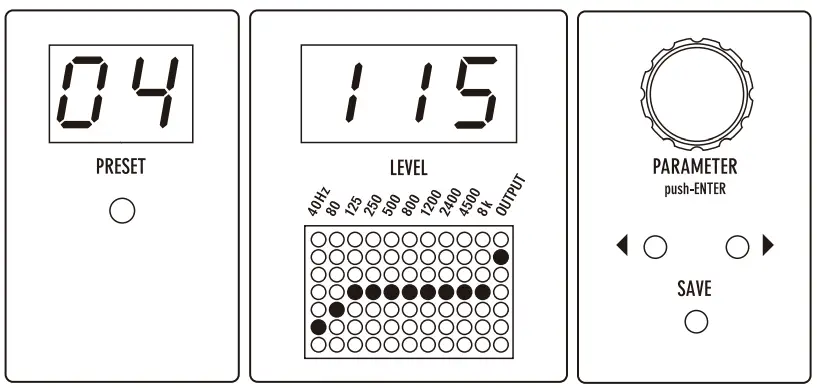
| 40Hz | 80 | 125 | 250 | 500 | 800 | 1200 | 2400 | 4500 | 8K | OUT |
| -05 | -01 | 00 | 00 | 00 | 00 | 00 | 00 | 00 | 00 | 115 |
PA-1QA (for Acoustic) Factory Presets
Preset 1: Crisp sound for ensemble playing without changing the nuance of the sound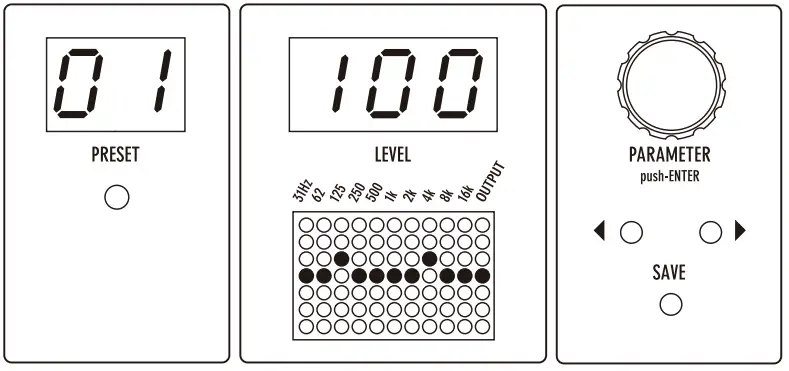
31Hz | 62 | 125 | 250 | 500 | 1K | 2K | 4K | 8K | 16K | OUT |
| 00 | 00 | 01 | 00 | 00 | 00 | 00 | 02 | 00 | 00 | 100 |
Preset 2: Emphasizes the low mid range for chordal playing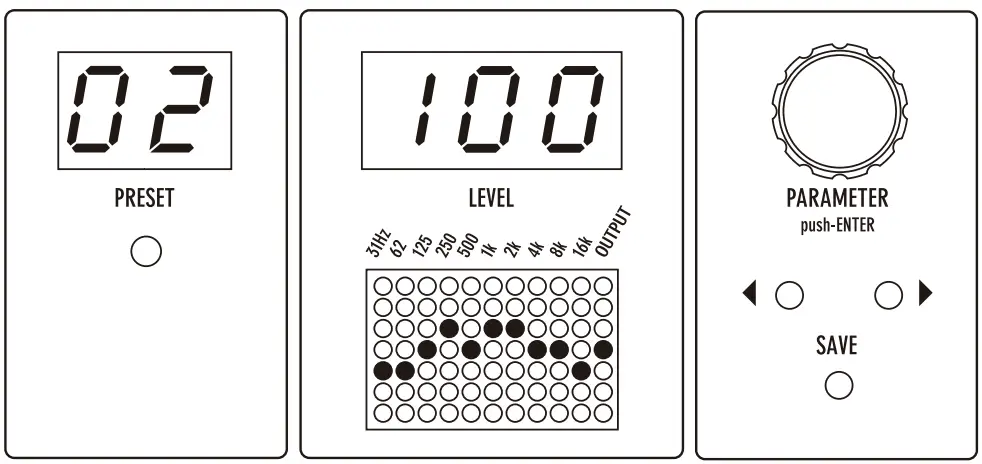
31Hz | 62 | 125 | 250 | 500 | 1K | 2K | 4K | 8K | 16K | OUT |
| -02 | -01 | 00 | 02 | 00 | 01 | 01 | 00 | 00 | -01 | 100 |
Preset 3: Emphasizes the treble range for arpeggios and finger- style playing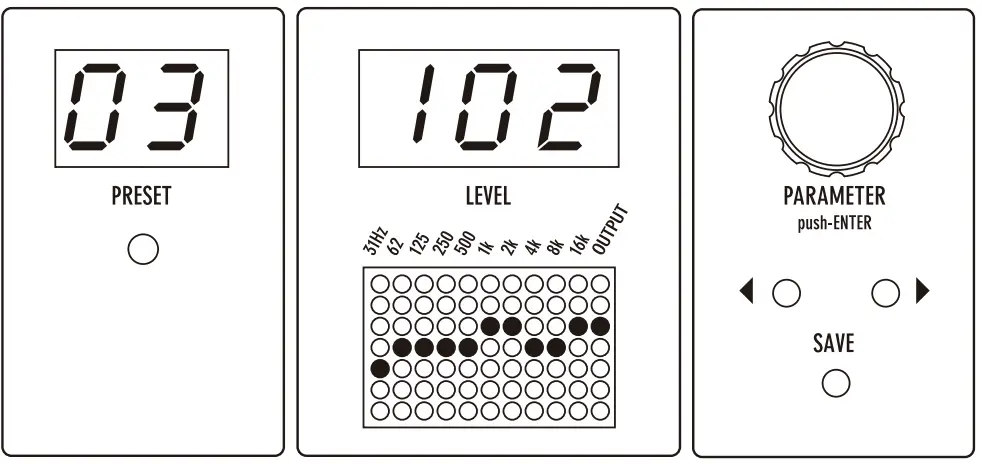
31Hz | 62 | 125 | 250 | 500 | 1K | 2K | 4K | 8K | 16K | OUT |
| -01 | 00 | 00 | 00 | 00 | 01 | 01 | 00 | 00 | 01 | 102 |
Preset 4: For Rasqueado strumming a nylon string guitar with a muted low bass range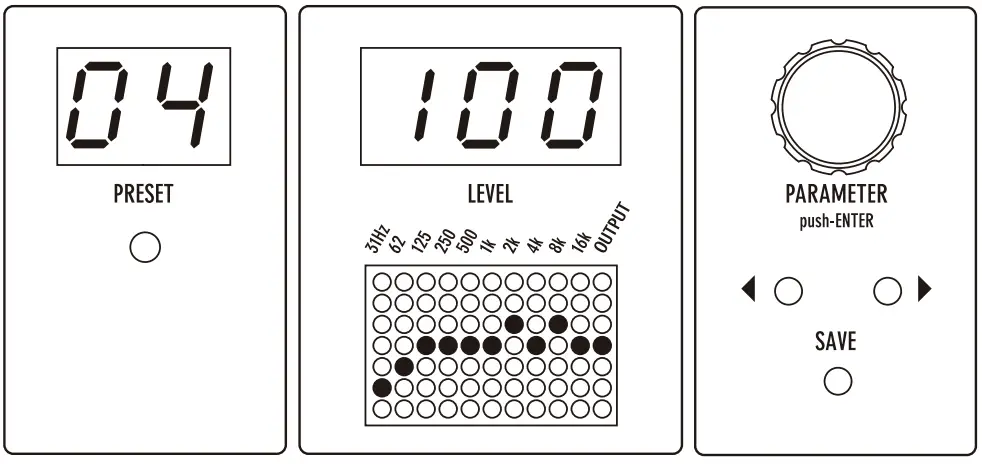
31Hz | 62 | 125 | 250 | 500 | 1K | 2K | 4K | 8K | 16K | OUT |
| -05 | -03 | 00 | 00 | 00 | 00 | 01 | 00 | 01 | 00 | 100 |
Specifications
- Number of presets: 99
- Input impedance: INST min. 1 MΩ / LINE min. 300 kΩ
- Output load impedance: min. 10 kΩ
- Max. input level: INST +4 dBu / LINE +14 dBu (EQ setting = flat)
- Controls: ◀▶ cursor keys, PARAMETER encoder, INST(-10dB)/LINE(+4dB) level selector switch
- Frequencies
PA-1QG: 50 Hz, 100 Hz, 200 Hz, 400 Hz, 800 Hz, 1500 Hz, 2500 Hz, 3500 Hz, 7 kHz, 10 kHz (±12 dB)
PA-1QB: 40 Hz, 80 Hz, 125 Hz, 250 Hz, 500 Hz, 800 Hz, 1200 Hz, 2400 Hz, 4500 Hz, 8 kHz (±12 dB)
PA-1QA: 31 Hz, 62 Hz, 125 Hz, 250 Hz, 500 Hz, 1 kHz, 2 kHz, 4 kHz, 8 kHz, 16 kHz (±12 dB) - Terminals: 1/4″ standard phone jack x 2 (input and output) 9V DC input jack (for AC adapter),
DIN 5-pin connector x 2 (MIDI IN and OUT/THRU) - Power supply: 9V DC center negative polarity
- Current consumption: 200 mA
- Dimensions (W x D x H): 120 x 102.3 x 58.5 mm or 4.7 x 4.0 x 2.3 inches (incl. protuberances such as
footswitch, jacks, etc.) - Weight (excl. accessories): approx. 350 g or 0.77 lbs
- Accessories: Warranty card, Quick Start Guide, Safety Precautions, rubber feet x 4
Specifications and appearance subject to change without notice.
Safety Precautions
Precautions are identified by the two types of symbols below:
![]() Caution
Caution
This symbol indicates that a risk of serious personal injury or material damage may result if precautions are ignored.
![]() Warning
Warning
This symbol indicates that a risk of death or serious personal injury may result if precautions are ignored.
Be sure to read these precautions and the user’s manual before using this product.
![]() Caution
Caution
Do not use or store the unit in environments where it will be exposed to:
- Extreme temperatures (direct rays of the sun, heat sources such as radiators or stoves.)
- High humidity or moisture.
- Excessive dust or sand.
- Excessive vibration or shock.
Whenever leaving the unit unattended for long periods,
be sure to unplug the AC adapter from the power source to avoid creating a fire hazard.
Take care not to drop the unit, and do not subject it to excessive pressure or weight.
Do not press the switches on the unit with a bare foot, or unexpected injury may result.
Do not use solvents (such as benzine, paint thinner) on the unit, since these may dull the finish or damage the surface.
![]() Warning
Warning
Never try to disassemble, or modify the unit.
Stop using the unit if you notice smoke or a strange odor coming from it and unplug the AC adapter from the outlet.
Never try to repair the unit or replace parts unless so instructed by the user’s manual. For other repair or parts replacement contact your local dealer or Free The Tone.
Never unplug the AC adapter while your hands are wet.
Do not apply too much pressure or tension or place a heavy object on the power cord. Doing so may damage the power cord and create a danger of fire or electrical shock.
Turn off the unit and unplug the AC adapter from the outlet and contact your local dealer or Free The Tone for repair in the case of any of the following:
- The power cord is damaged.
- Foreign objects (coins, pins, etc.) or liquid enter the unit.
- The unit gets wet from rain or other liquid.
- The unit is out of order.
Be careful of heat radiation from the unit.
Never cover the AC adapter with cloth or other objects.
Built-up heat can deform the case or cause a fire hazard.
Support / Service
Contact the following for support and/or repair service.
e-mail address: [email protected]


