![]()
Z3Pro
USER GUIDE
BEDIENUNGSANLEITUNG
Introduction
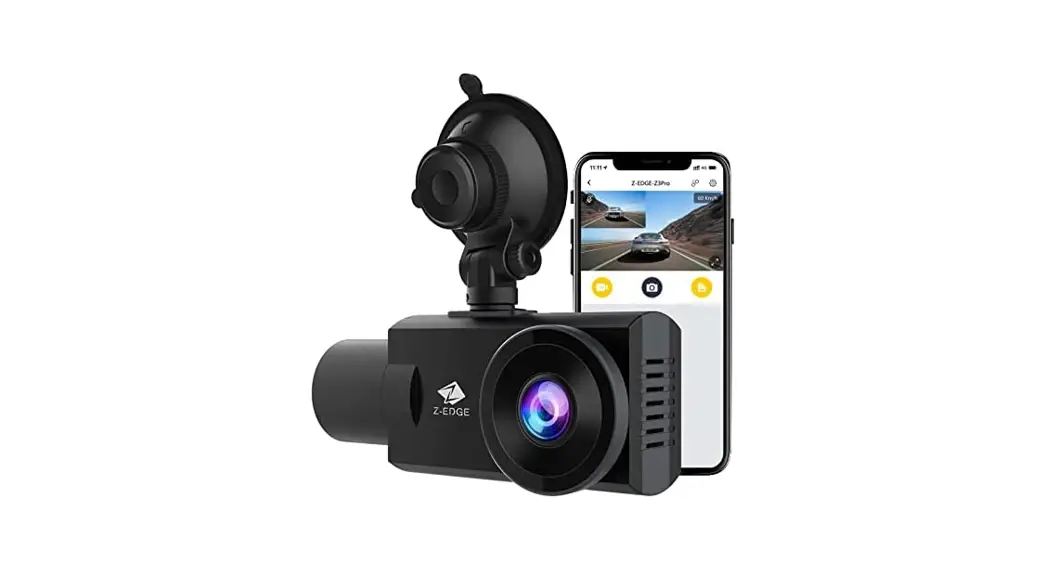
Welcome to the Z3Pro car dashcam. Protect you and your vehicle with real-time video and audio recording whilst you’re driving. Featuring a stealth size design and dual-lens for recording front and back. Please read this manual carefully before using this product.
Features
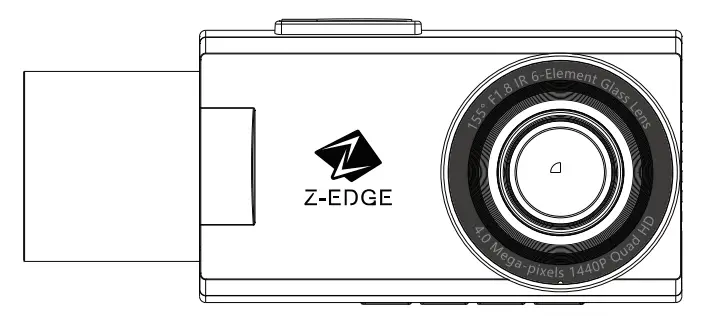
- Front Camera: 2560x1440P
- Rear Camera: 1920x1080P
- 0″ IPS LCD Color Screen
- Photo Resolution: 4.0 + 2.0 Megapixel
- Built-in G-Sensor
- Front Camera: 155-Degree
- Rear Camera: 155-Degree
- WiFi Connection
- Audio Recording
- Night Vision
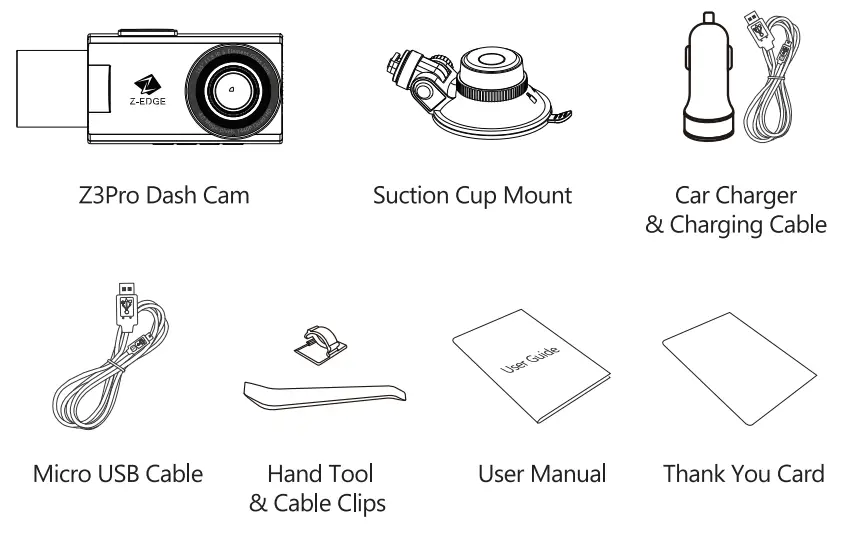
What’s in the Box
Product Overview
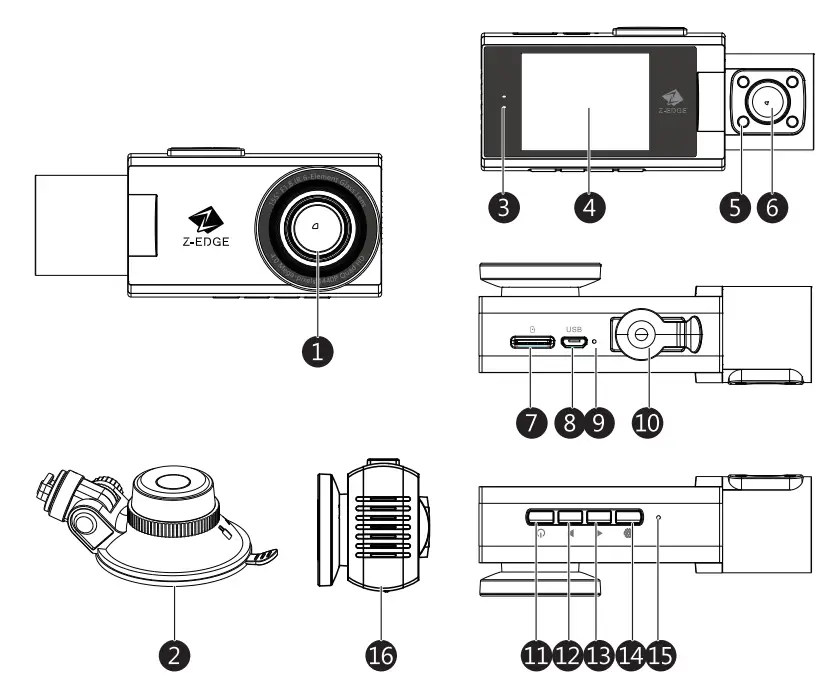
- Front Lens
- Suction Cup Mount
- LED Indicator
- LCD Display
- IR LEDs
- Rear Lens
- TF/MicroSD Card Slot
- Micro USB Port
- Mic
- Suction Mount Slot
- Power/Menu Button
- Left-Arrow Button
- Right-Arrow Button
- OK Button
- Reset Button
- Speaker
Getting Started
Inserting the Memory Card
Insert the memory card, with the pins facing towards the display, until it clicks into place.
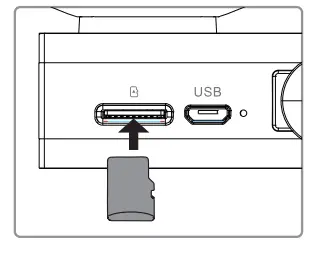
Remove Memory Card
Push the edge of the memory card inward until you feel it click, then allow it to push out until you can remove it from the slot.
![]() WARNING:
WARNING:
It is recommended to format the memory card before initial use. Please note that all data saved on the memory card will be erased after formatting.
Note:
- Supports Micro SDXC cards up to 256GB. (Class 10 or above)
- Do not remove or insert a memory card whilst the device is powered on -this may damage the memory card.
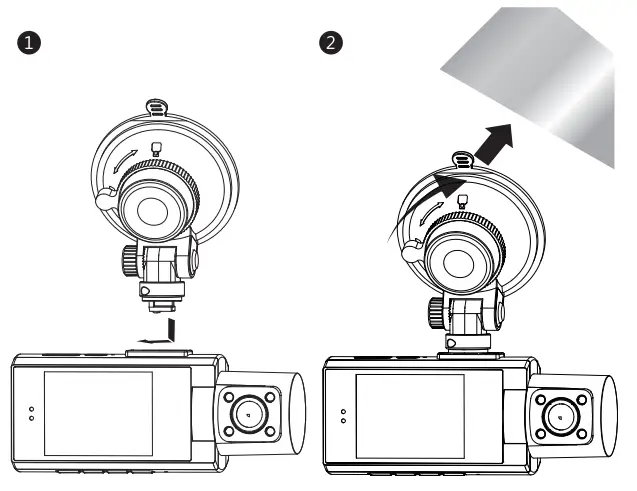
Installation
Please follow the below instructions for mounting your dashcam to your vehicle’s windshield:
- Slide the car mount into the slot on top of the device until a click sound is heard.
- Press the suction cup firmly against your windshield, and rotate the lever clockwise (12 o’clock) to secure.
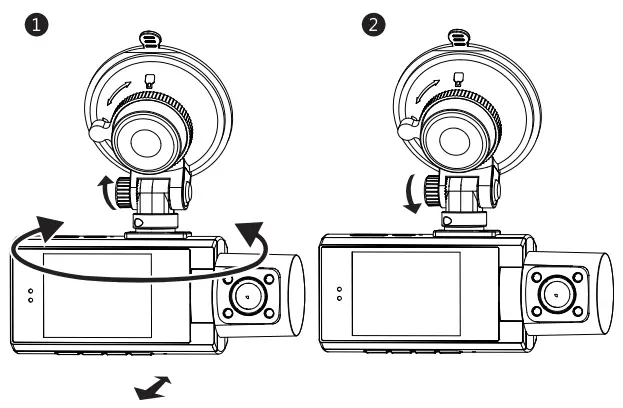
Adjust Device Position
Loosen the nut to swivel the device vertically. Click into place and secure by tightening the nut. Rotate the device horizontally for a clear view.
![]() WARNING:
WARNING:
Do not install the device on a tinted windshield. This may damage the tint film.
Connecting to Power
Use only the supplied car charger to power the dashcam.
- Plug the Micro USB port of the USB charging cable into the car dashcam Micro USB Port (8).
- Plug the other end into the car charger, and insert it into your vehicle’s lighter socket.
Powering the Dash Cam
Automatic Power
- Once the vehicle’s engine is switched on, the dashcam will automatically power on.
- When the vehicle engine is switched off, the dashcam will automatically save the recording and power it off.
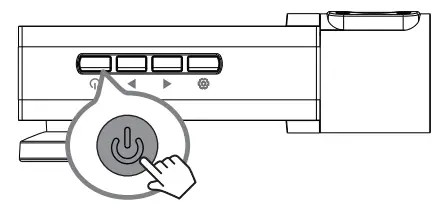
Manual Power
- To manually turn the power on, press and hold the Power Button (11) for 3
- To manually turn the power off, press and hold the Power Button (11) for 3

Set Date & Time
The first time you turn the camera on, the booted guide will appear. Please set the language, time zone, date, and time.
You can also set it in the settings menu:
Menu > Language
Menu > Date/Time
Before using the device, we recommend you set the correct date and time:
- Press the Menu Button(11) to enter the Settings menu.
- Press the Right-Arrow Buttons(13) to select Data/Time setup and press the OK button(14) to confirm. Follow the icons displayed on the screen and press the corresponding button to adjust the date and time settings.
- With all fields correct, press the OK button(14) to save and exit the menu.
Using the Car Dash Cam
Recording Videos
With an SD card inserted and the device connected to power, when the car engine is switched on the dashcam will automatically power on and start recording. When the vehicle engine is switched off, the dashcam will automatically save the recording and power it off.
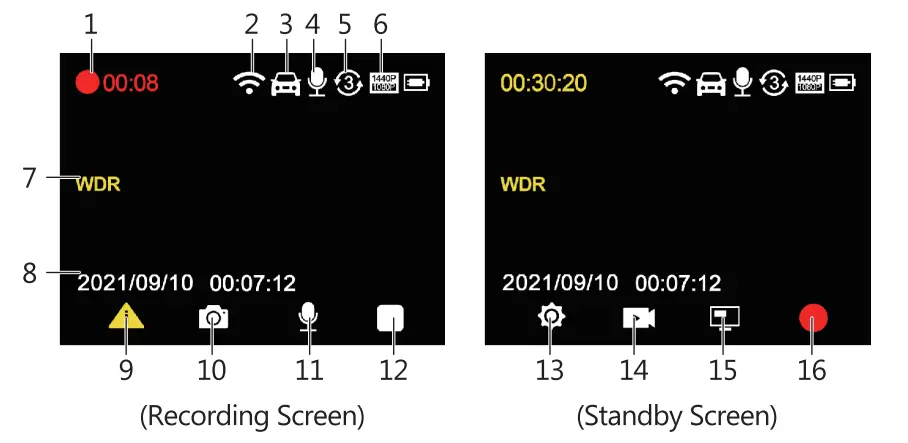
Recording Screen & Standby Screen
| No. | Item | Description |
| 1 | Recording | A flashing red light indicates the device is recording with time showing the current duration of the recording. |
| 2 | WIFI | Indicates if the WiFi function is activated. |
| 3 | Parking Mode | Indicates if Parking Mode is activated. |
| 4 | Audio Recording | Indicates if the audio recording is activated. |
| 5 | Loop Recording | Indicates loop recordings length 1, 3, or 5 minutes. |
| 6 | Resolution | Indicates current resolution settings. |
| 7 | WDR | Indicates if WDR is activated. |
| 8 | Data&Time Stamp | Indicates date and time. |
| 9 | Video Protection | Indicates if video protection is activated. Press Power Button to activate when recording. |
| 10 | Camera | Press Left-arrow Button to take a snapshot |
| 11 | Microphone | Press Right-arrow Button to enable/disable audio recording. |
| 12 | Stop Recording | Press the OK button to stop recording. |
| 13 | Setting Menu | Press the menu button to enter the setting menu. |
| 14 | Playback | Press Left-arrow Button to playback videos/photos. |
| 15 | Display Switch | Press the Right-arrow button to change the display view on the screen. |
| 16 | Start Recording | Press the OK button to start recording. |
Adjusting the Settings
Customize the video recording, photo, and other general settings via the on-screen display (OSD) menus:
- If the camera is in screensaver status, press any button to wake up the device.
- If the device is recording, press the OK button(14) to stop recording and enter the setting menu.
- Press the Left-arrow and Right-arrow Buttons(12 & 13) to select a menu option.
- Press the OK button(14) to select the desired setting.
Loop Recording
Videos are recorded and saved to the memory card in set intervals. Once the memory card is full, Loop Recording automatically overwrites the earliest unprotected saved file. This prevents long-duration video clips from being lost in a single overwrite. Video files can be saved to the memory card in 1, 3, or 5 mins intervals: Menu > Loop Clip Time
Emergency Video Protection
If G-Sensor is activated and senses an unusual impact or collision the dashcam will automatically protect the currently recorded video file from being overwritten. An icon![]() appears to indicate the current recording is protected. To manually protect a video file during recording, press the Power Button(11) once.
appears to indicate the current recording is protected. To manually protect a video file during recording, press the Power Button(11) once.
Motion Detection
With Motion Detection enabled, video recording is automatically started when movement is detected by the camera lens. After approximately 5 minutes with no movement detected, the video recording is automatically paused and the screen stays in black without flashing an LED indicator. If the camera did not detect any motion in 3 hours, it will turn off automatically.
Enable/disable feature: Menu > Car Monitoring > Motion Detection
Motion Detection requires the dash cam to be powered. For using this feature whilst the vehicle is parked and the engine is off, you may need to hardwire the dashcam to your vehicle. Please seek assistance from a trained mechanic before attempting this installation. (NOTE: Hardwire is NOT included in the packing list.) |
Parking Mode
With Parking Mode and G-Sensor enabled, if the vibration is detected, the camera will automatically turn on and start recording. If no more motion or vibration is detected within 60 seconds, the camera will automatically return to standby mode(in black screen). All recordings are automatically protected from being overwritten.
Enable/disable feature: Menu > Car Monitoring > Parking Mode
Please Note
When the folder of protected videos (30% SD card capacity) is full, the protected files will be overwritten with newly recorded protected files.
Vibration Detection (G-Sensor)
The camera features sense for unusual impacts or collisions detected by the built-in G-Sensor. It automatically triggers the Emergency Video Protection with an enabled G-Sensor.
To Set the sensitivity to automatically trigger these features with slight or strong vibrations (feature can also be turned Off): Menu > G–Sensor
Taking a Snapshot
Press Left-arrow Button(12) once to take a snapshot while recording.
Playback Videos & Photos
- In standby mode, press the Left-arrow Button(13) to enter the Playback folder.
- Press the Left-arrow & Right-arrow Buttons(12 & 13) to select between Normal Video, Emergency File, and Photo. Press the OK button(14) to confirm.
- Press the Left-arrow & Right-arrow Buttons(12 & 13) to select the previous or next file.
- Press the Power Button(11) to return to the previous menu.
- Press the Power Button(11) to exit.
Managing Video & Photo Files
Navigate to the file you wish to manage.(See 3.10)
- Press the Left-arrow & Right-arrow buttons(12 & 13) to select the previous or next file.
- Press the OK button(14) to select the file.
- Press the Left-arrow Button(12) to delete the file.
- Press the Left-arrow & Right-arrow Buttons(12 & 13) to select either Yes or No.
- Video only: Press the OK Button(14) to Play/Pause a video file.
Deleted files cannot be recovered. Please ensure you backup important files before deleting them. |
Night Vision
For better recording with the rear-facing camera, you can turn on the IR LEDs at night. The Night Vision has three settings to choose from Off, On, or Auto. To set the Night Vision: Menu > Infrared Light
Please Note:
If IR lights are on, the video footage of the cabin will turn black and white.
Enable W1Fi
With the WiFi feature enabled, the Android/OS app can be used on your supported devices to view and save recorded videos and photos. Enable/disable feature: Menu > WiFi
WiFi Setup and Android/Los App
WIFI Setup
- Search for the “Z-DashCam” app on the Google Play Store (Android device) / Apple App Store (i0S device).
Then download and install on your smartphone or tablet device. - Check if the WiFi feature is enabled on the Z3Pro WiFi dash camera. (See 3.13).
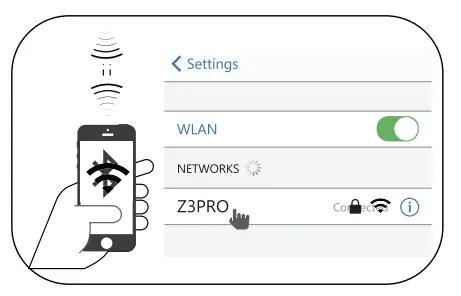
- Open the WLAN settings on your smart device and select the Z3Pro dash camera.
This name is Z3PRO. Make sure it is connected.
If a WiFi password is required, please enter password: 12345678 - Open the “Z-DashCam” app on your smart device.
- In the App, click Connect DVR, then it will turn to the record screen.
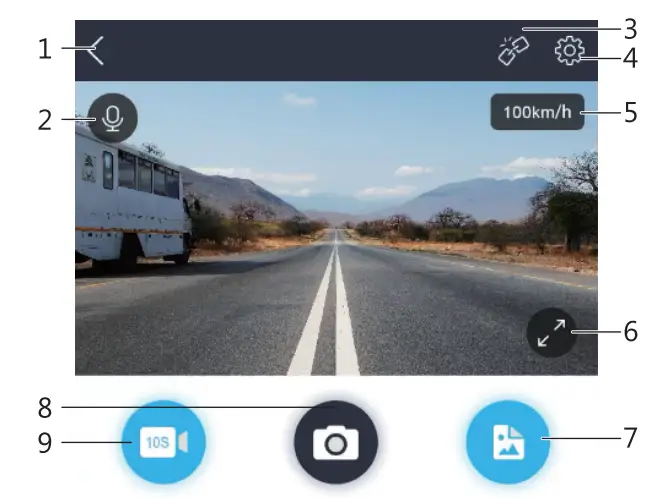
App Overview
| NO. | Item | Description |
| 1 | Back Arrow | Return to the main screen |
| 2 | Microphone | Enable/disable audio recording |
| 3 | Connection | Disconnect the app from the dash camera. |
| 4 | Settings | Open the setting menu and adjust settings for the dash camera. |
| 5 | Speed | Switch between mph & km/h |
| 6 | Display view of the recording | Tap to view between full and half screen |
| 7 | File Manager | View/Play/Download/Delete the saved videos and images |
| 8 | Camera | Take a snapshot |
| 9 | Recording Icon | Record a 10-second video clip |
Note:
Some features may not available on Z3Pro. If you have questions please contact Z-EDGE customer support via Email.
| Menu | Feature | Description | Option |
| Settings | App Download | Use a QR Code scanner to scan it and download Z-DashCam App | QR Code |
| Scenario Mode | Set driving mode | Default/Drive/Scenic/ Park | |
| Resolution | Set the recording resolution | Front+Rear. 2560x1440P 25fps + 1920x1080P 25fps 1920x1080P 30 fps + 1920x1080P 30 fps Only Front 2560x1440P 30fps 1920x1080P 60fps 1920x1080P 30fps | |
| Loop Clip Time | Set the duration of each video file (see 3.4) | 1 min/3 mins/5 mins | |
| Display | Set display view | Front Rear, PIP Front full screen, PIP Rear fullscreen | |
| Date/Time | Set date and time | Date and Time | |
| Sound Recording | Enable/disable audio recording | On/Off | |
| Power On Tone | Set power on sound | On/Off | |
| Driving Alert | Set the fatigue Alarm notification | Off/LHR/2hrs/4hrs | |
| Enable/disable Motion Detection and Parking Mode (see 3.6&3.7) | Off/Parking Mode/ Motion Detection | ||
| G-Sensor | Adjust the sensitivity of the G-Sensor (see 3.8). | Off/High/Medium/ Low | |
| Watermark | Enable/disable Date/Time, Logo stamp | On/Off | |
| WDR | Enable/Disable Wide Dynamic Range | On/Off | |
| Exposure | Set the Exposure of the recordings | 0, 0.3, 0.7,1,1.3,1.7, 2, -0.3, -0.7, -1, -1.3, -1.7, -2 | |
| Frequency | Set Frequency | 50Hz/60Hz | |
| Key Tone | Set button tone | On/Off | |
| Screen Saver | Set Screen Saver time | 1 min/3 mins/5 mins/ Always on | |
| Language | Set Language | English/German | |
| WiFi | Enable/disable WiFi | On/Off | |
| Infrared Light | Set Infrared LED | On/Off/Auto | |
| Device auto Off | Set turn-off time after parking. | Off/1/3/5 mins | |
| Delete Videos Reminder | Remind to delete videos to free up more capacities. | On/Off | |
| Format SD Card | Format SD Card, delete all files | Yes/No | |
| Defaults | Reset the camera to factory defaults | Yes/No | |
| About | Firmware Version, SN, WiFi Name, WiFi Password |
FAQs
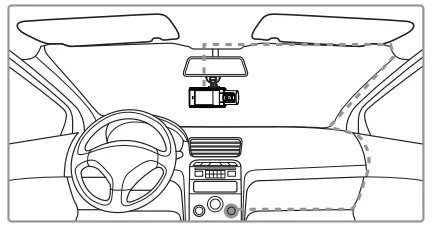
Where should I place the dashcam?
- We recommend that you mount the car dashcam as close to the center of the windshield as possible. This should neither distract the driver nor block the driver’s view (see 2.2-2.4).
Why does the dashcam stop recording after some time?
- If motion detection is enabled, the dashcam will automatically stop recording when no movement is detected for more than 5 minutes (see 3.6).
- Your micro SD card may be full and need to be formatted before using it again. 1440P and 1080P videos occupy a lot of card capacity and G-Sensor protected videos cannot be erased automatically. We recommend formatting your memory card every 14 days.
Why do you recommend a Class 10 micro SD card or above?
- 1440P and 1080P videos have a bigger data flow and hence require a micro SD card with faster writing speed. If memory cards below Class10 are used, they may cause the dashcam to freeze or other related video recording/erasing
How do I tum off audio during recording?
- To turn off the Audio Recording, press the Right-arrow Button (13) once during (Please note: this does not interrupt the video recording).
How do I start recording videos?
- The Z3Pro dashcam is programmed to automatically record when there is power connected and a memory card inserted. When the engine is turned off or power is disconnected, the dashcam will stop recording and turn off.
- It is recommended to format the SD card before initial use.
Customer Support
For customer support inquiries please contact via Email: [email protected]
Or visit our official website: wwwz-edge.com
![]() @zeroedgeGA facebook.com/zeroedgeGA/
@zeroedgeGA facebook.com/zeroedgeGA/ @zeroedgeGA twitter.com/zeroedgeGA
![]() @zeroedgeGA pinterest.com/zeroedgeGA
@zeroedgeGA pinterest.com/zeroedgeGA![]() @zeroedge youtube.com/zeroedge
@zeroedge youtube.com/zeroedge
Follow us to get the latest updates, your opinion is important to us!
Warranty
Thank you for choosing Z-EDGE. Your satisfaction is always our first priority.
All Z-Edge customers have a 30-day money-back guarantee, to make sure your shopping experience is worry-free.
By default, the unit warranty period is set to 12 months from the unit-shipped date.
You can be corrected to 18 months by registering your product on our official website.
Product Registration URL: www.z-edge.com/pages/register
Product Specifications
| Rem | Desaiption |
| Resolution | Front+Rear. 2560x1440P 25fps + 1920x1080P 25fps 1920x1080P 30 fps + 1920x1080P 30 fpsOnly Front: 2560x1440P 30fps 1920x1080P 60fps 1920x1080P 30fps |
| Storage Support | Supports Micro SDXC, Up to 256GB, Class10 or above |
| Display | 2.0″ IPS LCD |
| Lens | 155-degree wide-angle |
| Focus Range | 1.5m—Infinity |
| Video | Front camera: 2560x1440P 30fps Rear camera: 1920x1080P 30fps MP4 |
| Image | Resolution: 4M JPEG |
| G-Sensor | Yes |
| Microphone | Yes |
| Speaker | Yes |
| WiFi | Yes |
| Interface | Micro USB |
| Battery | Built-in Battery |
| Operating Temperature | -10 to 60°C / 14 to 140°F |
| Storage Temperature | -20 to 70°C / -4 to 158°F |
| Dimensions | 426 inch x 1.5 inch x 1.8 inch 110 x 40 x 45 mm (LxWxH) |
| Weight | 4 oz / 115g |
| Car Charger | INPUT: DC 12-24V, OUTPUT: DC 5V |
Please Note:
The contents of this manual are subject to change without notice to improve quality. ZeroEdge Technology owns the copyright for this manual.
FCC Statement
This equipment has been tested and found to comply with the limits for a Class B digital device, pursuant to Part 15 of the FCC Rules. These limits are designed to provide reasonable protection against harmful interference in a residential installation. This equipment generates, uses, and can radiate radio frequency energy and, if not installed and used in accordance with the instructions, may cause harmful interference to radio communications. However, there is no guarantee that interference will not occur in a particular installation. If this equipment does cause harmful interference to radio or television reception, which can be determined by turning the equipment off and on, the user is encouraged to try to correct the interference by one or more of the following measures:
- Reorient or relocate the receiving antenna.
- Increase the separation between the equipment and receiver.
- Connect the equipment into an outlet on a circuit different from that to which the receiver is connected.
- Consult the dealer or an experienced radio/TV technician for help. This device complies with Part 15 of the FCC Rules. Its operation is subject to the following two conditions: (1) This device may not cause harmful interference, and (2) this device must accept any interference received, including interference that may cause undesired operation.
FCC Caution:
Any changes or modifications not expressly approved by the party responsible for compliance could void the user’s authority to operate this equipment.
FCC RF Radiation Exposure Statement:
- This Transmitter must not be co-located or operating in conjunction with any other antenna or transmitter.
- This equipment complies with RF radiation exposure limits set forth for an uncontrolled environment.
- This equipment should be installed and operated with a minimum distance of 20cm between the radiator & your body.
![]()
Z3PROZ22UMDE-02


