
![]() Waketower Can Speakers Installation
Waketower Can Speakers Installation
Instructions Manual
Important Safety Information
![]() WARNING
WARNING
Failure to follow these warnings and cautions could result in personal injury, damage to the vehicle or vessel, or poor product performance.
This device must be installed according to these instructions.
Disconnect the vehicle’s or vessel’s power supply before beginning to install this product.![]() CAUTION
CAUTION
Continuous exposure to sound pressure levels over 100 dBA may cause permanent hearing loss. The volume is typically too loud if you cannot hear people speaking around you. Limit the amount of time you listen at high volume. If you experience ringing in your ears or muffled speech, stop listening and have your hearing checked.
Always wear safety goggles, ear protection, and a dust mask when drilling, cutting, or sanding.
NOTICE
When drilling or cutting, always check what is on the opposite side of the surface.
It is strongly recommended that you have your audio system installed by a professional installer to ensure optimum performance.
You must read all installation instructions before beginning the installation. If you experience difficulty during the installation, go to www.fusionentertainment.com for product support.
What’s In the Box
- Two Waketower can speakers
Materials and Tools Needed
- 18 AWG (0.82 mm) wire (speakers)
- 20 AWG (0.5 mm²) wire (LEDs)
- 3 A in-line fuses (LEDs)
- Speaker mounting bracket (sold separately)
- Drill and 12 mm (½ in.) drill bit
- Wire strippers
- Solder and heat-shrink tubing for wire connections
NOTE: For customized installations, additional tools and materials may be needed.
Mounting the Speakers
You must purchase mounting brackets for the FUSION® Waketower Can speakers separately. Each type of mounting bracket contains specific installation instructions.
- If necessary, mark the locations on the wake tower or the deck where you plan to mount the speakers.
- If necessary, drill a 12 mm (½ in.) cable pass-through hole in the wake tower or deck.
- Route the speaker and LED power wires (not included) to the mounting locations.
- Using the installation instructions provided with the mounting bracket, connect the bracket to the speakers and to the wake tower or the deck.
- Connect the speaker wires (Speaker Wiring, page 2).
- If necessary, connect the LED power wires (Speaker LED Wiring, page 2).
- If speakers were installed at an angle, rotate the front of the speaker and the endcap so the FUSION logo appears level (Adjusting the Angle of the FUSION Logos, page 2).
Speaker Wiring
When connecting the speakers to your stereo, observe these considerations.
- Speaker wire is not included with the speakers. You should use an 18 AWG (0.82 mm²) speaker wire to connect the speakers to the stereo.
- You should make all wiring connections using solder and heat-shrink tubing (not included).
- You can use this table to identify the polarity of the leads on the speaker.
| Positive (+) | |
| White with a black stripe | Negative (-) |
Speaker LED Wiring
You can control the color of the LEDs through the polarity of the LED wires.
- The wire is not included with the speakers. You should use 20 AWG (0.5 mm²) or thicker wire to connect the speaker LEDs to power.
- You should connect the positive (+) power wire to a 12 Vdc power source through an isolator switch or circuit breaker to turn the speaker LEDs on and off.
NOTE: You can use the same isolator or circuit breaker controlling the power supply to your stereo, which allows you to turn the speaker LEDs and the stereo on and off at the same time. - You should make all wiring connections using solder and heat-shrink tubing (not included).
- You can use this table to connect the LED wires from the speaker to power according to the preferred LED color.
| Black to negative (-) Red to positive (+) | |
| White LED | Black to positive (+) Red to negative (-) |
Adjusting the Angle of the FUSION Logos
You should secure the speaker to the wake tower or the deck before adjusting the angle of the FUSION logos.
If you installed the speaker at an angle, you can rotate the front and the endcap so the FUSION logos appear level.
- Remove the six #2 Phillips screws holding the front of the speaker to the can.
- Rotate the front of the speaker until the FUSION logo appears level.
You can rotate the front of the speaker in 30-degree increments. - Secure the front of the speaker to the can using the screws you removed in step 1.
- Rotate the endcap on the back of the can by hand until the FUSION logo appears level.
- Repeat this procedure for other speakers on the boat, as needed.
Speaker Information
True-Marine™ Products
True-Marine products are subjected to rigorous environmental testing under harsh marine conditions to surpass industry guidelines for marine products.
Any product that bears the True-Marine stamp of assurance has been designed for simplicity of use and combines advanced marine technologies to deliver an industry-leading entertainment experience. All True-Marine products are supported by the FUSION 3-year worldwide limited consumer warranty.
Registering Your Waketower Can
Help us better support you by completing our online registration today.
- Go to www.fusionentertainment.com.
- Keep the original sales receipt, or a photocopy, in a safe place.
Cleaning the Speakers
NOTE: When mounted correctly, these speakers are rated IP65 for dust and water ingress protection under normal conditions. They are not designed to withstand high-pressure water spray, which may occur when you wash down your vessel. Failure to carefully spray-clean the vessel may damage the product and void the warranty.
NOTICE
Do not use harsh or solvent-based cleaners on the speakers. Using such cleaners may damage the product and void the warranty.
- Clean all salt water and salt residue from the speaker with a damp cloth soaked in fresh water.
- Use a mild detergent to remove a heavy buildup of salt or stains.
Troubleshooting
Before you contact your FUSION dealer or service center, you should perform a few simple troubleshooting steps to help diagnose the problem.
If the FUSION speaker has been installed by a professional installation company, you should contact the company so the technicians can assess the problem and advise you about possible solutions.
There is no sound coming from the speakers
- Verify that all connections from the source device and/or the amplifier are connected correctly to the speaker terminals.
The system lacks bass or high frequencies - Verify that the correct wire polarity is observed between the source and speakers.
The wires should be connected positively to positively and negatively to negatively. - Verify that the speakers are attached firmly to the mounting surface.
The audio is distorted
- Verify that the source volume is not too loud for the speaker, and reduce the volume if necessary.
- Verify that the panels surrounding the speaker on the vessel are not rattling.
- Verify that the source device and/or the amplifier are connected to the speaker terminals correctly.
- If the speaker is connected to an amplifier, verify that the input level of the amplifier is matched to the output level of the stereo. For more information, see the manual for the amplifier.
The LED lights will not turn on
- Verify that all wiring connections are correct and tight.
Specifications
| Peak power (watts) | 330 W |
| RMS power (watts) | 130 W |
| Efficiency (1 W/m) | 91 dB |
| Frequency response (+3 DB) | 50 Hz to 20 kHz |
| Nominal impedance | 4 ohm |
| Recommended amplifier power (RMS) | From 25 to 250 W, playing music |
| LED color options | Blue and white |
| LED supply voltage | From 10.8 to 16 Vdc |
| LED load current at 14.4 Vdc | 150 mA |
| From 0 to 50°C (from 32 to 122°F) | |
| Storage temperature range | From -20 to 70°C (from -4 to 158°F) |
| 318 cm (10.43 ft.) | |
| Tweeter type | Silk dome |
| IEC 60529 IP65 (Protected against dust and water ingress.) |
Dimensions
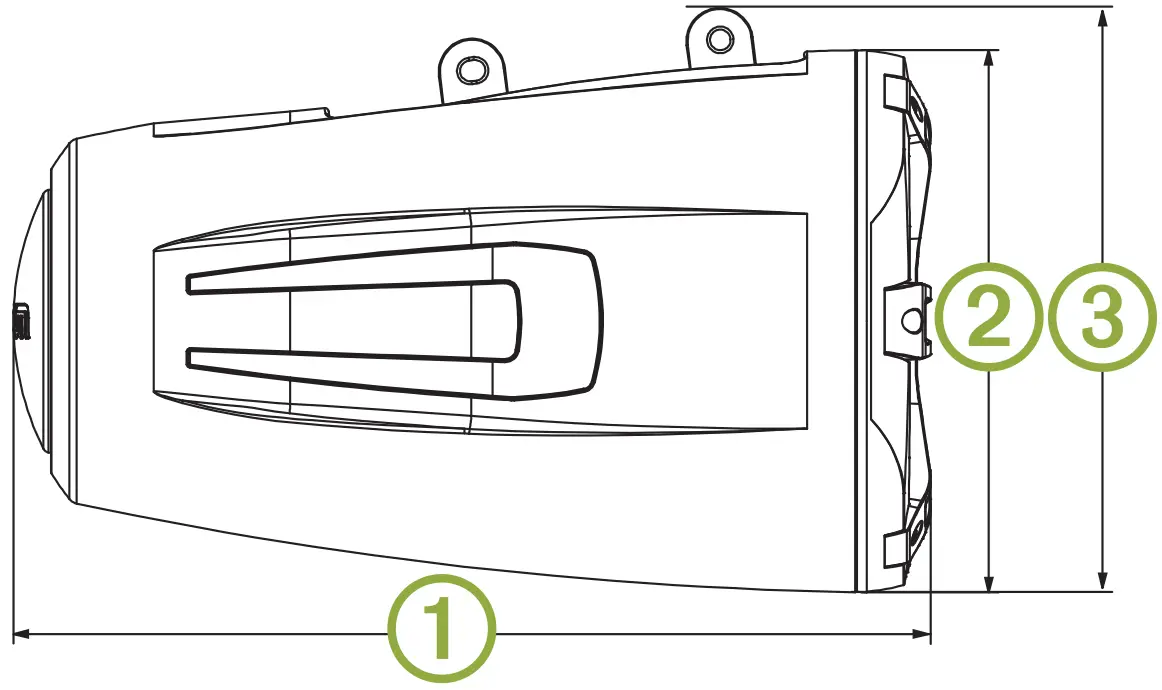
| 1 | 385 mm (15 5/32in.) |
| 2 | 241 mm (9 ½in.) |
| 3 | 224 mm (8 13/16in.) |
Garmin®, the Garmin logo, FUSION®, and the Fusion logo, are trademarks of Garmin Ltd. or its subsidiaries, registered in the USA and other countries. These trademarks may not be used without the express permission of Garmin.
 © 2018 Garmin Ltd. or its subsidiaries
www.fusionentertainment.com
October 2018
190-02482-90_0A


