
![]() Ultra Custom Ambi Gaming Mouse
Ultra Custom Ambi Gaming Mouse
Function layout
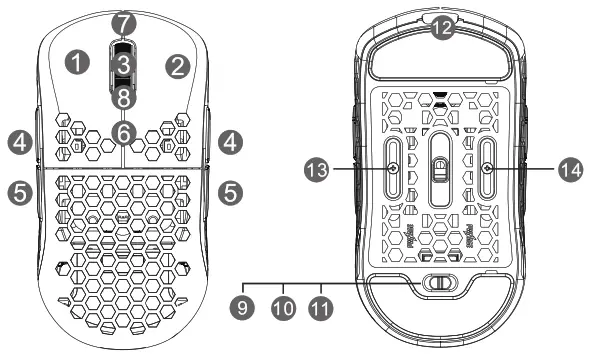
| 1. Left click 2. Right click 3. Middle click 4. Forward 5. Backward 6. DPI 7. Scroll up | 8. Scroll down 9. Power on with RGB Led on 10. Power Off 11. Power on with led off 12. Wired and charging Type-C 13. Sensor movement screw 14. Sensor movement screw |
Quick Start Guide
Mouse Instructions:
- Open top shell cover of mouse and remove the USB Nano receiver
- Plug the receiver into your computer USB port
- Turn on the mouse by switching on the power switch at the bottom of the mouse
- Wait for the computer installation to finish
DPI setting and Indicator:
- Default DPI levels: 400-800-1600-2400-3200-6400, a total of 6 DPI levels
- Press the DPI button on the top of the Ultra Custom to cycle through the DPI levels
- The mouse scroll wheel LED color indicates the DPI level 400DPI: Red Color Breathing, 800DPI: Blue Color Breathing, 1600DPI: Green Color Breathing, 2400DPI: Yellow Color Breathing, 3200DPI: Cyan Color Breathing, 6400DPI: Purple Color Breathing
Note:
- DPI levels can be adjusted by the software. Max DPI is 19000DPI 2. DPI LED effects can be adjusted or turned off to save power by the software
Polling Rate:
125-250-500-1000Hz can be set by the software. The default polling rate is 500Hz
Power switch function:
- Switch at Position 11: Turn on the mouse with RGB LED off
- Switch at Position 10: Turns off the mouse
- Switch at Position 9: Turn on the mouse power with RGB LED on
*Note* If you switch from position 11 to position 9 directly, you will need to stop at Power Off (position 10) for at least 3 seconds first for the LED to be turned on properly
**Note** If you want to turn on the LED in wired mode, you will need to turn on the LED in wireless mode first
Wired and wireless function:
- Wired and Wireless modes switch automatically. Simply plug the USB nano receiver into the computer without connecting the cable and the Ultra Custom will work in wireless mode
- If you connect the USB-C cable from the computer to the mouse, the Ultra Custom will switch to wired gaming mode automatically
Low power and charging indication
- Low power indicator: The Ultra Custom’s scroll wheel will blink red to indicate that the battery’s power is low (10%) and you should recharge your mouse’s batter by connecting i to the PC via the charging cable
- When charging, the scroll wheel LED will blink orange. Once the battery is fully charged, the LED will turn solid green.
Pairing:
If your mouse loses wireless connection, you can re-pair the mouse with the receiver by downloading the pairing software from our site. Contact support for help.
Shell Customization
The button cover, side buttons, dpi button, and top shell cover of the Ultra Custom Ambi are detachable without the use of tools. Choose from and swap from a variety of different colored button and cover set options. Check our site for new releases.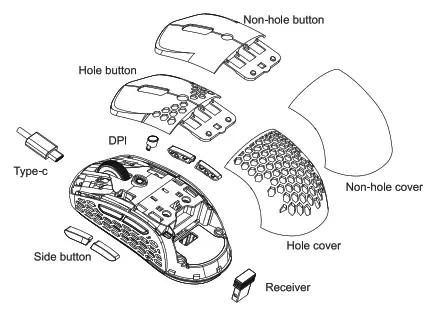 Sensor Position Customization:
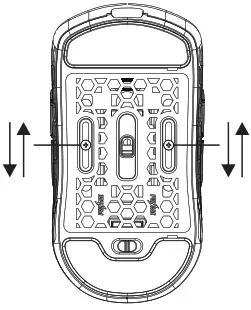
- Loosen the screws slightly with the screwdriver
- Use the screwdriver to move the screws up and down to adjust the sensor position
- Tighten the screw after moving the sensor to your desired position
Main Specification
| Size: | 118x60x39mm |
| Weight: | —71-78g |
| Switch | Kailh GM 8.0 |
| Sensor | PAW3370 |
| Max DPI | 19000 |
| Default DPI | 400-800-1600-2400-3200-6400 |
| IPS | 400ips |
| Acceleration | 50g(Max) |
| Polling rate | 125-250-500-1000Hz |
| Interface | USB 2.0 |
| Battery type | Li-ion Polymer Battery |
| Battery capacity | 300mAh |
| Default working time(1-time charge) | -50h(500Hz & LED On) |
| Charging time | around 1.5h |
FCC Statement
Changes or modifications not expressly approved by the party responsible for compliance could void the user’s authority to operate the equipment.
This equipment has been tested and found to comply with the limits for a Class B digital device, pursuant to Part 15 of the FCC Rules. These limits are designed to provide reasonable protection against harmful interference in a residential installation. This equipment generates uses and can radiate radio frequency energy and, if not installed and used in accordance with the instructions, may cause harmful interference to radio communications. However, there is no guarantee that interference will not occur in a particular installation. If this equipment does cause harmful interference to radio or television reception, which can be determined by turning the equipment off and on, the user is encouraged to try to correct the interference by one or more of the following measures:
- Reorient or relocate the receiving antenna.
- Increase the separation between the equipment and receiver.
- Connect the equipment into an outlet on a circuit different from that to which the receiver is connected.
- Consult the dealer or an experienced radio/TV technician for help
This device complies with part 15 of the FCC rules. Operation is subject to the following two conditions (1)this device may not cause harmful interference, and (2) this device must accept any interference received, including interference that may cause undesired operation. This equipment complies with FCC radiation exposure limits set forth for an uncontrolled environment.


