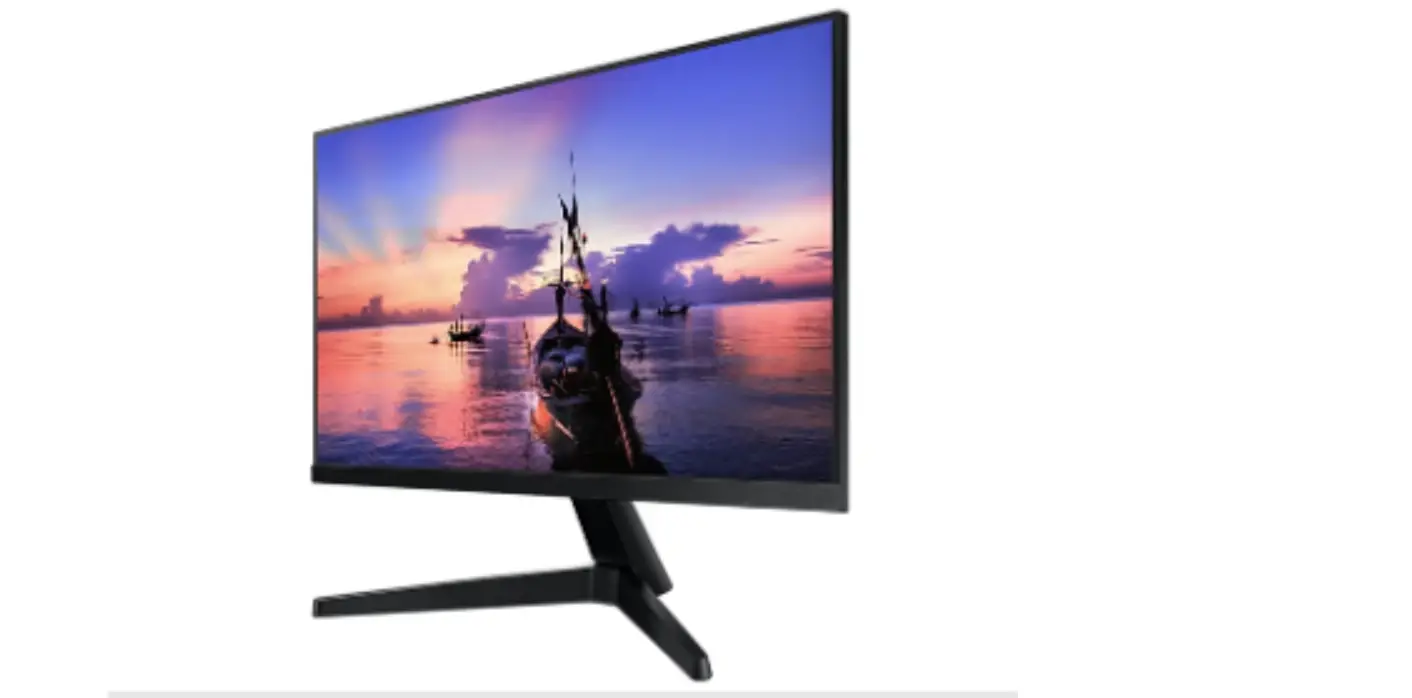
WISeNeT SMT-3240 Security LED Monitor
Security LED Monitor
User Manual
Copyright
©2022 Hanwha Techwin Co., Ltd. All rights reserved.
Trademark
Each of trademarks herein is registered. The name of this product and other trademarks mentioned in this manual are the registered trademark of their respective company.
Restriction
Copyright of this document is reserved. Under no circumstances, this document shall be reproduced, distributed or changed, partially or wholly, without formal authorization.
Disclaimer
Hanwha Techwin makes the best to verify the integrity and correctness of the contents in this document, but no formal guarantee shall be provided. Use of this document and the subsequent results shall be entirely on the user’s own responsibility. Hanwha Techwin reserves the right to change the contents of this document without prior notice.
Design and specifications are subject to change without prior notice.
Overview
IMPORTANT SAFETY INSTRUCTIONS
Read these operating instructions carefully before using the unit. Follow all the safety instructions listed below.
Keep these operating instructions handy for future reference.
- Read these instructions.
- Keep these instructions.
- Heed all warnings.
- Follow all instructions.
- Do not use this apparatus near water.
- Clean the contaminated area on the product surface with a soft, dry cloth or a damp cloth.
(Do not use a detergent or cosmetic products that contain alcohol, solvents or surfactants or oil constituents as they may deform or cause damage to the product.) - Do not block any ventilation openings, Install in accordance with the manufacturer’s instructions.
- Do not install near any heat sources such as radiators, heat registers, stoves, or other apparatus (including amplifiers) that produce heat.
- Do not defeat the safety purpose of the polarized or grounding- type plug. A polarized plug has two blades with one wider than the other. A grounding type plug has two blades and a third grounding prong. The wide blade or the third prong are provided for your safety. if the provided plug does not fit into your outlet, consult an electrician for replacement of the obsolete outlet.
- Protect the power cord from being walked on or pinched particularly at plugs, convenience receptacles, and the point where they exit from the apparatus.
- Only use attachments/accessories specified by the manufacturer.
- Use only with the cart, stand, tripod, bracket, or table specified by the manufacturer,
or sold with the apparatus. When a cart is used, use caution when moving the cart/
apparatus combination to avoid injury from tip-over. - Unplug this apparatus during lightning storms or when unused for long periods of time.
- Refer all servicing to qualified service personnel. Servicing is required when the apparatus has been damaged in any way, such as power-supply cord or plug is damaged, liquid has been spilled or objects have fallen into the apparatus, the apparatus has been exposed to rain or moisture, does not operate normally, or has been dropped.
Standards Approvals
FC CE
- Any changes or modifications in construction of this device which are not expressly approved by the party responsible for compliance could void the user’s authority to operate the equipment.
- This device complies with part 15 of the FCC Rules. Operation is subject to the following two conditions:
- This device may not cause harmful interference, and
- This device must accept any interference received, including interference that may cause undesired operation.
- ` This equipment has been tested and found to comply with the limits for a Class A digital device, pursuant to part 15 of the FCC Rules. These limits are designed to provide reasonable protection against harmful interference when the equipment is operated in a commercial environment.
This equipment generates, uses, and can radiate radio frequency energy and, if not installed and used in accordance with the instruction manual, may cause harmful interference to radio communications. Operation of this equipment in a residential area is likely to cause harmful interference in which case the user will be required to correct the interference at his own expense.
BEFORE START
You have to keep in mind the following notices :
- Hanwha Techwin retains the copyright on this manual.
- This manual cannot be copied without Hanwha Techwin’s prior written approval.
- We are not liable for any or all losses to the product incurred by your use of non-standard product or violation of instructions mentioned in this manual.
- Contact the retailer for troubleshooting help.
SAFETY INSTRUCTIONS
| Power | ||
Do not use a damaged power cord or plug or a damaged or loose power outlet.
| Do not touch the power plug with wet hands when removing or plugging the plug into the outlet.
| Make sure to connect the power cord to a grounded power outlet.
|
Ensure that the power plug is plugged into the power outlet firmly and correctly.
| Do not forcefully bend or pull the power plug and do not place any heavy material on it.
| Do not connect multiple appliances to the same power outlet.
|
Do not disconnect the power cord while using the product.
| To disconnect the apparatus from the mains, the plug must be pulled out from the mains socket, therefore the mains plug shall be readily operable.
| Use only the power cord provided by our company. Do not use the provided power cord of another product.
|
Connect the power plug to a wall outlet that can be easily reached.
| ||
| Installation | ||
Ensure that at least two persons lift and move the product.
| When installing the product in a cabinet or rack, make sure that the front end of the bottom of the product does not project out.
| Do not place candles, mosquito repellant, cigarettes and any heating appliances near the product.
|
Keep heating appliances as far away from the power cord or the product as possible.
| Do not install it in a badly ventilated location such as a bookcase or closet.
| When putting the product down, make sure to put it down softly.
|
Do not place the front of the product on the floor.
| Ensure that an authorized installation company installs the wall mount.
| Install your product in a well ventilated location. Ensure that there is a clearance of more than 4 inches (10 cm) from the wall.
|
Ensure that the packaging vinyl is kept away from children.
| If the height of your monitor is adjustable, do not place any object or part of your body on the stand when lowering it.
| |
| Clean | ||
Do not spray cleaner directly onto the surface of the product.
| When cleaning the power plug pins or dusting the power outlet, clean it with a dry cloth.
| When cleaning the product, make sure to disconnect the power cord.
|
When cleaning the product, disconnect the power cord and clean it with a soft, dry cloth.
| Since the product housing is easily scratched, make sure to use the specified cloth only. | When cleaning the product, do not spray water directly onto the main body of the product.
|
| Others | ||
The product is a high voltage product. Do not disassemble, repair or modify the product yourself.
| If there is a strange smell or a strange sound or smoke is coming from the product, disconnect the power plug immediately and contact a Service Center.
| Do not place this product in a location exposed to moisture, dust, smoke, water, or in a car.
|
When you drop the product or the case is broken, turn the power off and disconnect the power cord. Contact a Service Center.
| Never touch the power cord during a thunderstorm because it could be extremely dangerous.
| Do not try to move the monitor by pulling only the wire or the signal cable.
|
Do not lift or move the product back and forwards or right and left while only holding the power cord or signal cables.
| Make sure that the ventilating opening is not blocked by a table or curtain.
| Do not place any containers containing water, vases, flowerpots, medicines as well as any metal on the product.
|
Do not use or keep combustible spray or flammable material near the product.
| Do not insert any metal, such as chopsticks, coins, pins and steel, or flammable objects, such as matches or paper, inside the product (through the ventilating openings, input and output terminals, etc).
| When using a fixed screen for a long time, an afterimage or stain may occur.
|
When using headphones or earphones, do not turn the volume too high.
| To avoid eyestrain, do not sit too close to the product. | Do not install it in an unstable location such as an unstable rack or uneven surface or a location exposed to vibrations.
|
If you have to move the product, turn off the power and disconnect the power plug and all the cables connected to the product.
| Ensure that children do not hang onto the product or climb up onto the product.
| If you do not use the product for a long period of time, disconnect the power cord from the power outlet.
|
Do not place any heavy items or toys or confectionery, such as cookies etc. that may attract the attention of children and to the product.
| Do not place the product in a location exposed to direct sunlight or near any heat such as a fire or heater.
| Do not drop any objects onto the product or cause any impact to the product.
|
Do not use a humidifier near the product.
| When there is a gas leak, do not touch the product or the power plug; ventilate immediately.
| If the product has been turned on for a long time, the display panel becomes hot. Do not touch it. |
| Keep the small accessories in a location out of the reach of children. | Be careful when adjusting the angle of the product or the height of the stand.
| Do not install the product in a location low enough for children to reach.
|
Do not put any heavy objects on the product.
|
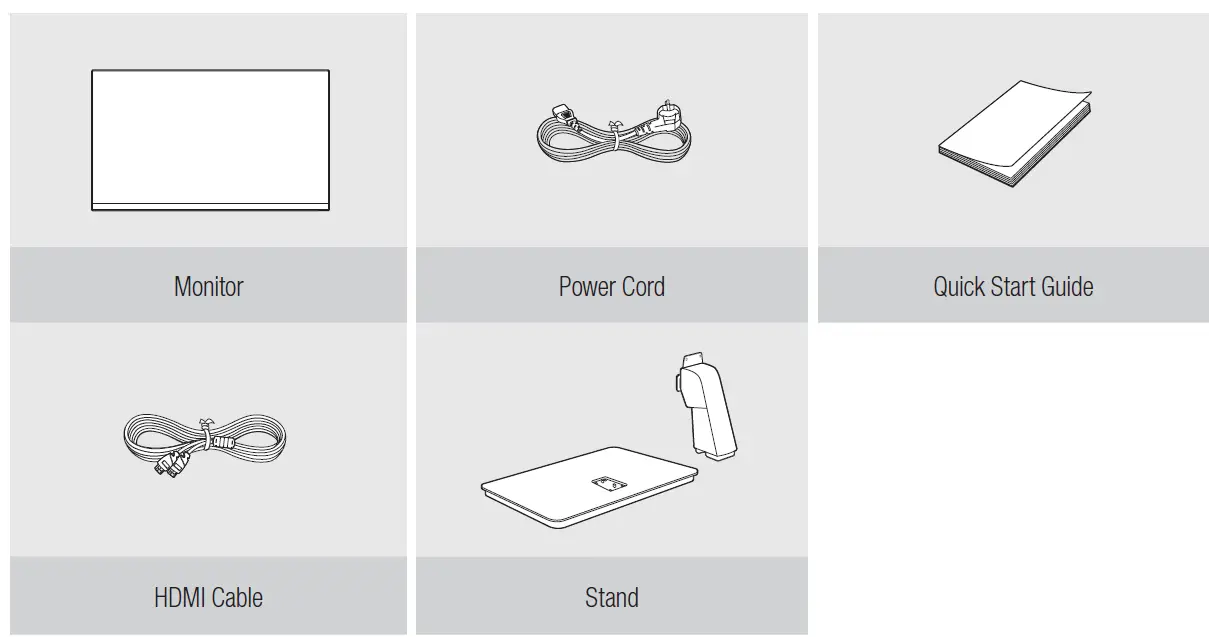
PACKAGE CONTENTS
Please unwrap the product, and place the product on a flat place or in the place to be installed.
Please check the following contents are included in addition to the main unit.
- Accessory category and quantity may differ depending on sales region.

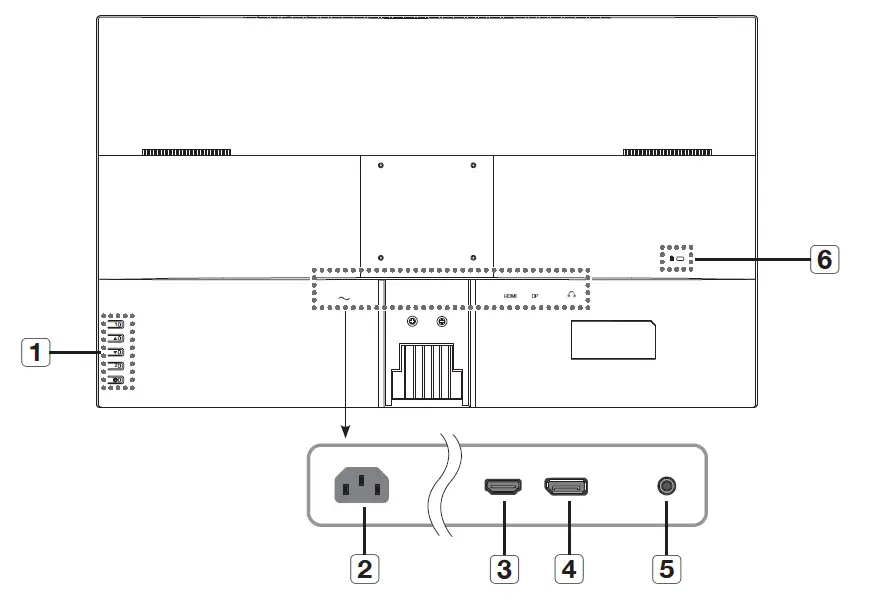
NAMES AND FUNCTIONS OF EACH PART
Back
| Button | Description of functions | ||
| 1 | Panel key |  | When the button is pressed while the product is on, the menu screen appears.
|
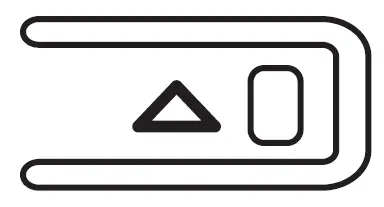 | Press the button while the menu screen is displayed to move the menu or adjust the value.
| ||
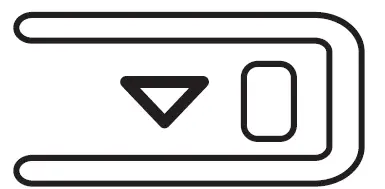 | Press the button while the menu screen is displayed to move the menu or adjust the value.
| ||
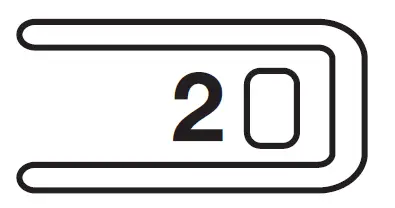 | If you press the button while the menu screen is displayed, the selection function is enabled. | ||
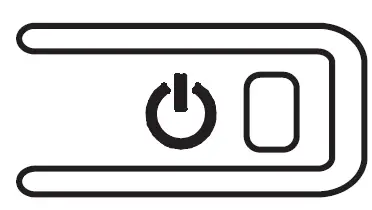 | Turns the power to the product on/off. | ||
| Name | Description of functions | |
| 2 | Power | Terminal to connect power. |
| 3 | HDMI | HDMI input terminal |
| 4 | DP | DP input terminal |
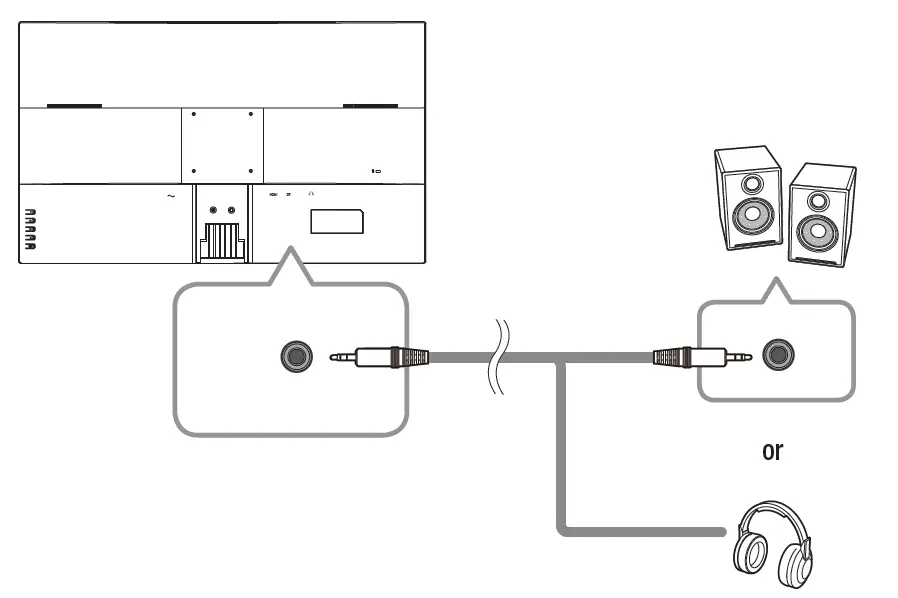
| 5 | AUDIO OUT | Used to send sound to headphones or external speakers. |
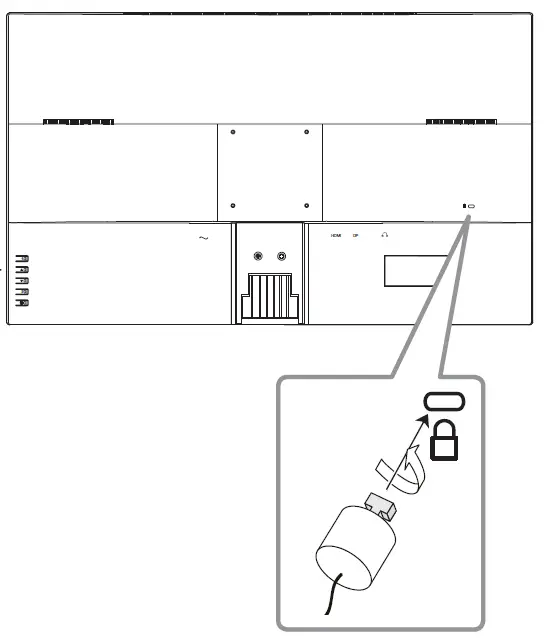
| 6 | Anti-theft lock | This device can be used safely in public places. |
Anti-theft Lock
- The locking device shape and locking method depend on the manufacturer. Please refer to the user guide provided with your anti-theft locking device for details.
- The following images are for reference only. Real-life applications may differ.
To lock an anti-theft locking device
- Fix the cable of your anti-theft locking device to a heavy object such as
- Put one end of the cable through the loop on the other end.
- Insert the locking device into the anti-theft lock slot at the back of the product.
- Lock the locking device.
- An anti-theft locking device can be purchased separately.
- Refer to the instruction manual supplied with the lock for detailed information on how to use it.
- You can purchase a lock at most stores specializing in electronics, or via the Internet.
installation
Please take note of the followings before using this product.
- Do not use the product outdoor.
- Do not spill water or liquid in the connection part of the product.
- Do not impose the system to excessive shock or force.
- Do not pull out the power plug forcefully.
- Do not disassemble the product on your own.
- Do not exceed the rated input/output range.
- Use a certified power cord only.
- For the product with an input ground, use a grounded power plug.
BEFORE INSTALLING THE PRODUCT
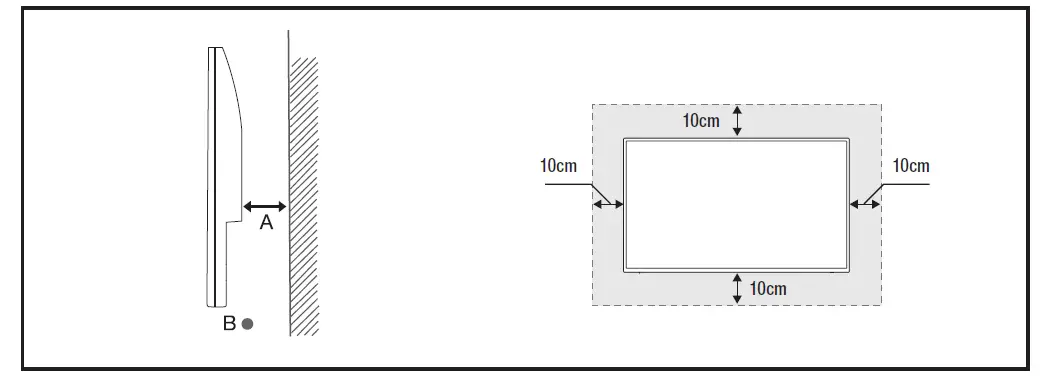
Ventilation requirement
If the product is installed in a poorly ventilated area, it might be damaged due to the temperature rising inside the product.
Ensure there is enough space around the product before installation.
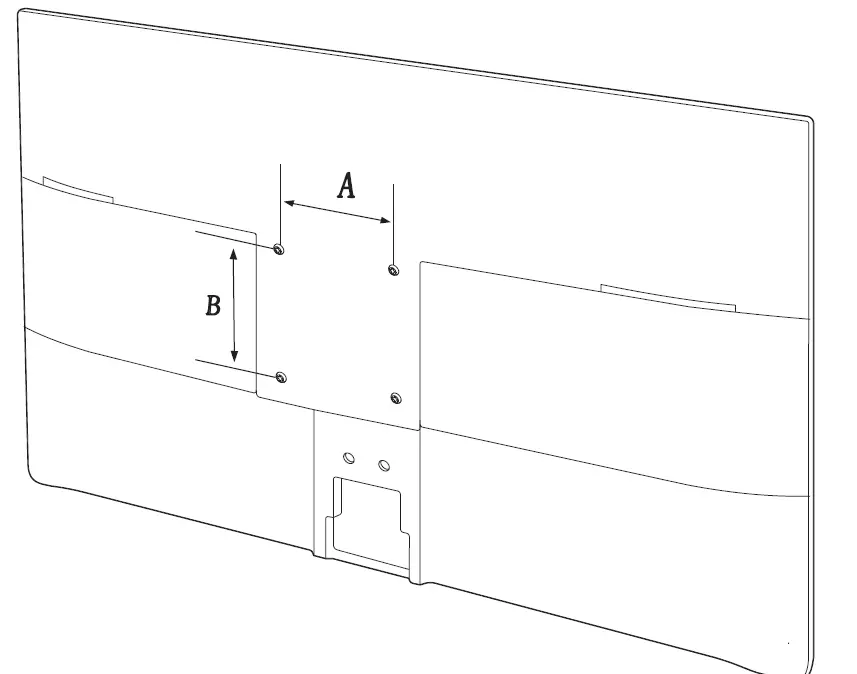
Vertical wall mount condition
- A. Minimum 40 mm
- B. Ambient temperature Measuring point <35°C
Installation conditions for standing monitors 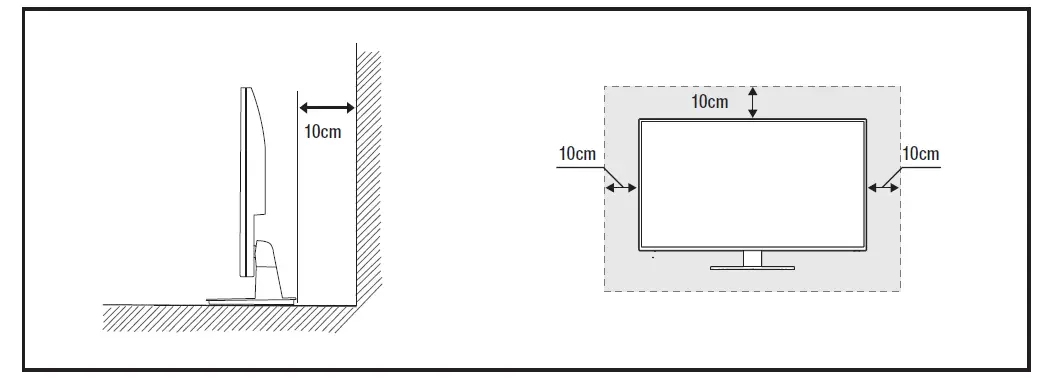
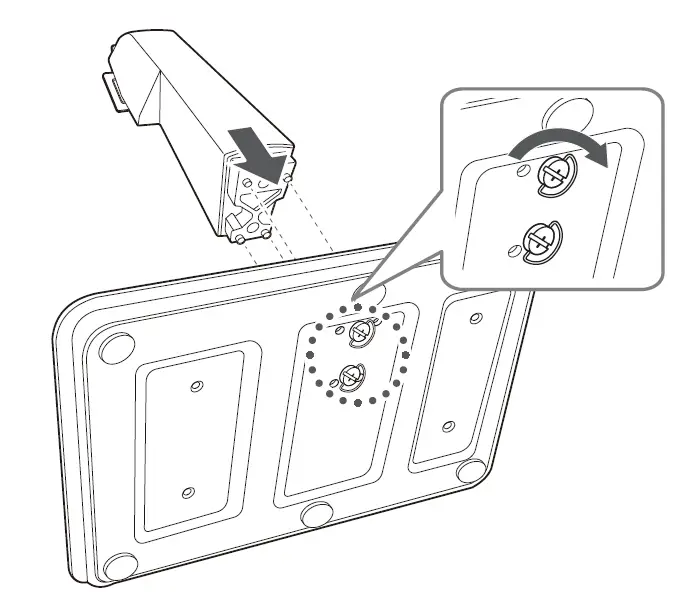
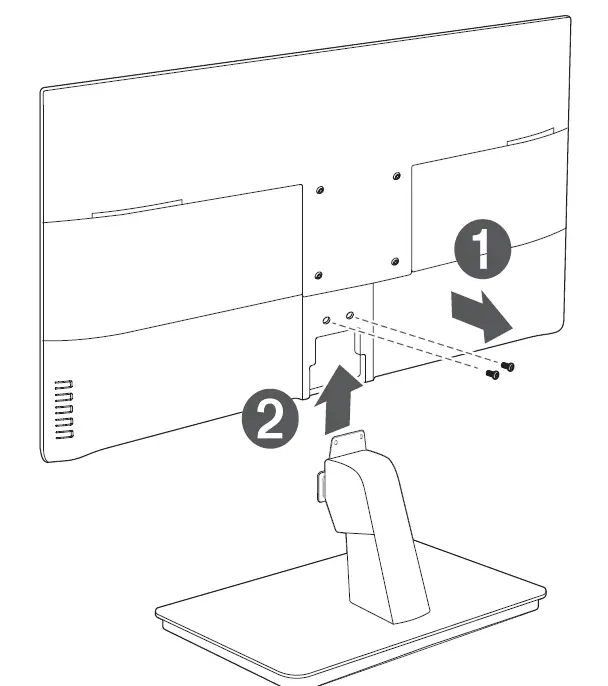
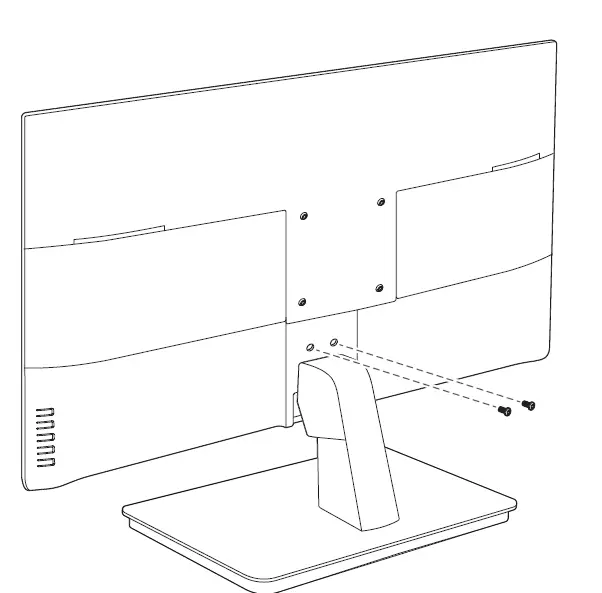
ASSEMBLING THE STAND
Before assembling the product, make sure that its screen is facing down when placing it on a flat and safe surface. Place the product on a soft cloth or product wrapping paper to protect it before installation.
- After attaching the connection part and the base of the stand, fix them firmly with screws under the base.

- Before assembling the stand, align the groove of the connection part with the groove on the monitor to assemble them after removing the screws from the back of the monitor.

- Firmly fix it in place with the screw removed from the back of the monitor.

INSTALLING WALL MOUNT PARTS
Installing Wall Mount Kits
The wall mount kit (sold separately) allows you to hang the product on a wall.
For more information on wall mounting, refer to the owner’s manual supplied with the wall mount parts. When installing the wall mount, seek the help of a technician.
Hanwha Techwin is not responsible for any damage to the product or injury to the user or others caused by any accident due to a user’s attempt to install the product.
Wall Mount Kit Specifications (VESA)
- Install the wall mount kit on a solid wall perpendicular to the floor.
- Please refer to the nearest store when installing on other materials.
- Installing on an inclined wall may cause the product to fall, which can result in serious injury.
- When using a VESA mount, select a product that can hold 4 times the weight of the monitor.
 When you purchase our wall mount kit, you will find a detailed installation guide and all parts required for assembly.
- Do not use screws that are longer than the standard dimensions or that do not conform to the VESA standard screw specifications. Using screws that are too long may damage the inside of the product.
- For wall mount parts that do not conform to the VESA standard screw specifications, the screw length may
vary depending on the wall mount specifications. - Do not over-tighten the screws. The product may be damaged, or may fall, resulting in injury. Hanwha Techwin is not responsible for any damage to the product or injury to the user or others caused by any accident due to a user’s attempt to install the product.
- Hanwha Techwin is not responsible for damage to the product or injury to the user caused by using non- compliant or non-VESA wall mount parts, or by the customer not following the product installation instructions.
- When hanging on a wall, two people should always lift the product.
- The standard dimensions of the wall mount kit are shown in the table below. [Unit: mm]
Model name VESA dimensions (A * B) Standard screws Quantity SMT-3240 100 × 100 M4/L12~L14 4 - Do not install the wall mount kit with the product turned on. This may lead to injury due to electric shock.
 When you purchase our wall mount kit, you will find a detailed installation guide and all parts required for assembly.
Connecting with other device
THINGS TO CHECK BEFORE CONNECTION
Check before connecting
- When connecting, refer to the instruction manual of the product to be connected. The number and position of external devices may differ depending on the product.
- Do not connect the power until all connections are complete. Connecting the power supply during connection may damage
the product. - Check the type of terminal behind the product you want to connect.
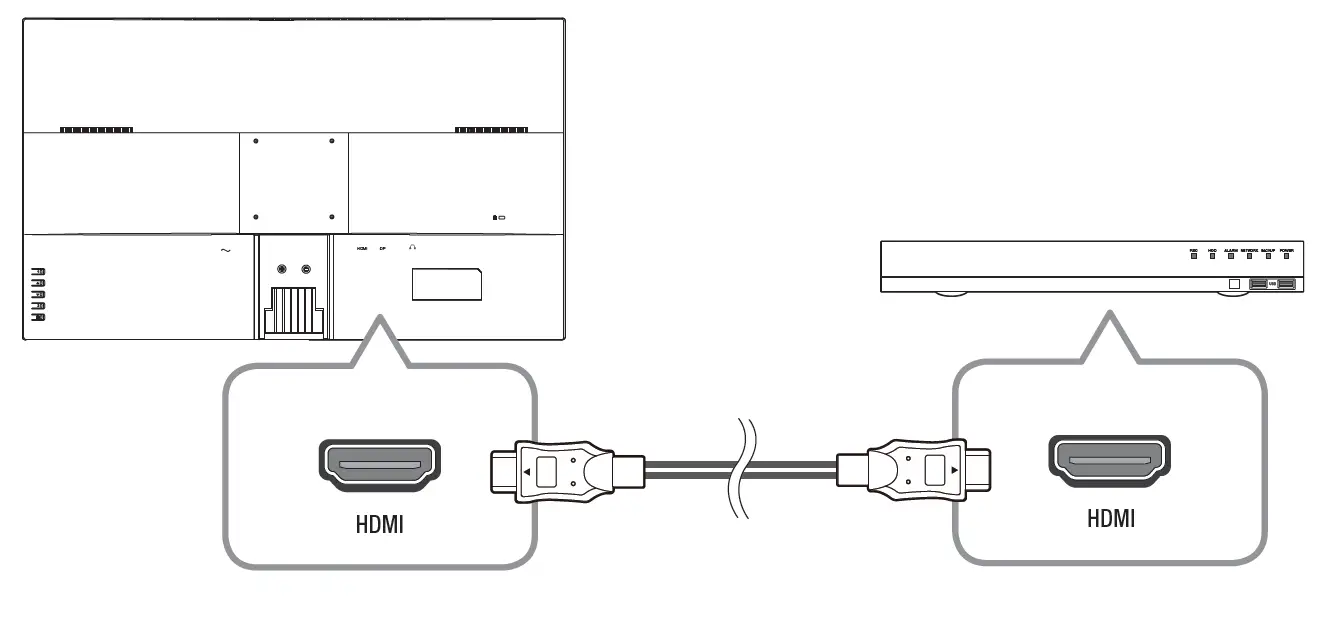
CONNECTING WITH EXTERNAL DEVICES
- Connect the power cable after all cables have been connected.
Disconnect the power cable before connecting external devices. - You can connect the product to external devices in various ways. Select the correct connection method for your external devices.
HDMI cable connection method
DP cable connection method 
Audio cable connection method
The screen adjustment menu can be set.
SCREEN (OSD) MENU SETTINGS
- Press the
 button to display the main menu.
 - Press the
 /
/ button to select the main menu, and then press the button.
 - Press the / button to select the sub-menu, and then press the button.
- Press the / buttons to adjust the adjustment value.
- Press the
 button to exit.
- To return to the pre1vious screen, press the button.
- If you do not press any buttons for a certain periodc of time, the OSD menu screen will disappear.
- You can set the time up to 60 seconds in <OSD settings> ; <OSD Time out>.
VIDEO SETTINGS
Sets the screen brightness, color, etc.
- Press the button to enter the 2main menu.
- Press the / button n to select [ contrast ] icon, and then press the button.
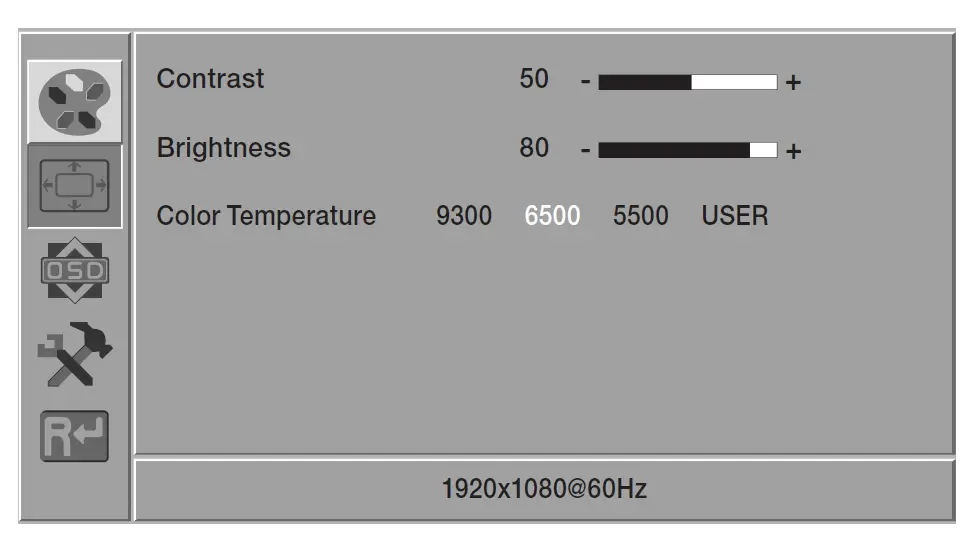
- Contrast : Adjusts the difference in brightness between the object and the environment.
- Brightness : Adjusts the brightness of the screen.
- Color Temperature : The color temperature can be adjusted and used depending on the monitor color.
You can select from 9300, 6500, 5500, USER.
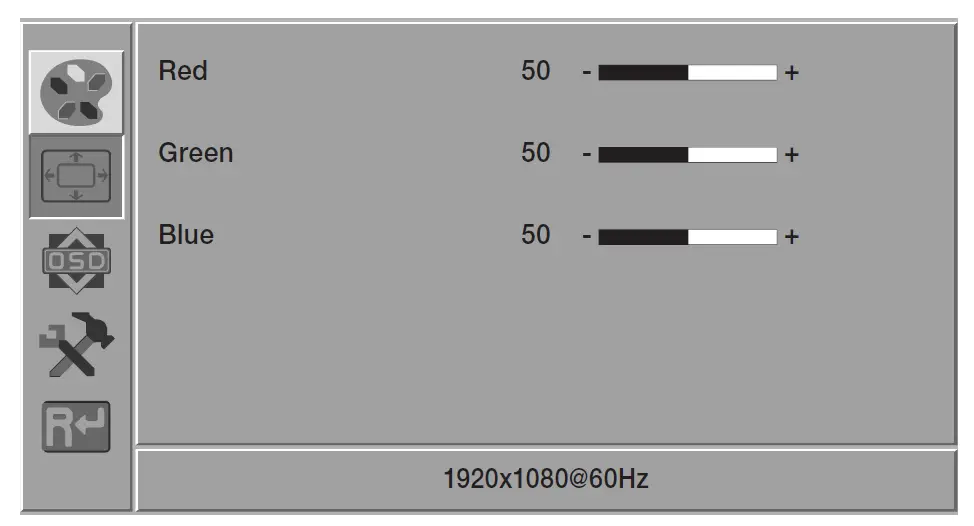
- USER : Red/Green/Blue values can be adjusted manually.
OSD SETTINGS
Sets up OSD values.
- Press the button to enter the 2main menu.
- Press the / button to select [OSD ] icon, and then press the button.
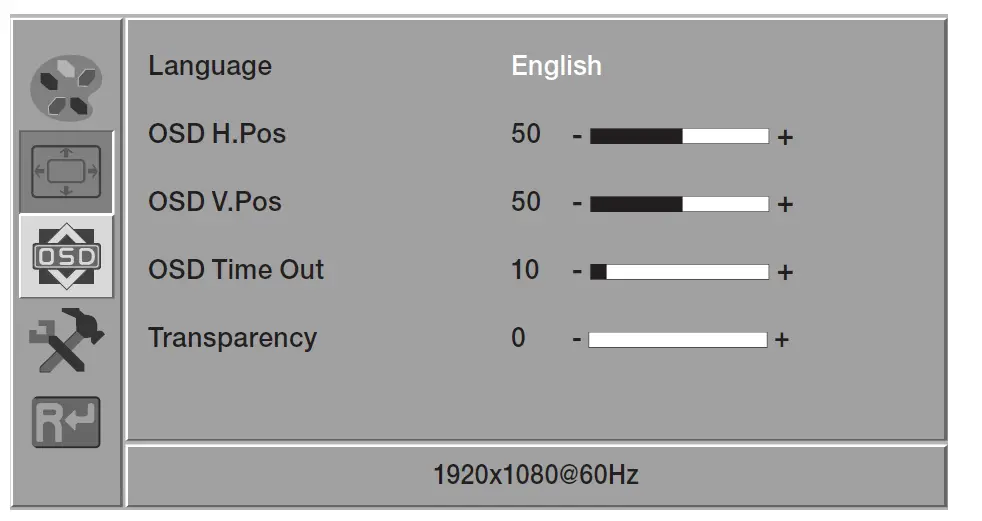
- Language : Select the screen language. The initial value is set to <English>.
- OSD H.Pos : Moves the screen of the menu to the left or right.
- OSD V.Pos : Moves the screen position of the menu up or down.
- OSD Time Out : The menu screen disappears if the screen does not change for a certain period of time.
- Transparency : Sets the transparency of the menu screen.
SYSTEM SETTINGS
Configures the system.
- Press the button to enter the main menu.
- Press the / button to select [DCR ] icon, and then press the button.
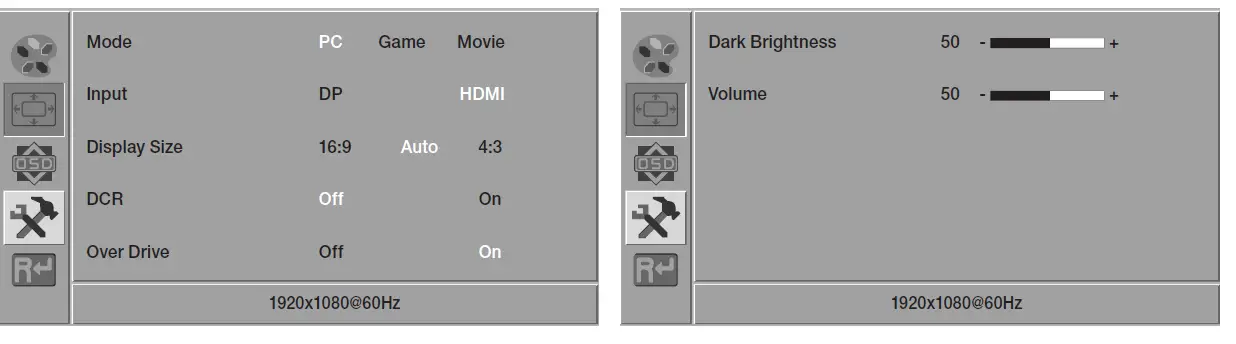
- Mode : Select a screen mode appropriate for your viewing environment.
- PC : A screen mode for PCs.
- Game : A screen mode appropriate for games.
- Movie : A screen mode appropriate for movies.
- Input : You can select an input mode.
- Display Size : You can select a screen size you want.
- 16:9 : Screen ratio is 16:9.
- Auto : The optimal aspect ratio changes to 4:3 or 16:9 depending on the input signal.
- 4:3 : Screen ratio is 4:3.
- DCR : If you set the DCR (dynamic contrast) to <On>, the dynamic contrast ratio will be automatically adjusted.
- Over Drive: The liquid crystal’s reaction time can be reduced by running it at a higher voltage over a shorter time.
- Dark Brightness : Adjusts the dark intensity of the screen.
- Volume : Adjusts the volume.
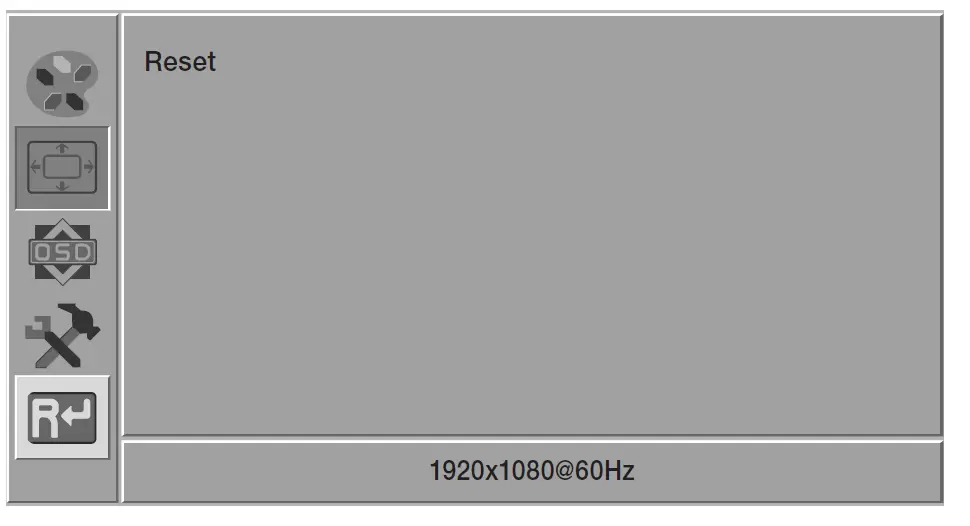
RESET
Resets the monitor settings to default.
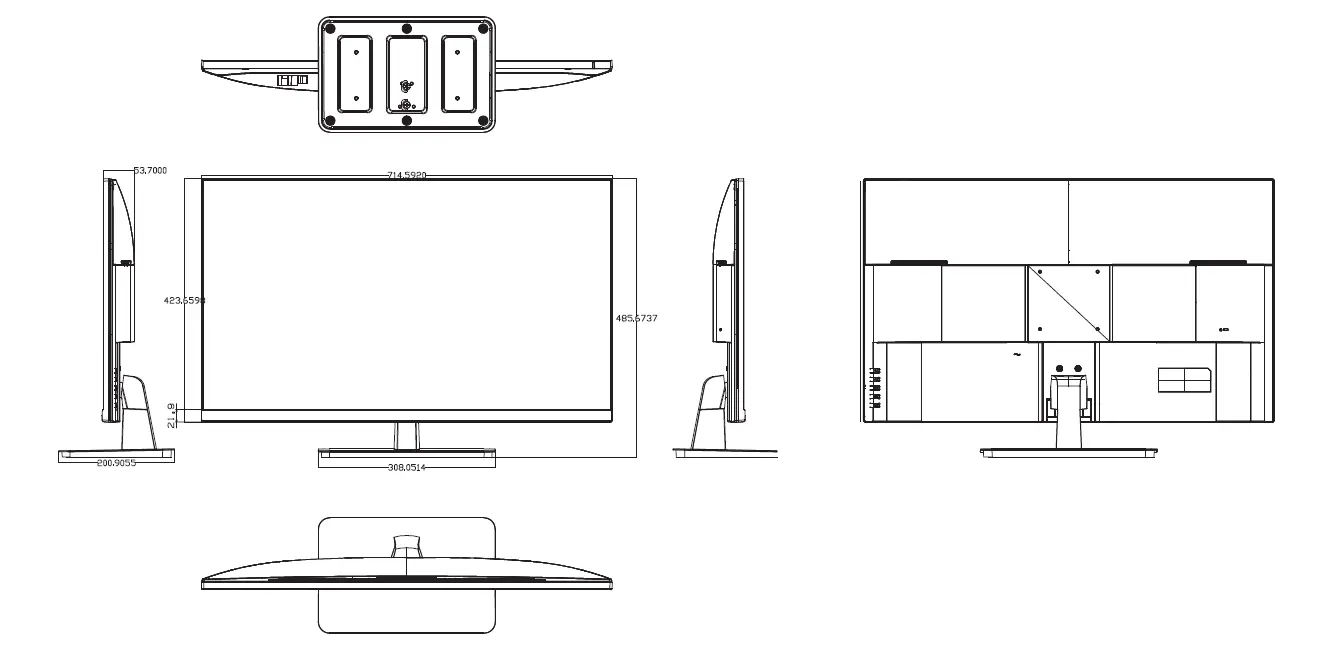
Appendix
PRODUCT OVERVIEW
TROUBLESHOOTING
| Problems and Symptoms | Troubleshooting |
| The screen appears and disappears repeatedly. |
|
| The screen will not switch on. |
|
| The screen seems to be flowing down. |
|
| The screen is too bright. The screen is too dark. |
|
| The product spontaneously turns itself off. |
|
| The image on the screen appears strange. |
|
| The brightness and color are strange. |
|
| I can see a dotted line on the edge of the screen. |
|
| I can see lines (red, green, blue) on the screen. |
|
| The screen is unstable and stops. |
|
| The image is not displayed on the full screen. |
|
| I cannot hear any sound. |
|
| Problems and Symptoms | Troubleshooting |
| The sound is too quiet. |
|
| The image appears but no sound plays. |
|
| I can hear a strange noise from the speaker. |
|
| The product smells of plastic. |
|
| Audio or video is intermittently interrupted. |
Make sure the cable is flexible enough to last a long time. When mounting the product on a wall, it is recommended to connect a 90 degree bent cable. |
| I cannot hear any sound in HDMI mode. |
If this happens, connect both the HDMI cable and a separate audio cable. |
| The monitor is tilted to the side. |
|
 Hanwha Vision cares for the environment at all product manufacturing stages, and is taking measures to provide customers with more environmentally friendly products.
The Eco mark represents Hanwha Vision’s devotion to creating environmentally friendly products, and indicates that the product satisfies the EU RoHS Directive.
 Correct Disposal of This Product (Waste Electrical & Electronic Equipment)
(Applicable in the European Union and other European countries with separate collection systems)
This marking on the product, accessories or literature indicates that the product and its electronic accessories (e.g. charger, headset, USB cable) should not be disposed of with other household waste at the end of their working life. To prevent possible harm to the environment or human health from uncontrolled waste disposal, please separate these items from other types of waste and recycle them responsibly to promote the sustainable reuse of material resources.
Household users should contact either the retailer where they purchased this product, or their local government office, for details of where and how they can take these items for environmentally safe recycling.
Business users should contact their supplier and check the terms and conditions of the purchase contract. This product and its electronic accessories should not be mixed with other commercial wastes for disposal.
 Correct disposal of batteries in this product
(Applicable in the European Union and other European countries with separate battery return systems.)
This marking on the battery, manual or packaging indicates that the batteries in this product should not be disposed of with other household waste at the end of their working life. Where marked, the chemical symbols Hg, Cd or Pb indicate that the battery contains mercury, cadmium or lead above the reference levels in EC Directive 2006/66. If batteries are not properly disposed of, these substances can cause harm to human health or the environment.
To protect natural resources and to promote material reuse, please separate batteries from other types of waste and recycle them through your local, free battery return system.


