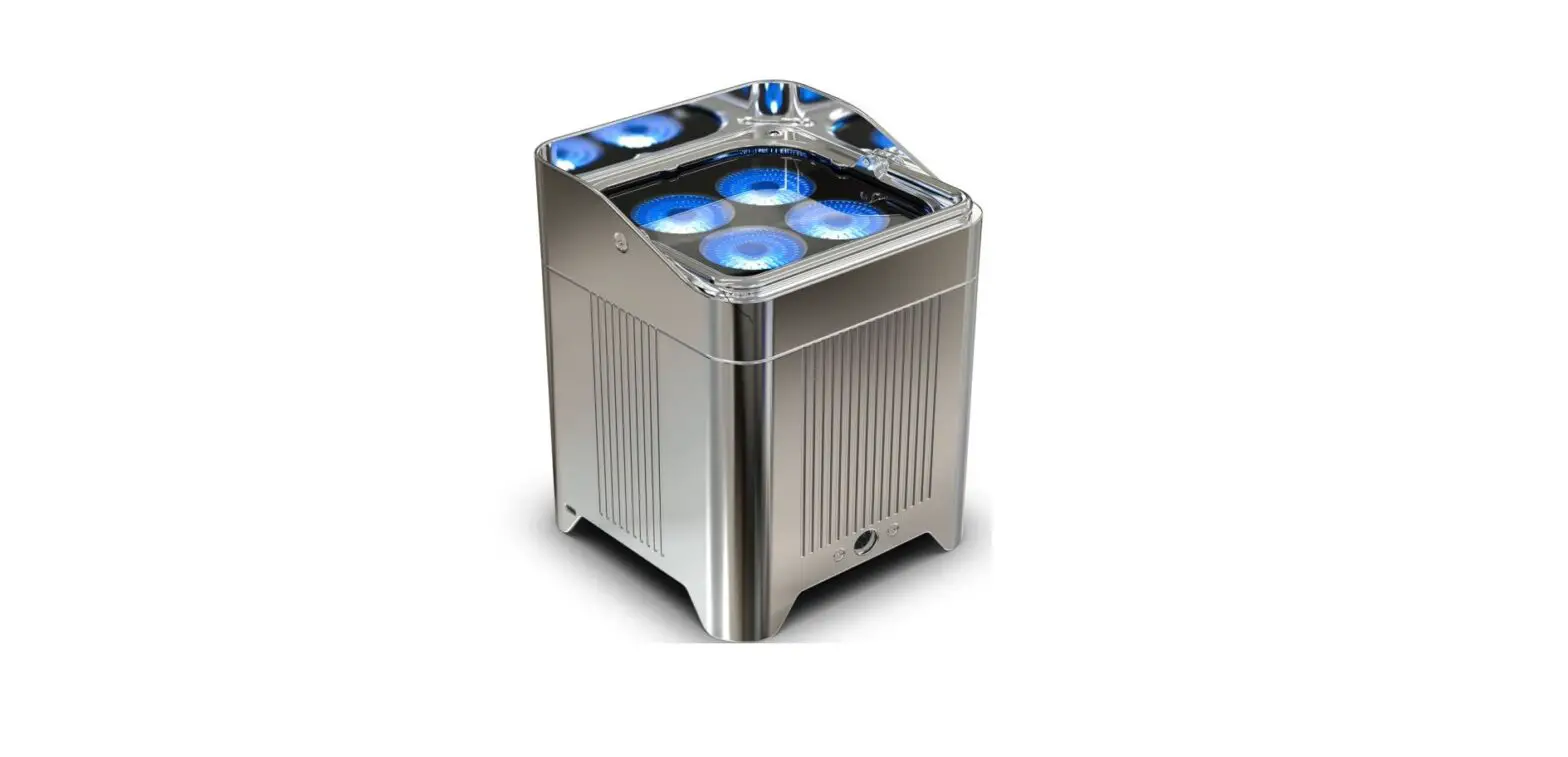
CHAUVET PROFESSIONAL WELL Fit Wireless Event LED Luminaire

About This Guide
The WELL Fit Quick Reference Guide (QRG) provides basic product information such as connection, mounting, menu options, and DMX values. For more details, download the User Manual from www.chauvetprofessional.com.
LIMITED WARRANTY
The information and specifications contained in this QRG are
subject to change without notice.
Safety Notes
To eliminate unnecessary wear and improve its lifespan, during
periods of non-use completely disconnect the product from power via
breaker or by unplugging it.
What is Included
- AC Power
- Power Linking
Power Linking
It is possible to power link up to 3 WELL Fit products at 100 V, 4 products at 120 V, 7products at 208 V, 8 products at 230 V, or up to 8 products at 240 V. Never exceed this number. Power-linking cables can be purchased separately.
AC Plug Connection
| Wire (U.S.) | Wire (Europe) | Screw Color |
|---|---|---|
| Black | Brown | Yellow/Brass |
| White | Blue | Silver |
| Green/Yellow | Green/Yellow | Green |
Replacing the Fuse
The WELL Fit has no external fuse. However, the road case charger comes with a replaceable fuse.
- Disconnect this product from power.
- Using a flat-head screwdriver, unscrew the fuse holder cap from the housing.
- Remove the blown fuse and replace it with a good fuse of the same type and rating.
- Screw the fuse holder cap back in place and reconnect the power.
Battery Charge Notes
CAUTION: The power switch must be in the off position before placing the product in the charging case.
DMX Linking
The WELL Fit will work with a DMX controller using a wireless DMX connection. A DMX Primer is available from www.chauvetprofessional.com.
DMX Connection
The WELL Fit uses a wireless DMX data connection for its DMX personalities: 4 Ch, 6 Ch, 10 Ch, HSI, and HSV. See the User Manual for information about connecting and configuring the product for DMX operation.
Infrared Remote Control (IRC)
The WELL Fit is fully compatible with the Infrared Remote Control (IRC) from CHAUVET. For more information on the IRC, download the User Manual from www.chauvetprofessional.com. It may be necessary to turn the product off and on again when switching from W-DMX to IRC and vise-versa.
Wireless Operation
In optimal conditions, the WELL Fit can operate up to 300 m (900 ft) away from the W-DMX transmitter. The W-DMX receiver in the WELL Fit must be paired with the W-DMX transmitter for wireless operation.
Initial Setup
- Turn the W-DMX transmitter on.
- Connect the W-DMX transmitter to a DMX controller.
- Place the WELL Fit within 300 m of the W-DMX transmitter.
- Turn the WELL Fit on.
Configuration
- From the WELL Fit’s control panel, go to DMX Address.
- Select the start address, as with any other DMX-compatible product.
- Go to Wireless Setting > Receive.
- Select On. (The Signal Strength Indicator will show a ? in front of the bars)
- Press the reset button on the W-DMX transmitter. (The Signal Strength Indicator on the WELL Fit will show a)
About This Guide
The WELL Fit Quick Reference Guide (QRG) has basic product information such as connection, mounting, menu options, and DMX values. Download the User Manual from www.chauvetprofessional.com for more details.
Disclaimer
The information and specifications contained in this QRG are subject to change without notice.
LIMITED WARRANTY
FOR WARRANTY REGISTRATION AND COMPLETE TERMS AND CONDITIONS PLEASE VISIT OUR WEBSITE. For Customers in the United States and Mexico: www.chauvetlighting.com/warranty-registration.
For Customers in the United Kingdom, Republic of Ireland, Belgium, the Netherlands, Luxembourg, France, and Germany: www.chauvetlighting.eu/warranty-registration.
Chauvet warrants that this product shall be free from defects in material and workmanship under normal use, for the period specified in, and subject to the exclusions and limitations set forth in the full limited warranty on our website. This warranty extends only to the original purchaser of the product and is not transferable. To exercise rights under this warranty, you must provide proof of purchase in the form of an original sales receipt from an authorized dealer that shows the product name and date of purchase. THERE ARE NO OTHER EXPRESS OR IMPLIED WARRANTIES. This warranty gives you specific legal rights. You may also have other rights that vary from state to state and country to country. This warranty is valid only in the United States, United Kingdom, Republic of Ireland, Belgium, the Netherlands, Luxembourg, France, Germany and Mexico. For warranty terms in other countries, please consult your local distributor.
Safety Notes
- DO NOT open this product. It contains no user-serviceable parts.
- DO NOT look at the light source when the product is on.
- Only use the retractable foot to tilt the product.
- Be sure retractable foot is closed completely before inserting into the charging case.
- Do not operate the product in a sealed enclosure or in an area without air circulation.
- To eliminate unnecessary wear and improve its lifespan, during periods of non-use completely disconnect the product from power via breaker or by unplugging it.
- CAUTION: When transferring product from extreme temperature environments, (e.g. cold truck to warm humid ballroom) condensation may form on the internal electronics of the product. To avoid causing a failure, allow product to fully acclimate to the surrounding environment before connecting it to power.
- CAUTION: This product’s housing may be hot when lights are operating.
- Mount this product in a location with adequate ventilation, at least 20 in (50 cm) from adjacent surfaces.
- DO NOT leave any flammable material within 50 cm of this product while operating or connected to power.
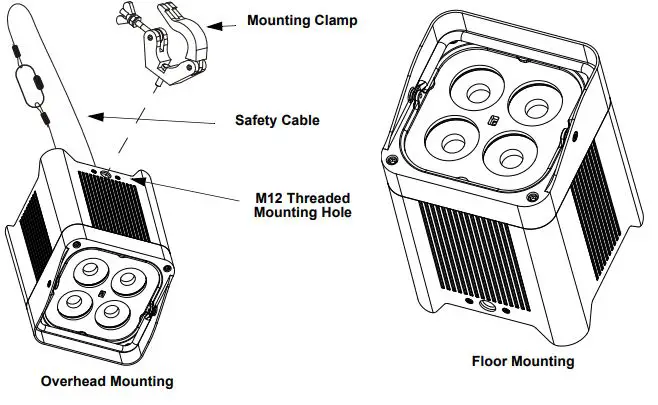
- USE a safety cable when mounting this product overhead.
- DO NOT submerge this product (IP65).
- DO NOT operate this product if the housing, lenses, or cables appear damaged.
- DO NOT connect the charging case to a dimmer or rheostat.
- It is not recommended to close the road case cover while charging the battery unless the procedure is monitored.
- ONLY connect this product to a grounded and protected circuit.
- ONLY use the handle to carry this product.
- In the event of a serious operating problem, stop using immediately.
- The maximum ambient temperature is 113 °F (45 °C). Do not operate this product at higher temperatures.
Contact
- Outside the U.S., United Kingdom, Ireland, Mexico, France, Germany, or Benelux, contact your distributor to request support or return a product. From inside the U.S., UK, Ireland, Mexico, France, Germany, or Benelux, use the information in Contact Us at the end of this QRG.
What is Included
- 6–WELL Fit
- Neutrik powerCON power cord
- IR remote
- Charging case
- Warranty Card
- Quick Reference Guide
AC Power
- This charging case has an auto-ranging power supply that can work with an input voltage range of 100–240 VAC, 50/60 Hz.
Power Linking
- It is possible to power link up to 3 WELL Fit products at 100 V, 4 products at 120 V, 7products at 208 V, 8 products at 230 V, or up to 8 products at 240 V. Never exceed this number. Power-linking cables can be purchased separately.
AC Plug
| Connection | Wire (U.S.) | Wire (Europe) | Screw Color |
| AC Live | Black | Brown | Yellow/Brass |
| AC Neutral | White | Blue | Silver |
| AC Ground | Green/Yellow | Green/Yellow | Green |
To eliminate unnecessary wear and improve its lifespan, during periods of non-use completely disconnect the product from power via breaker or by unplugging it.
Replacing the Fuse
The WELL Fit has no external fuse. However, the road case charger comes with a replaceable fuse.
- Disconnect this product from power.
- Using a flat-head screwdriver, unscrew the fuse holder cap from the housing.
- Remove blown fuse and replace with a good fuse of the same type and rating.
- Screw the fuse holder cap back in place and reconnect power.
Battery Charge Notes
This product is equipped with a built-in rechargeable lithium ion battery.
- Avoid depleting the battery below 10%.
- For best results, charge the battery in a temperature between 32 ºF (0 ºC), and 95 ºF (35 ºC).
- When charging the battery, keep the product at least 1 m from any open flame or hot plate.
- If the battery is completely discharged, the device cannot be turned on immediately when the charger is connected. Allow a depleted battery to charge for a few minutes before turning on the device.
- While charging, the device may heat up. This is normal and should not affect the device’s lifespan or performance. If the battery gets hotter than usual, the charger may stop charging.
- It is not recommended to close the road case cover while charging the battery unless the procedure is monitored.
- Always charge the battery with the product in an upright position.
- Do not charge the battery for more than 24 hours
Storage Notes
- The store charged product(s) in a dry environment, away from direct sunlight.
- Charge or discharge the battery to approximately 50% of capacity before storage.
- Lithium-Ion batteries continue to slowly discharge (self-discharge) when not in use or while in storage. Routinely check the battery’s charge status
- Store the battery at temperatures between 41 °F and 68 °F (5 °C and 20 °C).
- Always store the product in an upright position (≤ 10° tilt).
- CAUTION: The power switch must be in the off position before placing the product in the charging case.
DMX Linking
- The WELL Fit will work with a DMX controller using a wireless DMX connection. A DMX Primer is available from www.chauvetprofessional.com.
DMX Connection
- The WELL Fit uses a wireless DMX data connection for its DMX personalities: 4 Ch, 6 Ch, 10 Ch, HSI, and HSV. See the User Manual for information about connecting and configuring the product for DMX operation..
Infrared Remote Control (IRC)
- The WELL Fit is fully compatible with the Infrared Remote Control (IRC) from CHAUVET. For more information on the IRC, download the User Manual from www.chauvetprofessional.com.
- It may be necessary to turn the product off and on again when switching from W-DMX to IRC and vise-versa.
Wireless Operation
- In optimal conditions, the WELL Fit can operate up to 300 m (900 ft) away from the W-DMX transmitter. The W-DMX receiver in the WELL Fit must be paired with the W-DMX transmitter for wireless operation.
Initial Setup
- Turn the W-DMX transmitter on.
- Connect the W-DMX transmitter to a DMX controller.
- Place the WELL Fit within 300 m from the W-DMX transmitter.
- Turn the WELL Fit on.
Configuration
- From the WELL Fit’s control panel, go to DMX Address.
- Select the start address, as with any other DMX compatible product.
- Go to Wireless Setting > Receive.
- Select On. (The Signal Strength Indicator will show a ? in front of the bars)
- Press the reset button on the W-DMX transmitter. (The Signal Strength Indicator on the WELL Fit will show a ϟ in front of the bars for 3 seconds while a connection is established.)
Product Pairing
If the WELL Fit has already been paired with the W-DMX transmitter, the Signal Strength Indicator in the middle of the LCD screen will show the strength of the signal. In this case, the WELL Fit is ready to work in Wireless mode.
Pairing the WELL Fit and a new W-DMX transmitter.
- From the WELL Fit’s control panel, go to Wireless Setting.
- Select Reset. The Signal Strength Indicator on the WELL Fit will show a ? in front of the bars.
- From the W-DMX transmitter, press <RESET> (the Signal Indicator on the transmitter will flash).
- Once the transmitter has found the WELL Fit, the Signal indicator on the W-DMX transmitter will illuminate solid.
- The Signal Strength Indicator in the middle of the LCD screen on the WELL Fit will show the strength of the signal.
W- DMX operation can be interrupted or inhibited by liquid masses between the transmitter and receiver such as water, snow, or people. For best results, keep the area between the transmitter
and receiver clear of any liquid mass.
Mounting
Before mounting this product, read the Safety Notes. Use at least one mounting point per product. Make sure the mounting clamps are capable of supporting the weight of the product. For our Chauvet line of mounting clamps, go to http://trusst.com/productcategory/truss-clamps/
Product Mounting Diagram
Control Panel Description
| Button | Function |
| On/Off | Turns the product On and Off |
| <MENU> | Exits from the current menu or function |
| <ENTER> | Enables the currently displayed menu or sets the currently selected value into the selected function |
| <UP> | Navigates upwards through the menu list or increases the numeric value when in a function |
| <DOWN> | Navigates downwards through the menu list or decreases the numeric value when in a function |
Passcode
- After being prompted, enter the following passcode by pressing: <UP>, <DOWN>, <UP>, <DOWN>, <ENTER>
- This passcode cannot be changed and must be used whenever prompted.
| Main Level | Programming Levels | Description | |||
| Auto Show | Auto 1–5 | Speed | <0–100> | Automatic programs | |
|
Static |
Fixed Color | R | Red | ||
| G | Green | ||||
| B | Blue | ||||
| A | Amber | ||||
| GB | Green and blue | ||||
| RB | Red and blue | ||||
| RG | Red and green | ||||
| RGB | Red, green, and blue | ||||
| RA | Red and amber | ||||
| GA | Green and amber | ||||
| BA | Blue and amber | ||||
| RGA | Red, green, and amber | ||||
| RBA | Red, blue, and amber | ||||
| GBA | Green, blue, and amber | ||||
| RGBA | Red, green, blue, and amber | ||||
| Manual Color | R | Value | <0–255> | Combines red, green, blue, and amber to make a custom color (0-100%) | |
| G | |||||
| B | |||||
| A | |||||
| Dimmer Mode | Off | Linear dimmer | |||
| Dimmer 1–3 | Dimming curves Dimmer 1 (fast) to Dimmer 3 (slow) | ||||
|
Back Light | On | Display backlight always on | |||
| 10S | Turns off display backlight after 10 seconds of inactivity | ||||
| 20S | Turns off display backlight after 20 seconds of inactivity | ||||
| 30S | Turns off display backlight after 30 seconds of inactivity | ||||
| Information | Fixture Hours | Shows total hours the product has been powered on | |||
| Version | Shows current firmware version | ||||
| DMX Address | <1–512> | Selects DMX address (highest channel restricted to personality chosen) | |||
|
DMX Channel | 4Ch | 4-channel: RGBA control | |||
| 6Ch | 6-channel: Dimmer, RGBA control, Strobe | ||||
| 10Ch | 10-channel: Dimmer, RGBA control, Strobe, Color Macros, Auto Programs, Auto Speed, Dimmer Speed Mode | ||||
| HSV | 3-channel: Hue, Saturation, Value | ||||
| DMX Channel | HSI | 3-channel: Hue, Saturation, Intensity | |||
| Master/Slave Mode | Master | Reserved for future use | |||
| Slave | |||||
| White Balance | Balance | R | Value | <125– 255> | Sets red, green, and blue LED maximum values. |
| G | |||||
| B | |||||
| Wireless Setting | Receive | Off | Enables/disables wireless DMX | ||
| On | Reset | On | |||
| Off | Resets the wireless setting | ||||
| IR Setting | On | Enables/disables IR receiver | |||
| Off | |||||
| Key Lock | On | Locks display (password is <UP>, <DOWN>, <UP>, <DOWN>, <ENTER>) | |||
| Off | |||||
| Reset Factory | No | Resets the product to factory default settings | |||
| Yes | |||||
DMX Values 4Ch/6Ch/10Ch
| 4Ch | 6Ch | 10Ch | Function | Value | Percent/Setting |
| – | 1 | 1 | Dimmer | 000 ó 255 | 0–100% |
| 1 | 2 | 2 | Red | 000 ó 255 | 0–100% |
| 2 | 3 | 3 | Green | 000 ó 255 | 0–100% |
| 3 | 4 | 4 | Blue | 000 ó 255 | 0–100% |
| 4 | 5 | 5 | Amber | 000 ó 255 | 0–100% |
| – | 6 | 6 | Strobe | 000 ó 010 011 ó 255 | No function Strobe, slow to fast |
|
– |
– |
7 |
Color Macro | 000 ó 010 011 ó 030 031 ó 050 051 ó 070 071 ó 090 091 ó 110 111 ó 130 131 ó 150 151 ó 170 171 ó 200 201 ó 205 206 ó 210 211 ó 215 216 ó 220 221 ó 225 226 ó 230 231 ó 235 236 ó 240 241 ó 245 246 ó 250 251 ó 255 | No function R:100% G: 0-100% B: 0 R:100%-0 G: 100% B: 0 R:0 G: 100% B: 0-100% R:0 G: 100%-0 B: 100% R:0-100% G: 0 B: 100% R:100% G: 0 B: 100%-0 R:100% G: 0-100% B: 0-100% R:100%-0 G: 100%-0 B: 100% RGBA: 100% Color temperature 1 (warmest) Color temperature 2 Color temperature 3 Color temperature 4 Color temperature 5 Color temperature 6 Color temperature 7 Color temperature 8 Color temperature 9 Color temperature 10 Color temperature 11 (coolest) |
|
– |
– |
8 |
Auto Program | 000 ó 051 052 ó 101 102 ó 152 153 ó 203 204 ó 254 255 | No function Auto 1 Auto 2 Auto 3 Auto 4 Auto 5 (Auto 1–4) |
| – | – | 9 | Auto Speed | 000 ó 255 | Auto speed, slow to fast |
| – | – | 10 | Dimmer Speed Mode | 000 ó 051 052 ó 101 102 ó 152 153 ó 203 204 ó 255 | Preset dimmer speed from display menu Dimmer speed mode off (linear dimmer) Dimmer speed mode 1 (fastest) Dimmer speed mode 2 Dimmer speed mode 3 (slowest) |
HSV
| Channel | Function | Value | Percent/Setting |
| 1 | Hue | 000 ó 255 | 0–100% |
| 2 | Saturation | 000 ó 255 | 0–100% |
| 3 | Value | 000 ó 255 | 0–100% |
HSI
| Channel | Function | Value | Percent/Setting |
| 1 | Hue | 000 ó 255 | 0–100% |
| 2 | Saturation | 000 ó 255 | 0–100% |
| 3 | Intensity | 000 ó 255 | 0–100% |
Contact Us
General Information Technical Support
- Chauvet World Headquarters
- Address: 3360 Davie Rd. Voice: (844) 393-7575
- Davie, FL 33314 Fax: (954) 756-8015
- Voice: (954) 577-4455 Email: [email protected]
- Fax: (954) 929-5560
- Toll-Free: (800) 762-1084 Website: www.chauvetprofessional.com
- Chauvet U.K.
- Address: Unit 1C Email: [email protected]
- Brookhill Road Industrial Estate
- Pinxton, Nottingham, UK Website: www.chauvetprofessional.eu
- NG16 6NT
- Voice: +44 (0) 1773 511115
- Fax: +44 (0) 1773 511110
- Visit the applicable website above to verify our contact information and instructions to request support. Outside the U.S., U.K., Ireland, Mexico, France, Germany, or Benelux, contact the dealer of record.


