![]() Smart Standing Fan 3 Instruction Manual 01
Smart Standing Fan 3 Instruction Manual 01
Manuel d’instruction Smartmi Ventilateur Vertical 3012
704012020321-00
READ AND SAVE THESE INSTRUCTIONS
Warning
Improper product use may lead to electrical shocks, accidental fire, personal injuries, and other damages.
![]() Please do not operate the product on an uneven or unsteady surface where it may topple over.
Please do not operate the product on an uneven or unsteady surface where it may topple over.![]() Please do not operate the product near other objects which may topple over.
Please do not operate the product near other objects which may topple over.![]() Please do not operate the product in a hot and humid environment, such as a bathroom.
Please do not operate the product in a hot and humid environment, such as a bathroom.![]() Please discontinue your use of the product if the power cord is damaged or the power plug is loose.
Please discontinue your use of the product if the power cord is damaged or the power plug is loose.![]() Please do not operate the product if the fan grille is not properly installed or the rear fan grille is loose/missing.
Please do not operate the product if the fan grille is not properly installed or the rear fan grille is loose/missing.![]() This appliance can be used by children aged 8 years and above and persons with reduced physical, sensory or mental capabilities or lack of experience and knowledge if they have been given supervision or instruction concerning the use of the appliance in a safe way and understand the hazards involved.
This appliance can be used by children aged 8 years and above and persons with reduced physical, sensory or mental capabilities or lack of experience and knowledge if they have been given supervision or instruction concerning the use of the appliance in a safe way and understand the hazards involved.![]() Children shall not play with the appliance.
Children shall not play with the appliance.![]() Cleaning and user maintenance shall not be made by children without supervision.
Cleaning and user maintenance shall not be made by children without supervision.![]() Please do not take the product apart on your own.
Please do not take the product apart on your own.![]() Please do not fold, bend, or twist the power cord with excessive force to prevent exposed or broken wires.
Please do not fold, bend, or twist the power cord with excessive force to prevent exposed or broken wires.![]() Please do not insert your finger or foreign objects into the front fan grille, rear fan grille, or fan blades while the fan is in operation.
Please do not insert your finger or foreign objects into the front fan grille, rear fan grille, or fan blades while the fan is in operation.![]() Please keep your hair or fabrics away from the fan to prevent objects from becoming entangled in the fan blades.
Please keep your hair or fabrics away from the fan to prevent objects from becoming entangled in the fan blades.![]() To reduce the risk of fire or electric shock, do not use this appliance with any solid-state speed control device.
To reduce the risk of fire or electric shock, do not use this appliance with any solid-state speed control device.![]() This appliance has a polarized plug (one blade is wider than the other). To reduce the risk of electric shock, this plug is intended to fit in a polarized outlet only one way. If the plug does not fit fully in the outlet, reverse the plug. If it still does not fit, contact a qualified electrician. Do not attempt to defeat this safety feature.
This appliance has a polarized plug (one blade is wider than the other). To reduce the risk of electric shock, this plug is intended to fit in a polarized outlet only one way. If the plug does not fit fully in the outlet, reverse the plug. If it still does not fit, contact a qualified electrician. Do not attempt to defeat this safety feature.![]() Please do not use the supplied power cord with any other product
Please do not use the supplied power cord with any other product![]() This appliance contains batteries that are only replaceable by skilled persons.
This appliance contains batteries that are only replaceable by skilled persons.![]() The remote controller is powered by 1 LRAAA battery, insert 1 LRAAA battery with the correct polarity in the battery compartment. The supply terminals are not to be short-circuited.
The remote controller is powered by 1 LRAAA battery, insert 1 LRAAA battery with the correct polarity in the battery compartment. The supply terminals are not to be short-circuited.![]() The non-rechargeable battery used for the remote controller is not to be recharged. Exhausted batteries are to be removed from the appliance and safely disposed of.
The non-rechargeable battery used for the remote controller is not to be recharged. Exhausted batteries are to be removed from the appliance and safely disposed of.![]() If the remote controller is to be stored unused for a long period, the battery in the remote controller should be removed.
If the remote controller is to be stored unused for a long period, the battery in the remote controller should be removed.
Safety instructions
Precautions
Handling
![]() Always turn the fan off and unplug it before moving it.
Always turn the fan off and unplug it before moving it.![]() Hold the fan column firmly to prevent falling and personal injuries.
Hold the fan column firmly to prevent falling and personal injuries.
Installation![]() Be sure to properly install the product according to the instructions to avoid electric shocks, fire hazards, personal injuries, and any other accidents.
Be sure to properly install the product according to the instructions to avoid electric shocks, fire hazards, personal injuries, and any other accidents.![]() When installing and dismantling the device, be sure to first disconnect the AC power. This fan contains a battery. When assembling the unit, mount the fan cover and fan blades first, and then assemble the base to prevent the fan from starting accidentally and causing mechanical hazards.
When installing and dismantling the device, be sure to first disconnect the AC power. This fan contains a battery. When assembling the unit, mount the fan cover and fan blades first, and then assemble the base to prevent the fan from starting accidentally and causing mechanical hazards.
In use![]() If you encounter any of the following: abnormal sound, strange odor, high temperature, inconsistent fan rotation, etc., stop the fan immediately.
If you encounter any of the following: abnormal sound, strange odor, high temperature, inconsistent fan rotation, etc., stop the fan immediately.![]() Do not lean on the fan or tilt the fan while it is running.
Do not lean on the fan or tilt the fan while it is running.![]() Do not dismantle the device by yourself. In case repair or consultation is needed, please contact Smartmi customer service.
Do not dismantle the device by yourself. In case repair or consultation is needed, please contact Smartmi customer service.
Power cord![]() Disconnect the AC power cord from the AC power outlet prior to maintaining or moving the fan.
Disconnect the AC power cord from the AC power outlet prior to maintaining or moving the fan.![]() When disconnecting the AC power cord, do not pull or drag it.
When disconnecting the AC power cord, do not pull or drag it.![]() If the plug or insulation of the power cord is damaged, it must be replaced with either a dedicated power cord or one purchased from the maintenance department of the manufacturer.
If the plug or insulation of the power cord is damaged, it must be replaced with either a dedicated power cord or one purchased from the maintenance department of the manufacturer.
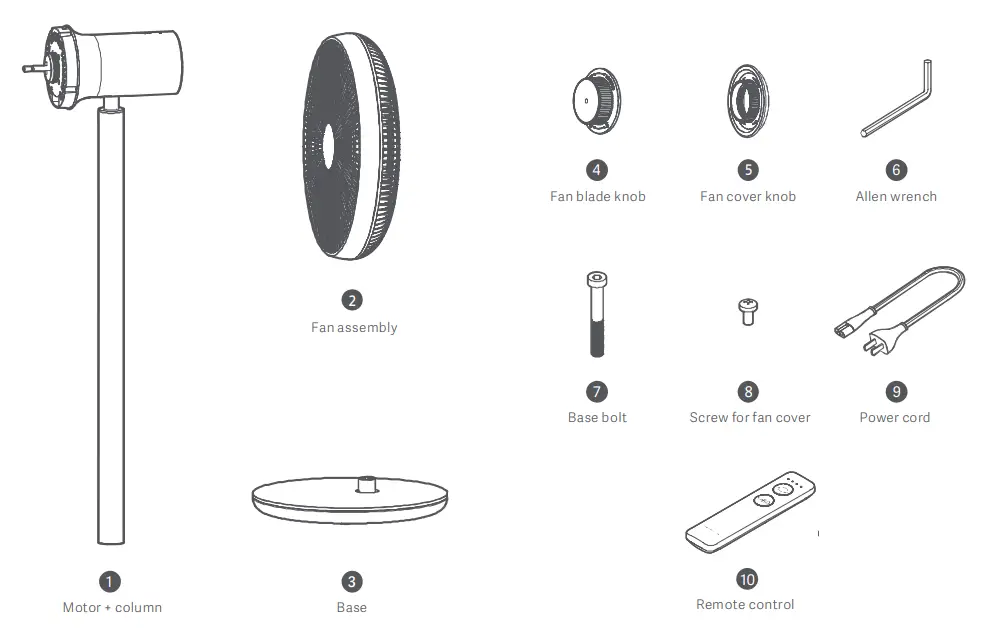
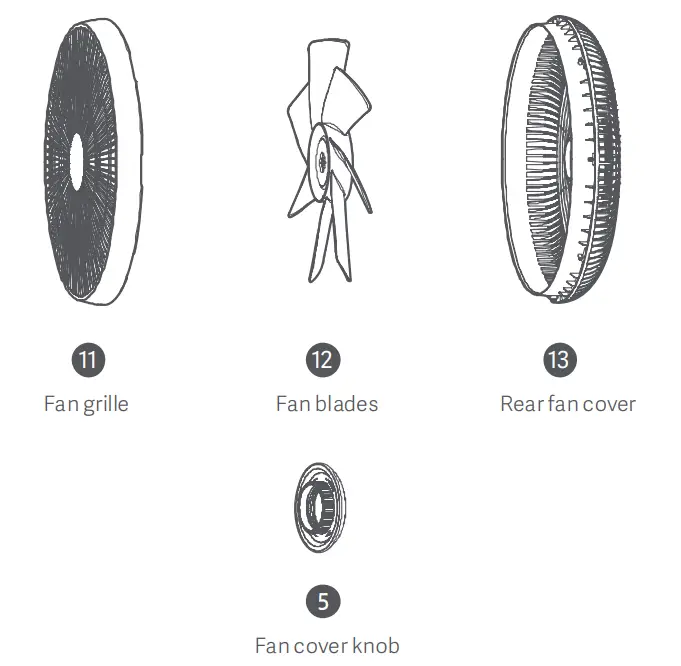
Package list
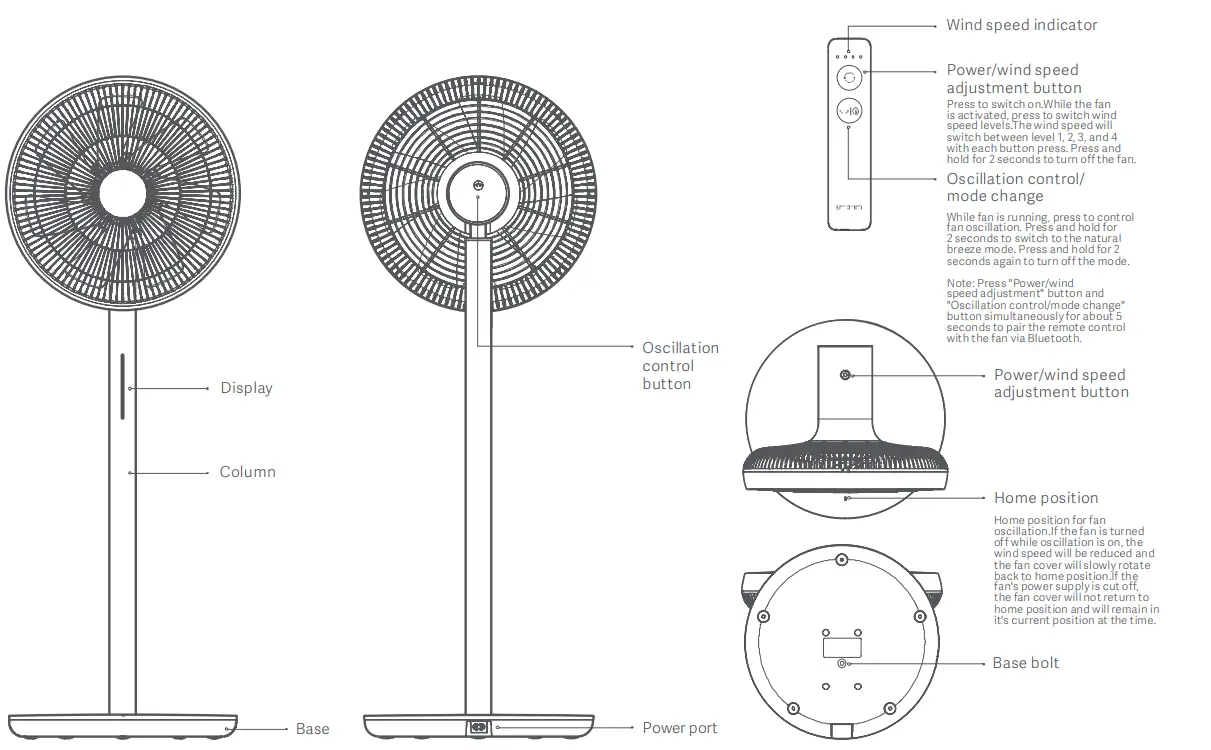
Product overview
Installation
Dismantling the fan assembly Take out the fan assembly. Rotate the fan grille counterclockwise until it is loose, as shown in Fig. U below. Remove the fan grille as per the directions in Fig. and remove El fan blades. 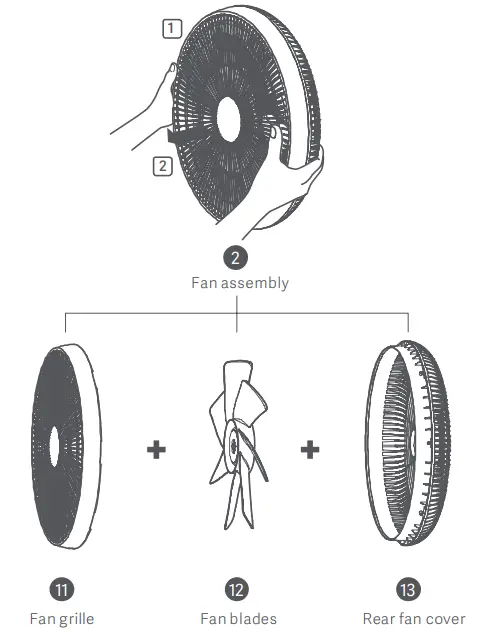
Installing the rear fan cover Place the rear fan cover on the motor aligned at the top A position. Tighten fan cover knob clockwise to attach the rear fan cover to motor. 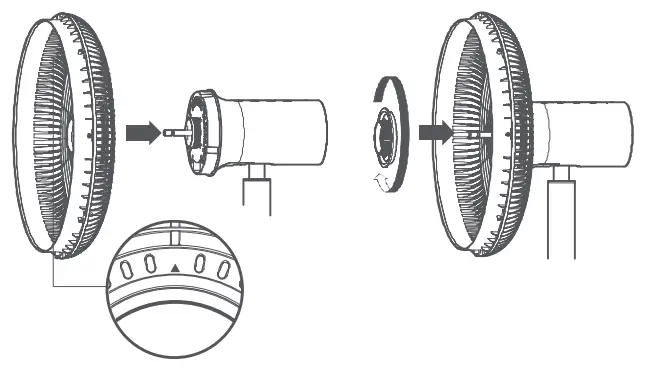
Installing the fan blades Align the center hole of fan blades with the motor shaft and push them into position. Tighten the blade knob counterclockwise to attach fan blades to a motor that has the rear fan cover installed. 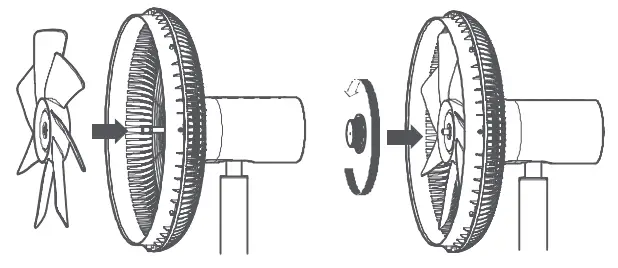
Installing the fan grille
Place the fan grille into the frame of the rear fan cover, then rotate the fan grille clockwise to align with the engraved markings on the rear cover.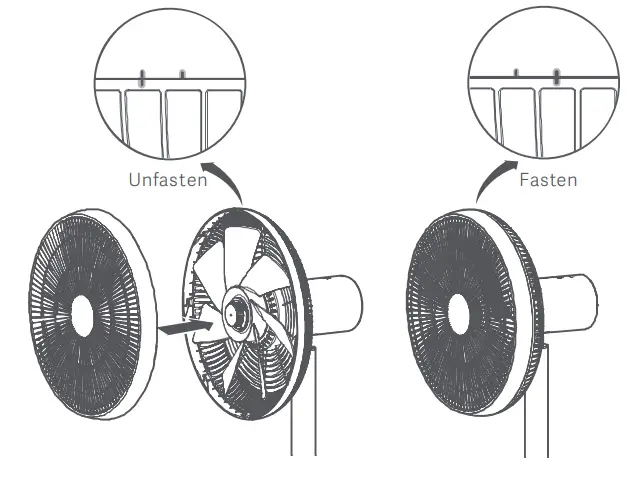
Fastening the fan grille
Insert the° screw for the fan cover into the hole at the bottom of the fan cover, then fasten it clockwise with a Phillips head screwdriver. 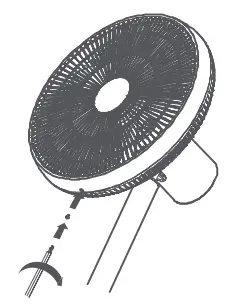
Installing the base
Align the 0 motor and 0 columns with the base socket in the direction shown above, then insert the lower end of the column into the base socket.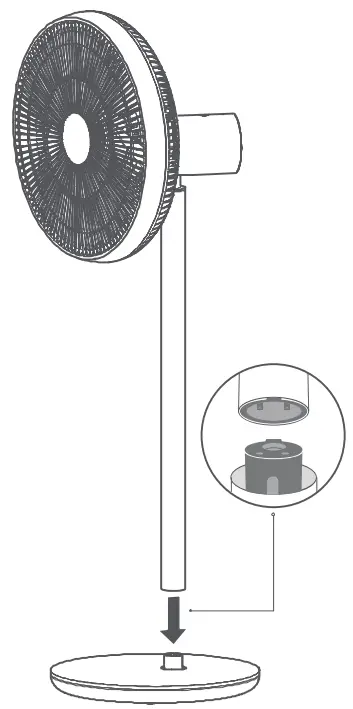
Insert the CO base bolt into the hole at the bottom of the base. 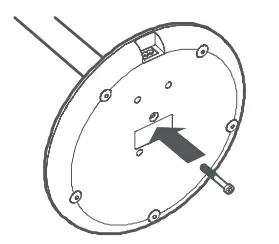
Tighten the 0 base bolt clockwise with the 0 Allen wrench to secure the column to base. 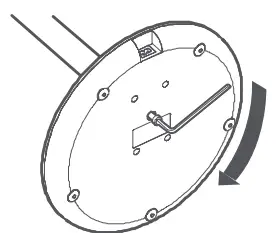
Connecting to power supply/charging the battery
Plug one end of the power cord into the power port on the back of the base and the other end into a power supply to connect the power supply and charge the battery. There is a battery contained inside the fan base. When it is sufficiently charged, the power cord can be unplugged and the device can be used independently. If the battery is installed and the fan is connected to a power supply, no battery power will be consumed while it is running, and the battery will be charged to full capacity.
Charging
When the battery level is between 0%-90%, the indicator light is orange and slowly fades off in 20 seconds. When the battery level is between 91%-100%, the indicator light remains solid green for 20 seconds. 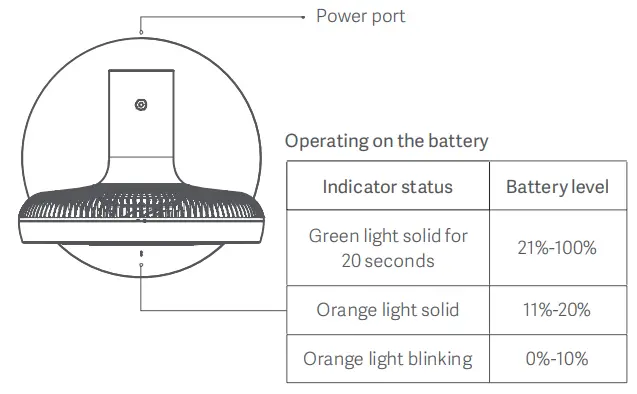
Connect with Mi Home/ Xiaomi Home App
This product works with Mi Home / Xiaomi Home app*. Control your device with the Mi Home / Xiaomi Home app.
 http://home.mi.com/do/index.html?model=zhimi.fan.za5
Scan the QR code to download and install the app. You will be directed to the connection setup page if the app is installed already. Or search “Mi Home / Xiaomi Home” in the App Store to download and install it. * The app is referred to as the Xiaomi Home app in Europe (except for Russia). The name of the app displayed on your device should be taken as the default.
Open the Mi Home/ Xiaomi Home app, tap “+” on the upper right, and then follow prompts to add your device.
Note: The version of the app might have been updated, please follow the instructions based on the current app version.
Use
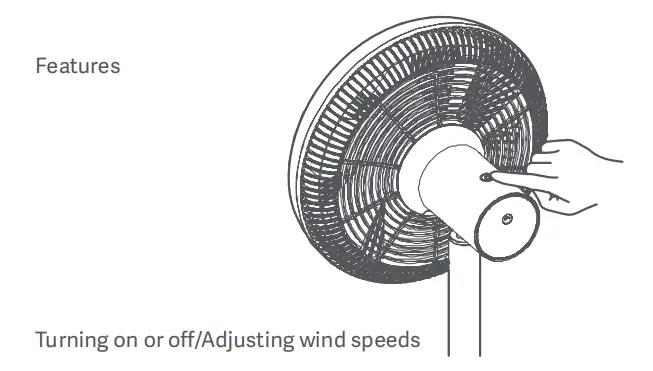
Power on
Press the 0 buttons to start the fan. When it is turned on for the first time, the wind speed will be set at Level 1. When it is turned on again after being turned off, the wind speed will default to the level set when last powered on.
Power off
Press and hold the 0button for 2 seconds to stop the fan. 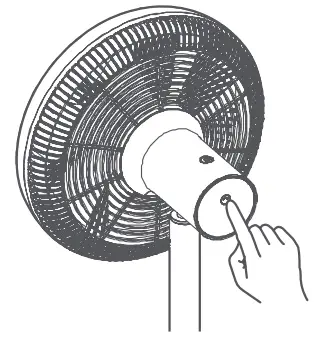
Setting oscillation
Press the 0 buttons to set fan oscillation. When the fan is turned off, it will automatically return to the home position.
 Pairing remote control via Bluetooth
- Press and hold the buttons simultaneously for 5 seconds. The 4 wind speed indicators will begin to flash simultaneously and will go out once the pairing is successful.
- When a pairing request is received by the fan, the 4 LEDs on the fan body will begin to flash. At this point, press any button on the fan to pair. A beep indicates that pairing has been successful.
- If no button is pressed on the fan within 30 seconds, pairing will discontinue and/SS/ate Windows remote control will stop flashing. Go to Settings to activa4E
Resetting Wi-Fi
If the fan cannot connect to the phone, press II) and 4) simultaneously for 5 seconds. A beep indicates that Wi-Fi has been successfully reset. 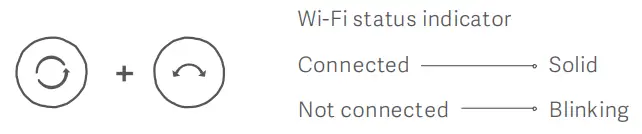
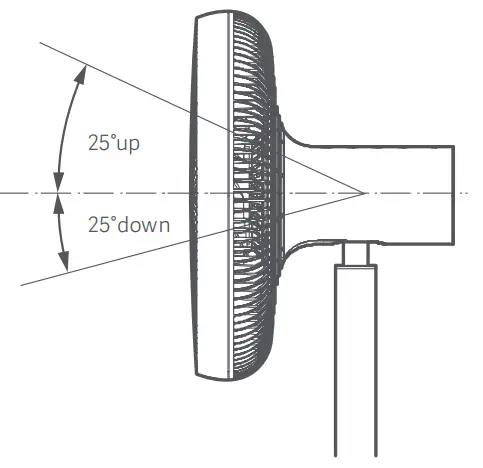
Pitch
To adjust the fan’s pitch, gently lift or press the motor or fan cover.
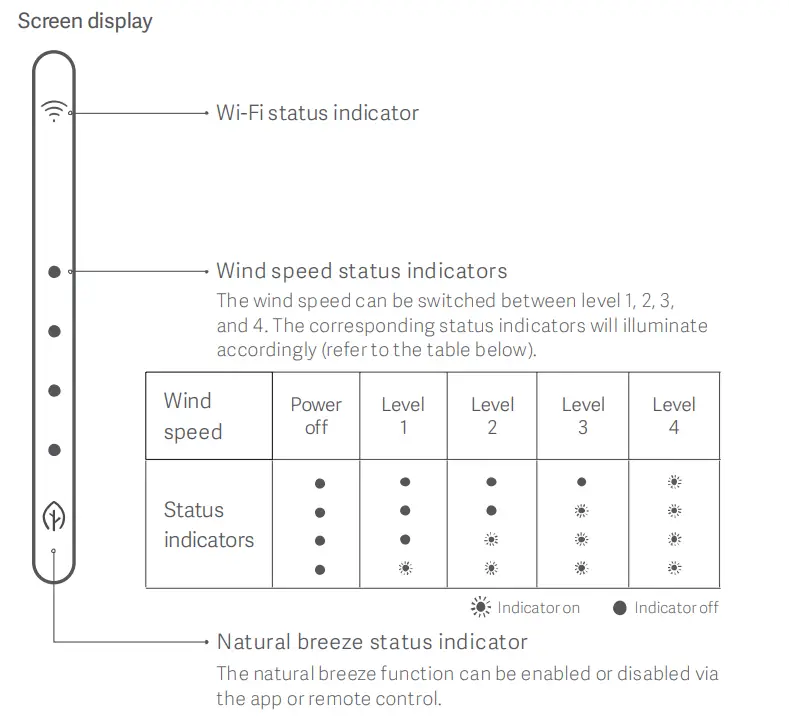
Additional functions
The natural breeze mode and ionizer function can be enabled via the app. More functions such as “Oscillation angle setting” and “On/off timer” can be used on the app.
Troubleshooting
| Issue | Cause | Solution |
| The fan does not run | No power is supplied to a power outlet | use an outlet that has power |
| The power cord is not connected properly | Connect power cord correctly | |
| Fan column and base are not installed properly | Align fan column with the socket on the base, and fasten connecting screws | |
| Wi-Fi cannot be connected | The router is on 5G channel | Connect router via 2.4G C channel |
| The mobile app is using up too much memory | Shut down the app completely and restart | |
| The fan has been unable to connect to the network for more than half a haw | Reset Wi-Fi (please refer to “Resetting Wi-Fi”) | |
| Fan blades stop, fan beeps three times, and four indicators flash | A foreign object stuck in fan blades | Power off the fan and remove the foreign object |
| Motor failure | Contact post-sales service |
Maintenance and care
Fan cleaning
Parts that can be cleaned
The following parts can be cleaned with clean water or diluted neutral detergent using a soft cloth or sponge.
Be sure to stop the fan and power it off before disassembly. Before dismantling Fan Cover, remove the metal column from base to prevent the fan from starting accidentally and causing mechanical hazards. After cleaning, ensure all parts are completely dry before re-installation and use, and avoid direct sunlight.
Parts that cannot be cleaned
Gently wipe the following parts with a soft, dry cloth. 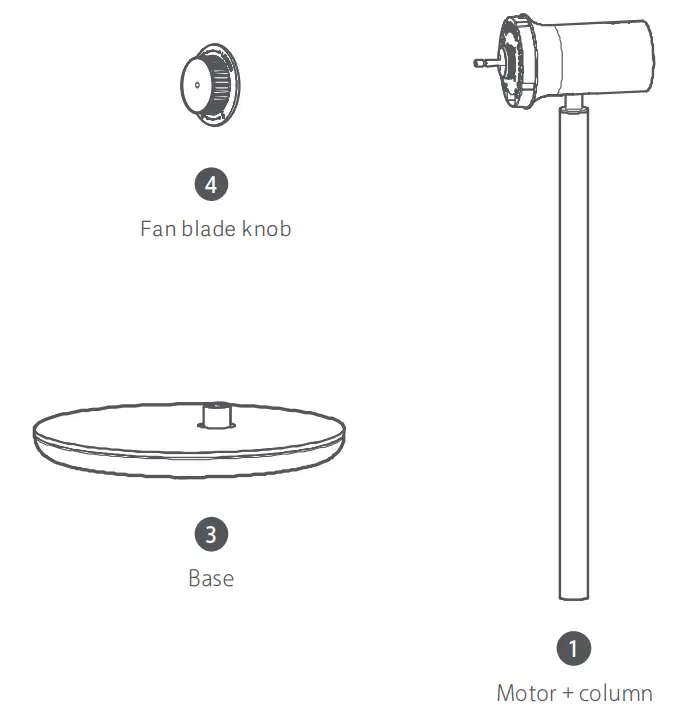
![]() Do not flush the above parts with water.
Do not flush the above parts with water.![]() Do not use thinner, lightweight gasoline, detergent or alkaline-based cleaners.
Do not use thinner, lightweight gasoline, detergent or alkaline-based cleaners.
| Name | Smart Standing Fan 3 | Rated voltage | 120V— | Item dimensions | 340mm x 330mm x 960mm |
| Model | ZLBPLDS05ZM | Rated frequency | 60Hz | Battery type | Lithium-ion battery pack |
| Type | DC standing fan | Rated power | 25W | Rated capacity of battery | 2800mAh ( 33.6Wh ) |
| Gross weight | Approx.5.3kg | Net weight | Approx.3.5kg | Noise | s60dB(A) |
| Wireless connection | Wi-Fi IEEE 80211 b/g/n 2.4G Hz | ||||
Regulatory Compliance Information
![]() Fan: Contains FCC ID: 2AC7Z-ESPWROOM32D
Fan: Contains FCC ID: 2AC7Z-ESPWROOM32D
Remote Controller FCC ID: 2AP98-FSYKQ04ZM
Contains IC: 21098-ESPWROOM32D![]()
IC: 26864-FSYKQ04ZM
This device complies with part 15 of the FCC Rules. Operation is subject to the following two conditions: (1) This device may not cause harmful interference, and (2) this device must accept any interference received, including interference that may cause undesired operation. Caution: Changes or modifications to this unit not expressly approved by the party responsible for compliance could void the user’s authority to operate the equipment. NOTE: This equipment has been tested and found to comply with the limits for a Class B digital device, pursuant to part 15 of the FCC Rules. These limits are designed to provide reasonable protection against harmful interference in a residential installation. This equipment generates, uses, and can radiate radio frequency energy and, if not installed and used in accordance with the instructions, may cause harmful interference to radio communications. However, there is no guarantee that interference will not occur in a particular installation. If this equipment does cause harmful interference to radio or television reception, which can be determined by turning the equipment off and on, the user is encouraged to try to correct the interference by one or more of the following measures:
- Reorient or relocate the receiving antenna.
- Increase the separation between the equipment and receiver.
- Connect the equipment into an outlet on a circuit different from that to which the receiver is connected.
- Consult the dealer or an experienced radio/TV technician for help.
Limited by local law regulations, the version for North America does not have a region selection option. Fan: To satisfy FCC RF exposure requirements, a separation distance of 20 cm or more should be maintained between the antenna of this device and persons during device operation. To ensure compliance, operations at closer to this distance is not recommended. ISED Compliance This device contains license-exempt transmitter(s)/receiver(s) that comply with Innovation, Science, and Economic Development Canada’s license-exempt RSS(s). Operation is subject to the following two conditions: - This device may not cause interference.
- This device must accept any interference, including interference that may cause undesired operation of the device.
Manufacturer: Beijing Smartmi Electronic Technology Co., Ltd.
Address: Room 201-203, Unit 6, Building A, No. 66, Zhuang Road, Qinghe, Haidian District 100085, Beijing, China.


