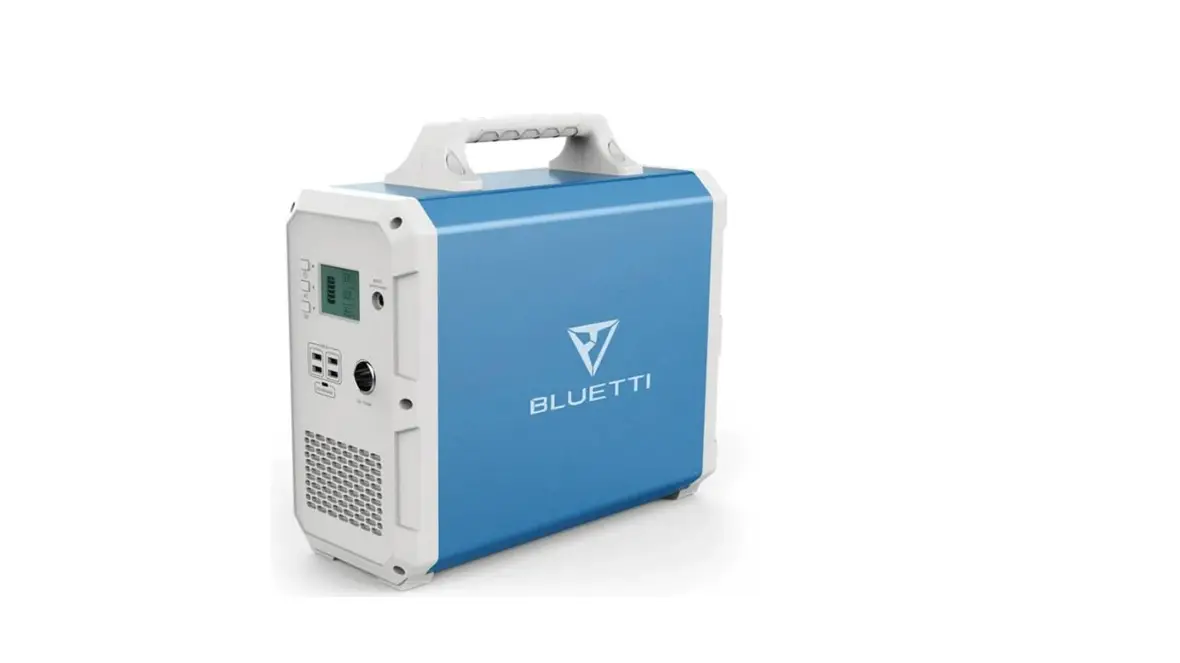
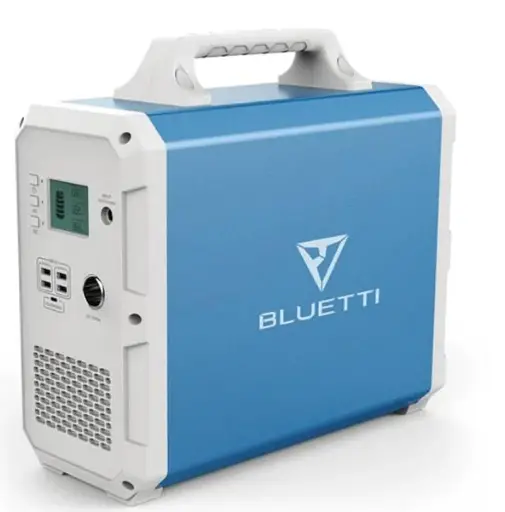
BLUETTI EB120 Portable Power Station
Please read this manual before use and follow its guidance. Keep this manual for future reference.
Product Overview
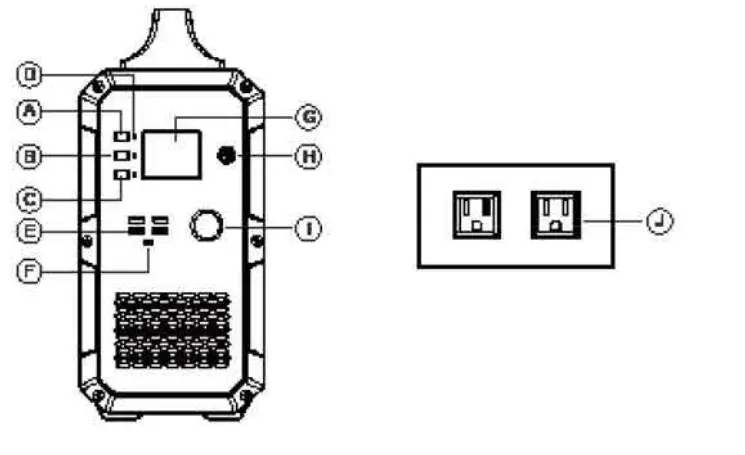
- Master power button
- AC power button
- 5V-USB output ports
- Display screen
- 12V cigarette lighter socket
- DC power button
- LED indicator lamps
- Type-C PD output port
- AC charger/PV input port
- AC100-120V outlet US standard socket
LCD Display 
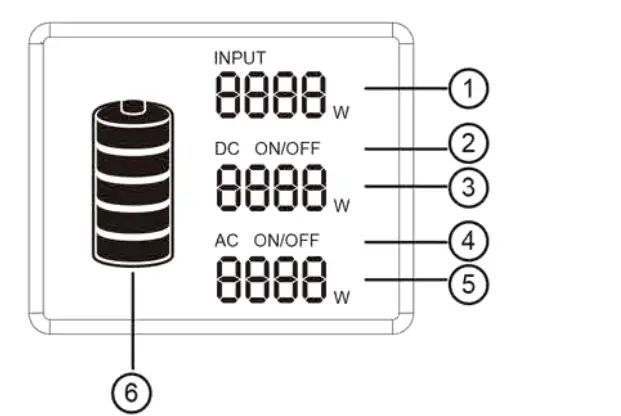
- Charging power
- DC output power
- AC output power
- DC ON/OFF status
- AC ON/OFF status
- Battery status indicator
Note:
- If the product malfunctions, error codes would be displayed on the screen.
- When a product is powered on, but not in use, the product would turn off by itself after 60seconds of inactivity.
- When the product is powered on and the AC/DC output is turned on, the backlight would turn off by itself after a period of inactivity. To turn on the backlight again, press any button.
Safety warning
- please read all the safety warnings before use and keep the manual .warranty does not cover damage caused by failure to follow instructions.
- Please note the warning labels and operate accordingly.
- Avoid exposing the product to rain or using the product in a humid environment.
- Do not install the product near heat sources, such as electric furnace and heaters.
- Place and store the product in a well-ventilated place.
- Wipe the product clean with a dry cloth.
- In case of fire, use dry powder fire extinguishers for this product.do not use water fire extinguishers, which may cause electric shock.
- Please do not alter or disassemble this product.
- If the generator needs maintenance, please contact the local designated system installation and maintenance personnel or contact seller
Storage and maintenance
- operating and storage environment may influence product life and the reliability of performance. Thus, remember to:
- place the product in a dry and well-ventilated area with mild temperature (suitable temperature:0°C -40°(, suitable relative humidity 10% – 90% )
- place the product in a safe area where it would not be hit or shaken.
- Keep the product away from corrosive and combustible material.
- The product would turn off itself when the battery voltage is too low, if this happens, you need to charge the battery within 2-3months.
- If you are not going to use it for a long time, please charge it fully before storage and then charge it at least once every month, store the product in a dry environment.
- Please fully charge the product before storage and charge it at least once every 3 months.
Off-grid power storage system 

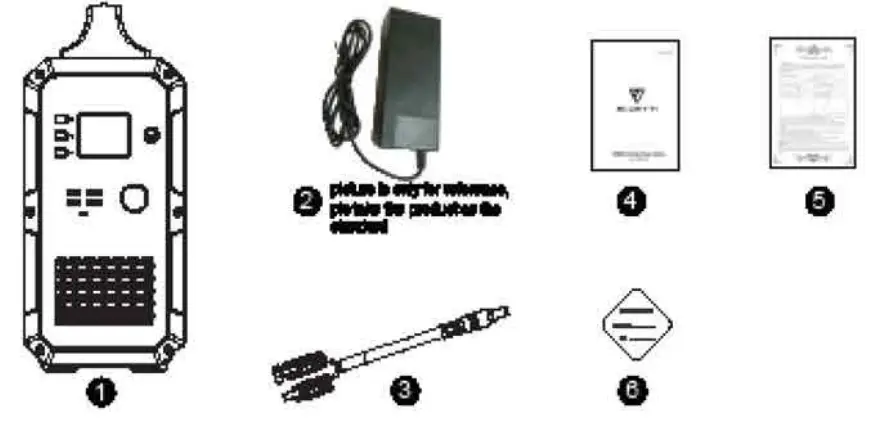
Unboxing
Before opening the parcel, please check whether the parcel is damaged or not. If the product is damaged during delivery or if any items go missing upon arrival, please contact Seller customer service([email protected]) to get it solved. You should receive the following items:
| 1 | Item Portable solar power generator | Number of item 1 |
| 2 | AC wall charger (Including AC input charging cable) | 1 |
| 3 | PV solar charge cable(7909 to MC4) | 1 |
| 4 | User manual | 1 |
| 5 | Warranty card | 1 |
| 6 | Certificate of qualification | 1 |
Operation guidance
Attention:
- the operating environment should meet our requirement.
- Make sure that the air inlet/outlet is not blocked.
- Please power off the product if you are not going to use it.
- Please fully charge the product if you are going to idle for a long period.
How to use the product
Turn on/off the product
- turn on the product: press and hold the master power button about 2 seconds to turn on the product. The LED indicator light and the display screen will light up.
- Turn off the product: press and hold the master power button for about 2 seconds to turn off the product. The display screen and the LED indicator light would turn off.
AC/DC output
Note: check to make sure the product is turned on. Otherwise, you can not turn on AC/ DC output.
- Turn on AC/DC output: press and hold the AC/DC power button to turn on the product. The corresponding LED indicator light would light up and the display screen would show “AC ON/DC ON”.
- Turn off AC/DC output: press and hold the AC/DC power button to turn off the product. The LED indicator light would turn off and the display screen would show “AC OFF/DC OFF”.
PV charge activation
Turn off the generator, connect PV( or charger)to charge, activate PV charge function, the first column on the screen will be lit up and show input power, at this time, the generator is in charging state, can not support AC and DC functions. I want to open AC and DC functions, need to press the master power button for more than 1 second to turn on the generator, the screen will be lit up after the generator is turned on. After start-up, connect PV(or charger) to start charging, the screen shows input power wattage, at this time, can open AC and DC functions.
Notice:
- If Master Power Button is not turned on, the AC button and DC button are in off status, with no AC output and DC output.
- If Master Power Button is turned on, the AC button and DC button are still in off status, with no AC output and DC output. Need to turn on the AC power button and DC power button separately.
How to charge the product
Charge with solar power
To charge the product, insert the solar charging cable or AC adapter into the input port of the product. The display screen would light up and the charging power would be displayed. But don’t care this the wrong way. The product will not turn on by itself when being charged. If the product is previously turned off, it will remain turned off unless you manually turn it on. 
Charge with AC power
Insert one end of the adapter into wall outlet and insert the other end to the input port of the product. Then, the product will be charged and you can monitor the battery status by checking the battery icon on the LCD screen The product comes with a built-in advanced control circuit. When the battery is fully charged, it will stop charging itself automatically. 
Cold Weather
Cold weather can influence battery capacity. In sub-zero temperature (<0°C), you may be able to discharge the product, but you should not charge ii. Otherwise, the battery of the product would be greatly damaged and the capacity may not even be recovered. Low temperature charging protection: When the product is charged at a temperature below 0°C, it will shut off and stop charging itself automatically. The product will reboot and start charging itself when the temperature rise to above 10°C.
Low temperature discharging protection: If the product is discharged at a temperature of -20°C, it will turn off. The product will reboot and turn on output when the temperature rise to above -1 o•c.
FAQ
- : How to check to charge status?
The battery icon indicates the battery level of this product. The battery level is displayed in 5 segments. When the battery is being charged, the icon would flash. When the battery is fully charged, the icon would stop flashing and all 5 segments will be filled. - Can this product be used to charge my electronic devices?
You need to check the power at each output port. For example, the power at the AC output port is provided by the built-in inverter of the product, whose maximum continuous output power is 1000W. This means that it is only suitable for electronic devices whose required power is no more than 1 000W.
Intelligent Cooling Control
The cooling fan will start working automatically when the following conditions are met :
- A load of inverter exceeds 400w.
- A load of 12V cigarette lighter socket exceeds 80w.
- The charging power of the attached appliances exceeds 1 00W.
Besides, the generator intelligent system will adjust the PV input of AC output power based on the outer case temperature, to keep the outer case at a touchable temperature.
Note: Do not use the machine when the cooling tan is broken.
Frequency Setting
When the product is powered on, turn on DC output and keep the AC output turned
off. Press and hold both the DC button & AC button to enter setting mode Press the AC power button to choose the inverter AC output frequency. Press and hold both DC and AC power buttons to exit frequency setting mode Restart the machine.
ma
Troubleshooting and technical specification
| Error | Problem | Solution |
| E001 | over-voltage protection (battery pack) | Stop charging and start discharging. |
| E002 | Under-voltage protection (battery pack) | PleaseCharge theK[ioouct in time. Restart the machine once It Is Uy charged. |
| E003 | Battery failure | Restart the machine and charge it. |
| E004 | Over-temperature protection when dis- charging the batter.y | Wait for a white for it to oool down and then restart tile machin.e |
| E006 | Under-temperature protection ‘Nhen dis- charging thebattery. | Walt for a vvhlle for It toheat up and then restart fha machine. |
| EOOO | Over-temperature protection when charging the battery; | Wait for a while for it to oooldown and then restart the machine. |
| E007 | Under-temperature rotection when charging e battery. | Walt for a whl!e for it toheat up and then restart tile machin.e |
| E008 | Under-voltage protection for the 1st celL | Please Charge the proouct in time andre- start it when fully charged. |
| E009 | Under-voltage protection for the 2nd ooll. | Pleasecharge ttte proouct In time andre- start it Vvhen fully cllarge<l. |
| E010 | Under-voltage protection for the 3rd cell. | Please chargetha product in time andre- start It when fUlly charged. |
| E011 | Under-voltage protection for the 4th c:e!L | Please chargethe product in time andre- start It when fully charged. |
| E012 | Busbar fault of Inverterdue to under-volt- age. | Tum off and on the machine. |
| E013 | Over load protection of inverter. | Check if the o utrortof inverter is over- loaded. Tum o an on theAC output to recove.r |
| E014 | Output port of Inverter Is short-circuited. | Check if the output port of inverter is short- oirouited. Tum off andon theAC out-put to recove.r |
| E015 | Theheat sink of inverter is overheated. | Wait for it to oool down and then restart the machine. |
| E016 | The temperature of theheat sink is not detected. | Insert the NTC andrestart the machine. |
| E017 | Over-voltage protection (PV Input}. | Disocmnect the solar charging cable and then restart tile machlne. |
| E018 | over-voltage protection (PV output) | Disconnect fhe solar cttaw1ng cable, re- start the machine and then re-insert thesolar c:hamlna cable. |
| E019 | OVer–temperatureprotection of heat sink for PV module | Theheat sink for PV module ovemeats. Walt for it to0001do’Wt’l and then charge it. |
| E020 | The tem rature of the heat sink for module is not detected. | Restart the machine. |
| E021 | Charging protection of battery protection board | Wait for the temperature to return to an acceptable temperature and then start charging. |
| E022 | Battery protection | Disconnect tile solar charging cable and restart the machine. |
| E023 | Over-power pr otection (system) | Check if the totaloutput power is overloadK ed. Restart the machine. |
| !f youhave fried themethods mentioned above, buttheproblem stillcannot be solved. Contact seller customer service team. | ||
ATTENTION!
If you cannot find the solution for your problem in the chart above, please provide the following information to our customer service team:
- About the product
- Serial number
- Model
- The displayed information on the screen
- Description of your problem
- Does it happen before?
- In what circumstance does the problem occur?
- About the solar panel (not included)
- Manufacturer and model of the solar panel
- The output voltage of the solar panel
- The output power of the solar panel
- The MPPT output voltage of the solar panel
- The MPPT output current of the solar panel
- The number of solar panels and how do you connect the panels
Specifications
| Mod el | EB1 2 0 I EB150 I EB180 I EB240 | |
| Output Specifications | ||
|
Inverter Output | Contlnuous Oulput Volt- aae | 100-120Vac, 220-240Vac |
| Rated Frequency | 50/60Hz | |
| Continuous Output Power | 1000W | |
| Power Factor | 1 | |
| THDV@O.7R{under nominalvoltaae) | “5% | |
| Over-load protection | 1000W Load<1200W @2Min; 1200W:.Load ® 1s: | |
| Power lo ss {No Load & Tumed–Off) | <20W | |
| Max Efficiency (>7 /4Load) | 88%(100-120V.ca), 90%(220-240Vac) | |
| 12V/9A Ci ga r Light- er Output | ContinuousOutput Vol t- aoe | 12.2V{:t:1V) |
| Continuous Output Cur- rent | 9A | |
| 5VUSB Output | Output Voltage Ra.ni:1e | 5V±0.3V |
| MaxOutput Current 3A | ||
| Note: The maximum output of a single USB portIs 3A The maximum output of 2 USB ports Is 3A{(top and down). | ||
| Type-C PD Output | Supported Fast Charge | PO Protocol |
| Output Voltage Ranae | o-,20V{.t5%) (5V by default) | |
| Continuous Output Volt- age/Current | {5V/9V/12V/15V)3A{±0.3A2),0V/2.25A(±O.’2.A) | |
| I nput S p$Cification | ||
| ACAdapter Charger | 42V/200W | |
| PV Max Input Power | 500W | |
| PV Input Voltage Range | 16-60Vdc(OVP73V±2V) | |
| PV Max Input Cur- rent | 10A | |
| MPTT Efficiency | 90.5% | |
| Max Efficiency | >88% | |
| Solar Charging Mode | MPPT | |
| Battery | ||||
| rated voltage | 14.8Vdc | |||
| rated capacity | 1200Wh | 1600Wh | 1800Wh | 2400Wh |
| built-in battery cell | Li-ion | Li-ion | Li-ion | Li-ion |
| battery packing | 4530P | 4S3P | 4S45P | 4860P |
| Min Unit | ||||
| IP Ra.ting | !P21 | |||
| Operating Environ ment | Re!atlve Humidity: 10 /o-900/4 | |||
| Operating Temperature0: -40″C | ||||
| Dimensions | 293.6*165.4 364.7mm | 371.5*165.4$ 364.7mm | 393.6*165.4 364.7mm | 493.5il165 .4* 364.7mm |
| Net Weight | 12,6KG | 17.2KG | 17KG | 22KG |
| Note: When Iha total output power exceeds 1000W, fhe.DC ol.lfput wmbe diract1y shut down. When the load Isless than 30W, the output power would not be displayed. When a higfl..power appliance ls attached to the product, the <11splaye<l output power and the actual output oower oould bel:llfferent forup to 30W. | ||||
Warranty
Our company provides customers with a warranty of 12 months from the date of purchase.
Contact us
For any inquiries or comments concerning our products, please contact the seller([email protected]) and we will respond as soon as possible.


