

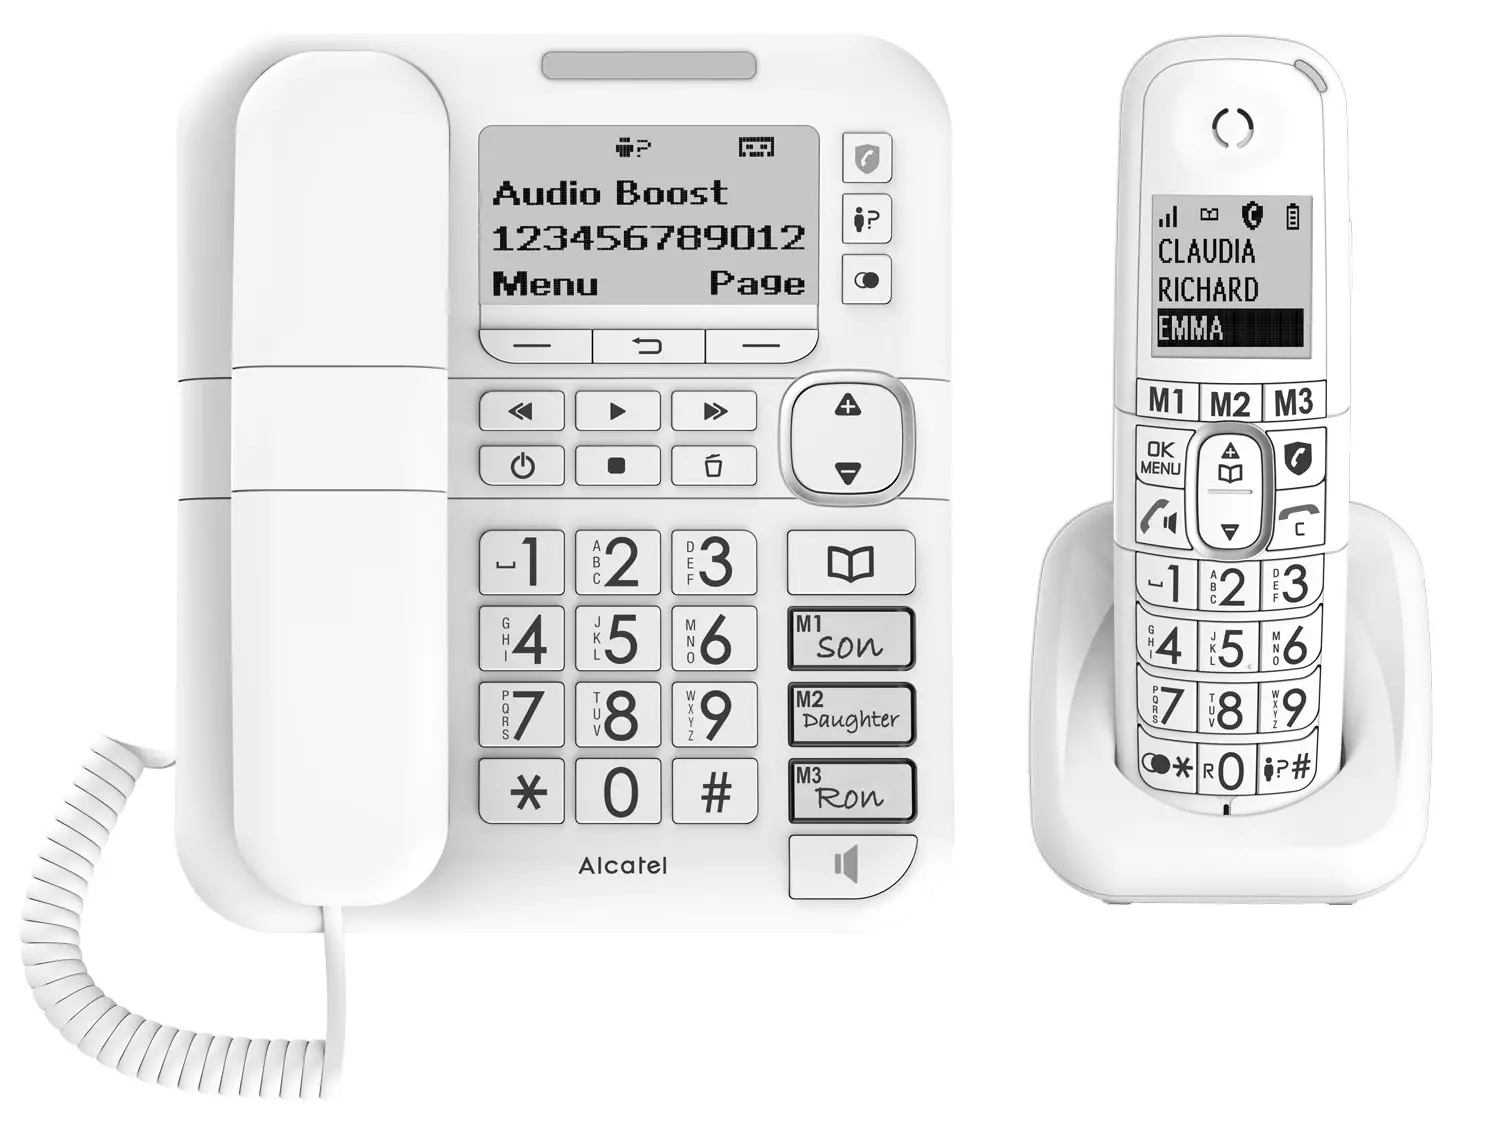
XL785 Voice Combo
USER’S GUIDE
IMPORTANT SAFETY INSTRUCTIONS
When using your telephone equipment, basic safety precautions should always be sticked to reduce the risk of fire, electric shock, and injury, including the followings:
- Read and understand all the instructions.
- Follow all warnings and instructions marked on the product.
- Unplug this product from the wall outlet before cleaning. Do not use liquid cleaners or aerosol cleaners. Use a damp cloth for cleaning.
- Do not use this product near water (for example, near a bath tub, kitchen sink, swimming pool).
- Do not expose the telephone to direct sunlight or extreme cold environment. Do not put the telephone close to a heating source such as radiators, cookers, etc.
- Do not overload wall outlets and extension cords as this can result in the risk of fire or electric shock.
- NEVER use your phone outdoors during a thunderstorm-unplug the base from the telephone line and the mains socket when there are storms in your area.
- Do not use the telephone to report a gas leak in the vicinity of the leak.
- Use only the supplied NiMH (Nickel Metal Hydride) batteries! The operation periods for the handsets are only applicable with the default battery capacities.
- The use of other battery types or non-rechargeable batteries/primary cells can be dangerous. These may cause interference and/or unit damages. The manufacturer will not be held liable for damage arising from such noncompliance.
- Do not use third party chargers. The batteries may be damaged.
- Dispose of batteries safely. Do not immerse them in water, burn them, or put them where they could get punctured.
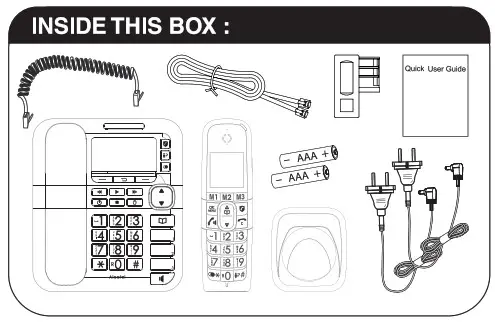
Package Contents
The package contains the following items:
- 1 cordless handset
- 1 cordless handset charger
- 1 wired telephone base
- 1 handset (wired)
- 1 spiral cord
- 2 mains adapters (1 for the base and 1 for the charger of cordless handset)
- 1 telephone line cord
- 1 rechargeable NiMH battery pack
- 1 wall mounting bracket attached to the base
- 1 user guide
The additional duo and trio package contains the Repeating items:
- Cordless Handset(s)
- Cordless handset charger(s)
- AC power adapter(s) for cordless handset charger(s)
- Rechargeable NiMH battery packs
 INSTALLING YOUR PHONE
 INSTALLING YOUR PHONE
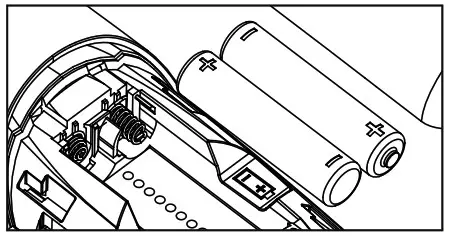
Installing and charging the batteries
- Slide down to open the battery compartment cover.
- Place the 2 supplied rechargeable batteries as indicated. Pay extra attention to direction of polarity.
- Slide the battery compartment cover back.
- Put the handset on the base and charge for 8 hours before using the handset for the first time. The handset will give a beep when it is properly placed on the charger.
Notes:
- Use only the supplied power adapter for the base station and wireless handset charger.
- Use only the supplied NiMH rechargeable battery cells.
- If the handset will not be used for a long time, disconnect and remove the batteries to prevent possible leakage.
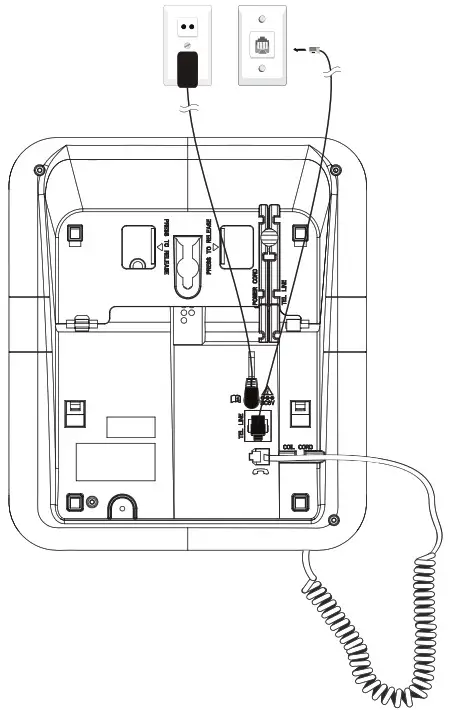
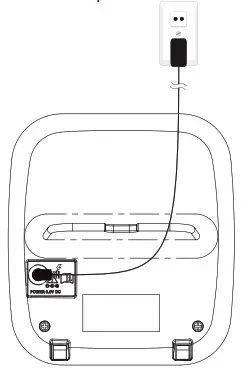
Connecting the Base Station
- Plug one end of the telephone line cord into the telephone jack on base bottom.
- Plug the small end of power adapter into a power jack on base bottom.
- Plug the large end of power adapter into a wall power outlet.
- Plug the other end of the telephone line cord in to the telephone jack or micro-filter.
- Always use the cables provided in the box.
Connecting the Charger
- Plug the small end of power adapter into a power jack on base bottom.
- Plug the large end of power adapter into a wall power outlet.
GETTING TO KNOW YOUR PHONE
Base Station Overview
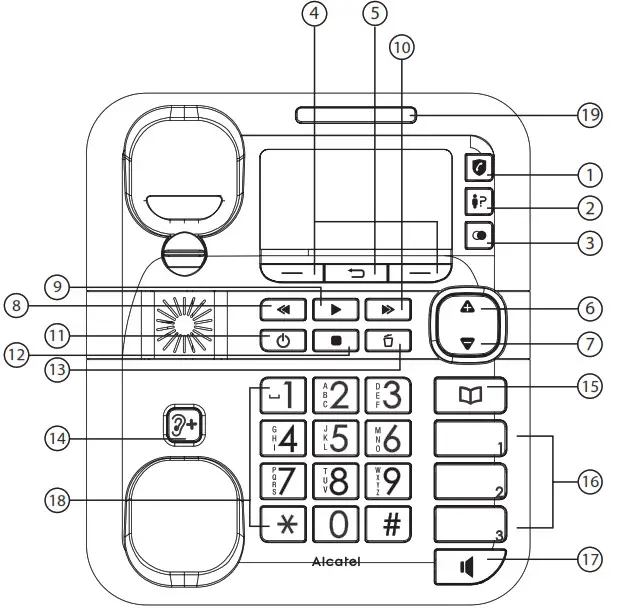
- CALL BLOCK

• In Idle mode: Press to go to Call Block menu
• In ringing mode: Press to block incoming call number if Block Set is set to ON - CALL LIST

• In idle mode: Press to access the Call List. - REDIAL LIST

• Press these keys to confirm the options on the screen above the keys. - SOFT KEYS
• Press these keys to confirm the options on the screen above the keys. - RETURN KEY

• Press to go back to previous menu without making changes - UP & VOLUME INCREASE KEY

• In menu mode: Press to scroll up the menu items.
• In Phonebook list / Redial list / Call List: Press to scroll up the list.
• While entering names or numbers: Press to move the cursor to the left.
• During a call and message playback: Press to increase the volume. - DOWN & VOLUME DECREASE KEY

• In menu mode: Press to scroll down the menu items.
• In Phonebook list / Redial list / Call List: Press to scroll down the list.
• While entering names or numbers: Press to move the cursor to the right.
• During a call and message playback: Press to decrease the volume. - SKIP BACKWARD

• Press to skip backward to the previous message. - PLAY

• In idle mode: Press to play the message
• During playback : Press to repeat playing the current message from the beginning - SKIP FORWARD

• Press to skip the current message and play the next message. - TAM ON/OFF

• Press to toggle On/ Off of the answering machine. - STOP

• Press to stop the message playback. - DELETE

Press to delete current message during playback. - AUDIO BOOST

• During a call: Press to audio boost on/off (inactive in speakerphone mode). - Phonebook

• In idle mode: Press to access the phonebook. - Direct Memory Keys M1, M2, M3
• In idle mode or in a call: Press to dial pre-recorded number stored in Direct Memory. - SPEAKERPHONE

• Press to make, answer or end a call by base speakerphone.
• Press to switch between the corded handset and the base speakerphone during a call. - ALPHANUMBERIC KEYPAD/ */#
• In idle / pre-dial / editing mode / during a call: Press to enter characters / numbers.
• In pre-dial mode / during a call: Press and hold # to insert pause.
• In intercom mode with an external call): Press and hold 0 to start conference call
• In idle / pre-dial / editing mode / during a call: Press and hold 0 to insert a flash. - IN USE LED-BLUE
• Steadily on while the handset is in use, or base is in conversation mode
• Flashes when receiving an incoming call, or during registration.
Display Icons and Symbols of Combo Base
| Display icons | Description |
| Soft key icon for access the main menu | |
| Soft key icon for confirm selection and save input data | |
| Soft key icon for: 1. Delete current shown Phonebook/ Call list/ Redial entry 2. Cancel selection and abort from current operation | |
| 1. Soft key icon for temporarily set silence for the ringer during ringing mode. 2. Steady ON Indicates that the ringer of base is switched off. | |
| Steady On when there are received new Voice Message Waiting (VMWI) and not yet read. Disappear when all the voice messages have been read. | |
| Steady On indicates it’s a new call which has not been read in call list Disappear after all call have been read. Flashes when the call list is being accessed. | |
| Flashes when redial list is being accessed. | |
| Steady ON indicates either Call Block or Block Anonymous is set to ON Flashes when Call Block menu is being accessed. | |
| Flashes when phonebook is being accessed. | |
| Flash when new TAM messages or Memo have not been read or TAM menu is being accessed. Steady ON indicate TAM turn ON while all the TAM messages and Memo have been read. Disappear indicate TAM turn OFF while all the TAM messages and Memo have been read. | |
| Soft key indication for abort from current operation and return to idle mode. | |
| Steadily on when an alarm is set. Flashes when the alarm time set before reaches. |
Handset Overview
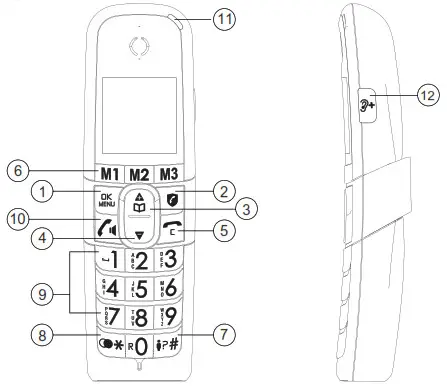
- Menu/Ok

In idle mode: Press to access the main menu
In sub-menu mode: Press to confirm the selection
During a call: Press to access Intercom/ Phonebook/ Redial List/ Call List - SMART CALL BLOCK
In standby mode: Press to go to Call Block Setting menu
In ringing mode: Press to block incoming call* if Block Set. is set to ON. - UP

In idle mode: Press to access the phonebook
In menu mode: Press to scroll up the menu items
In Phonebook list / Redial list / Call List: Press to scroll up the list
During a call: Press to increase the volume
In editing mode: Press to move the cursor one character to the left. - DOWN
In menu mode: Press to scroll down the menu items
In Phonebook list / Redial list / Call List: Press to scroll down the list
During a call: Press to decrease the volume
In editing mode: Press to move the cursor one character to the right. - TALK OFF

During a call: Press to end a call and go back to idle screen
In menu / editing mode: Press to go back to previous screen, or press and hold back to idle mode .
In editing / pre-dialing mode: Press to clear a character / digit.
During ringing: Press to set ring volume off. - DIRECT MEMORY KEYS M1, M2, M3
In idle mode /During a call: Press to dial pre-recorded number stored in Direct Mem. - AUDIO BOOST
During a call: Press to audio boost on/off (inactive in speakerphone mode) - * Key
Press to insert *
In idle mode: press and hold to access the redial list - # Key
Press to insert #
In idle mode: Press and hold to access the call list
In pre-dialing mode / during a call: Press and hold to insert pause - ALPHANUMERIC KEYPAD
Press to insert a digit / character
1, 2, 3, key: In idle mode, Press and hold to dial pre-recorded number stored in Direct Memory.
0 key: In pre-dialing mode / during a call, Press and hold to insert flash
0 key: During a call, Press and hold to start conference call(in intercom mode) - TALK ON/SPEAKER

In idle / pre-dialing mode : Press to make a call
In Redial list / Call List / Phonebook entry: Press to make a call to the selected entry in the list
During ringing: Press to answer a call
During a call: Press to switch to speaker mode - HANDSET LED

During charging: On steadily
In ringing mode / Paging mode: Flashing quickly
When new voice mail or new voice message (TAM): Flash slowly
Display Icons and Symbols of cordless handset
The LCD display gives you information on the current status of the telephone.![]()
| Steady ON indicates either Call Block or Block Anonymous is set to ON Flashes when Call Block menu is being accessed. | |
| Indicates the quality of the signal between the handset and the base. 3 bars: maximum quality and 0 bar: handset out of range or searching for the base | |
| Steady ON indicates a call is in progress. Flashes when there is an incoming call | |
| Steady ON indicates that handsfree is being used. | |
| Steady ON when an alarm is set. Flashes when the alarm time set reached, or Alarm menu is being accessed. | |
| Steady ON when the telephone answering machine (TAM) is turned on. Flashes when new TAM messages are received or TAM menu is being accessed. | |
| Steady ON indicates the ringer is switched off. | |
| Steady ON when there are newly received Voice Message Waiting (VMWI) not yet read. | |
| Steady ON indicates the battery is fully charged. Flashes during the initial charging of the batteries. Internal block icon flashes when the battery is almost fully charge. | |
| Flashes when low battery power level is detected. | |
| Steady ON indicates it’s a new call which has not been read in call list and * will be shown in the end of the unread call number or name. After call read, * mark will disappear. Flashes when the call list is being accessed | |
| On indicates audio boost is on (very loud sound on earpiece of handset) | |
| Flashes when phonebook is being accessed. | |
| Flashes when redial list is being accessed. |
Hearing Aid Compatibility:
Special feature which helps to eliminate background noise and interference when you use this telephone with a hearing aid.
USING YOUR PHONE
Welcome Mode (Country)
Your phone will enter Welcome mode under following 2 conditions.
First time power up cordless handset without register to any base (Extra cordless handset).
- Country list will appear on LCD
- Use
 to select desired country
 - Press to confirm.
- Resetting and Please Wait will be shown on LCD
- After complete the resetting, you are requested to input date and time (as part 13.5.3 describe).
After resetting your phone
- Country list will appear on LCD of Telephone base and all Cordless Handset.
- Use
 to select desired country on Telephone base or any Cordless Handset.
I. Press to confirm, if you select country on Cordless Handset.
II. Press OK to confirm, if you select country on Telephone base. - Resetting and Please Wait will be shown on LCD of Telephone base and all Cordless Handset.
- After complete the resetting, you are requested to input date and time (as part 13.5.3 describe).
Make a Call
Preparatory Dialing
Through Cordless Handset:
- Enter the phone number and press to dial the number.
- Press to clear entry number.
Through Telephone Base:
- Enter the phone number and press or lift up corded handset to dial the number.
- Press C to clear entry number.
Direct Dialing
Through Cordless Handset:
Press ![]() to take the line and enter the phone number.
to take the line and enter the phone number.
Through Telephone Base:
Press ![]() or lift up corded handset and enter the phone number.
or lift up corded handset and enter the phone number.
Call from the phonebook
Through Cordless Handset:
- Press OR press and to select Phonebook then to access phonebook
- Press to select the desired entry.
- Press to dial out the desired entry number.
Through Telephone Base:
- Press
 OR press
  and to select Phonebook then OK to access the phonebook.
 - Press to select the desired entry
- Press or lift up corded handset to dial the entry.
Call from the Call List
Through Cordless Handset:
- Press and hold # key, OR press and to select Call List then to access Call List.
- Press to select the desired entry
- Press to dial the entry.
Through Telephone base:
- Press key, OR press and to select Call List then OK to access Call List.
- Press to select the desired entry.
- Press or lift up corded handset to dial the entry.
Call from the redial list
Through Cordless Handset:
- Press and hold * key to access the redial list
- Press or to select the desired entry.
- Press to dial the entry.
Through Telephone base:
- Press
 key to access the redial list
 - Press to select the desired entry.
- Press or lift up corded handset to dial the entry.
Dial from direct memory keys M1/M2/M3 or 1/ 2/ 3
Press M1, M2, M3, on the base and the cordless handset, then the number is automatically dialed. You must first store a phone number on these keys. Refer to section 6.1. For keys 1, 2 or 3, press and hold 1, 2 or 3 on the base or cordless handset, then the number is automatically dialed. You must first store a phone number on these keys. Refer to section 6.2.
Answer a Call
Through Cordless Handset:
During ringing, press ![]() to answer a call.
to answer a call.
If the handset is on the charging cradle and Auto Answer is set to ON. During ringing, pick up the handset from cradle will automatic answer the call. Through Telephone base:
During ringing, Press ![]() or lift up corded handset to answer a call.
or lift up corded handset to answer a call.
End a Call
During a call,
Through Cordless Handset:
Press, ![]() OR place the cordless handset on the charging cradle to end the call.
OR place the cordless handset on the charging cradle to end the call.
Through Telephone base:
Press ![]() or put back corded handset to end the call.
or put back corded handset to end the call.
Adjust Earpiece and Handsfree Volume
For Both Cordless Handset and Telephone base:
During a call, Press ![]() and
and ![]() to select desired volume 1-5. When you end the call, the setting will remain at the last selected level.
to select desired volume 1-5. When you end the call, the setting will remain at the last selected level.
Audio Boost
To significantly increase the sound volume in the cordless / corded handset earpiece during a call. While you are on a call or listening to a message/ announcement, Press ![]() key on the cordless handset or Telephone base. To turn on Audio Boost. Press
key on the cordless handset or Telephone base. To turn on Audio Boost. Press ![]() again the key to turn off Audio Boost. Warning: A sound that is too loud for a long time can affect hearing.
again the key to turn off Audio Boost. Warning: A sound that is too loud for a long time can affect hearing.
Mute a Call (Only for Telephone base)
During a call, Press <MUTE> on the Telephone base to mute its microphone. Your caller cannot hear you. Press <Unmute> on the telephone base to unmute its microphone.
Temporary Ringer Silence
When the phone is ringing, you can temporarily set silence for the ringer of current call. The next call rings will back to normally.
Through Cordless Handset: Press ![]() to silence the ringer.
to silence the ringer.
Through Telephone base: Press ![]() to silence the ringer.
to silence the ringer.
Find the Handset
You can locate cordless handset by pressing< Page >on telephone base station.
All registered cordless handsets base will produce the paging tone and “Paging” is displayed on the LCD of the cordless handsets for 60 seconds. You can stop the paging by press , or any dialing keys on any cordless handset or on the base.
Note: If there is an incoming call during paging, the phone will ring with the incoming call instead of paging.
CALL BLOCK
This telephone is built-in with Smart Call Block feature*. This feature will help you avoid nuisance calls by only allowing some numbers to make your phone ring.
*This feature is default turn OFF and requires a subscription of Caller Line Identification service from your telephone service provider as well.
CALL BLOCK OVERVIEW
| Setting | Explanations |
| Off | Call Block function is disabled. This is the default mode. |
| On | Call Block function is set to Manual mode. Numbers stored in the block list will not go through and the phone will ring silently. Numbers can be added to the list while the phone is ringing and/or after a call (to enable, see part 5.1). |
| Contacts | In this mode, any number not stored to your phonebook will be automatically be blocked and not cause your phone to ring. All calls match with contacts registered in your phonebook will proceed normally. When this mode is chosen, CONTACTS OK is displayed on LCD in idle mode unless you have unread messages/missed calls (to enable, see part 5.2.1). |
| VIP | In this VIP mode, only calls match with contacts registered as VIP in your phonebook will go through and cause your phone to ring. Any other number will not ring. When this mode is chosen, VIPS OK is isplayed on the LCD in idle mode unless you have unread messages/ missed calls (to enable, see part 5.2.2) |
| ANONYMOUS | This extra feature allows you to block call that do not have a number attached (ie private calls, nternational calls, etc). This option can be enabled on top of any of the previous four (to enable, see part 5.3) |
Manual call block mode
Manual call block is the easiest option when starting out. When you chose ON in the call block settings, all calling numbers stored in your block list will be blocked. You can add/remove numbers from that list at any time.
How to block an incoming call:
When Call Block function is set to ON, press ![]() while the phone is ringing. It will terminate the call and offer you the option to store the number to the block list in one click.
while the phone is ringing. It will terminate the call and offer you the option to store the number to the block list in one click.
Confirm? will appear on display, press on cordless handset , or OK on telephone base to confirm store this number to the block list.
IMPORTANT: if you don’t confirm, the number will not be added to the block list and the next call will go through normally.
NOTE: All the procedures described below (from 5.1.1 to 6.1) can also be performed from the handset. From there, the only difference is that the ![]() icon described below corresponds to the handset
icon described below corresponds to the handset ![]() key
key
- Enable MANUAL mode
In idle mode,
Through Telephone base:- Press , press
 to select Call Block
 - Press OK , press to select Block Set. OR, press to access Block Set directly.
- Press OK , press to select On (manual mode).
After you enable this option, the call block icon will be displayed on the LCD.
- Press
- Add numbers to Blocklist
- In idle mode
Through Telephone base:
1. Press , Block Set is displayed, or Press to press to select Call Block.
2. Press OK , pressto select Blocklist.
3. Press OK , pressto select Add New, enter number to be blocked, press OK to save. - From incoming call numbers
Depuis la base:
En mode veille, appuyez la touche
Through Telephone base:
1. In idle mode, press key, or press , press to access the Call list.
2. Pressto browse the Call list.
3. Press OK to select desired number.
4. Press OK and orto select Add To Block.
5. Press OK to edit the number if necessary, press <OK> to save to Block List. - From Redial numbers
Through Telephone base:
1. In idle mode, presskey to access the redial list.
2. Press orto browse the redial list.
3. Press OK to select desired redial number.
4. Press OK andto select Add To Block.
5. Press OK to edit the number if necessary.
6. Press OK to confirm.
- In idle mode
- Edit numbers in Block List
Through Telephone base:
1. Repeat step 1 and 2 in Part 5.2.1.
2. Press OK , pressto select number to be edited.
3. Press OK twice, pressto select Edit.
4. Press OK , to edit, and then press OK to save. - Delete a numbers in Blocklist
Through Telephone base:
1. Repeat step 1 and 2 in Part 5.2.1.
2. Press OK , press to select number to be deleted.
3. Press OK , then press X Delete? will be show..
4. Press OK to confirm delete, or press X confirm not to delete. - Delete all numbers from Blocklist
Through Telephone base:
1. Repeat step 1 and 2 in Part 5.2.1.
2. Press OK , press to select any Block number.
3. Press OK twice, pressto select Delete All.
4. Press OK , Confirm? will be show. Press OK to confirm delete, or press X confirm not to delete. - Automatic call block mode
- VIPS only
In this restrictive automatic mode, only calls match with numbers stored as VIP in your phonebook will go through and make your phone ring.
In idle mode,
Through Telephone base:
1. Repeat step 1 and 2 in Part 5.1.1., or press to access BLOCK SET directly.
2. Press OK , andto select VIP OK.
3. Press OK to confirm. - Contacts only
In this mode, only calls match with contacts stored in your phonebook (normal and VIP) will go through and make your phone ring.
In idle mode,
Through Telephone base:
1. Repeat step 1 and 2 in Part 5.2, or press to access BLOCK SET directly.
2. Press OK , press to select Contacts OK.
3. Press OK to confirm.
- VIPS only
- Anonymous call block mode
This feature allows you to block numbers that do not display a number on your phone. It can be enabled or disabled independently from the other call block modes.- Block Private Calls
This mode will block incoming calls that have been purposely kept their numbers private from you.
In idle mode,
Through Telephone base:
1. Press, and to select Call Block, then press OK , or press instead.
2. Pressto select Block Anonym.
3. Press OK , andto select Private.
4. Press OK to confirm. - Block All Anonymous Calls
This mode will block all kind incoming anonymous calls, including private calls, international calls, pay phone and other out-of-area calls.
In idle mode,
Through Telephone base:
1. Repeat step 1 and 2 in Part 5.7.1,
2. Press OK , pressto select All.
3. Press OK to confirm.
- Block Private Calls
SET THE SPEED DIAL
Note: The direct keys M1 M2 and M3 are identical on the base and cordless handset. No matter you program them on the base or cordless handset (s).
- For M1, M2, M3
In idle mode,
Through Telephone base:
1. Press and to select Direct Mem.
2. Press OK and to select M1/ M2/ M3,
3. Press OK to enter the name.
4. Press OK to enter the number.
5. Press OK and to select the melody.
6. Press OK and press √ to select the entry is a VIP or press X for a normal entry.
(Note: ! will appears to indicate this phonebook is VIP entry.) - For Key 1, Key 2, Key 3
In idle mode,
Through Cordless Handset
1. Press, and to select Direct Mem.
2. Press to select Key 1, Key 2 or Key 3.
3. Press to enter the number.
4. Pressto confirm.
Through Telephone base:
1. In idle mode, pressand to select Direct Mem.
2. Press to select Key 1, Key 2 or Key 3.
3. Press OK to enter the number.
4. Press OK to confirm.
(Note: key 1, 2, 3 memories is independent among base and each cordless handset.)
PHONEBOOK
Your phone can store up to 100 phonebook entries with names and numbers. Each phonebook entry can have a maximum of 24 digits for the phone number and 12 characters for the name. You can also select different ringtones for your phonebook entries. Phonebook entries are stored in alphabetically by name.
Add a New Phonebook Entry
In idle mode,
Through Cordless Handset:
- Press to access the phonebook, OR Press and or to select Phonebook, then press to access the phonebook list.
- Press to select Add New.
- Repeat steps 3 to 6 of part 6.1.
Through Telephone base:
- Press key OR Press and to select Phonebook, then press OK to access the phonebook list.
- Press OK to select Add New.
- Repeat steps 3 to 6 of part 6.1.
(Note: ! appears to indicate this phonebook is VIP entry.)
View a Phonebook Entry
Through Cordless Handset:
- Repeat step 1 in part 7.1
- Press or to select the desired entry.
- Press , then the name, number and melody of the selected phonebook entry will be shown.
Through Telephone base:
- Repeat step 1 in part 7.1
- Press to select the desired entry.
- Press OK , then the name, number and melody of the selected phonebook entry will be shown.
Edit a Phonebook Entry
Through Cordless Handset:
- Repeat steps 1 and 2 in part 7.2
- Press twice and or to select Edit.
- Press to edit the name.
- Press to edit the number.
- Repeat step 6 in part 6.1
Through Telephone base:
- Repeat steps 1 and 2 in part 7.2
- Press OK twice and to select Edit.
- Press OK to edit the name.
- Press OK to edit the number.
- Repeat step 6 in part 6.1
Make a Phonebook Entry as VIP
Through Cordless Handset:
- Repeat steps 1 and 2 in part 7.2.
- Press twice and or to select VIP?.
- Repeat step 6 in part 6.1
Through Telephone base:
- Repeat step 1 and 2 in part 7.2.
- Press OK twice and to select VIP?.
- Press OK , VIP? will be shown.
- Repeat step 6 in part 6.1
Add a Phonebook Entry to Direct Memory
In idle mode, Through Cordless Handset:
- Repeat step 1 in part 7.1
- Press twice and
 to select Add to DM.
 - Press, and to select M1/ M2/ M3/ Key 1/ Key 2/ Key 3.
- Press to show name, number and melody, and then press to confirm.
Note: If select Key 1 or Key 2 or Key 3, only number will be shown on step 4.
Through Telephone base:
- Repeat step 1 in part 7.1
- Press OK twice and to select Add to DM.
- Press OK , and to select M1/ M2/ M3/ Key 1/ Key 2/ Key 3.
- Press OK to show name and number , then press OK to confirm.
Note: If select Key 1 or Key 2 or Key 3, only number will be shown on step 4.
Delete a Phonebook Entry
Through Cordless Handset:
- Repeat steps 1 and 2 in part 7.2
- Press twice and or to select Delete.
- Press , Confirm? will be shown, and then Press to select √ for delete or X not to delete.
- Press to confirm.
Through Telephone base:
- Repeat steps 1 and 2 in part 7.2
- Press OK to show name, number and melody of the entry.
- Press X , Delete? will be shown. Press OK to confirm delete, or press X confirm not to delete.
Delete the Entire Phonebook
Through Cordless Handset:
- Repeat step 1 and 2 in part 7.2
- Press twice and to select Delete All.
- Press , Confirm? will be show, and then Press to select √ for delete or X for not to delete.
- Press to confirm.
Through Telephone base:
- Repeat step 1 and 2 in part 7.2
- Press OK twice and to select Delete All.
- Press OK , Confirm? will be shown. Press OK to confirm delete, or press X confirm not to delete.
REDIAL LIST
There are up to 10 of the last numbers called stored in redial list. If any of redial list number match with a phonebook entry having name information, the name will be displayed instead.
Store a Redial Number into the Phonebook
In idle mode,
Through Cordless Handset:
- Press and hold * key to access the redial list.
- Press to browse the redial list.
- Press to select desired redial number.
- Press and to select Add To PB.
- Press to enter the name.
- Press to edit the number if necessary.
- Repeat step 5 to 6 in part 7.1
Through Telephone base:
- Press key to access the redial list.
- Press to browse the redial list.
- Press OK to select desired redial number.
- Press OK and to select Add To PB.
- Press OK to enter the name.
- Press OK to edit the number if necessary.
- Repeat step 5 and 6 in part 7.1
(Note: ! appears to indicate this phonebook is VIP entry.)
Store a Call List Number into the Direct Memory
Through Cordless Handset:
- Repeat step 1 and 3 in part 9.1
- Press twice and to select Add to DM.
- Repeat step 4 to 6 in part 8.2.
Through Telephone base:
- Repeat step 1 and 3 in part 9.1
- Press OK twice and to select Add to DM.
- Repeat step 4 to 6 in part 8.2.
Store a Redial Number into the Direct Memory
Through Cordless Handset:
- Repeat steps 1 to 3 in part 8.1.
- Press and to select Add To DM.
- Press and to select M1/ M2/ M3.
- Press to enter the name.
- Press to edit the number if necessary.
- Repeat step 5 to 6 in part 7.1.
Through Telephone base:
- Repeat steps 1 to 3 in part 8.1.
- Press OK and to select Add To DM.
- Press to select M1/ M2/ M3.
- Press OK to enter the name.
- Press OK to edit the number if necessary.
- Repeat step 5 and 6 in part 7.1.
(Note: ! appears to indicate this phonebook is VIP entry.)
Delete a Redial Number
Through Cordless Handset:
- Repeat steps 1 to 3 in part 8.1.
- Press and to select Delete.
- Repeat steps 3 and 4 in part 7.6.
Through Telephone base:
- Repeat Steps 1 to 3 in part 8.1.
- Repeat steps 3 in part 7.6.
Delete the Entire Redial List
Through Cordless Handset:
- Repeat steps 1 to 3 in part 8.1.
- Press and to select Delete All.
- Repeat steps 3 and 4 in part 7.7.
Through Telephone base:
- Repeat Steps 1 to 3 in part 8.1.
- Press OK and to select Delete All.
- Repeat steps 3 in part 7.7.
CALLER DISPLAY (network dependent)
This feature is available if you have subscribed the Caller Line Identification service with your telephone service provider. Your phone can store up to 50 received calls with date/time information in the Call List.
Notes: If the caller information is disabled to send by caller number, “Withheld” will be displayed. If the caller numbers not provided, “Out of Area” will display.
In standby, if three unanswered calls are received, “3 New Calls” will be displayed.
View the Call List
All received calls are saved in Call List with the latest call putting on top of the list. When the call list is full, the oldest call will be replaced by the new call.
In idle mode,
Through Cordless Handset:
- Press and hold # key, or Press and to select Call List.
- Press , the call list will be shown. The unanswered call which has not been read is marked with a * at the end of the number.
- Press to select the desired entry.
- Press , to see more detail information of the desired entry.
Through Telephone base:
- Press key, or Press and to select Call List.
- Press OK , the call list will be shown. The unanswered call which has not been read is marked with a * at the end of the number.
- Press to select the desired entry.
- Press OK , to see more detail information of the desired entry.
Store a Call List Number into the Phonebook
Through Cordless Handset:
- Repeat steps 1 and 3 in Part 9.1.
- Press twice and to select Add To PB.
- Press to enter the name.
- Press to edit the number if necessary.
- Repeat step 5 to 6 in part 6.1.
Through Telephone base:
- Repeat steps 1 and 3 in Part 9.1.
- Press OK twice and to select Add To PB.
- Press OK to enter the name.
- Press OK to edit the number if necessary.
- Repeat step 5 and 6 in part 6.1
(Note: ! appears to indicate this phonebook is VIP entry.)
Store a Call List Number into the Direct Memory
Through Cordless Handset:
- Repeat step 1 and 3 in part 9.1
- Press twice and to select Add to DM.
- Repeat step 4 to 6 in part 8.2.
Through Telephone base:
- Repeat step 1 and 3 in part 9.1
- Press OK twice and to select Add to DM.
- Repeat step 4 to 6 in part 8.2.
Delete an entry in the Call List
Through Cordless Handset:
- Repeat Steps 1 to 3 in part 9.1.
- Press twice and to select Delete.
- Repeat steps 3 and 4 in part 7.6.
Through Telephone base:
- Repeat Steps 1 to 3 in part 9.1.
- Press OK to show name, number and melody of the entry.
- Press OK , Delete? will be shown
- Repeat steps 3 in part 7.6.
Delete the entire list of the Call List
Through Cordless Handset:
- Repeat Steps 1 to 3 in part 9.1.
- Press twice and to select Delete All.
- Repeat steps 3 and 4 in part 7.7.
Through Telephone base:
- Repeat Steps 1 to 3 in part 9.1.
- Press OK twice and to select Delete All.
- Delete All Confirm? will be shown.
- Press OK to confirm delete entire redial list, or press X confirm not to delete.
VOICE MAIL (Network Dependent)
Voice Mail Waiting Indication (VMWI) ![]() appear when a new voice mail message is waiting on the telephone service provider for you to listen. This feature is available only if you have subscribed to the voicemail service from your telephone service provider.
appear when a new voice mail message is waiting on the telephone service provider for you to listen. This feature is available only if you have subscribed to the voicemail service from your telephone service provider.
Access Voice Mail Messages
![]() will appear and the VMWI number is stored in the Call List when you have new message in your voice mailbox.
will appear and the VMWI number is stored in the Call List when you have new message in your voice mailbox.
Through Cordless Handset:
- In idle mode, Press and hold # key, or press and to select Call List.
- Press , press to select the desired VMWI entry.
- Press to dial to the voice mail server, or dial voicemail number provided from the telephone service provider.
Through Telephone base:
- In idle mode, Press key, or Press and to select Call List.
- Press OK , press to select the desired VMWI entry
- Press or lift up corded handset on telephone base to dial to the voice mail server, or dial voicemail number provided from the telephone service provider.
ANSWERING MACHINE
Your phone includes a telephone answering machine that records unanswered calls when it is on. The answering machine can store up to 59 messages within the maximum recording time of approximately 30 minutes. As well as recording incoming messages, you can record memos for other users of your phone. If the answering machine memory is full, the LCD will display Memory Full in idle mode.
Turn On/Off the Answering Machine
Through Cordless Handset:
- Press and to select Ans. Machine.
- Press and to select Tam On/Off.
- Press and to select On or Off.
- Press to confirm.
Through Telephone base:
- Press on the Telephone base to toggle On/ Off of TAM. OR
- Press and to select Ans. Machine.
- Press OK and to select Tam On/Off.
- Press OK and to select On or Off.
- Press OK to confirm.
If answering machine is set to On, ![]() displays on LCD of cordless handset and telephone base station.
displays on LCD of cordless handset and telephone base station.
For answering machine is set to Off, ![]() will disappear from the LCD.
will disappear from the LCD.
Listen to the Messages in the Answering Machine
When new messages are recorded on the answering machine, ![]() flashes on LCD display and the number of new message will appear on LCD display until all the new messages are played.
flashes on LCD display and the number of new message will appear on LCD display until all the new messages are played.
Through Cordless Handset:
- Press and to select Ans. Machine.
- Press and to select MSG Playback..
- Press to start message playback and the screen displays the date and time information of the message received.
- During message playback, press to increase or decrease the message playback volume respec tively.
- Press and to select Stop, Forward, Previous, Delete.
- Press to perform functions respectively during message playback.
- Alternatively, you can use the following shortcut keys to control different operations during message playback.
I. Press to stop message playback (Stop function).
II. Press to skip to repeat playing the current message from the beginning.
III. Press twice to skip backward to the previous message (Previous function).
IV. Press to skip to play next message (Forward function).
V. Press to delete the current playback message (Delete function).
Depu is la base:
Through Telephone base:
- Press .

- The new messages will play from the loudspeaker on telephone base.
- Press to increase or decrease the volume during message playback respectively.
- You can use the following keys Stop, Forward, Previous, Delete to control different operations during message playback.
I. : Stop the message playback.
II. : Skip to play the next message.
III. : Skip backward to playing the previous message.
IV..: Skip to repeat playing the current message from the beginning.
V. : Delete the current playback message.
Delete All Messages in the Answering Machine
Through Cordless Handset:
- Press and to select Ans. Machine.
- Press and to select Del All Old.
- Repeat steps 3 and 4 in part 7.8
Through Telephone base:
- Press and to select Ans. Machine.
- Press OK and to select Del All Old.
- Press OK , Confirm? will be shown.
- Press OK to confirm delete all listened messages, or
 back to idle mode.
Answering Machine Settings
Set the Answer Mode
By default, the answer machine is set in Ans & Rec mode which allows callers to leave a message. This mode can be changed to Answer Only which does not allow callers to leave a message. In that case, your callers will be prompted to call back later.
Through Telephone base:
- Press and
 to select Ans. Machine.
 - Press OK and to select TAM Settings.
- Press OK and to select Answer Mode
- Press OK and to select Ans & Rec or Answer Only.
- Press OK to confirm.
Record Your Own Outgoing Message (OGM)
You can record your own OGM for Ans & Rec mode or Answer Only mode, that will be used while the answering machine answers the call. If your personalized OGM is deleted, the pre-set OGM will be restored automatically.
Through Cordless Handset:
- Repeat steps 1 and 2 in 11.4.1
- Press and to select OGM SETTINGS.
- Press and to select ANS & REC or ANSWER ONLY.
- Press and to select Rec. Message.
- Press to start recording your personalized OGM and “Recording” is displayed on the screen.
- Press to stop and save your personalized OGM. Your newly saved OGM will playback automatically.
Alternatively, press Key C to return to previous screen without saving the personalized OGM.
Through Telephone base:
- Repeat steps 1 and 2 in 11.4.1
- Press OK and to select OGM SETTINGS.
- Press OK and to select ANS & REC or ANSWER ONLY.
- Press OK and to select Record.
- Press OK to start recording your personalized OGM and “Rec. Message” is displayed on the screen.
- Press OK to stop and save your personalized OGM. Your newly saved OGM will playback automatically.
Alternatively, press Key to return to previous screen without saving the personalized OGM
Playback and Delete the Outgoing Message (OGM)
You can playback your own personalized OGM or the pre-set OGM for ANS & REC mode or ANSWER ONLY mode and choose to delete your personalized OGM during playback and record a new one whenever you want. Please note that pre-set OGM cannot be deleted.
Through Cordless Handset:
- Repeat steps 1 to 3 in part 11.4.2.
- Press and to select PLAYBACK.
- Press to playback your personalized OGM (if you have recorded a personalized OGM before) and “Playing OGM” is displayed on the screen. If a personalized OGM is not recorded before, the pre-set OGM will be played.
- Use to select <Stop>, press to stop the OGM playback and return to the previous menu.
- Alternatively use to select Delete in step 2, press to delete your personalized OGM, and return to previous menu. Also the pre-set OGM is restored automatically.
Through Telephone base:
- Repeat step 1 and 3 in 11.4.2.
- Press OK and to select Play.
- Press OK to playback your personalized OGM (if you have recorded a personalized OGM before) and “Playing OGM” is displayed on the screen. If a personalized OGM is not recorded before, the pre-set OGM will be played.
- Press to stop the OGM playback and return to the previous menu.
- Alternatively use to select <Use Default> in step 2.
- Press OK Confirm? will be shown. Press OK to delete your personalized OGM, and return to previous menu.
Also the pre-set OGM is restored automatically.
Note: You are not allow to delete the pre-set OGM.
Set the Answer Delay
You can set the number of rings before the answering machine answers incoming call and starts playing OGM. You can set the answering machine to answer after two to ten rings.
Through Cordless Handset:
- Repeat step 1 and 2 in 11.4.1
- Press and to select Answer Delay.
- Press and to select your desired answer delay.
- Press to confirm.
Through Telephone base:
- Repeat step 1 and 2 in 11.4.1
- Press OK and to select Answer Delay.
- Press OK and to select your desired answer delay.
- Press OK to confirm.
Set the Recording Time of Incoming Message
You can set the maximum length of the recording time for the incoming messages (60S or 120S or 180S).
Through Cordless Handset:
- Repeat step 1 and 2 in part 11.4.1
- Press and to select Record Time.
- Press and to select your desired recording time.
- Press to confirm.
Through Telephone base:
- Repeat step 1 and 2 in part 11.4.1
- Press OK and to select Record Time.
- Press OK and to select your desired recording time.
- Press OK to confirm.
Turn On or Off the Base Screening
You can select to turn on or off the call screening on Telephone base
Through Telephone base:
- Repeat step 1 and 2 in 11.4.1
- Press OK and to select Bs Screening.
- Press OK and to select On or Off.
- Press OK to confirm.
Change Answering Machine Voice Prompt Language
Through Cordless Handset:
- Repeat step 1 and 2 in part 11.5.1.
- Press and to select TAM Language.
- Press and to select your desired Voice Prompt Language.
- Press to confirm.
Through Telephone base:
- Repeat step 1 and 2 in part 11.5.1.
- Press OK and to select TAM Language.
- Press OK and to select your desired Voice Prompt Language.
- Press OK to confirm.
Access Your Answering Machine Remotely
You can ring your XL785 Voice Combo from another tone-dialing phone to switch on or off the answering machine and listen to your messages remotely.
- Place a call from a tone-dialing phone to your XL785 Voice Combo.
- When the answering machine answers the calls and starts playing the OGM, press KEY .
* - Enter the 4-digit Remote Access PIN.
- Press the following keys to carry out your desired function as below table.
| Keys | Functions | |
| While message is playing | While message is not playing | |
| 2 | Delete the current message playback | |
| 4 | Repeat playing the current message from the beginning. Press twice to skip backward to the previous message. | |
| 5 | Stop the current message playback | Play the message |
| 6 | Skip forward to play the next message | |
| 7 | Turn on the answering machine | |
| 9 | Turn off the answering machine |
Note: If your answering machine is switched off, the phone will answer after 12 rings. You can press * and then enter the 4-digit remote access PIN (Default Remote Access PIN is 0000) to activate the remote access feature.
Call Screening
Through Cordless Handset:
When the answering machine is set to On and when there is an incoming message after the preset numbers of rings of answer delay. Screening? will show. Press ![]() or to select
or to select √ or X√ to screen the call on your handset.
X let the cordless handset stay at silent ring mode.
At any time if you want to pick up the call, you can press ![]() on the cordless handset.
on the cordless handset.
Through Telephone base:
When the Bs Screening is set to On and when there is an incoming message, the Telephone base will start call screening after the preset numbers of rings of answer delay.
At any time if you want to pick up the call, you can press ![]() or lift up corded handset on telephone base.
or lift up corded handset on telephone base.
Note: The message recording will be stopped automatically. If the answering machine is in the process of recording, the message already stored will be saved.
ALARM SETTINGS
You can set an alarm clock for telephone base and individual cordless handset. When an alarm is set, the ![]() displays on the LCD. When the alarm time is reached, the
displays on the LCD. When the alarm time is reached, the ![]() and “Alarm On” flash on the LCD. Telephone base or individual cordless handset will ring with the alarm melody for a duration of 30 seconds. You can press any key to disable the alarm. If snooze function is activated, the alarm will sound again at the end of the snooze period of 6 minutes.
and “Alarm On” flash on the LCD. Telephone base or individual cordless handset will ring with the alarm melody for a duration of 30 seconds. You can press any key to disable the alarm. If snooze function is activated, the alarm will sound again at the end of the snooze period of 6 minutes.
Note: The alarm volume level is the same as the settings of the handset ringer volume. If the handset ringer is set to Off, the alarm still sounds at Volume 1 level.
Through Cordless Handset:
- Press and to select Alarm.
- Press and to select On/Off.
- Press If On is selected, you will be asked to enter the alarm time.
- Enter the alarm time.
- Press and to select Once or Daily.
- Press to set the snooze function, and <UP> or <DOWN> to select On or Off.
- Press to confirm.
Through Telephone base:
- Press and to select Alarm.
- Press OK and to select On/Off.
- Press OK . If On is selected, you will be asked to enter the alarm time.
- Enter the alarm time.
- Press OK and to select Once or Daily.
- Press OK to set the snooze function, and <UP> or <DOWN> to select On or Off.
- Press OK to confirm.
PHONE SETTINGS
Set Ringer Volume
For Cordless Handset:
- Press and to select HS Settings.
- Press and to select Ring Setup.
- Press and to select Ring Volume.
- Press and to select the desired ringer volume. There are 6 ringer volume levels including Off.
- Press to confirm.
For Telephone base:
- Press and to select BS Settings.
- Press OK and to select Ring Volume.
- Press OK and to select the desired ringer volume. There are 6 ringer volume levels including Off.
- Press OK to confirm
Note: The respective ringer volume will be played during your selection. If Off is selected, ![]() icon will display.
icon will display.
Set Ringer Melody
For Cordless Handset:
- Repeat steps 1 and 2 of 13.1
- Press and to select Int. Ring (for intercom call) or Ext. Ring (for incoming call).
- Press and to select the desired ringer melody. There are total of 10 melodies for selection.
- Press to confirm.
For Telephone base:
- Press and to select BS Settings.
- Press OK and to select BS Ringer.
- Press OK and to select the desired ringer melody. There are total of 5 melodies for selection.
- Press OK to confirm.
Set Alert Tone
For Cordless Handset:
- Press and to select HS Settings.
- Press and to select Tone Setup.
- Press and to select Key Tone/ Battery Tone / Out Of Range.
- Press and to turn On or Off these tones.
- Press to confirm.
For Telephone base:
- Press and to select BS Settings.
- Press OK and to select Key Tone.
- Press OK and to turn On or Off.
- Press OK to confirm.
LCD Contrast
For Cordless Handset:
- Press and to select HS Settings.
- Press and to select LCD Contrast.
- Press and to select desired Contrast level. There are 5 level for selection.
- Press to confirm the LCD contrast level.
For Telephone base:
- Press and to select BS Settings.
- Press OK and to select LCD Contrast.
- Press OK and to select desired Contrast level. There are 5 level for selection.
- Press OK to confirm the LCD contrast level.
Set the Date and Time
Change the Date Format
Through Cordless Handset:
- Press and to select HS Settings.
- Press and to select Date & Time.
- Press and to select Date Format.
- Press and to select your desired date format (DD-MM-YY or MM-DD-YY).
- Press to confirm.
Through Telephone base:
- Press and to select BS Settings.
- Press OK and to select Date & Time.
- Press OK and to select Date Format.
- Press OK and to select your desired date format (DD-MM-YY or MM-DD-YY).
- Press OK to confirm.
Change the Time Format
Through Cordless Handset:
- Repeat step 1 and 2 of 13.5.1
- Press and to select Time Format.
- Press and to select your desired time format (12 HR or 24 HR).
- Press to confirm.
Through Telephone base:
- Repeat step 1 and 2 of 13.5.1
- Press OK and to select Time Format.
- Press OK and to select your desired time format (12 HR or 24 HR).
- Press OK to confirm.
Set the Date and Time
Through Cordless Handset:
- Repeat step 1 and 2 in part 13.5.1
- Press and to select Set Time.
- Press to enter the date information.
- Press to enter the time information.
- Press to confirm.
Through Telephone base:
- Repeat step 1 and 2 of 13.5.1
- Press OK and to select Set Time.
- Press OK to enter the date information.
- Press OK to enter the time information.
- Press OK to confirm.
Rename the Cordless Handset
- Press and to select HS Settings.
- Press and to select Rename HS.
- Press and enter the name of your handset.
- Press to confirm.
Change Display Language
For Cordless Handset:
- Press and to select HS Settings.
- Press and to select Language.
- Press and to select desired language.
- Press to confirm.
For Telephone base:
- Press and to select BS Settings.
- Press OK and to select Language.
- Press OK and to select desired language.
- Press OK> to confirm.
Registration Cordless Handset to Telephone Base
Your handset and base station is pre-registered. Up to 4 handsets can be registered to a single base station.
For new handset, registration is required before use.
Through Cordless Handset:
- Press and to select HS Settings.
- Press and to select Registration.
- Press and enter the 4-digit system PIN (This PIN is equal to 0000 by default).
- Press to confirm. Please wait will display on Cordless Handset LCD.
- Press and hold <Page> on the Telephone base for about five seconds, the base station is entered into registration mode. Registering will display on Telephone base LCD.
- When registration is successfully completed, the handset displays Handset x (X represents the number assigned to the handset). The handset then synchronizes data, such as contacts, speed dial numbers and handset names, with all other already registered handsets.
De-register a Handset
You are requested to enter the 4-digit PIN in order to de-register a handset from the base station (default PIN is 0000).
Through Telephone base:
- Press and to select BS Settings.
- Press OK and to select Delete HS.
- Press OK and you are requested to enter the 4-digit system PIN.
- Enter the 4-digit system PIN.
- Press OK and a list of registered handsets is displayed.
- Press to select one of the handsets that you want to de-register.
- Press OK to confirm.
Change the System PIN Code (Default system PIN code is 0000)
Through Telephone base:
- Press and to select BS Settings.
- Press OK and to select Change Pin.
- Press OK and enter the 4-digit current system PIN.
- Press OK New Pin? will be shown, and enter the new system PIN.
- Press OK Confirm? will be shown, and enter the new system PIN again.
- Press OK to save the new system PIN.
Reset Your Phone
You can reset your phone to the default settings by Through handset or telephone base. After reset, all your personal settings, redial and call list entries will be deleted, but your phonebook, direct memory entries and Call block list remains unchanged.
Through Cordless Handset:
- Press and to select HS Settings.
- Press and to select Default.
- Press and enter the 4-digit system PIN.
- Press to confirm.
- Confirm? will be show. Select √ to confirm delete, or select X confirm not to delete.
Note: After reset your phone, Welcome mode screen will appear again, then you can select the desired country.
TECHNICAL SPECIFICATIONS
| Free Field Range | Up to 300 metres* |
| Indoor Range | Up to 50 metres* |
| Handset Battery Life (average values) | 10 hours talk time** 100 hours standby** |
| Number of Handsets | Up to 4 |
| Intercom Mode | Yes |
| Three-Way Conference (1 outside correspondent + 2 internal correspondents) | Yes |
| Electrical Connection/Base Mains Adaptor/Charger | Main base adapter and charger: Model No .: AT-337E-060045A or 1-CHEUA451-081 Input: 100-240 V / 50-60 Hz / 0.15 A Output: 6 V DC / 450 mA, 2.7 W Use only the adapters provided with the phone. Single-phase AC, excluding IT installations defined by the standard EN62368-1. Attention: The network voltage is classified as dangerous according to the criteria of this standard. |
| Telephone Connection | Appliance designed for connection to a TNV3 class (telecommunications network voltage) analogue telephone line as defined by the EN62368 standard. |
| Batteries | AAA battery pack – 2.4 V – 300 mA Only use the batteries supplied with the telephone. Use any other type of battery presents a risk of explosion. Used batteries must be disposed of in compliance with current environmental protection regulations. |
| Operating Temperature | From 5°C to 40°C |
* Values may vary according to environment.
** Depending on initial battery charge.
TROUBLESHOOTING
If you have difficulty with your phone, please try the suggestions listed below.
| Problem | Cause | Solutions |
| No dialing tone when pressing | a. The connection cord of the base station may not be plugged in. b. The adapter cord may not be plugged in correctly in the base station. c. The line may be busy, as another handset may not be used. | a. Check the connections. Unplug and plug back in the mains. Check that the telephone line cord has been plugged into the base station and the phone socket. b. Check the base station plug and the 220V plug (remove and plug-in). c. Wait until the line is unoccupied. |
| When connected to a PBX, no and/or wrong connection after dialing. | Dialing prefix is needed. | Insert the dialing prefix. |
| “OUT OF RANGE” is displayed. | a. Base station may be out of range. b. Base station may not be connected to mains. | a. Reduce the range. b. Connect base station to mains. |
| The call does not work. | Service may not be activated or wrong operation or wrong setting | Check your Subscription with network |
| No display. | Empty battery | Recharge battery |
| Incoming calls are blocked (if you did not intend to enable Call Block function) | a. Check if BLOCK SET. is set to VIP OK or CONTACTS OK? b. Check if BLOCK SET. is set to ON and the incoming call in blacklist? | a.If so, set BLOCK SET. to OFF. b.If so, clean up the number in Blocklist in part 5.1.4. |
| Answering Machine | ||
| The unit does not record new messages. | The answering machine may be turned off. | Turn on the answering machine. |
| The caller cannot leave a message. | a. The answering machine may be turned off. b. Message memory may be full. | a. Turn on the answering machine. b. Erase unnecessary messages. |
| I cannot operate the answering machine remotely. | a. You may be entering the wrong remote access code. b. You may be pressing the dial keys too quickly. c. The answering machine may be turned off. d. You may be Through a pulse telephone. | a. If you forget the remote access code, reset to the default settings. b. Press each key firmly. c. Turn on the answering machine. d. Try again Through a touch tone phone. |
| While recording an outgoing message or listening to messages, the unit rings and recording stops. | Probably a call is being received. | Answer the incoming call and try again to record your outgoing message later. |
Please contact the technical support of the telephone service provider for further information.
WARRANTY
Please carefully read the user guide included in this kit. The Alcatel XL785 Combo product is approved equipment in accordance with European regulations, attested by the CE mark. The product you have just purchased is a technological product, it must be handled with care.
Note: you have a legal warranty on this product in accordance with the applicable regulations on the sale of consumer goods in the country where you made this purchase.
For any information relating to this legal warranty, please contact your dealer.
Without prejudice to the legal warranty from which the products benefit, ATLINKS guarantees that the product appearing in this box complies with its technical specifications appearing in the user guide included in this box, and this for a warranty period, counted from the date of purchase of the new Product, the date appearing on your invoice or receipt showing the name of your reseller as proof, and equal to: Twenty four (24) months for the telephone device, at the exclusion of consumables, accessories and batteries.
For any claim under this warranty during the warranty period, you must return the entire Product to your reseller, along with proof of purchase, consisting of the invoice or sales receipt issued by your reseller, indicating the place of purchase and the number of the invoice or sales receipt issued by your reseller, indicating the place of purchase and the serial number of the Product, following the appearance or discovery of the defect. ATLINKS
undertakes to repair any defective item due to a design, material or manufacturing defect, at its expense, or to replace it, at its expense, with an identical or at least equivalent item in terms of functionality and performance.
If repair or replacement is impossible under normal commercial conditions, the Product will be refunded to you or replaced by an equivalent Product. To the maximum extent permitted by applicable law, the replacement product or component, which may be new or reconditioned, is warranted for a period of ninety (90) days from the date of repair or until the end date of the initial warranty period if the latter is greater than ninety (90) days, it being specified that any period of immobilization of the Product of at least seven (7) days will be added to the duration of warranty remaining to run. This guarantee does not apply in the following cases:
- Installation or use not in accordance with the instructions in the user guide,
- Poor connection or abnormal use of the Product, in particular with incompatible accessories, as indicated in the user guide,
- Product opened, modified or replaced using unapproved parts, serial number erased, illegible, damaged, Normal wear and tear, including normal wear and tear of accessories, batteries and screens,
- No compliance with the technical and safety standards in force in the geographical area of use,
- Product having suffered a shock or a fall,
- Product damaged by lightning, an electrical surge, a source of heat or radiation, water damage, exposure to excessive ambient conditions or any other cause external to the product,
- Negligence or faulty maintenance,
- A intervention, modification or repair carried out by a person not approved by ATLINKS.
If the returned Product is not covered by the warranty, you will receive a repair estimate which will mention the cost of analysis and the transport costs which will be charged to you if you wish the Product to be returned to you.
This warranty is valid in the country in which you regularly purchased the Product, provided that this country is a member of the European Union. Subject to the legal provisions in force, these are expressly excluded.
TO THE MAXIMUM EXTENT PERMITTED BY APPLICABLE LAW,
A) THIS WARRANTY IS EXCLUSIVE OF ALL OTHER WARRANTIES, EXPRESS OR IMPLIED, INCLUDING MERCHANTABILITY OR FITNESS FOR A PARTICULAR PURPOSE:
B) ATLINKS DISCLAIMS ANY RESPONSIBILITY FOR LOSS OR DAMAGE TO DATA, LOSS OF FAILED USE, LOSS OF CHANCE, TURNOVER OR REVENUE, LOSS OF OPERATION, CONSEQUENTIAL, INCIDENTAL, CONSEQUENTIAL, OR INCIDENTAL DAMAGES;
C) ATLINKS’S LIABILITY IS LIMITED TO THE PURCHASE VALUE OF THE PRODUCT, EXCEPT MAJOR OR INTENTIONAL MISTAKE, AND EXCEPT BODILY DAMAGE.
SAFETY
In the event of an electrical hazard, the mains adapter acts as a 230 V electrical isolation device. It must therefore be installed near the device and easily accessible as a precaution. To disconnect the device from the main power source, the AC adapter must be removed from the 230 V AC / 50 Hz outlet.
If the AC adapter fails, it must be replaced with an identical model.
If it is not plugged into the mains or if there is a power failure, phones that use cordless handsets will not work. You will then no longer be able to make or receive calls in an emergency. We therefore recommend that you also keep a conventional telephone – which does not require a power supply – s a backup solution.
! Do not use the phone to report a gas leak by standing in the vicinity of the leak.
It is recommended that you avoid using this device during lightning storms. Do not try to open the batteries as they contain chemicals. In the event of a leak, avoid contact with skin, eyes, nose and mouth. In case of contact, rinse the affected part for about 20 minutes with running water and see an emergency doctor. Clean the product with absorbent paper or a dry cloth and contact your dealer for battery replacement.
ENVIRONMENT
 This symbol means that your inoperative electronic device must be collected separately and must not be mixed with household waste. The European Union has set up a specific collection and recycling system for which manufacturers are responsible.
This appliance has been designed and manufactured with high quality materials and components which can be recycled and reused. Electrical and electronic devices are likely to contain parts necessary for the correct functioning of the system, but which can become a risk to health and the environment if they are not handled or disposed of properly. Therefore, please do not dispose of your inoperative appliance with household waste. If you own the device, you must drop it off at the appropriate local collection point or leave it with the seller when purchasing a new device.
- If you are a professional user, please follow the instructions of your supplier.
- If the device is rented or left to you, please contact your service provider.
Concerned about preserving the environment, ATLINKS has equipped this device with a switching power supply, offering better energy efficiency. The advantages are not only very low power consumption, but also a more compact size than the conventional power supplies used by the previous range. The used batteries of your phone (if it is equipped with batteries) should be disposed of in accordance with applicable environmental protection regulations. Observe local regulations. Return your batteries to your dealer or dispose of them at an authorized recycling center.
Help us protect the environment we live in!
CONFORMITY
 The undersigned, ATLINKS EUROPE, declares that the DECT type radio equipment is in compliance with Directive
2014/53 / EU. The full text of the EU declaration of conformity is available at the following internet address: www.alcatel-home.com
Then, Support / Declarations of conformity Average power per channel of 10mW
Maximum transmit power: 24dBm
Frequency range: 1880-1900MHz
Hereby, ATLINKS EUROPE declares that the radio equipment type DECT is in compliance with Legislation : Radio Equipment Regulations 2017 (SI 2017/1206). The full text of the UKCA declaration of conformity is available at the following internet address: www.alcatel-home.com
www.alcatel-home.com
ATLINKS Europe
147 avenue Paul Doumer
92500 RUEIL-MALMAISON France
RCS Nanterre 508 823 747
© ATLINKS 2021 – Reproduction prohibited.
The Manufacturer reserves the right to modify the specificationsof its products
in order to make technical improvements or complywith new regulations.
ALCATEL and ATLINKS are registered trademarks.
Alcatel is a trademark of Nokia, used under license by ATLINKS.
Alcatel XL785 Voice Combo
A/W No: 10002461 Rev.0 (EN)
Printed in China


