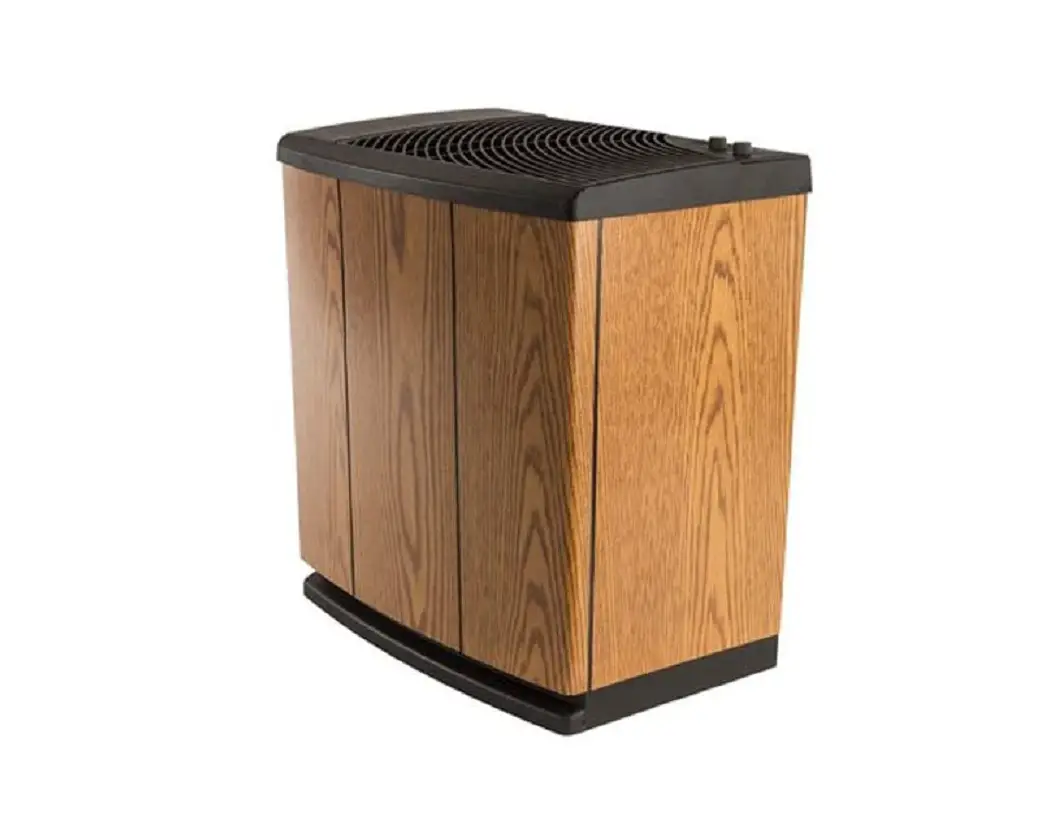
AIRCARE Evaporative Humidifier

AIRCARE Evaporative Humidifier
IMPORTANT SAFEGUARDS
General Safety Instructions
READ BEFORE USING YOUR HUMIDIFIER
DANGER: means if the safety information is not followed someone will be seriously injured or killed.
WARNING: means if the safety information is not followed someone could be
seriously injured or killed.
CAUTION: means if the safety information is not followed someone may be injured.
- To reduce the risk of fire or shock hazard, this humidifier has a polarized plug (one blade is wider than the other.) Plug humidifier directly into a 120V, A.C. electrical outlet. Do not use extension cords. If the plug does not fully fit into the outlet, reverse plug. If it still does not fit, contact a qualified electrician to install the proper outlet. Do not change the plug in any way.
- Keep the electric cord out of traffic areas. To reduce the risk of fire hazard, never put the electric cord under rugs, near heat registers, radiators, stoves or heaters.
- Always unplug the unit before moving, cleaning or removing the fan assembly section from the humidifier, or whenever it is not in service.
- Keep the humidifier clean.
- Do not put foreign objects inside the humidifier.
- Do not allow unit to be used as a toy. Close attention is necessary when used by or near childre
- To reduce the risk of electrical hazard or damage to humidifier, do not tilt, jolt or tip humidifier while unit is running.
- To reduce the risk of accidental electrical shock, do not touch the cord or controls with wet hands.
- To reduce the risk of fire, do not use near an open flame such as a candle or other flame source.
WARNING: For your own safety, do not use humidifier if any parts are
damaged or missing.
WARNING: To reduce risk of fire, electric shock, or injury always unplug before servicing or cleaning.
WARNING: To reduce the risk of fire or shock hazard, do not pour or spill water into control or motor area. If controls get wet, let them dry completely and have unit checked by authorized service personnel before plugging in.
INTRODUCTION
Your new humidifier adds invisible moisture to your home by moving dry air through a saturated wick. As air moves through the wick, the water evaporates into the air, leaving behind any white dust, minerals, or dissolved and suspended solids in the wick. Because the water is evaporated, there is no messy mist or spray, just clean and invisible moist air.
As the evaporative wick traps accumulated minerals from the water, its ability to absorb and evaporate water decreases. We recommend changing the wick at the beginning of every season and after every 30 to 60 days of operation to maintain optimum performance. In hard water areas, more frequent replacement may be necessary to maintain your humidifier’s efficiency.
Use only AIRCARE® or Essick Air® brand replacement wicks and additives. To order parts, wicks and other products call 1-800-547-3888. This humidifier uses wick part number 1045(CN). Only the AIRCARE® evaporative wick guarantees the certified output of your humidifier. Use of other brands of wicks voids the certification of output.
HOW YOUR HUMIDIFIER WORKS
LEGEND:
- Water bottle
- Chassis/power pack (motor/fan assembly)
- Evaporative wick
- Water reservoir
- Dry room air intake
- Moist air output
FEATURES
| Total Water capacity | 5.4 gallons (bottle and base) |
| Sq. ft. coverage* | Up to 3700 (tight constr.) |
| Fan Speeds | 4 |
| Replacement wick | 1045(CN) |
| Adjustable humidistat | Yes |
| Auto shutoff | Yes |
| Refill indication | Yes |
| Control type | Analog with digital display |
| Casters | Yes (4) |
| ETL Listed | Yes |
| Volts | 120 |
| Hertz | 60 |
| Watts | 80 |
Once the wick becomes saturated, air is drawn in, passes through the wick and
moisture is circulated into the air. All evaporation occurs in the humidifier so any residue remains in the wick. This natural process of evaporation creates no white dust like some other humidifiers. Dry air is drawn into the humidifier though the back and moisturized as it passes through the evaporative wick. It is then circulated out into the room. *In accordance with HU-1-2016. Output based on 8’ ceiling.
Results may vary due.
CAUTIONS ON ADDITIVES TO WATER:
- To maintain the wick’s integrity and warranty, never add anything to the water
except Essick Air bacteriostat for evaporative humidifiers. If you only have softened water available in your home, you can use it, but mineral buildup will occur more quickly. You can use distilled or purified water to help extend the life of the wick. - Never add essential oils in the water. It can damage the plastic seals and cause leaks.
ASSEMBLY
UNPACKING AND SETTING UP THE UNIT
- Remove the two inserts from the top of the humidifier.
- Open the water bottle covers. Remove the water bottles, lift off the chassis/power pack and then remove the humidifier cabinet from the carton.
- Remove the evaporative wick and all of the remaining packaging materials from the cabinet. Check to see that you have all of the following items removed from the boxes, accessory kit, and cabinet before discarding the packaging:
- Filler Hose
- Caster kit
- Bacterial treatment sample
- Evaporative Wick
- Water Bottle with cap
- Float, float rod and retainer
- Manual
CASTERS
- With access to the bottom of the cabinet, insert each caster stem into a caster hole on each corner of the humidifier bottom. The casters should fit snugly and be inserted until the stem shoulder reaches the cabinet surface. Turn the cabinet right side up.


NOTE:
To ensure bottle empties properly, use a bubble level to verify the humidifier cabinet is placed on a level surface.
EVAPORATIVE WICK
- When placing the wick back into the humidifier, the rod and float assembly must also be reattached. Insert the top of the float rod through the hole on the extended wick retainer (attached to the top of the wick frame)


- Holding the float in place, lower the wick and float assembly together into the cabinet. Thewick has a mounting rib on the top edge which hooks over a rib at the inside back of the cabinet.


NOTE: The float rod retainer must be extended prior to inserting the float rod. The white float must be positioned into the pocket in the bottom of the cabinet.
FILLING INFORMATION
CAUTION: In order to reduce the possibility of electrical shock, ensure the control panel stays dry.
- Your humidifier is equipped with one water bottle. A fill hose that fits most faucets is provided with your humidifier. Fill the bottle with cool, fresh(preferably unsoftened) water. If you only have softened water available in your home, you can use it, but mineral buildup will occur more quickly.
- For optimum running time, fill the water bottle, tighten the cap, and place inside unit. The bottle will drain until the reservoir is filled. Remove and refill bottle.
- Place the water bottle into the left side of the humidifier with the valve cap end down, so that the groove in the water bottle faces the inside. Replace the water bottle cover.


CAUTION: When filling, be careful not to pressurize the bottle by overfilling it. Bottle damage can result from this, and unit will not drain properly.
NOTE: On initial fill up, it will take approximately 20 minutes for the reservoir to fill because the dry wick has to absorb water. Subsequent fillings will take approximately 12 minutes, since the wick is already saturated.
CAUTION: Use only EPA Registered Bacteriostat. Under no circumstances should you use Water Treatment products intended for Rotobelt or Ultrasonic humidifiers.
NOTE: Each refill we recommend adding bacteriostat to reduce bacterial growth. We recommend using Essick Air Bacteriostat treatment P/N 1970 available for purchase on line at www.aircareproducts.com or by calling 1-800-547-3888.
When both the water bottle and reservoir have emptied, the humidifier fan will automatically shut off, but will start again automatically when the water bottle and reservoir are refilled.
HASSIS/POWER PACK
Place the chassis/power pack unit into the cabinet, so it fits without tipping or rocking.
OPTIONAL AIR CLEANING FILTER
If available, install the 1051(CN) AIRCARE® air filter at the back of the unit. The filter has four tangs that engage into four keyhole slots that mount the air filter onto the outside of the back of the cabinet. See page 8 for more information on the AIRCARE® air filter.
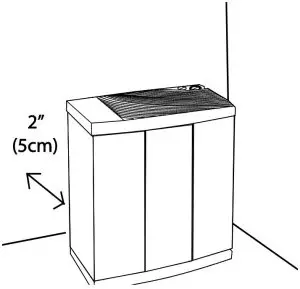
NOTES ON LOCATION:
In order to get the most effective use from your humidifier, it is important to position the unit where the most humidity is needed or where the moist air will be circulated throughout the house such as near a cold air return. If the unit is positioned close to a window, condensation may form on the window pane. If this occurs the unit should be repositioned in another location.
Place humidifier on a flat level surface. Do NOT position the unit directly in front of a hot air duct or radiator. Do NOT place on soft carpet. Due to release of cool, moist air from the humidifier, it is best to direct air away from thermostat and hot air registers. Position humidifier next to an inside wall on a level surface at least 2 inches away from the wall or curtains.
Be sure that the humidistat, which is located on the power cord, is free from obstruction and away from any hot air source.
ABOUT HUMIDITY
Where you set your desired humidity levels depends on your personal comfort level, the outside temperature and the inside temperature.
NOTE: Recent CDC tests show that only 14% of flu virus particles could infect people after 15 minutes at levels of 43% humidity.
You may wish to purchase a hygrometer to measure the humidity level in your home.
The following is a chart of recommended humidity settings.
IMPORTANT: Water damage may result if condensation starts to form
on windows or walls. Humidity SET point should be lowered until condensation no longer forms. We recommend room humidity levels do not exceed 50%.
| *When Outdoor Temperature is:
°F ° C | Recommended Indoor Relative Humidity (RH) is | |
| -20 | -30° | 15 – 20% |
| -10° | -24° | 20 – 25% |
| 2° | -18° | 25 – 30% |
| 10° | -12° | 30 – 35% |
| 20° | -6° | 35 – 40% |
| 30° | -1° | 40 – 43% |
Model 1990 digital hygrometer is available for purchase by calling 1-800-547-3888.
NOTE: External hygrometer readings and humidistat readings may differ. Humidity levels can vary significantly even in one room. The amount of time it takes to affect the room humidity depends on the relative humidity of the air. In especially dry areas it could take up to 48 hours to see humidity climb to the desired level.
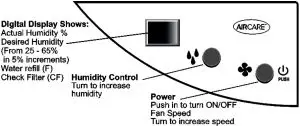
CONTROLS AND OPERATION
This unit has a hybrid control panel with knobs for adjustment and a digital display to monitor humidity and fan settings.
- Plug cord into wall receptacle. Your humidifier is now ready for use.
- Push in on the Power (lower) knob to turn the unit on.

FAN SPEED - Rotate the fan speed knob clockwise to increase the speed. The 4 speed settings will be shown on the LED display.

NOTE: When excessive condensation exists, a lower speed setting
is recommended.
HUMIDITY CONTROL
NOTE: Allow 10 to 15 minutes for the humidistat to adjust to the room when setting up the unit for the first time.
NOTE: This model has an automatic humidistat with settings from 25-65%. The humidistat will turn the humidifier on when the humidity in your home is below the humidistat setting and will turn the humidifier off when the humidity reaches the humidistat setting. When set at 65%, the humidifier will operate continuously until the unit is empty, and the fan turns off. - For initial operation, set the humidity knob at a midpoint setting (45-50% is recommended) and adjust up or down from there to achieve the desired humidity level. The digital display will show the desired setting momentarily, and then revert to displaying the actual humidity.

CONTROL PANEL DISPLAYS:
Several functions of the humidifier can be monitored through the LED display on the control panel.
REFILL INDICATION: - The letter F on the display indicates when the unit is entirely out of water. The motor will cut off at this point.

FILTER INDICATION:
The filter’s condition is critical to the humidifier’s effectiveness. A check filter function (CF) will display every 720 hours of operation to remind the user to check the condition of the wick. Water quality significantly affects the life of a wick, so replacement of wick may be required more often if hard water conditions exist.
- When the Check Filter (CF) message is displayed, turn off, disconnect the power cord and check the condition of the wick. Replace wick as necessary. The CF function is reset after plugging the unit back in.


CONTROL LOCK FEATURE
To avoid unwanted tampering with the humidifier settings the controls can be locked.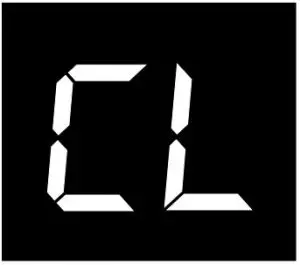
CONTROL LOCK ACTIVATION PROCEDURE
After the humidifier functions have been set up, hold the power button down for 5 seconds. The display will show “CL”( CONTROL LOCK) for 2 seconds; release the power button and the control will resume the display of the room humidity. The humidifier will continue to function with the locked in settings. If buttons are operated while “CL” is active, the “CL” is displayed and settings are unaffected.
CONTROL LOCK DEACTIVATION PROCEDURE
To deactivate the “CL” function simply press and hold the power button for 5 seconds. “CL” will flash at the rate of 1 second on and 1 second off for a period of seconds and then resume the display of room humidity.
OPTIONAL AIRCARE® AIR FILTER (Sold Separately)
The air filter number model 1051(CN) is an excellent means of cleaning the air while using your humidifier. The first stage of the air filter is a high-efficiency, electrostatically charged filter media which traps dust, pollen, and airborne pollutants. The second stage is an activated carbon media which absorbs odors from cooking, pets, and tobacco smoke. We recommend replacing the AIRCARE® air filter at least once a year and more often if necessary. When the white filter media is coated with a layer of dust and dirt, it is time to replace the air filter. The certified water output of your humidifier will be reduced when using the air filter. *The air filters are optional and are not required for normal operation of the humidifier. The 1051(CN) is available for purchase on line or by calling 1-800-547-3888.
CARE AND MAINTENANCE
CAUTION: Disconnect power before, cleaning or servicing unit. Keep grille dry at all times.
Cleaning your humidifier regularly helps reduce odors and bacterial and fungal growth. Ordinary household bleach is a good disinfectant and can be used to wipe out the humidifier base and bottle/reservoir after cleaning. We recommend cleaning your humidifier whenever changing the wicks. We also recommend using Essick Air® Bacteriostat Treatment each time you refill your humidifier to reduce bacterial growth. Add bacteriostat according to the instructions on the bottle. Please go online at www.aircareproducts.com or call 1-800-547-3888 to order P/N 1970(CN).
STANDARD CLEANING
- Turn off unit completely and unplug from outlet. Open bottle covers.
- Lift out the water bottle and remove the chassis.
- Carry bottle and base to cleaning basin. Remove and dispose of used wick.
- Empty the water from the reservoir and water bottle. Fill reservoir and water bottle ½ full with water and add 8 oz. (1 cup) of white vinegar to each. Let stand 20 minutes. Then empty solution.
- Dampen a soft cloth with white vinegar and wipe out reservoir to remove scale.
Rinse the water bottles and reservoir thoroughly with fresh water to remove scale and cleaning solution before disinfecting.
DISINFECTING UNIT - . Fill the water bottle and reservoir ½ full with water and add 1 teaspoon of bleach to each. Wipe all surfaces on water bottle and cabinet. Let solution stay for 20 minutes, then rinse with water until bleach smell is gone. Dry with clean cloth. The outside of the unit and water bottle may be wiped down with a soft cloth dampened with fresh water.
- Refill unit and re-assemble per ASSEMBLY instructions.
SUMMER STORAGE
- Clean unit as outlined in Care & Maintenance section.
- Discard used wick and any water in the reservoir or bottles and allow to dry thoroughly before storage. Do not store with water inside reservoir or bottles.
3. Do not store unit in an attic or other high-temperature area, as damage will occur. - Install new filter at beginning of season.
TROUBLESHOOTING
| Trouble | Probable Cause | Remedy |
| Unit does not operate on any speed setting |
|
|
| – |
|
|
| – |
|
|
| Motor does not Turn On. |
|
|
| Water not draining into reservoir |
|
|
| – |
|
|
| Not enough humidity. |
|
|
| Too much humidity. (condensation becomes heavy on fold surfaces in room) |
|
|
| Water leak |
|
|
| Trouble | Probable Cause | Remedy |
| Odor |
|
|
| “CF” message does not appear even when wick is dirty or humidifier performance is clearly reduced. |
|
|
| Display blinks or fan moves slightly when humidifier is plugged in. |
|
|
| Alternating “F” and room humidity displayed. |
|
|
| Alternating “CF” and room humidity displayed. |
|
|
| Display flashes “20” |
Unit cannot read below 20%. |
|
| Display flashes ”—“ |
|
|
LIST OF REPLACEMENT PARTS
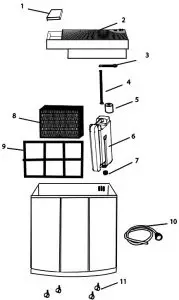
| Item No. | Part Number | Description | Qty |
| 1 | 4V5096101 BLK | Bottle cover lid | 1 |
| 2 | 1B72344 | Chassis | 1 |
| 3 | 1B72647 | Float Rod Retainer | 1 |
| 4 | 4V5098201BLKP | Float Rod | 1 |
| 5 | 1B71675 | Styrofoam float | 1 |
| 6 | 1B5060120 | Water Bottle | 1 |
| 7 | 1B5060000 | Bottle Cap Assy. | 1 |
| 8 | 1045(CN) | Wick | 1 |
| 9 | 1051(CN) | Air Filter (Optional – sold separately) | 1 |
| 10 | 1B5060140 | Fill hose | 1 |
| 11 | 1B5460070 | Casters | 4 |
| 12 | 1B72893 | Manual ( not shown) | 1 |
HUMIDIFIER TWO YEAR LIMITED WARRANTY POLICY
SALES RECEIPT REQUIRED AS PROOF OF PURCHASE FOR ALL WARRANTY CLAIMS.
This warranty is extended only to the original purchaser of this humidifier when the unit is installed and used under normal conditions against defects in workmanship and materials as follows:
- Two (2) years from date of sale on the unit, and
- Thirty (30) days on wicks and filters, which are considered disposable components and should be replaced periodically.
The manufacturer will replace the defective part/product, at its discretion, with return freight paid by the manufacturer. It is agreed that such replacement is the exclusive remedy available from the manufacturer and that TO THE MAXIMUM EXTENT PERMITTED BY LAW, THE MANUFACTURER IS NOT RESPONSIBLE FOR DAMAGES OF ANY KIND, INCLUDING INCIDENTAL AND CONSEQUENTIAL DAMAGE OR LOSS OF PROFITS OR REVENUES.
Some states do not allow limitations on how long an implied warranty lasts, so the above limitations may not apply to you.
Exclusions from this warranty
We are not responsible for replacement of wicks and filters.
We are not responsible for any incidental or consequential damage from any malfunction, accident, misuse, alterations, unauthorized repairs, abuse, including failure to perform reasonable maintenance, normal wear and tear, nor where the connected voltage is more than 5% above the nameplate voltage.
We are not responsible for any damage from the use of water softeners or treatments, chemicals or descaling materials.
We are not responsible for the cost of service calls to diagnose the cause of trouble, or labor charge to repair and/or replace parts.
No employee, agent, dealer or other person is authorized to give any warranties or conditions on behalf of the manufacturer. The customer shall be responsible for all labor costs incurred.
Some states do not allow the exclusion or limitation of incidental or consequential damages, so the above limitations or exclusions may not apply to you.
How to obtain service under this warranty
Within the limitations of this warranty, purchaser with inoperative units should contact customer service at 800-547-3888 for instructions on how to obtain service within warranty as listed above.
This warranty gives the customer specific legal rights, and you may also have other rights which vary from province to province, or state to state. Register your product at www.aircareproducts.com.
DOWNLOAD RESOURCES
- AIRCARE Evaporative Humidifier [pdf] Instructions AIRCARE, Humidifier, H12 CN SERIES, H12 300HB, H12 400HB CN, H12600 CN
- Read more: https://manualsee.com/aircare/evaporative-humidifier-manual#ixzz7od8e14tw
FAQ’S
How long do AIRCARE humidifier filters last?
Caring for Your Wick
We recommend changing your wick every 30-90 days, but your water quality will ultimately dictate your wick’s replacement frequency. Areas with very hard or very soft water will typically require more frequent wick changes, since your wick is working harder to filter your water.
How do I reset my AIRCARE humidifier after changing the filter?
After checking the condition of your filter, and replacing if needed, you can refill your unit and plug it back in. This will reset the timer and after another 720 hours of use the reminder will appear once again.
How do I know when to refill my humidifier?
You should refill your humidifier when the humidity level in your room falls below 40% or when you notice that the mist output has decreased.
What is the best way to fill my humidifier with water?
First, unplug your humidifier from its electrical outlet. Then, using a pitcher or measuring cup, fill it with cold tap water until it reaches the MAX line on your tank. Finally, plug it back into its electrical outlet and turn it on.
What are some of the benefits of using an evaporative humidifier?
Evaporative humidifiers help relieve symptoms of allergies and asthma by reducing airborne allergens and irritants in your home. They also reduce static electricity by increasing humidity levels in your home. Finally, they can help relieve dry skin and chapped lips during cold winter months by increasing moisture levels in your home’s air.
Why did my humidifier suddenly stop working?
The first thing you should do if your humidifier stops working is to check the water level. When the water tank gets too low, or empty there is an automatic shut-off function in most humidifiers that will stop it from working. Simply fill it back up with some filtered water.
How do I know if my humidifier is broken?
If you go look at your humidifier you should see water running out of it. You should see water running down the hose and into the floor drain. That is how you check if your humidifier is working.
What is the difference between a cool mist and evaporative humidifiers?
An evaporative humidifier operates much like a cool mist evaporator – it does not heat water to create humidity. It is a wick humidifier that uses a fan to circulate humidity. Because they do not generate heat, they are ideal for homes with children and pets.
Is it okay to leave a humidifier running all night?
Overall, humidifiers are safe to keep overnight when you’re asleep. It’s beneficial and helpful in many ways. It’ll help your skin, lowers infection risk, and you’ll sleep better at night.
Are evaporative humidifiers healthier?
Evaporative Humidifiers
Throughout the EPA’s study, the clear front-runner for the safest humidifier type was an evaporative humidifier. There is less of a chance for these types to release airborne bacteria or minerals back into the air.
Do evaporative humidifiers leave white dust?
Purchase an evaporative humidifier
These humidifiers do not operate in the same fashion as ultrasonic and, therefore will not disperse a layer of white dust. The only difference to keep a watch out for is the noise level, as they are a bit noisier than ultrasonic models.
How do you clean a humidifier sensor?
Stop the data logger from recording in your Tinytag software, then remove its battery.
Using a can of compressed air, blow away any dust or dirt that has built up on the sensor.
Flush the sensor in deionized water.
VIDEO
https://aircareproducts.com/support/
Documents / Resources
 | AIRCARE Evaporative Humidifier [pdf] Instructions AIRCARE, Humidifier, H12 CN SERIES, H12 300HB, H12 400HB CN, H12600 CN |


