
VOLPI Olytech Mondial 845SP Olive Picking Machine
MACHINE GENERAL DESCRIPTION
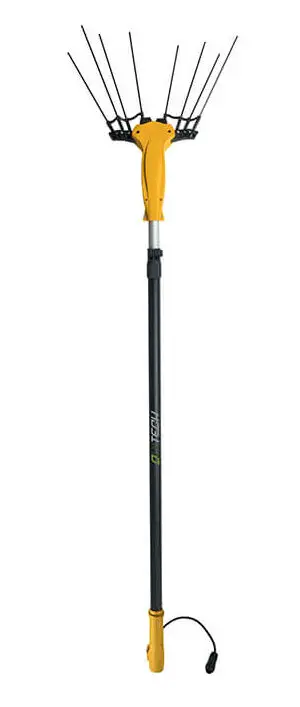
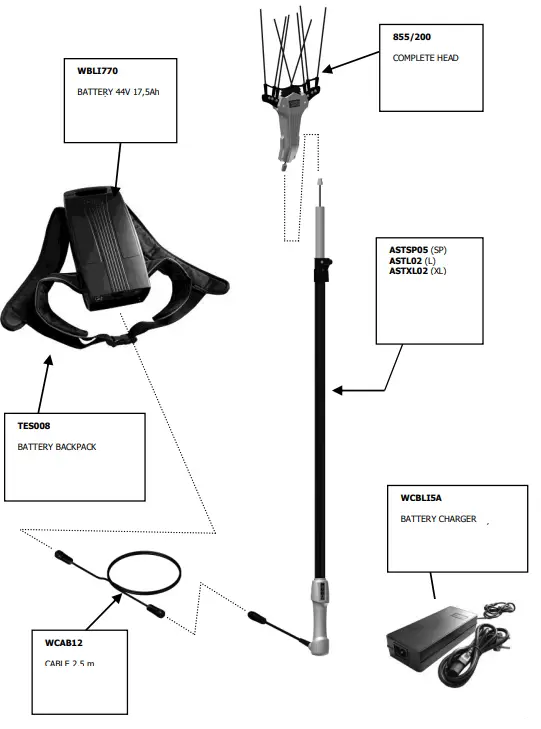
The machine has been designed exclusively for the harvesting of olives, almonds, coffee and other similar fruits. It is made of two main parts: the head and the pole.
The pole is fix or extendable and can be used at different heights. It includes the handle with membrane keypad for switching on, speed regulation and switching off, the system of connection to the power and the connection to the electric motor.
The head contains the electric motor (direct brushless engine), the transmission (pinion reducer, piston rod and eccentric shaft) and the tines, 4 on the left side and 4 on the right side.
The working principle is based on the alternate movement of the tines, which is very fast and it reproduces a shaking movement on the trees, causing the falling down of the fruits.
It deals with a machine dedicated to outdoor agricultural use, where usual power supply is not available. The power supply is provided by an external accumulator (that can be provided or not, depending on the model). The models are 4, 755 – 845 – 855 – 865 and differ one to the other by the type of power supply and by the presence of the battery. With model 755 and 845, the system of recharging of the accumulator is not provided.
All the 4 models have a version SP (fix pole), L and XL, extendable pole.
SAFETY SIMBOLS
- Read carefully the user’s manual
- Use hands protection
- Use body protection
- Use eyes protection
- Do not leave the machine exposed to frost
- Use the machine only between +1°C and +40°C.
- Minimum distance between machine and other people 3m.
- Materials projection danger
- “CE” marking. See EC declaration of conformity.
- Li-on battery. Don’t dispose with household waste.
- Don’t dispose the battery in fire where it will explode.
- Don’t disassemble the battery
- The battery can be recharged and recycled. Discarded batteries should be recycled in an environmentally friendly way.
BATTERY CHARGER SAFETY SYMBOLS
- Warnings
- Only use the charger indoor
- Insulation Class II
- Electrical equipment cannot be disposed to domestic waste.
MACHINE COMPONENTS


INTRODUCTION
Dear Customer, many thanks for your decision to buy the olive picking equipment Olytech, manufactured by our company. This equipment has been specifically designed to let olives, nuts, coffee beans drop into a net, facilitating the collection of those and other types of fruits. As applicable to all other products manufactured by us, this machine has been strongly tested to assure the right quality and performance. You can also count on a continuous after sales assistance provided by Volpi maintenance shops which have all the necessary spare parts.
DESCRIPTION OF THE MANUAL
This instruction manual follows the requirements of the original Annex Nr.1 of the Machineries Directive 2006/42/CE of the European Community following additions and modifications. This manual has to be considered part of the equipment and must be kept in a clean place for easy and continuous consultation; it will follow the equipment from day one up to the nd until the final garbage disposal. This instruction manual has the following objectives:
- Describe the functioning and the correct utilisation of the machine.
- Show the most important features of the machine.
- Instruct the owner on how to use it.
- Warn on possible hazard, and dangers.
- Instruct on how to maintain and repair the machine.
- Provide the list of spare parts available.
In addition to the specifications of this manual, all the existing safety laws and practices have to be followed.
ASSEMBLING
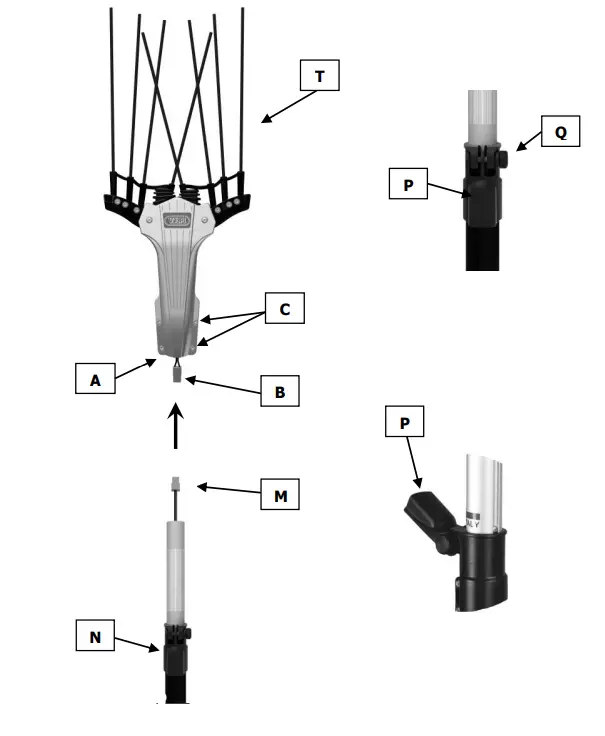
Hold the head of the machine -T- and position the head support -A- close to the standard pole as indicated in this picture. Join the connector in the pole -M- with the connector on the head -B- pushing up to the end to be sure to have electrical connection. Insert the pole in the head support and introduce it into the pole. Push straight the pole into the head support and fix it by screwing the four nut -C- and insure a firm hold of the pole into the head support.
The pole can be fix or telescopic. In order to extend or shorten the telescopic pole, use the lock N. Open the lever P, set the desired length, up to the maximum length, and lock again the lever P. If the pole is not correctly locked, re-open the lever P, slightly tighten the screw Q and lock the lever.
STARTING UP


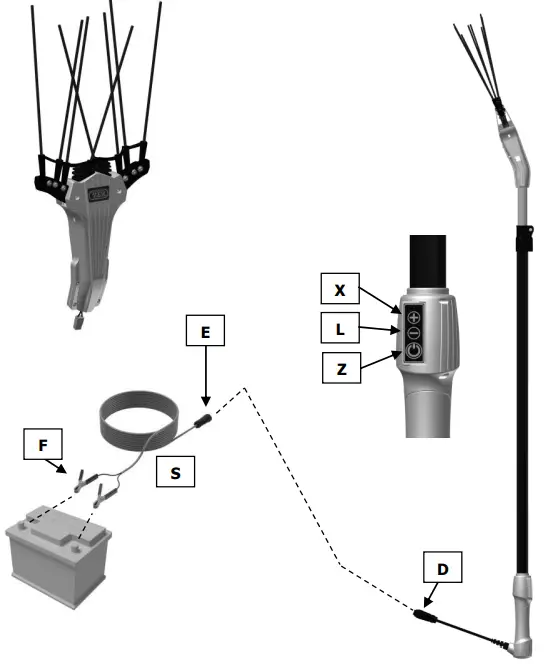
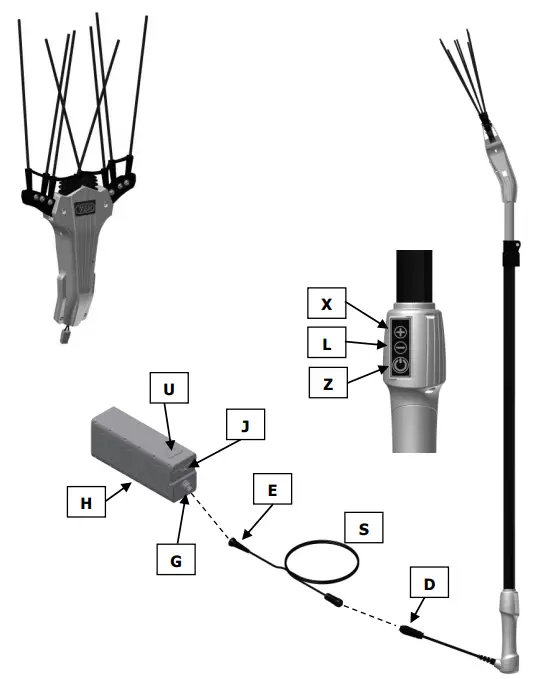
- Link the connector positioned at the bottom of the pole -D- to the connector -E- positioned at the end of the extension cable -S- and screw it.
- Connect the clamps F of the cable S to the 12V battery: red clamp to the positive terminal (+), black clamp to the negative terminal (-).
- The battery, not provided, must never be connected to the battery charger while used.
- Press the Z button on the handle in order to switch the machine on. The red led on the handle lights up and stays on until the machine is turned off.
- The machine has three different working speeds, selectable using the X button (to increase speed) and L button (to reduce the speed), positioned on the handle.
- At first switching on, the machine will start at speed 1 (the lowest), then changeable as described above. If the machine is switched off without disconnecting the battery, next time you switch it on it will start at the last selected speed.
- If the battery is disconnected, next time you switch the machine on, it will start at speed 1 (lowest). Press the button Z on the handle in order to switch the machine off.
Use only 12V batteries. Do not use the machine with low battery.Outside temperature between +1°C and +40°C.
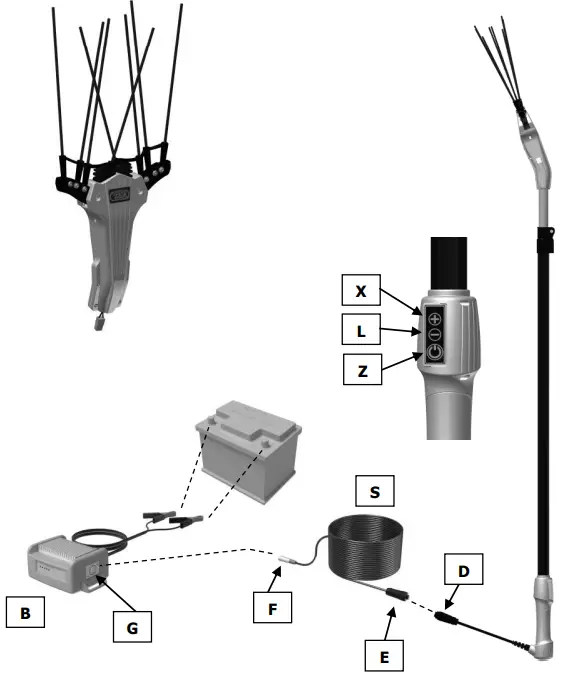
- Link the connector positioned at the bottom of the pole -D- to the connector -E- positioned at the end of the extension cable -S- and screw it.
- Insert the other connector -F- of the long cable S into the socket -G- on the electronic converter -B-. Connect the electronic converter -B- to the battery,12-24V, through the 2 nippers, the red one on the positive (+) and the black one on the negative (-).
- The battery, not provided, must never be connected to the battery charger while used.
- Press the Z button on the handle in order to switch the machine on. The red led on the handle lights up and stays on until the machine is turned off.
- The machine has three different working speeds, selectable using the X button (to increase speed) and L button (to reduce the speed), positioned on the handle.
- At first switching on, the machine will start at speed 1 (the lowest), then changeable as described above. If the machine is switched off without disconnecting the battery, next time you switch it on it will start at the last selected speed.
- If the battery is disconnected, next time you switch the machine on, it will start at speed 1 (lowest). Press the button Z on the handle in order to switch the machine off.
- Use only 12V batteries. Do not use the machine with low battery. Outside temperature between +1°C and +40°C.
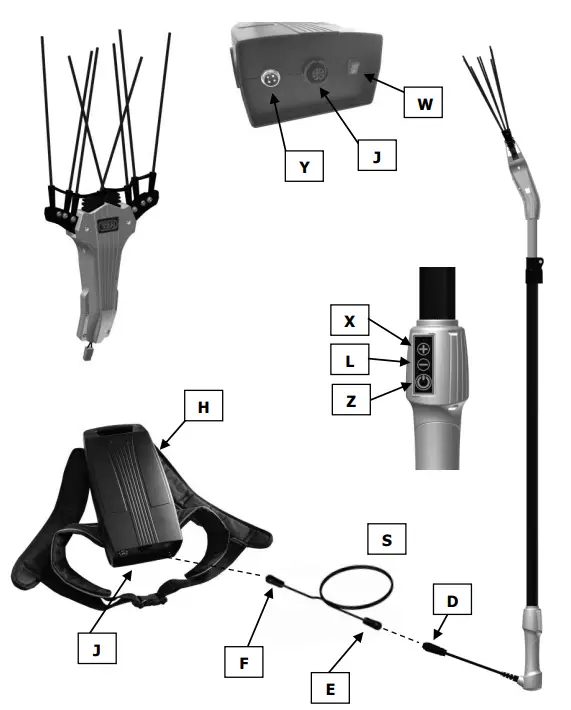
- Link the connector positioned at the bottom of the pole -D- to the connector -E- positioned at the end of the extension cable -S- and screw it.
- Insert the other connector -E- of the cable S into the socket G of the battery H.
- Switch on the battery with the J switch.
- The battery must never be connected to the charger while used.
- Press the button Z on the handle to switch the machine ON. The red led on the handle lights up and stays on until the machines is turned off.
- The machine has three different working speeds, selectable using the X button (to increase speed) and L button (to reduce the speed), positioned on the handle.
- At first switching on, the machine will start at speed 1 (the lowest), then changeable as described above. If the machine is switched off without disconnecting the battery, next time you switch it on it will start at the last selected speed.
- If the battery is disconnected, next time you switch the machine on, it will start at speed 1 (lowest). Press the button Z on the handle in order to switch the machine off.
Volpi Lithium battery characteristics: nominal voltage 43,2V – Capacity 11,6Ah. Outside temperature between +1°C and +40°C.
- Link the connector positioned at the bottom of the pole -D- to the connector -E- positioned at the end of the extension cable -S- and screw it.
- Insert the other connector -F- of the cable S into the socket J of the battery H.
- Switch on the battery with the W switch.
- The battery must never be connected to the charger while used.
- Press the button Z on the handle to switch the machine ON. The red led on the handle lights up and stays on until the machines is turned off.
- The machine has three different working speeds, selectable using the X button (to increase speed) and L button (to reduce the speed), positioned on the handle.
- At first switching on, the machine will start at speed 1 (the lowest), then changeable as described above. If the machine is switched off without disconnecting the battery, next time you switch it on it will start at the last selected speed.
- If the battery is disconnected, next time you switch the machine on, it will start at speed 1 (lowest). Press the button Z on the handle in order to switch the machine off.
Volpi Lithium battery characteristics: nominal voltage 44V – Capacity 17,5Ah. Outside temperature between +1°C and +40°C.
USE OF THE PICKING MACHINE
- The machine power supply is provided by a lead acid accumulator – 12V battery – 70÷80Ah (not included) that, through a 15m long power cable with clamps for the connection to the battery, can give power directly to the motor of the machine. Since there is no adjustment of the supply voltage, the motor rotation speed is maximum when the battery is charged, and decreases slightly while the battery is discharging. This situation is normal. When the tines rotating speed reduces intensely, you have to switch off the machine and charge the battery.
- In case of overloading, with excessive effort of the head among the branches, the motor stops automatically in order to protect all the parts of the machine. In such case, remove the head from the branches and after 1 second the machine restarts automatically.
- After 5 consecutive times of locking of the head between the branches, with overloading, the machine does not restart automatically and the red led fleshes. In such case, after having removed the head from the branches, it is necessary to restart the machine with button Z.
- If such a security system activates frequently, it means that the impact of the machine with the tree branches is too violent and, therefore, it is necessary to use the harvester with more regularity.
- If the machine does not start and the led on the handle flashes, it means that the battery output voltage is below the minimum and so the battery must be recharged.
IMPORTANT: in the majority of cases, speed 1 is enough for olive harvesting so it is recommended. In the few cases where more harvesting energy is temporarily needed, you can use speed 2 or 3. The use of speed 1 allows a high energy saving and a longer battery operating time.
Do not connect the battery to the machine when it is not used.
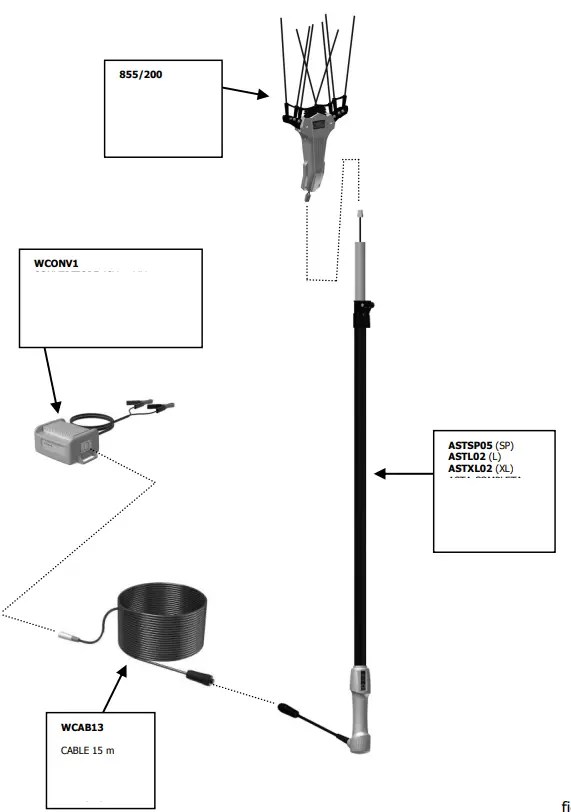
Energy to the machine is provided by a 12-24Vdc-50÷60Ah car type battery (not included) connected to the electronic converter by 1mt two wires cable holding two nippers, red on the positive (+) and black on the negative (-).
The circuit converts the supply voltage from 12V to 44V.
The electronic box shows the various functions of the machine through 3 Leds:
- ON – green Led: indicates that the electronic circuit is properly connected.
- MOTOR – yellow Led: indicates that the engine is properly connected to the electronic circuit.
- ALARM – Red Led:
- fixed light means that the battery is off charge.
- blinking light means that the battery voltage is becoming low.
- if after charging the battery and having operated ON-OFF the main switch the red light is still blinking, this requires the technical assistance provided in your territory.
In case of overloading, with excessive effort of the head among the branches, the motor stops automatically in order to protect all the parts of the machine. In such case, remove the head from the branches and after 1 second the machine restarts automatically.
After 5 consecutive times of locking of the head between the branches, with overloading, the machine does not restart automatically and the red led fleshes. In such case, after having removed the head from the branches, it is necessary to restart the machine with button Z.
If such a security system activates frequently, it means that the impact of the machine with the tree branches is too violent and, therefore, it is necessary to use the harvester with more regularity.
If the machine does not start and the led on the handle flashes, it means that the battery output voltage is below the minimum and so the battery must be recharged.
IMPORTANT: in the majority of cases, speed 1 is enough for olive harvesting so it is recommended. In the few cases where more harvesting energy is temporarily needed, you can use speed 2 or 3. The use of speed 1 allows a high energy saving and a longer battery operating time.
Do not connect the battery to the machine when it is not used.
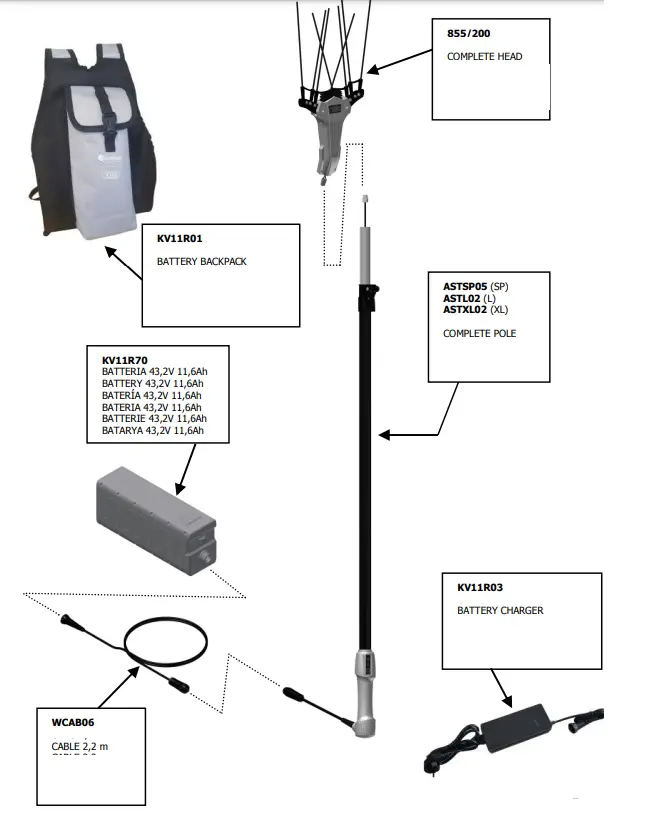
- The machine power supply is provided by a lithium battery 43,2Vcc – 11,6Ah (Codes 855Sp-L-XL) or 44Vcc 17,5Ah (Codes 865SP-L-XL) into the backpack. Thanks to a bipolar cable, it gives power to the electronic board contained into the handle.
- Since there isn’t any supply voltage regulation system, the motor rotation speed is maximum when the battery is charged and drops slightly while the battery is discharging; this situation is normal.
- When the rotation speed of the tines drops too much, it is time to switch off the machine and recharge the battery.
- In case of overloading, with excessive effort of the head among the branches, the motor stops automatically in order to protect all the parts of the machine. In such case, remove the head from the branches and after 1 second the machine restarts automatically.
- After 5 consecutive times of locking of the head between the branches, with overloading, the machine does not restart automatically and the red led fleshes. In such case, after having removed the head from the branches, it is necessary to restart the machine with button Z.
- If such a security system activates frequently, it means that the impact of the machine with the tree branches is too violent and, therefore, it is necessary to use the harvester with more regularity.
- If the machine does not start and the led on the handle flashes, it means that the battery output voltage is below the minimum and so the battery must be recharged.
IMPORTANT: in the majority of cases, speed 1 is enough for olive harvesting so it is recommended. In the few cases where more harvesting energy is temporarily needed, you can use speed 2 or 3. The use of speed 1 allows a high energy saving and a longer battery operating time.
Do not connect the battery to the machine when it is not used.
USE OF THE BATTERY
The battery is not supplied with the machine. Please make reference to the user manual of the battery and the battery charger to get indications on the usage precautions, maintenance and charging instructions.
- Olive harvester Olytech Mitho 855 is supplied with lithium battery 43,2Vcc – 11,6Ah (Codes 855Sp-L-XL) or 44Vcc 17,5Ah (Codes 865SP-L-XL) inserted in a dedicated backpack and connected either to the power supply or to the battery charger alternatively (never simultaneously).
- The machine must be used only with the original battery, to be charged using only the original battery charger. Battery life depends on the working conditions and also on the charge status of the battery. With full battery (100% charge), the machine can reach 4/5 hours (Codes 855Sp-L-XL) or 6/7 hours (Codes 865SP-L-XL) of continuous work depending on the conditions of use.
- In order to charge the battery, use the automatic charger 100÷240V AC, provided in the standard equipment, connecting it to the socket and, later, to the battery connector.
- Connecting the electrical outlet, a green led turns on. Connecting now the battery, the led becomes red.
- The battery will be completely full only when the LED on the battery charger is green.
- Charging time depends on the battery charge status. For the full charge, 4/5 hours (Codes 855Sp-L-XL) or 5/6 hours (Codes 865SP-L-XL) are necessary. In case of need, it is occasionally possible to charge the battery partially.
The 4 LEDs U on the battery indicate its charging status:- Three green leds – 100% battery charge
- Two green leds – 80% battery charge
- One green led – 50% battery charge
- One red led – 20% battery charge
Charge the battery indoor, in a fresh, dry and aired environment.
Do not disassemble, drill, warm, wet, or modify the battery and the charger.
If the machine is not used for a long time, charge the battery completely, disconnect it from the machine and store it. Recharge the battery every 6 months. If the battery is not charged for more than 6 months, it can be damaged and the warranty condition expire.
TINES REPLACEMENT

- Identify the type of tine to be replaced using the drawing E.1.
- Replace tines 2D/2S. 3D/3S and 4D/4S following the procedure described in fig. E.3:
- With the socket wrench R (provided) and the 2,5mm wrench K (provided), unscrew the tine’s locking nut D until the tine is free to come out from its housing P and support Y. If the tine does not come out easily, use the tool S (included) and a hammer to push it slowly out from its housing in the direction indicated by the arrow.
- Fix the new tine in the support Y and then in the housing P, pushing it down eventually using a hammer. Tighten the screw and the locking nut up to the limit.
- Replace tines 1D/1S following the procedure in fig. E.2 and fig. E.4: move manually the tines in the position of maximum closure, as indicated by the 2 arrows in fig. E.2 and rotate the head on itself.
- In this position, from the bottom hole F, use the 3mm wrench K (provided) to unscrew the tine locking screw until the tine is free to come out from its housing P and support Y. If the tine does not come out easily, use the tool S (included) and a hammer to push it slowly out from its housing in the direction indicated by the arrow.
- Fix the new tine in the support Y and then in the housing P, pushing it down eventually using a hammer. Screw the locking nut up to the limit.
ORDINARY MAINTENANCE
MAINTENCANCE
Maintenance has to be carried on by qualified personnel, following the instructions of this manual and using only original spare parts. User has to follow all the applicable safety laws, using as necessary the right protective equipment.
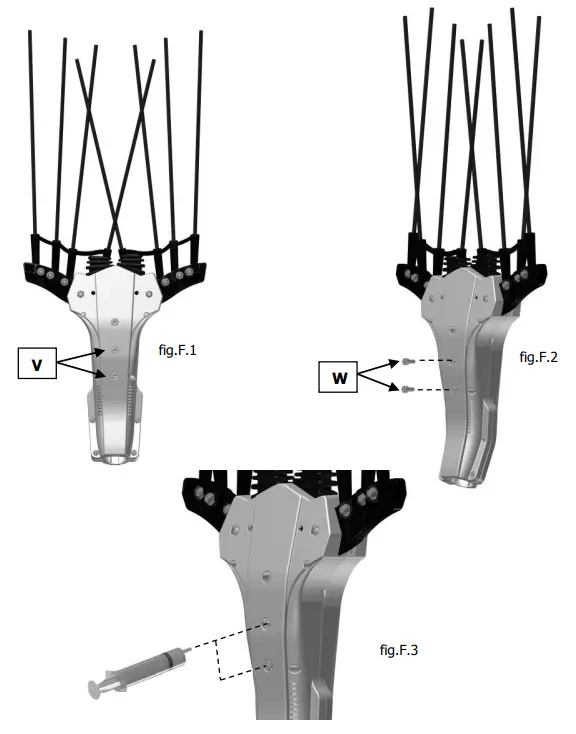
IMPORTANT : Every 50 working hours, the internal mechanisms of the head have to be lubricated with grease for high temperatures. The points have to be lubricated according to the picture F.
Follow the instructions in fig. F for the grease input.
Rotate the head in order to have access to the rear part (fig. F.1) and identify the two holes V. Unscrew the two screws W, as indicated in fig. F.2. Using one needleless syringe, as indicated in fig. F.3, put the grease inside using the holes V. Reassemble the screws and tighten them down. To prevent the screws from loosening due to vibrations, it is recommended to use thread lockers.
LONG TERM MAINTENANCE
In case of long lasting inactivity periods, the machine has to be carefully cleaned and then protected from dust and humidity in a dry place clear from direct sun and freeze. The battery shall not be connected with the machine as is it is not in use. It shall be stored with full charge and re-charged every 6 months.
CHECKS
| COMPONENT | ACTION | FREQUENCY |
| Clamps and connectors | Check the integrity and efficiency of the contacts | Every day |
| Power cable | Check that the cable is not twisted | Every day |
| Tines | Check the integrity and locking | Every day
|
ANOMALIES
| ANOMALIES | LED SIGNALS | CAUSE | SOLUTION |
| By pressing the start button the motor does not turn on. | Led OFF | Damaged clamps or connectors | Replace |
| Damaged external cables | Replace | ||
| The led flashes every 4 seconds for 5 times, then it flashes continuously | Damaged internal cable | Replace | |
| The led flashes every 4 seconds for 5 times, then it flashes continuously | Damaged motor | Replace | |
| Led OFF | Blown fuse (handle) | Replace | |
| Led OFF | Completely empty battery | Replace or recharge | |
| Led flashes | Too low battery voltage | Recharge | |
| All the LEDs of the power supply are off. | Damaged clamps or connectors | Replace | |
| Interrupted fuse | Replace | ||
| Damaged electronic power supply | Replace | ||
| LEDs are regularly ON | Damaged cables | Replace | |
| LEDs are regularly ON | Damaged motor | Replace | |
| ALARM red light ON | Empty battery | Replace or recharge | |
| ALARM red light ON (single impulse) | Low battery | Recharge | |
| ALARM red light ON (multiple impulses) | Anomaly | Contact the service point |
SAFETY INSTRUCTIONS
PERSONAL SAFETY
- For safety reasons, kids, young people below 16 years old and whoever is not familiar with the “Operation and Maintenance Manual” cannot use the machine.
- Each time you need to clear or repair the machine, be sure that the electrical circuit is disconnected.
- Do not use the machine under rain.
- Do not use next to electrical cables at high tension.
- It may happen that some parts become hot during the usage. Don’t touch.
- Do not switch on the machine while charging the battery.
IMPORTANT NOTICE Operations not allowed:
- All modification to the machine are not allowed except it authorized by the manufacturer.
- Use of not original spare parts is not permitted. In case of utilization of not original parts all forms of warranty will end.
- During the operation of the machine it is advisable to use protective glasses.
- After using the machine it is advisable to clean the engine area from dust and scraps and then put it in a dry and clear zone, with batteries fully charged and disconnected.\
VIBRATIONS AND NOISE
- Weighted root mean square acceleration value to which the hand/arm system is subjected is 7 m/ s2 (maximum value).
- Equivalent continuous A – weighted sound pressure level=81 dB(A).
- Maximum value of the C – weighted instantaneous sound pressure Lpc<130 dB(C).
SAFETY SIGNALS (Pictograms)
The most important indications about the correct and safe use of the harvester are shown by symbols (pictograms) on the machine, that must be kept intact, clean and readable.
The meaning of each symbol is reported in fig. H.
INCORRECT USE
- Do not direct the machine towards people or animals
- Do not use the machine directly over the body (over your head), to avoid the falling fruits hit you
- Do not use the machine on non-recommended plants
RESIDUAL RISKS
- Due to the fast movement of the tines, there is a crush risk for the hands/fingers. This risk is very low; but it cannot be reduced, since it is inherent to the working cycle. We recommend not touching the tines while they are moving and not direct them towards people or animals.
- Eventual residual risks could be caused by the incorrect use, such as for example by using the machine for a very long time without having a break. This could generate problems to the arms of the operator. We recommend a careful evaluation concerning the working hours.
- The operator can slip, stumble or fall while using the machine, due to the surrounding environment (orchards, olive groves). In such case, please make sure you are informed about the dangers of the working area.
INDICATIONS FOR THE GARBAGE DISPOSAL
- The symbol of the crossed out wheelie bin reported on the machine indicate that this product must be collected separately from other waste at the end of its useful life.
- In case the user decides not to use and to dispose the machine, the latter shall not be disposed among general domestic waste. It shall be delivered to an appropriate point of collection for the recycling of electric and electronic equipment, in order the machine to be treated and recycled according to national regulations.
- Batteries (not included for models 755SP-L-XL-845SP-L-XL) shall be disposed according to the regulations in force in the user’s country.
In any case, the machine and its parts shall not be disposed as municipal waste.
WARRANTY
- The Davide e Luigi Volpi company guarantees this product for 1 YEAR starting from the purchase date. The guarantee covers manufacturing and materials defects and is limited to the substitution of parts. The warranty is valid for 2 years in case of purchase and utilisation by a private person (upon presentation of the sale slip).
- The guarantee does not cover the manpower, the shipping costs and the costs related to the non utilisation of the machine.
- The guarantee does not cover those parts which are subject to wear due to the normal utilisation of the machine: small carbon tubes, cable, flexible cables, ON-OFF switch, driving belt, connectors, battery (if not new).
The guarantee will not be granted in the following cases:
- The user has not properly followed the instructions contained in the present operation manual.
- The machine has been used for applications different from the ones for which it was designed.
- Damages occur for incorrect use of the machine from the owner or from other people.
- Repairs have been performed by not qualified people
- Original spare parts have not been utilised.
- Damages are caused by poor maintenance or improper use of the user.
- The battery has not been charged every 6 months, as recommended in this manual.
IMPORTANT
The warranty is valid only for products that have been registered through the website within 30 days from the purchase date.
For more information you can write to [email protected]
Activate the warranty for your new product Originale Volpi through our website: http://www.volpioriginale.it/garanzia/
The buyer must also keep a copy of the sales document (receipt, invoice) and of the warranty registration: a copy of these documents must be given to the Dealer or Authorized Customer Service together with the machine to be repaired. In the absence of these documents, the machine will in any case be considered out of warranty.
FOR MAINTENANCE AND REPAIRS ONLY USE ORIGINAL SPARE PARTS MADE IN ITALY
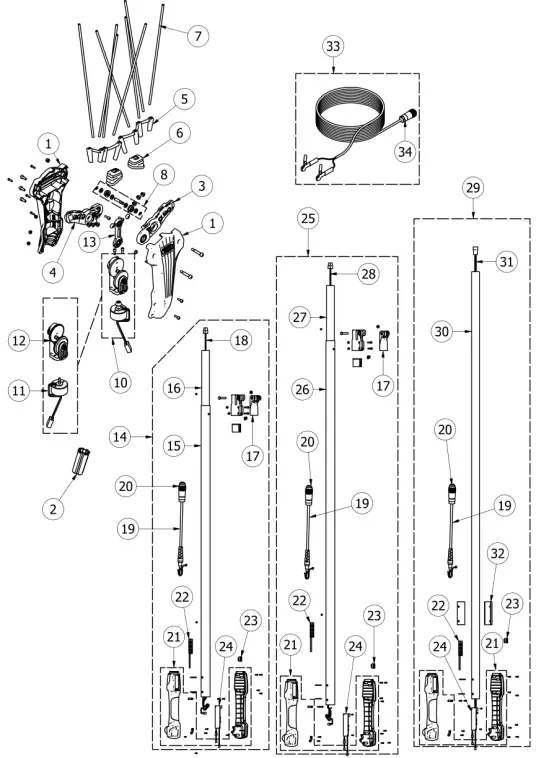
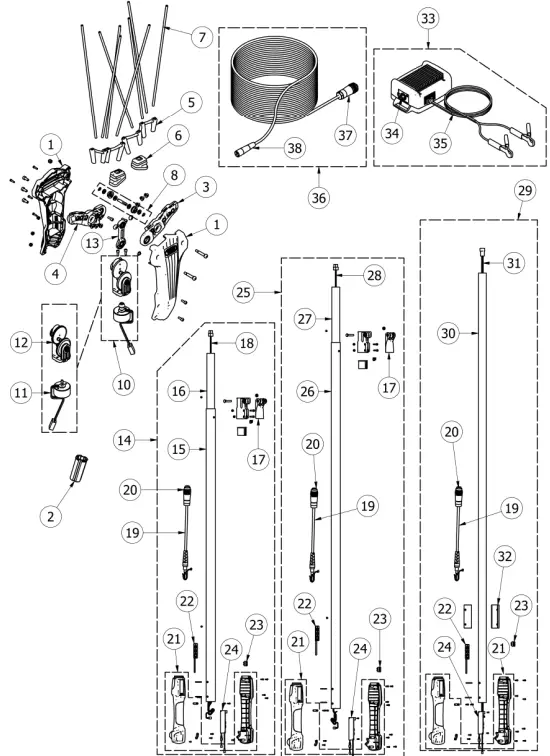
SPARE PARTS LIST


| Pos. | Code | Part Description | Part per Machime | Pcs per Package | Notes |
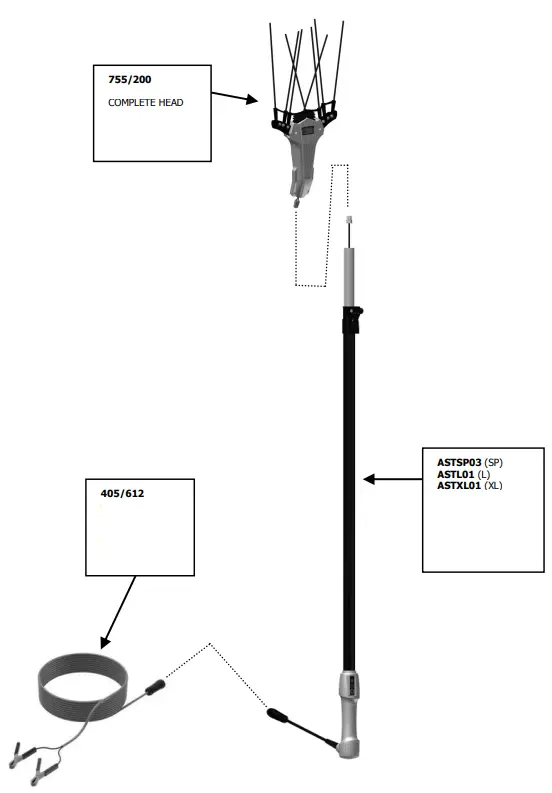
| 1 | 755K1 | TOP AND BOTTOM HEAD CRANKCASE KIT (GREY) FOR OLYTECH BRUSHLESS | 1 | 1 | |
| 2 | CP0013 | POLE INSERT D32 H64 | 1 | 1 | |
| 3 | 405/216D | TINES HOLDER WITH BEARINGS (RIGHT) 405-505-605 | 1 | 1 | |
| 4 | 405/216S | TINES HOLDER WITH BEARINGS (LEFT) 405-505-605 | 1 | 1 | |
| 5 | 405/108 | TINES REINFORCEMENT 405-505-605 | 2 | 2 | |
| 6 | 405/106 | FOLDING ELEMENT FOR TINES 405-505-605 | 2 | 2 | |
| 7 | 905/103G | CARBON TINE 405-505-605 | 8 | 10 | |
| 8 | OLYK01 | SPARE PARTS KIT FOR HEAD – OLYTECH | 1 | 1 | |
| 9 | 405K2 | SPECIAL NUTS KIT M4 – 455 555 655 755 855 | 1 | 1 | |
| 10 | CM0021 | BRUSHLESS MOTOR GROUP 12V WITH FRAME CM0001 COMPLETE | 1 | 1 | |
| 11 | CM0019 | BRUSHLESS MOTOR GROUP 12V WITH CONICAL PINION ZEROL | 1 | 1 | |
| 12 | CM0010 | FRAME CM0001 WITH SHAFT, GEARS AND BEARINGS | 1 | 1 | |
| 13 | 405/211C | COMPLETE HEAD CONNECTING ROD FOR 405-505-605 | 1 | 1 | |
| 14 | ASTL01 | TELESCOPIC POLE WITH HANDLE AND CABLE 755L BRUSHLESS 12V | 1 | 1 | 755L only |
| 15 | 405L/508 | EXTENSION POLE (BLACK) D.37×1200 | 1 | 1 | 755L only |
| 16 | 905L/401 | ALUMINIUM POLE GREY COLOR D.32×1300 | 1 | 1 | 755L only |
| 17 | 405/509 | LOCKING GROUP FOR TELESCOPIC POLE 405-505-605 | 1 | 1 |
| 18 | WCAB02 | SPIRAL CABLE 3×2.5 FOR BRUSHLESS L | 1 | 1 | 755L only |
| 19 | WCAB04 | CABLE WITH MALE CONNECTOR FOR HANDLE | 1 | 1 | |
| 20 | 405/620 | COMPLETE 4 PINS MALE CONNECTOR | 1 | 1 | |
| 21 | ASM001 | HANDLE SHELLS GROUP FOR BRUSHLESS MODELS | 1 | 1 | |
| 22 | WTST01 | MEMBRANE KEYBOARD FOR HANDLE (BRUSHLESS) | 1 | 1 | |
| 23 | WFUS02 | FUSE 30A | 1 | 1 | |
| 24 | WSCH01 | ELECTRONIC BOARD FOR BRUSHLESS MOTOR 12V | 1 | 1 | |
| 25 | ASTXL01 | TELESCOPIC POLE WITH HANDLE AND CABLE 755XL BRUSHLESS 12V | 1 | 1 | 755XL only |
| 26 | 405XL/508 | EXTENSION POLE (BLACK) D.37×1500 | 1 | 1 | 755XL only |
| 27 | 705/401 | ALUMINIUM POLE (GREY) D.32×1600 | 1 | 1 | 755XL only |
| 28 | WCAB03 | SPIRAL CABLE 3×2.5 FOR BRUSHLESS XL | 1 | 1 | 755XL only |
| 29 | ASTSP03 | FIX POLE WITH HANDLE AND CABLE 12V 755SP | 1 | 1 | |
| 30 | TALL01 | ALUMINIUM POLE (GREY) Ø32 FOR HANDLE | 1 | 1 | 755SP only |
| 31 | WCAB08 | COMPLETE CABLE FOR FIX POLE FOR BRUSHLESS 3X2,5mm | 1 | 1 | 755SP only |
| 32 | 705/412 | SADDLE 32-37 FOR SHORT POLE | 2 | 2 | 755SP only |
| 33 | 405/612 | CABLE MT.15 FOR 405 | 1 | 1 | 755SP only |
| 34 | 705/620 | COMPLETE FEMALE CONNECTOR 4 POLES | 1 | 1 | |
| – | ASM002 | NUTS AND BOLTS KIT OLYTECH BRUSHLESS | 1 | 1 |
| Pos. | Code | Part Description | Part per Machime | Pcs per Package | Notes |
| 1 | 755K1 | TOP AND BOTTOM HEAD CRANKCASE KIT (GREY) FOR OLYTECH BRUSHLESS | 1 | 1 | |
| 2 | CP0013 | POLE INSERT D32 H64 | 1 | 1 | |
| 3 | 405/216D | TINES HOLDER WITH BEARINGS (RIGHT) 405-505-605 | 1 | 1 | |
| 4 | 405/216S | TINES HOLDER WITH BEARINGS (LEFT) 405-505-605 | 1 | 1 | |
| 5 | 405/108 | TINES REINFORCEMENT 405-505-605 | 2 | 2 | |
| 6 | 405/106 | FOLDING ELEMENT FOR TINES 405-505-605 | 2 | 2 | |
| 7 | 905/103G | CARBON TINE 405-505-605 | 8 | 10 | |
| 8 | OLYK01 | SPARE PARTS KIT FOR HEAD – OLYTECH | 1 | 1 | |
| 9 | 405K2 | SPECIAL NUTS KIT M4 – 455 555 655 755 855 | 1 | 1 | |
| 10 | CM0022 | BRUSHLESS MOTOR GROUP 44V WITH FRAME CM0001 COMPLETE | 1 | 1 | |
| 11 | CM0020 | BRUSHLESS MOTOR GROUP 44V WITH CONICAL PINION ZEROL | 1 | 1 | |
| 12 | CM0010 | FRAME CM0001 WITH SHAFT, GEARS AND BEARINGS | 1 | 1 | |
| 13 | 405/211C | COMPLETE HEAD CONNECTING ROD FOR 405-505-605 | 1 | 1 | |
| 14 | ASTL02 | TELESCOPIC POLE WITH HANDLE AND CABLE 855L BRUSHLESS 44V | 1 | 1 | 845L only |
| 15 | 405L/508 | EXTENSION POLE (BLACK) D.37×1200 | 1 | 1 | 845L only |
| 16 | TALL02 | ALUMINIUM POLE GREY COLOR D.32×1300 | 1 | 1 | 845L only |
| 17 | 405/509 | LOCKING GROUP FOR TELESCOPIC POLE 405-505-605 | 1 | 1 | |
| 18 | WCAB02 | SPIRAL CABLE 3×2.5 FOR BRUSHLESS L | 1 | 1 | 845L only |
| 19 | WCAB10 | CABLE WITH MALE CONNECTOR FOR HANDLE 44V | 1 | 1 | |
| 20 | 405/620 | COMPLETE 4 PINS MALE CONNECTOR | 1 | 1 | |
| 21 | ASM001 | HANDLE SHELLS GROUP FOR BRUSHLESS MODELS | 1 | 1 |
| 18 | WCAB02 | SPIRAL CABLE 3×2.5 FOR BRUSHLESS L | 1 | 1 | 855L only |
| 19 | WCAB10 | CABLE WITH MALE CONNECTOR FOR HANDLE 44V | 1 | 1 | |
| 20 | 405/620 | COMPLETE 4 PINS MALE CONNECTOR | 1 | 1 | |
| 21 | ASM001 | HANDLE SHELLS GROUP FOR BRUSHLESS MODELS | 1 | 1 | |
| 22 | WTST01 | MEMBRANE KEYBOARD FOR HANDLE (BRUSHLESS) | 1 | 1 | |
| 23 | WFUS02 | FUSE 30A | 1 | 1 | |
| 24 | WSCH02 | ELECTRONIC BOARD FOR BRUSHLESS MOTOR 44V | 1 | 1 | |
| 25 | ASTXL02 | TELESCOPIC POLE WITH HANDLE AND CABLE 855XL BRUSHLESS 44V | 1 | 1 | 855XL only |
| 26 | 405XL/508 | EXTENSION POLE (BLACK) D.37×1500 | 1 | 1 | 855XL only |
| 27 | 705/401 | ALUMINIUM POLE (GREY) D.32×1600 | 1 | 1 | 855XL only |
| 28 | WCAB03 | SPIRAL CABLE 3×2.5 FOR BRUSHLESS XL | 1 | 1 | 855XL only |
| 29 | ASTSP05 | FIX POLE WITH HANDLE AND CABLE 44V 855SP | 1 | 1 | |
| 30 | TALL01 | ALUMINIUM POLE (GREY) Ø32 FOR HANDLE | 1 | 1 | 855SP only |
| 31 | WCAB08 | COMPLETE CABLE FOR FIX POLE FOR BRUSHLESS 3X2,5mm | 1 | 1 | 855SP only |
| 32 | 705/412 | SADDLE 32-37 FOR SHORT POLE | 2 | 2 | 855SP only |
| 33 | KV11R70 | LITHIUM BATTERY 43,2V 11,6 Ah | 1 | 1 | |
| 34 | WCAB06 | CABLE 2,5M FOR BATTERY 44V 11,6Ah WITH CONNECTOR | 1 | 1 | |
| 35 | 705/620 | COMPLETE FEMALE CONNECTOR 4 POLES | 1 | 1 | |
| 36 | KV11R03 | BATTERY CHARGER FOR LITHIUM BATTERY 43,2 V 11,6Ah | 1 | 1 | |
| 37 | KV11R01 | BACKPACK FOR LITHIUM BATTERY 43,2V 11,6Ah | 1 | 1 | |
| – | ASM002 | NUTS AND BOLTS KIT OLYTECH BRUSHLESS | 1 | 1 |
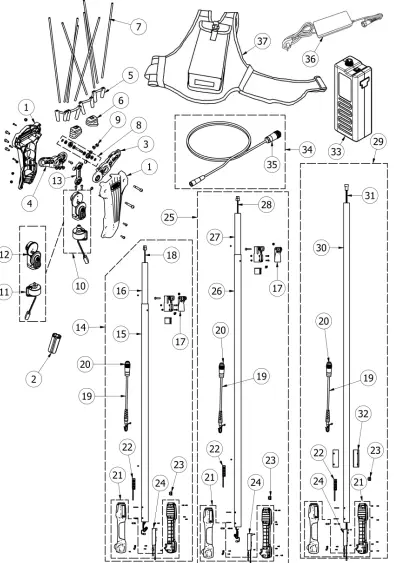
| Pos. | Code | Part Description | Part per Machime | Pcs per Package | Notes |
| 1 | 755K1 | TOP AND BOTTOM HEAD CRANKCASE KIT (GREY) FOR OLYTECH BRUSHLESS | 1 | 1 | |
| 2 | CP0013 | POLE INSERT D32 H64 | 1 | 1 | |
| 3 | 405/216D | TINES HOLDER WITH BEARINGS (RIGHT) 405-505-605 | 1 | 1 | |
| 4 | 405/216S | TINES HOLDER WITH BEARINGS (LEFT) 405-505-605 | 1 | 1 | |
| 5 | 405/108 | TINES REINFORCEMENT 405-505-605 | 2 | 2 | |
| 6 | 405/106 | FOLDING ELEMENT FOR TINES 405-505-605 | 2 | 2 | |
| 7 | 905/103G | CARBON TINE 405-505-605 | 8 | 10 | |
| 8 | OLYK01 | SPARE PARTS KIT FOR HEAD – OLYTECH | 1 | 1 | |
| 9 | 405K2 | SPECIAL NUTS KIT M4 – 455 555 655 755 855 | 1 | 1 | |
| 10 | CM0022 | BRUSHLESS MOTOR GROUP 44V WITH FRAME CM0001 COMPLETE | 1 | 1 | |
| 11 | CM0020 | BRUSHLESS MOTOR GROUP 44V WITH CONICAL PINION ZEROL | 1 | 1 | |
| 12 | CM0010 | FRAME CM0001 WITH SHAFT, GEARS AND BEARINGS | 1 | 1 | |
| 13 | 405/211C | COMPLETE HEAD CONNECTING ROD FOR 405-505-605 | 1 | 1 | |
| 14 | ASTL02 | TELESCOPIC POLE WITH HANDLE AND CABLE 855L BRUSHLESS 44V | 1 | 1 | 865L only |
| 22 | WTST01 | MEMBRANE KEYBOARD FOR HANDLE (BRUSHLESS) | 1 | 1 | |
| 23 | WFUS02 | FUSE 30A | 1 | 1 | |
| 24 | WSCH02 | ELECTRONIC BOARD FOR BRUSHLESS MOTOR 44V | 1 | 1 | |
| 25 | ASTXL02 | TELESCOPIC POLE WITH HANDLE AND CABLE 855XL BRUSHLESS 44V | 1 | 1 | 845XL only |
| 26 | 405XL/508 | EXTENSION POLE (BLACK) D.37×1500 | 1 | 1 | 845XL only |
| 27 | TALL03 | ALUMINIUM POLE (GREY) D.32×1600 | 1 | 1 | 845XL only |
| 28 | WCAB03 | SPIRAL CABLE 3×2.5 FOR BRUSHLESS XL | 1 | 1 | 845XL only |
| 29 | ASTSP05 | FIX POLE WITH HANDLE AND CABLE 44V 855SP | 1 | 1 | |
| 30 | TALL01 | ALUMINIUM POLE (GREY) Ø32 FOR HANDLE | 1 | 1 | 845SP only |
| 31 | WCAB08 | COMPLETE CABLE FOR FIX POLE FOR BRUSHLESS 3X2,5mm | 1 | 1 | 845SP only |
| 32 | CM0029 | SADDLE 37-32 FOR SHORT POLE | 2 | 2 | 845SP only |
| 33 | WCONV1 | CONVERTER 12V – 44V | 1 | 1 | |
| 34 | 505/606 | FIX FEMALE PLUG FOR POWER SUPPLY 505-605 | 1 | 1 | |
| 35 | 702/607 | CABLE WITH CLAMPS 1 MT | 1 | 1 | |
| 36 | WCAB13 | CABLE MT.15 Ø 2,5 MM FOR MONDIAL 44 | 1 | 1 | |
| 37 | 702/403 | MALE PLUG CONNECTOR | 1 | 1 | |
| 38 | 705/620 | COMPLETE FEMALE CONNECTOR | 1 | 1 | |
| – | ASM002 | NUTS AND BOLTS KIT OLYTECH BRUSHLESS | 1 | 1 |
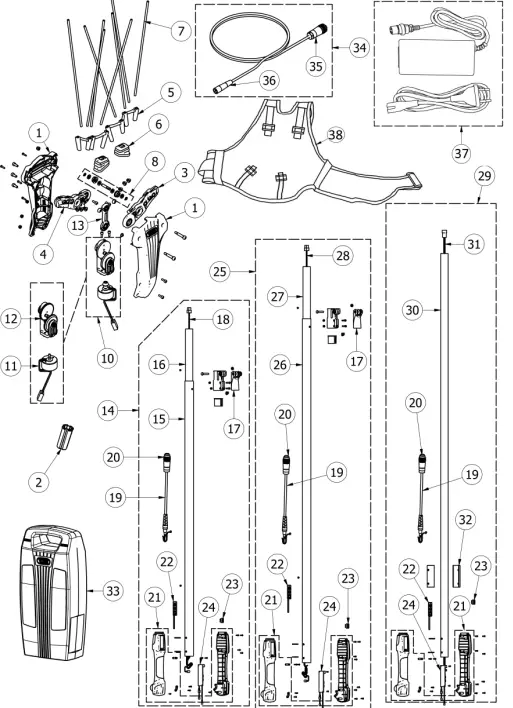
| Pos. | Code | Part Description | Part per Machime | Pcs per Package | Notes |
| 1 | 755K1 | TOP AND BOTTOM HEAD CRANKCASE KIT (GREY) FOR OLYTECH BRUSHLESS | 1 | 1 | |
| 2 | CP0013 | POLE INSERT D32 H64 | 1 | 1 | |
| 3 | 405/216D | TINES HOLDER WITH BEARINGS (RIGHT) 405-505-605 | 1 | 1 | |
| 4 | 405/216S | TINES HOLDER WITH BEARINGS (LEFT) 405-505-605 | 1 | 1 | |
| 5 | 405/108 | TINES REINFORCEMENT 405-505-605 | 2 | 2 | |
| 6 | 405/106 | FOLDING ELEMENT FOR TINES 405-505-605 | 2 | 2 | |
| 7 | 905/103G | CARBON TINE 405-505-605 | 8 | 10 | |
| 8 | OLYK01 | SPARE PARTS KIT FOR HEAD – OLYTECH | 1 | 1 | |
| 9 | 405K2 | SPECIAL NUTS KIT M4 – 455 555 655 755 855 | 1 | 1 | |
| 10 | CM0022 | BRUSHLESS MOTOR GROUP 44V WITH FRAME CM0001 COMPLETE | 1 | 1 | |
| 11 | CM0020 | BRUSHLESS MOTOR GROUP 44V WITH CONICAL PINION ZEROL | 1 | 1 | |
| 12 | CM0010 | FRAME CM0001 WITH SHAFT, GEARS AND BEARINGS | 1 | 1 | |
| 13 | 405/211C | COMPLETE HEAD CONNECTING ROD FOR 405-505-605 | 1 | 1 | |
| 14 | ASTL02 | TELESCOPIC POLE WITH HANDLE AND CABLE 855L BRUSHLESS 44V | 1 | 1 | 855L only |
| 15 | 405L/508 | EXTENSION POLE (BLACK) D.37×1200 | 1 | 1 | 855L only |
| 16 | 905L/401 | ALUMINIUM POLE GREY COLOR D.32×1300 | 1 | 1 | 855L only |
| 17 | 405/509 | LOCKING GROUP FOR TELESCOPIC POLE 405-505-605 | 1 | 1 |
| 15 | 405L/508 | EXTENSION POLE (BLACK) D.37×1200 | 1 | 1 | 865L only |
| 16 | 905L/401 | ALUMINIUM POLE GREY COLOR D.32×1300 | 1 | 1 | 865L only |
| 17 | 405/509 | LOCKING GROUP FOR TELESCOPIC POLE 405-505-605 | 1 | 1 | |
| 18 | WCAB02 | SPIRAL CABLE 3×2.5 FOR BRUSHLESS L | 1 | 1 | 865L only |
| 19 | WCAB10 | CABLE WITH MALE CONNECTOR FOR HANDLE 44V | 1 | 1 | |
| 20 | 405/620 | COMPLETE 4 PINS MALE CONNECTOR | 1 | 1 | |
| 21 | ASM001 | HANDLE SHELLS GROUP FOR BRUSHLESS MODELS | 1 | 1 | |
| 22 | WTST01 | MEMBRANE KEYBOARD FOR HANDLE (BRUSHLESS) | 1 | 1 | |
| 23 | WFUS02 | FUSE 30A | 1 | 1 | |
| 24 | WSCH02 | ELECTRONIC BOARD FOR BRUSHLESS MOTOR 44V | 1 | 1 | |
| 25 | ASTXL02 | TELESCOPIC POLE WITH HANDLE AND CABLE 855XL BRUSHLESS 44V | 1 | 1 | 865XL only |
| 26 | 405XL/508 | EXTENSION POLE (BLACK) D.37×1500 | 1 | 1 | 865XL only |
| 27 | 705/401 | ALUMINIUM POLE (GREY) D.32×1600 | 1 | 1 | 865XL only |
| 28 | WCAB03 | SPIRAL CABLE 3×2.5 FOR BRUSHLESS XL | 1 | 1 | 865XL only |
| 29 | ASTSP05 | FIX POLE WITH HANDLE AND CABLE 44V 855SP | 1 | 1 | |
| 30 | TALL01 | ALUMINIUM POLE (GREY) Ø32 FOR HANDLE | 1 | 1 | 865SP only |
| 31 | WCAB08 | COMPLETE CABLE FOR FIX POLE FOR BRUSHLESS 3X2,5mm | 1 | 1 | 865SP only |
| 32 | 705/412 | SADDLE 32-37 FOR SHORT POLE | 2 | 2 | 865SP only |
| 33 | WBLI770 | LITHIUM BATTERY 44V 17,5Ah 770Wh | 1 | 1 | |
| 34 | WCAB12 | CABLE 2,5M FOR BATTERY 44V 17,5Ah WITH CONNECTOR | 1 | 1 | |
| 35 | 705/620 | COMPLETE FEMALE CONNECTOR 4 POLES | 1 | 1 | |
| 36 | 405/620 | COMPLETE 4 PINS MALE CONNECTOR | 1 | 1 | |
| 37 | WCBLI5A | BATTERY CHARGER FOR LITHIUM BATTERY 44V 17,5Ah | 1 | 1 | |
| 38 | TES008 | BACKPACK FOR LITHIUM BATTERY 44V 17,5Ah | 1 | 1 | |
| – | ASM002 | NUTS AND BOLTS KIT OLYTECH BRUSHLESS | 1 | 1 |
CE DECLARATION OF CONFORMITY
| GB | The Company Davide e Luigi Volpi S.p.A. | |
| Via San Rocco, 10 – 46040 Casalromano (MN) ITALIA DECLARES THAT THE MACHINE Denomination: Olive harvester Type: Olytech Model: 755L-755XL-755SP-845L-845XL-845SP-855L- 855XL-855SP-865L-865XL-865SP IS IN CONFORMITY WITH THE RELEVANT COMMUNITY HARMONISATION LEGISLATION: DIRECTIVE 2006/42/CE Machinery Directive DIRECTIVE 2014/30/UE Electromagnetic Compatibility Reference to the relevant harmonized standards used or references to other technical specifications for which conformity is declared: UNI EN ISO 12100:2010 Authorized person to set up the technical documentation: | ||
| Name: | Davide e Luigi Volpi S.p.A. | |
| Residence: | Via San Rocco 10 – 46040 Casalromano (MN) Italia | |
| This Declaration of Conformity is issued under the sole responsibility of the manufacturer. Casalromano, July 15th 2020 The legal representative Eligio Volpi MADE IN ITALY | ||
Davide e Luigi Volpi S.p.A. Via San Rocco, 10 – 46040 Casalromano (MN) – Italia
Tel. +39 0376 76009 Fax +39 0376 76408 www.volpioriginale.it
COMPANY WITH QUALITY SYSTEM MANAGEMENT CERTIFIED BY ICIM = ISO 9001 =


