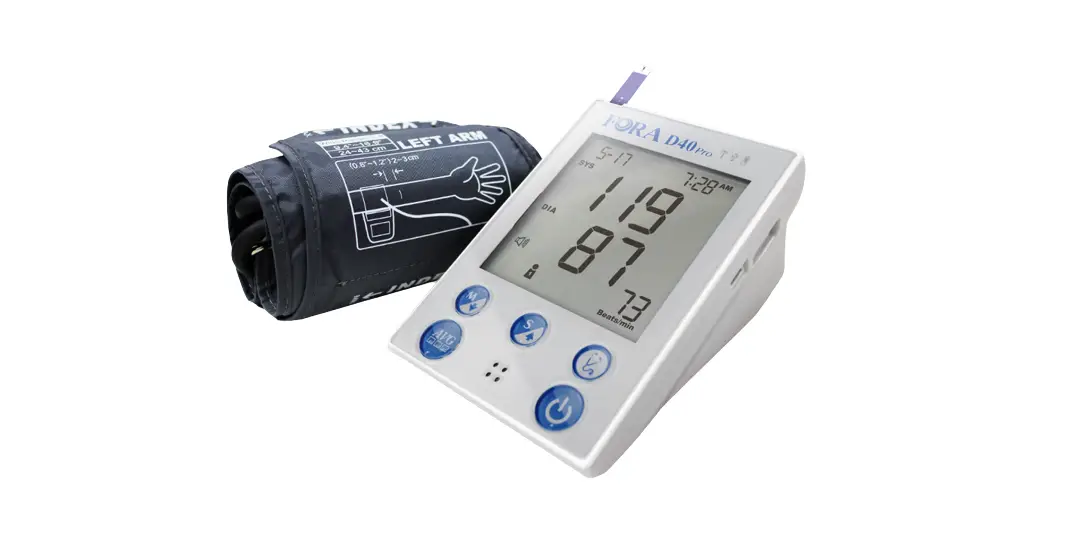
FORA D40 DUO ultima Blood Glucose Plus Blood Pressure Monitoring System Owner’s Manual
Safety Information
Read the following Safety Information thoroughly before using the device.
- Use this device ONLY for the intended use described in this manual.
- Do NOT use accessories which are not specified by the manufacturer.
- Do NOT use the device if it is not working properly or damaged.
- Do NOT use the equipment where aerosol sprays are being used or where oxygen is being administered.
- Do NOT use under any circumstances on newborns or infants.
- This device does NOT serve as a cure for any symptoms or diseases. The data measured is for reference only. Always consult your physician to have the results interpreted.
- Before using this device to test blood glucose, read all instructions thoroughly and practice the test. Do all quality control checks as directed.
- Keep the device and testing supplies away from young children. Small items such as the battery cover, batteries, test strips, lancets and vial caps are choking hazards.
- Keep the equipment and its flexible cord away from hot surfaces.
- Do NOT apply the cuff to areas other than the place directed.
- Use of this instrument in a dry environment, especially if synthetic materials are present (synthetic clothing, carpets etc.) may cause damaging static discharges that may cause erroneous results.
- Do NOT use this instrument in close proximity to sources of strong electromagnetic radiation, as these may interfere with the correct operation.
- Proper maintenance and periodically calibration are essential to the longevity of your device. If you are concerned about your accuracy of measurement, please contact local customer service for help.
- f you experience any serious incident that occurred in relation to the use of this product, please report it to the manufacturer and the competent authority of medical devices in your country.
A serious incident means any incident that directly or indirectly led, might have led, or might lead to any of the following:
- the death of a patient, user, or other people,
- the temporary or permanent serious deterioration of a patient’s, user’s or other person’s state of health,
- a serious public health threat.
Important Information
- Severe dehydration and excessive water loss may cause readings which are lower than actual values. If you believe you are suffering from severe dehydration, consult a healthcare professional immediately.
- If your blood glucose results are lower or higher than usual, and you do not have symptoms of illness, first repeat the test. If you have symptoms or continue to get results higher or lower than usual, follow the treatment advice of your healthcare professional.
- Use only fresh whole blood sample to test your blood glucose.
- Using other substances will lead to incorrect results.
- If you are experiencing symptoms that are inconsistent with your blood glucose test results and you have followed all instructions described in this owner’s manual, call your healthcare professional.
- We do not recommend using this product on severely hypotensive individuals or patients in shock. Please consult the healthcare professional before use.
- The measurement unit used for indicating the concentration of blood or plasma glucose can have mg/dL or mmol/L. The approximate calculation rule for conversion of mg/dL in mmol/L is:
mg/dL Divided by 18 = mmol/L mmol/L Times 18 = mg/dL
Introduction
Intended Use
This system is a 2 in 1 system designed to measure blood glucose outside the human body (in vitro diagnostic use) and to measure blood pressure non-invasively. It is intended for use in the home and in clinical settings as an aid to monitoring the effectiveness of diabetes control.
It is intended to be used for the quantitative measurement of glucose (sugar) in fresh whole blood samples drawn from the finger, palm, forearm, upper arm. It should not be used for the diagnosis of diabetes, or testing on newborns. This system is also intended to be used to measure non-invasively the systolic and diastolic blood pressure and pulse rate of an adult individual at home. The blood pressure is measured by using an inflatable cuff wrapped around the arm.
Product Overview
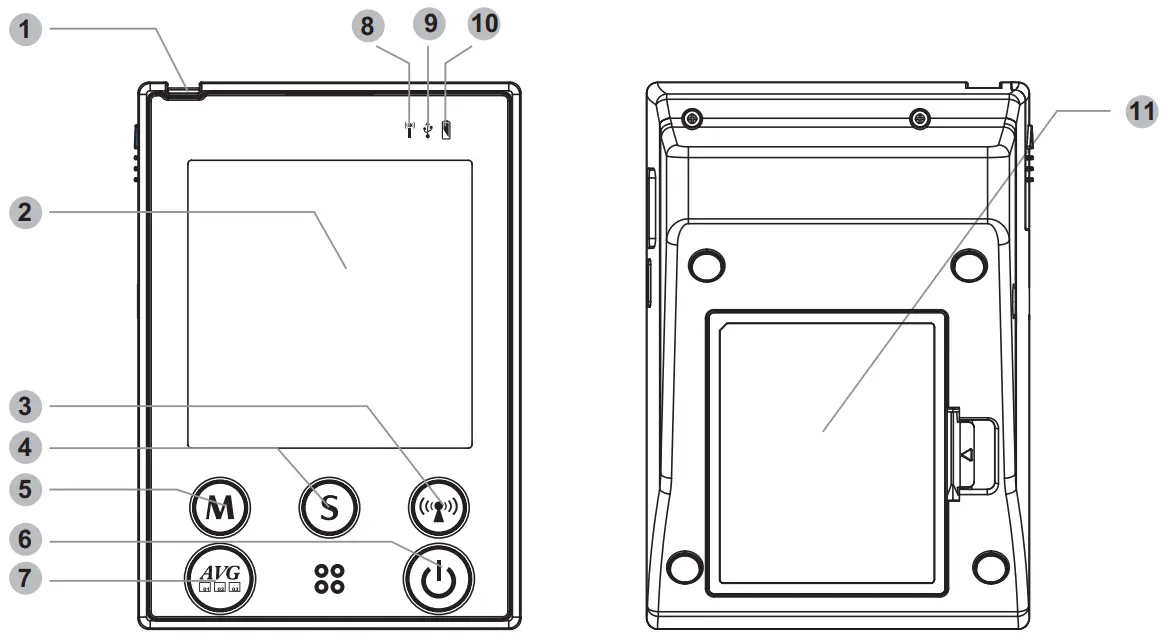
No. | Item | Description |
| 1 | Test Slot | Insert test strip here to turn the device on for testing. |
| 2 | Display Screen |
|
| 3 | RF Button | Press to activate the wireless data transmission. |
| 4 | S Button | Press to enter and confirm the settings. |
| 5 | M Button | Press to enter the device memory. |
| 6 | Power Button | Press to turn on the device and start a single blood pressure measurement. |
| 7 | Average Button | Press to measure your blood pressure in average mode. |
| 8 | RF Indicator | Indicate a wireless data transmission status. |
| 9 | USB Indicator | Indicate a USB connection status. |
| 10 | Power Indicator | Indicate the power status of the device. |
| 11 | Battery Compartment | Open the cover to install the batteries. |
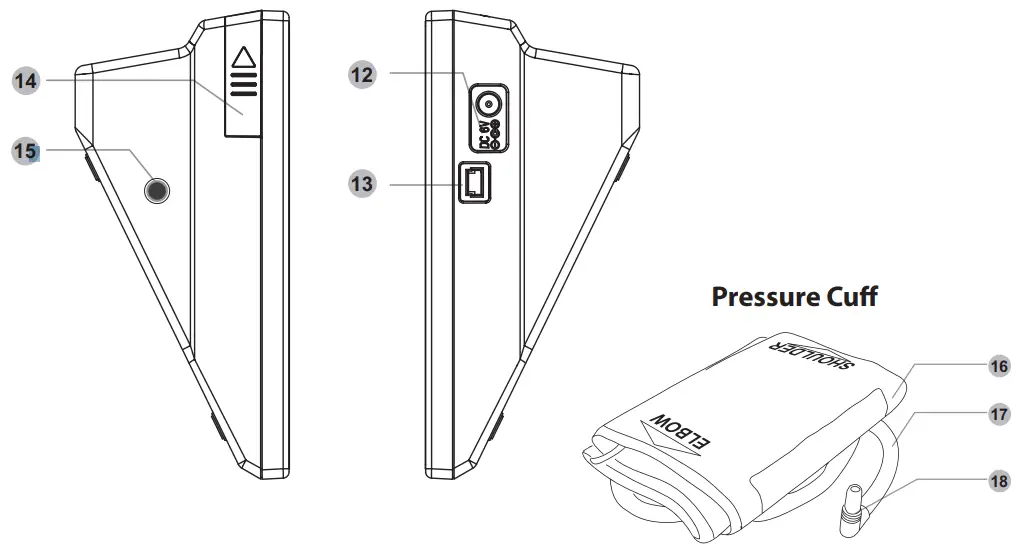
| 12 | AC/DC Adapter Port | Connect to a power supply. |
| 13 | USB Port | Connect to a mini USB type B cable For maintenance and engineering only. |
| 14 | Strip Ejector | Push upward to eject the used strip. |
| 15 | Air Jack | Connect to an air plug. |
| 16 | Pressure Cuff | Measure blood pressure. |
| 17 | Air Tube | Inflate the pressure cuff. |
| 18 | Air Plug | Connect to air jack. |
Screen Display
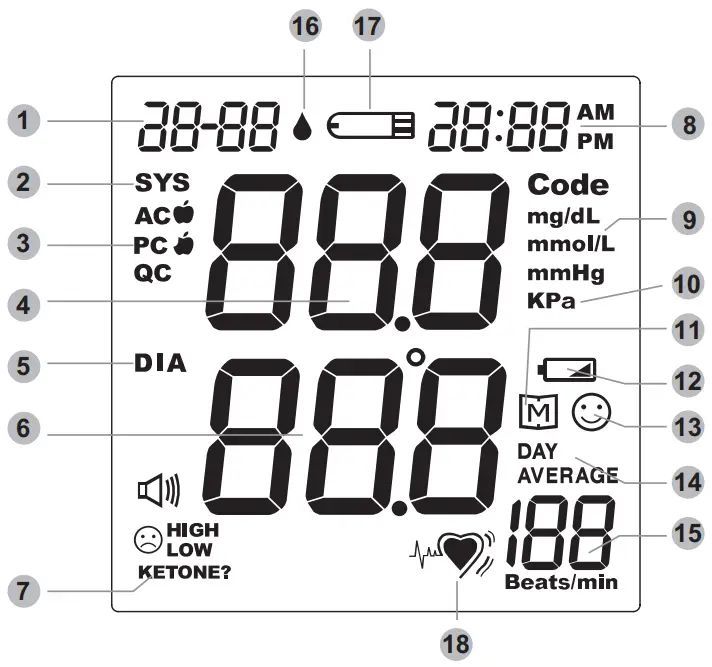
No. | Item |
| 1 | Date |
| 2 | Systolic Pressure Symbol |
| 3 | Measurement Mode |
| 4 | Systolic Pressure Value |
| 5 | Diastolic Pressure Symbol |
| 6 | Diastolic Pressure Value |
| 7 | Special Message |
| 8 | Time |
| 9 | Unit for Blood Glucose |
| No. | Item |
| 10 | Unit for Blood Pressure |
| 11 | Memory Mode Symbol |
| 12 | Battery Symbol |
| 13 | Result Indicator |
| 14 | Day Average Result |
| 15 | Pulse Rate |
| 16 | Blood Drop Symbol |
| 17 | Test Strip Symbol |
| 18 | Heart Symbol – for IHB Detection (Irregular Heart Beat) |
Getting Started
Initial Setup
Before using the device for the first time or after you changed the batteries, do the following initial setup:
Step 1: Enter the Setting Mode
Press and hold S until the display turns on.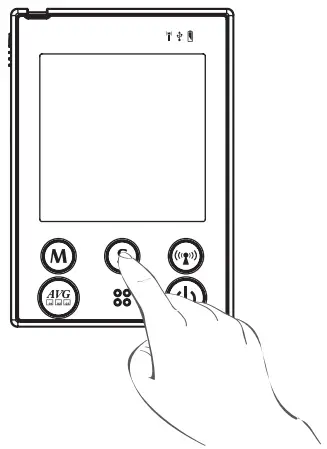
Step 2: Configuring the Settings
(Date, Time, Time Format, Auto-send and Memory Deletion)
Press M repeatedly to adjust the value or enable/disable the setting. Then press S to confirm the setting and switch to another field.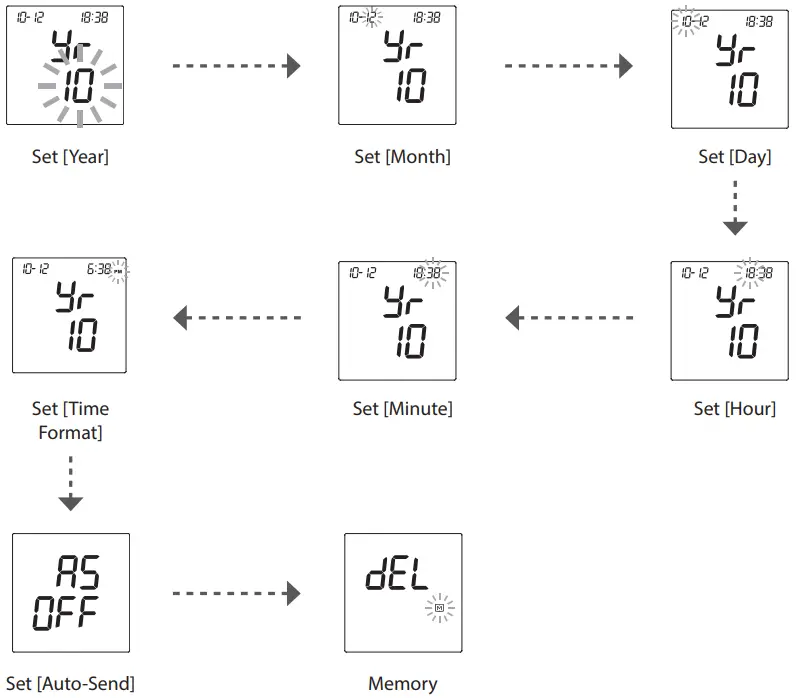
After all settings are complete, the device will automatically repeat all settings before shutdown.
Note:
- During memory deletion, do the following:
- To keep all saved results, press S to keep the saved result.
- To delete all results, press M twice to delete all memory.
- If the device is idle for 3 minutes during the setting mode, it will turn off automatically.
Testing Your Blood Pressure
Fitting the Cuff
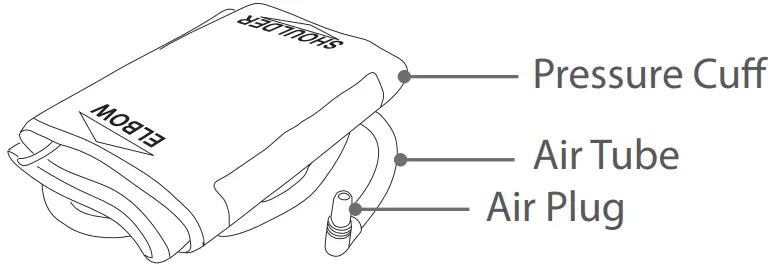
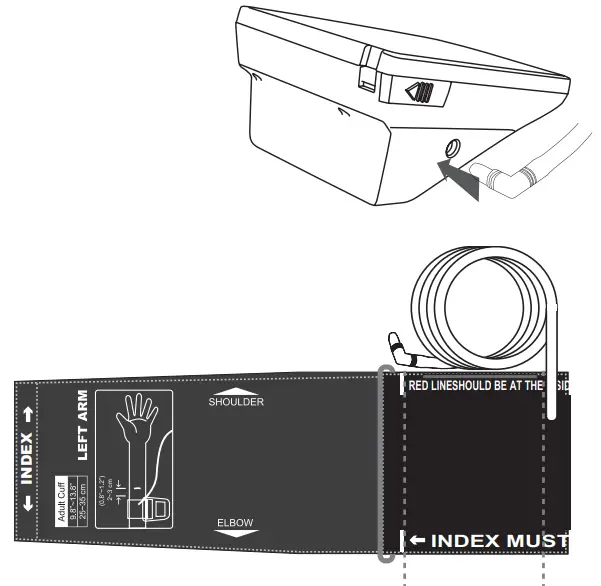
- Connect the air plug of the tubing to the air jack of the device.
- Assemble the cuff as shown in the illustration.
The smooth surface should be inside the cuff loop and the metal D-ring should not touch your skin.
Note:- Before using the cuff, be sure the cuff size fits with your upper arm circumference.
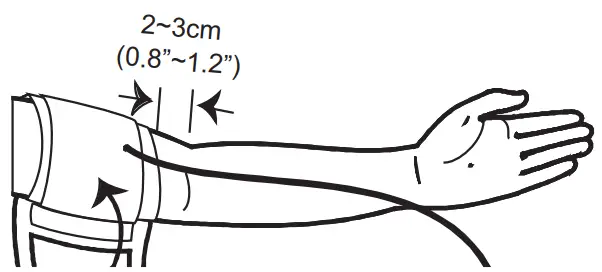
- Stretch your left (right) arm in front of you with your palm facing up.
Slide and place the cuff onto your arm with the air tube and artery mark region (in red) toward the lower arm.
Wrap and tighten the cuff above your elbow. The red line on the edge of the cuff should be approximately 0.8 to 1.2 inches (2 to 3 cm) above your elbow. Align the tube over the main arteries on the inside. - Leave a little free space between the arm and the cuff. You should be able to fit 2 fingers between them.
- Press the hook material firmly against the pile material. The top and bottom edges of the cuff should be tightened evenly around your upper arm.
Proper Measurement Position
- Sit down for at least 10 minutes before measuring.
- Place your elbow on a flat surface. Relax your hand with the palm facing up.
- Make sure the cuff is about the same height as the location of your heart.
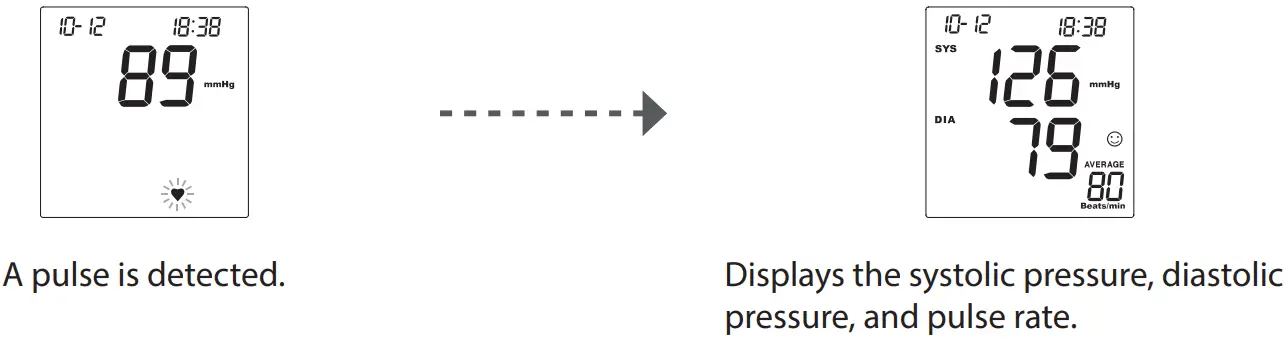
- After the device is turned on, the cuff will begin to inflate automatically. Remain still and do not talk or move during the measurement.
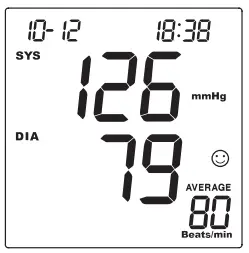
Measuring Blood Pressure
This device provides you two different ways to measure your blood pressure. When the device detects an irregular heart beat, the pulse rate symbol is shown as “ ![]() ” instead of “
” instead of “ ![]() ”. If the problem still persists, please consult your doctor.
”. If the problem still persists, please consult your doctor.
Important!
Always apply the pressure cuff before turning on the device.
A. Single Measurement
Perform an individual blood pressure measurement.
- Press
 All the LCD symbols will appear. The cuff will begin to inflate automatically.
 - Press to turn the device off.

Note:
- If the device is idle for 3 minutes, it will turn off automatically.
B. Average measurement
Automatically perform three (3) consecutive blood pressure measurements and display the final average result.
- Enter the Average mode. Press “
 ” the cuff will begin to inflate automatically.
 - After the first measurement is complete, the device will start counting down before the second measurement begins. The device will take three (3) measurements consecutively with an interval of 20 seconds for D40b, 60 seconds for D40g After taken three measurements, the results are averaged to produce the blood pressure measurement.

- Press to turn the device off.

Control Solution Testing
FORA Control Solution contains a known amount of glucose that reacts with test strips and is used to ensure your device and test strips are working together correctly.
Do a control solution test when:
- you suspect the device or test strips are not working properly.
- your blood glucose test results are not consistent with how you feel, or if you think the results are not accurate.
- you have dropped or think you may have damaged the device.
To perform the control solution test, do the following:
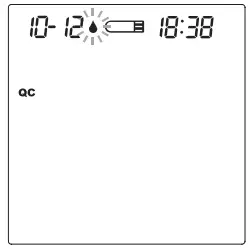
- Insert the test strip into the test slot of the device. Wait for the device to display the test strip and blood drop symbol.
- Press to mark this test as a control solution test.
With “QC” displayed, the device will store your test result in memory. If you press again, the “QC” will disappear and this test is no longer a control solution test.
Important!
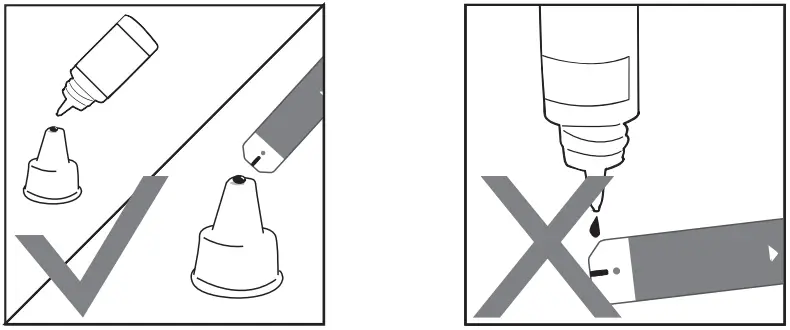
When doing the control solution test, you have to mark it so that the test result will not be stored in the memory. Otherwise, it will mix up the blood glucose test results with the control solution test results in memory. - Apply the control solution.
Shake the control solution vial thoroughly before use. Squeeze out a drop and wipe it off, then squeeze another drop and place it on the tip of the vial cap. Hold the device to move the absorbent hole of test strip to touch the drop. Once the confirmation window fills completely, the device will begin counting down.
Note:- To avoid contaminating the control solution, do not directly apply control solution onto a strip.
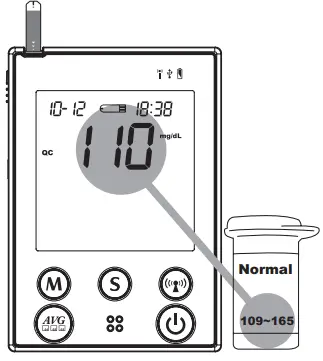
- Read and compare the result.
After counting down to 0, the test result of control solution will appear on the display. Compare this result with the range printed on the test strip vial and it should fall within this range. If the test result is out of range, read the instructions again and repeat the control solution test.
(110 mg/dL= 6.1 mmol/L, 109~165 mg/dL = 6.0~9.1 mmol/L) 109~165
Testing Your Blood Glucose
Test Strip Appearance
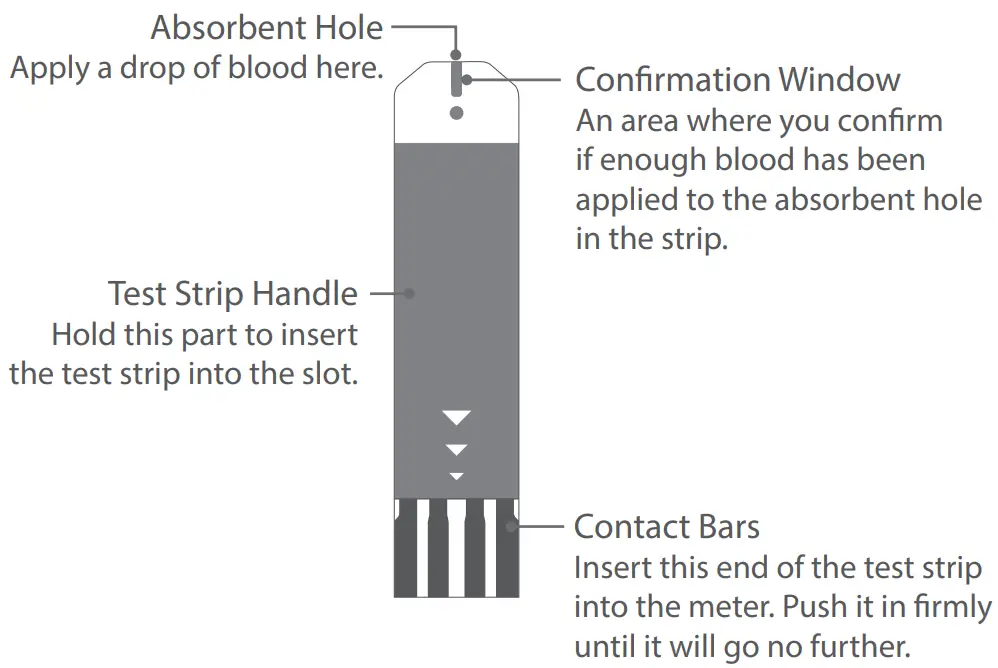
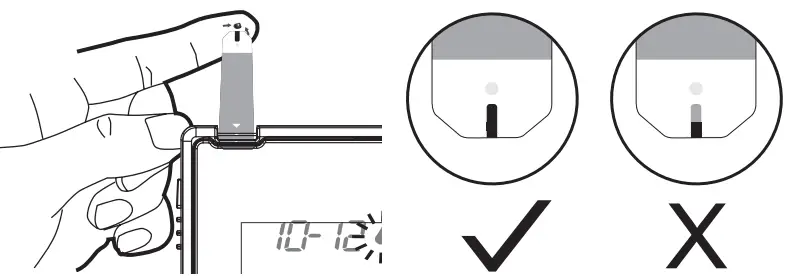
Inserting a Test Strip
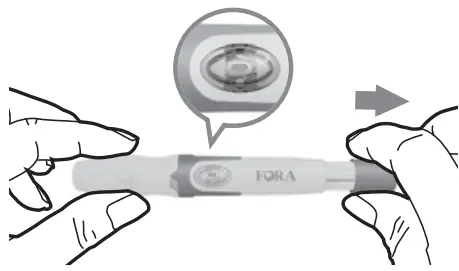
Insert the test strip as shown in the illustration.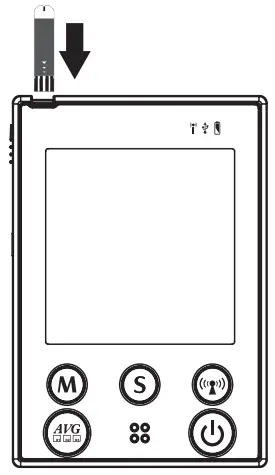
Important!
The front side of test strip should face up when inserting test strip. Test results might be wrong if the contact bar is not fully inserted into the test slot.
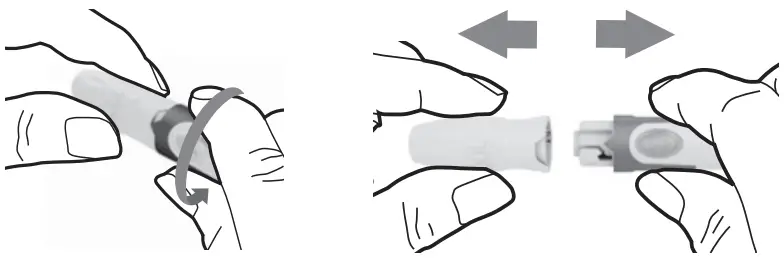
Preparing the Lancing Device
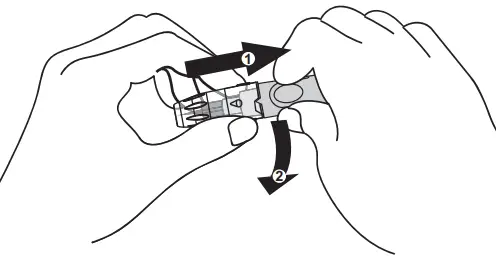
- Remove the cap.

- Insert a new lancet firmly into the white lancet holder cup.
- Remove the protective disk on the lancet. Hold the lancet firmly in place and twist off the protective disk.

- Replace the cap until it snaps or clicks into place.
- Rotate the dial to set the desired lancing depth.

- Pull the cocking control out until the orange bar appears on the release button window.

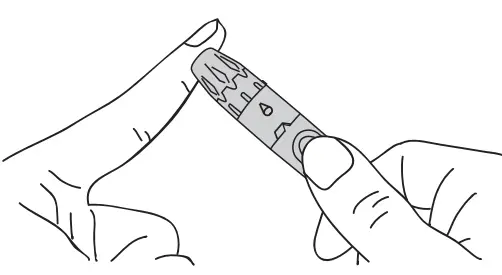
Obtaining the Blood Sample
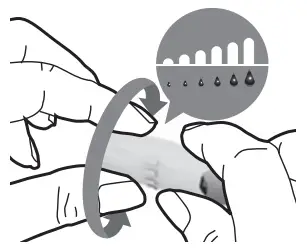
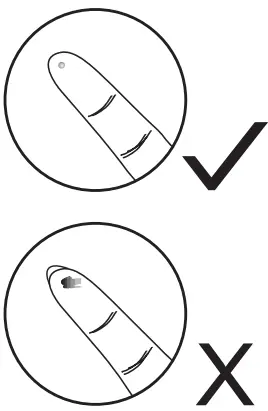
Please follow the suggestions below before obtaining a drop of blood:
- Wash and dry your hands before starting.
- Select the puncture site either at fingertips or another body parts.
- Rub the puncture site for about 20 seconds before penetration.
- Use a clear cap (included in the kit) while setting up the lancing device. Wait for the device to display the test strip and blood drop symbol.
Blood from the fingertip
- Press the lancing device’s tip firmly against the lower side of your fingertip.
- Press the release button to prick your finger, then a click indicates that the puncture is complete.

Blood from sites other than the fingertip
Important!
- Avoid lancing areas with obvious veins to avoid excess bleeding.
Alternative site testing (AST) is when individuals check their blood glucose levels using other areas of the body other than the fingertips. The FORA test strips allow AST to be performed on sites other than the fingertips. Please consult your health care professional before you begin AST.
Alternative site sample results may be different from fingertip sample results when glucose levels are changing rapidly (e.g., after a meal, after taking insulin, or during or after exercise).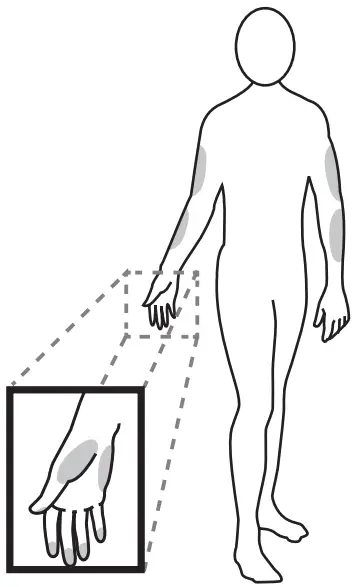
We strongly recommend that you perform AST ONLY at the following times:
- During a pre-meal or fasting state (more than 2 hours since the last meal).
- Two hours or more after taking insulin.
- Two hours or more after exercise.
Do NOT rely on test results at an alternative sampling site, but use samples taken from the fingertip, if any of the following applies:
- You think your blood sugar is low.
- You are not aware of symptoms when you become hypoglycemic.
- The results do not agree with the way you feel.
- After a meal.
- After exercise.
- During illness.
- During times of stress.
To obtain a blood sample from the alternative sites, please rub the puncture site for approximately 20 seconds.
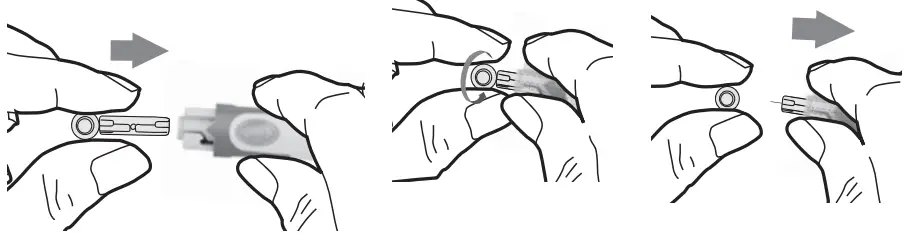
- Replace the lancing device cap with the clear cap.
- Pull the cocking control out until the orange bar appears on the release button window.

Note
- Do not use results from alternative site samples to calibrate continuous glucose monitoring systems (CGMS), or for insulin dose calculations.
- Choose a different spot each time you test. Repeated punctures at the same spot may cause soreness and calluses.
- Please consult your health care professional before you begin AST(Alternative Site Testing).
- It is recommended to discard the first drop of blood as it might contain tissue fluid, which may affect the test result.
Measuring Blood Glucose Test
- Insert the test strip into its slot.
Wait for the device to display the test strip and blood drop symbol. - Select the appropriate measuring mode by pressing M.
- General Tests (not display) – any time of day without regard to time since last meal.
- AC
 – no food intake for at least 8 hours.
 - PC
 – 2 hours after a meal.
 - QC – testing with the control solution.
- Obtain a blood sample.
Use the pre-set lancing device to puncture your desired site. After penetration, discard the first drop of blood with a clean tissue or cotton. Gently squeeze the punctured area to obtain another drop of blood. Be careful NOT to smear the blood sample. The volume of blood sample must be at least 0.5 microliter (μL) of volume.
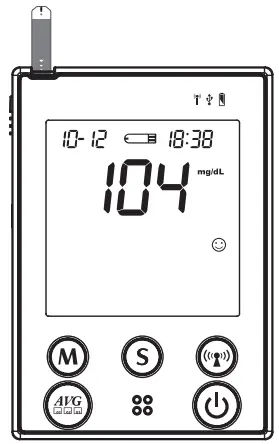
- Apply the blood sample.
Hold the blood drop to touch the absorbent hole of the test strip. Blood will be drawn in and after the confirmation window is completely filled, the device begins counting down.
- Read your result.
The result of your blood glucose test will appear after the device counts down to 0. This result will automatically be stored in the memory.
(104 mg/dL = 5.7 mmol/L)
Disposing Used Test Strip and Lancet
To remove the used test strip, simply push the Strip Ejector button upward to eject the used test strip. The device will automatically turn off after the test strip is ejected.
To remove the used lancet, remove the lancet from the lancing device after you have finished testing.
Discard your used strip and lancet properly in a puncture resistant container.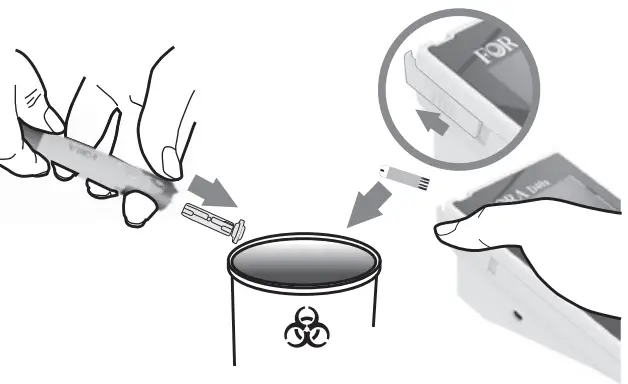
Reviewing Test Results
Your device stores the 864 most recent test results along with respective dates and times in its memory.
To review all test results, do the following:
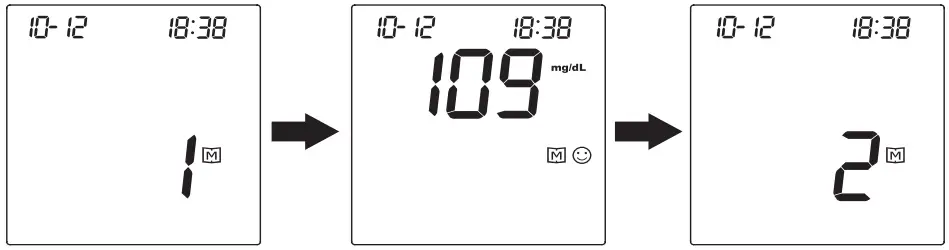
- Press M The “
 ” icon appears on the screen.
 - Press M to review the test results stored in the device. Press M to search the result forwards, and press S to search the result backwards.

(109 mg/dL = 6.0 mmol/L)
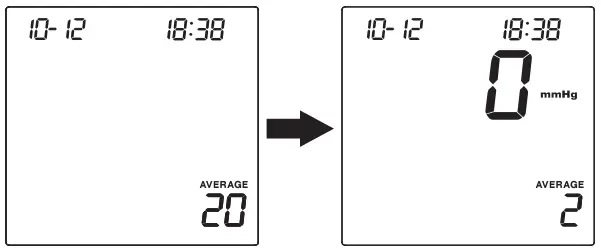
To review the day-average test results, do the following:
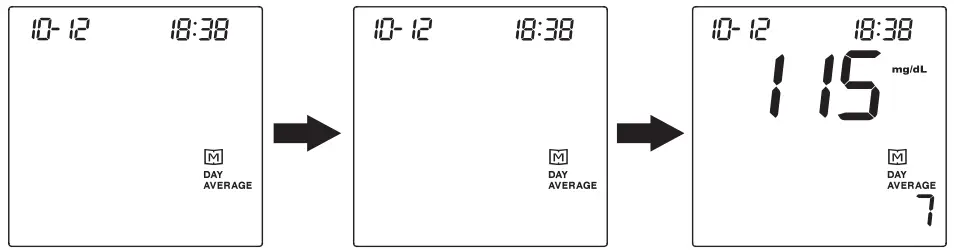
- Press and hold M for 3 seconds until the “
 ” icon appears on the screen. Your blood glucose 7-day average result will appear on the display.
(115 mg/dL= 6.3 mmol/L) - Press M to review your 14-, 21-, 28-, 60- and 90-day average.
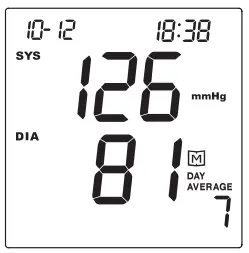
- Press S to review your blood pressure 7-, 14-, 21-, 28-, 60- and 90-day average.
Note:
- Press to exit the memory mode or leave it without any action for 3 minutes. The device will turn off automatically.
- If using the device for the first time, the “—” icon appears when you recall the test results or review the average result. This indicates that there is no test result in the memory.
- Control solution results are NOT included in the day average.
- The blood glucose test results of Lo and will NOT be calculated in the day average results.
Appendix
Transferring Data
There are two types of connection to transfer results, please check your meter box for the transmission method of your meter. For Bluetooth or 3G/4G methods, please contact service providers for more information.
Data Transmission Via Bluetooth (For FORA D40b only)
You can use your device with an iOS (5.0.1 or higher) Android system (4.3 API Level 18 or higher) or PC (Windows 8 or higher) to download data from your FORA D40b via Bluetooth.
Follow the steps below to transmit data from your FORA D40b. Please contact your local customer service or place of purchase for assistance.
Pairing with your mobile device
- Turn on the Bluetooth function on your mobile device.
- With the meter off, press and hold the RF Button for 3 seconds to turn the Bluetooth on.
- Follow the instruction of your APP to pair the device. (e.g., search to find the meter and then add it into the app.)
- After successfully pairing the APP with the device, the Bluetooth function of the meter shall be on before transmitting the data to your APP.
| BT Indicator | Status | BT Indicator | Status | |
| Flash Fast | Pairing mode. | Lit Solid | The connection is established. | |
| Flash Slowly | Connection mode. |
The transmission procedure is controlled by software, the device will turn off by
software after completion of data transmission. If the device is still on, press and
the device will turn off.
Note:
- While the meter is in transmission mode, it is unable to perform the test.
- Make sure your device with iOS or Android system has turned on its Bluetooth before transmitting the data and the meter is within the receiving range.
Data transmission via 3G/4G (For FORA D40g only)
Before initiating 3G/4G transmission, insert the SIM card at the bottom of the device battery compartment to transmit data. Please contact service providers for more information on SIM card, server information and data transmission.
- Initiate 3G/4G transmission
To initiate 3G/4G transmission, do one of the following:- (a) with the device turned off, press
 to initiate 3G/4G transmission of batch upload with test results which have not been uploaded,
 - (b) if Auto-send is set to On, the device will initiate 3G/4G after measurement to send the current new data,
- (c) in memory mode, press to initiate 3G/4G to upload data shows on the screen.
- (a) with the device turned off, press
- During transmission
With the device turned off, press to initiate the data transmission from the device. “PCL” will appear on the display first and the RF indicator will light up in orange. Then the test result under transmission will show on the screen.
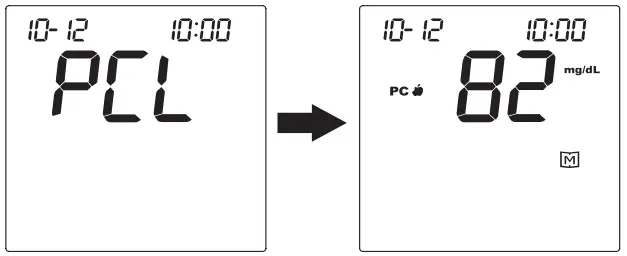
When the RF indicator is blinking in blue, the data transmission has started. When the RF indicator shows an blue light, the 3G/4G service is online.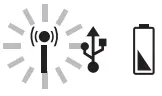
The device will turn off automatically
Note:
- If the SIM card is not inserted, the “PCL” will start blinking, and the device will turn off automatically after blinking for 30 seconds. If the problem still persists, contact the place of purchase for help.
- When the data transmission is in progress, the device is unable to perform any test.
- Signal Quality Check
To begin the quality check, press and hold for 10-15 seconds when the device is off. Wait until PCL appears on the screen. The number displayed in the middle of the screen indicates the signal quality of 3G/4G service at where you are.
4G LTE RSRP signal range (-44~-140)
RSRP > -75 (Good)
-76 >RSRP > -94 (Normal)
RSRP < -95 (Weak)
2G/3G RCRP signal range (-25~-115)
RSCP > -60 (Good)
-61 >RSCP > -79 (Normal)
RSRP < -80 (Weak)
If you receive poor signal quality, take the device to a spot with a better reception and try again. Keep away from microwave or other devices that may interrupt the signal.
Maintenance
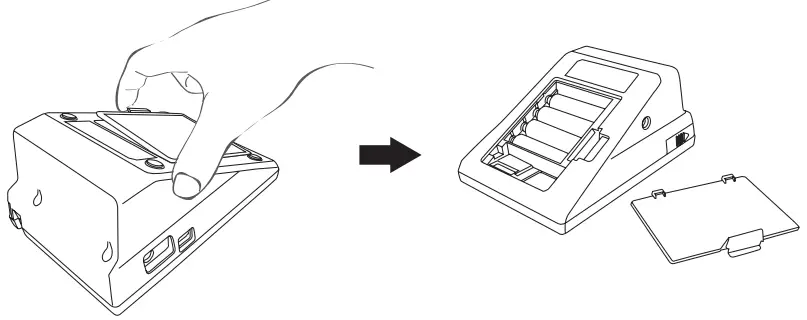
Changing Battery (For FORA D40b only)
When the battery is low, the “ ![]() “ icon shown on the display starts blinking and the power indicator lights up in red.
“ icon shown on the display starts blinking and the power indicator lights up in red.
To change the batteries, do the following:
- Press the edge of the battery cover and lift it up to remove the cover.
- Remove the old batteries and replace with four 1.5V AA size alkaline batteries.
- Close the battery cover.
When you will hear a “beep” sound, this indicates the batteries are inserted correctly.
CAUTION
RISK OF EXPLOSION IF BATTERY IS REPLACED BY AN INCORRECT TYPE. DISPOSE OF USED BATTERIES ACCORDING TO THE INSTRUCTIONS.
Note
- Replacing the batteries does not affect the test results stored in memory.
- Keep away these batteries from small children. If swallowed, promptly seek medical assistance.
- Batteries may leak chemicals if unused for a long time. Remove the batteries if you are not going to use the device for an extended period.
- Properly dispose of the used batteries according to your local environmental regulations.
Recharging the Battery (For FORA D40g Only)
The AC adapter can be used as the battery charger when you need to recharge Li-ion battery. To recharge the 3.7V Li-ion battery, connect AC adapter to the monitor and a power source.
The power indicator will light up in green, which indicates the battery is undergoing a recharge. It should take approximately 5 hours to be fully charged.
If the power indicator starts blinking in green, this indicates the recharge is nearly finished. The power indicator will diminish when the recharge completes.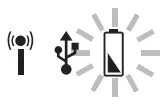
Using an AC Adapter
As an alternative, you can use an AC adapter to provide the power supply. However, when alkaline batteries are used for FORA D40b, these batteries cannot be recharged with the device by connecting AC adapter.
To use an AC adapter, do the following:
- Connect AC adapter plug to AC adapter jack of the device.
- Plug AC adapter power plug into an electrical outlet.
CAUTION!
- For FORA D40g, the Li-ion battery must be recharged with the FORA D40g monitor by connecting AC adapter to an electrical outlet. Only this 3.7V rechargeable Li-ion battery (battery pack Model No.: S14500 1S4P) can be recharged with FORA D40 by the connection of AC adapter. Any other kind of rechargeable battery is not allowed or it may damage the monitor.
Caring for Your Device
To clean the device exterior, wipe it with a cloth moistened with tap water or a mild cleaning agent, then dry the device with a soft dry cloth. Do NOT flush with water.
- Do NOT use organic solvents to clean the device.
- Do NOT wash or iron the pressure cuff.
- Always store or transport the device in its original storage case.
- Avoid dropping and heavy impact.
- Avoid direct sunlight and high humidity.
Device Storage
- Storage condition : Temperature -25 ºC to 70 ºC (-13 °F to 158 °F), and humidity 10% ~ 95%.
- Always store or transport the monitor in its original storage case.
- Avoid dropping and heavy impact.
- Avoid direct sunlight and high humidity.
Caring for Your Test Strips
- Storage condition: 4°C to 40°C (39.2°F to 104°F), below 85% relative humidity. Do not freeze.
- Store your test strips in their original vial only. Do not transfer to other container.
- Store test strip packages in a cool and dry place. Keep away from direct sunlight and heat.
- After removing a test strip from the vial, immediately close the vial cap tightly.
- Touch the test strip with clean and dry hands.
- Use each test strip immediately after removing it from the vial.
- Write the opening date on the strip vial label when you first opened it. Discard remaining test strips after 3 months.
- Do not use test strips beyond the expiry date. This may cause inaccurate results.
- Do not bend, cut, or alter a test strip in any way.
- Keep the strip vial away from children since the cap and the test strip may be a choking hazard. If swallowed, promptly see a doctor for help.
For further information, please refer to the test strip package insert.
Reference Values
Blood Glucose
The meter provides you with plasma equivalent results.\
| Time of day | Normal plasma glucose range for people without diabetes (mg/dL) |
| Fasting and before meal | Less than 100 mg/dL (5.6 mmol/L) |
| 2 hours after meals | Less than 140 mg/dL (7.8 mmol/L) |
Source: American Diabetes Association (2012). Clinical Practice Recommendations. Diabetes Care, 35 (Supplement 1): S1-100.
Please consult your doctor to determine a target range that works best for you.
Blood Pressure
Clinical studies show that adult diabetes is often accompanied by elevated blood pressure. People with diabetes can reduce their heart risk by managing their blood pressure along with diabetes treatment*1.
Definitions and Classification of blood pressure levels according to 2007 ESH-ESC Practice Guidelines for the Management of Arterial Hypertension:
| Category | Systolic (mmHg) | Diastolic (mmHg) | |
| Optimal | < 120 | and | < 80 |
| Normal | 120 –129 | and/or | 80–84 |
| High normal | 130 –139 | and/or | 85–89 |
| Grade 1 hypertension | 140 –159 | and/or | 90– 99 |
| Grade 2 hypertension | 160 –179 | and/or | 100–109 |
| Grade 3 hypertension | ≥ 180 | and/or | ≥ 110 |
| Isolated systolic hypertension | ≥ 140 | and | < 90 |
Isolated systolic hypertension should be graded (1, 2, 3) according to systolic blood pressure values in the ranges indicated, provided that diastolic values are < 90mmHg.
Source: The European Society of Hypertension and European Society of Cardiology Task Force Members. 2007 ESH-ESC Practice Guidelines for the Management of Arterial Hypertension. J Hypertens 2007; 25: 1751-1762.
*1: American Diabetes Association: The Diabetes-Heart Disease Link Surveying Attitudes, Knowledge and Risk (2002)
Symbol Information
Symbol | Referent |
 | For in vitro diagnostic use |
 | Read instructions before use |
| Use by/ Expiry date | |
 | Batch code |
 | Serial number |
IP21 | Ingress protection rating |
 | Authorised representative in the European Union |
 | Refer to instruction manual |
 | CE Mark |
Symbol | Referent |
 | Do not reuse |
 | Type BF equipment |
| Temperature limitation | |
 | Humidity limitation |
| Manufacturer |
| Caution |
| Dispose of or recycle the electrical wastes according to local regulations |
| Model number |
 | Medical Device |


Troubleshooting
If you follow the recommended action but the problem persists, or error messages other than the ones below appear, please call your local customer service.
Error Message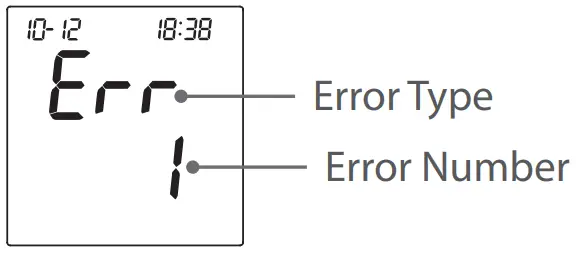
| Error Message | Cause | What To Do |
| Err 1 | Inflation or pressure error. | Please contact local customer service for help. |
| Err 2 | Refit cuff tightly and correctly. Relax and repeat the measurement. If the error still remains, please contact local customer service for help. | |
| Err 3 | Cuff pressure is too high. | |
| Err 4 or Err 5 | No pulse rate detected or the pulse rate is too low. | |
| Err 8 | Forced to stop the blood pressure measurement after repump for 2 times. | Turn off the device and start over. Follow the instructions and try again. |
| Err 15 | Data corrupted. | Follow the instructions and try again. If problem persists, contact the local customer service for assistance. |
| E-U | Strip has been used. | Repeat the test with a new strip. |
| E-d | Problem in operation. | Review the instructions and repeat the test with a new strip. |
| E-t | Environmental temperature is outside the system’s operational range. | System operational range is 10°C to 40°C (50°F to 104°F). Repeat the test after the device and test strip have reached the above temperature. |
Error Message of FORA D40g 3G/4G Transmission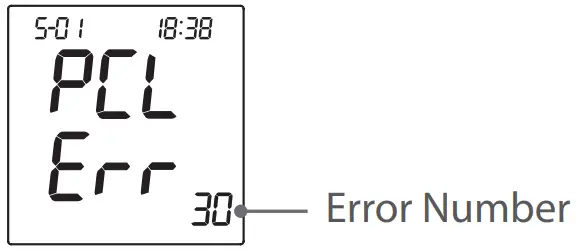
Error No. | Cause | What To Do |
| 30 | Unable to connect to the service | Please start over and try again. |
| 31 | Incorrect PIN number of SIM card | Check if the entered PIN number of your SIM card is correct and try again. Reset the PIN number if necessary. If problem persists, please contact the customer service for assistance. |
| 32 | Incorrect PIN 2 number of SIM card | |
| 33 / 34 | Locked SIM card | |
| 38 | Unfinished registration | Complete the registration. Try again after you have successfully registered. |
| 39 | Problem of reading SIM card | Check if the SIM card is correctly placed and try again. If problem persists, please contact the customer service for assistance. |
| 40 | No response from the server | Turn off the device and reconnect to the service. Change to a spot with a better quality of connection and try again. If problem still persists, please contact local customer service for assistance. |
| 41 | No Answer due to Module or Internet Service failure | |
| 42 | Failure connecting to the service | |
| 43 | Connection overtime | Turn off the device and try again to reconnect to the service. |
| 44 | Command failure | Turn off the device and try again. If problem still persists, please contact local customer service for assistance. |
| 45 | Data upload error | |
| 48 / 49 | Problem of connecting to the service |
Blood Glucose Measurement
Symptom | Cause | What To Do |
| The device does not display a message after inserting a test strip. | Test strip inserted upside down or incompletely. | Insert the test strip with contact bars end first and facing up. |
| Defective device or test strips. | Please contact customer service. | |
| The test does not start after applying the sample. | Insufficient blood sample. | Repeat the test using a new test strip with larger volume of blood sample. |
| Defective test strip. | Repeat the test with a new test strip. | |
| Sample applied after the device is automatically turned off. | Repeat the test with a new test strip. Apply sample only when flashing “ | |
| Defective device. | Please contact customer service. | |
| The control solution testing result is out of range. | Error in performing the test. | Read instructions thoroughly and repeat the test again. |
| Control solution vial was poorly shaken. | Shake the control solution vigorously and repeat the test again. | |
| Expired or contaminated control solution. | Check the expiration date of the control solution. | |
| Control solution that is too warm or too cold. | Control solution, device, and test strips should be at room temperature (20°C to 25°C / 68°F to 77°F) before testing. | |
| Defective test strip. | Repeat the test with a new test strip. | |
| Device malfunction. | Please contact customer service. |
Blood Pressure Measurement
Symptom | Cause | What To Do |
| Nothing is displayed after pressing the Power button. | Batteries incorrectly installed or no battery is installed. | Check that the batteries are correctly installed. |
| The heart rate is higher/lower than user’s average. | Movement during measurement | Repeat measurement |
| Measurement taken just after exercise. | Rest at least 30 minutes before repeating measurement | |
| The result is higher/ lower than user’s average measurement. | May not be in correct position while measuring. | Adjust to the correct position to measure. |
| Blood pressure naturally varies from time to time. | Keep in mind for next measurement. | |
| Defective test strip. | Repeat the test with a new test strip. | |
| Device malfunction. | Please contact customer service. |
Specifications
System performance | |
| Power Source | 1.5V alkaline battery for D40b 3.7V rechargeable Li-ion battery for D40g |
| Device Dimensions (w/o cuff) | 147 (L) x 105 mm (W) x 80 mm (H), 500g with batteries |
| Memory | Maximum 864 memory records |
| Power Saving | Automatic power off if system idle for 3 minutes (normal mode) or 5 minutes (RF mode). |
| Operating condition | Temperature: 5 ºC to 40 ºC (41 °F to 104 °F) Humidity: 15% ~ 93% |
| Storage condition | Temperature: -25 ºC to 70 ºC (-13 °F to 158 °F) Humidity: 10% ~ 95% |
| Power Supply Input | DC +6V / 1A (max) via Power Plug |
| Blood glucose measurement performance | |
| Measurement Unit | mg/dL or mmol/L |
| Linear Range | 20 to 600 mg/dL (1.1 to 33.3mmol/L) |
| Precision | ±5 % (CV) |
| Accuracy | ±15 mg/dL (0.83 mmol/L) when glucose < 75mg/dL (4.2 mmol/L) |
| ±20% when glucose ≥ 75mg/dL (4.2 mmol/L) | |
| Ketone Warning | glucose value is over 240 mg/dL (13.3 mmol/L) |
| Blood pressure measurement performance | |
| Pressure Range | 0 – 300 mmHg |
| Heart Rate Measuring Range | 30 ~ 199 beat per minute |
| Measurement Unit | mmHg |
| Systolic Measuring Range | 60 ~ 250 mmHg |
| Diastolic Measuring Range | 30 ~ 180 mmHg |
| Maximum Inflation Pressure | 280 mmHg |
| Accuracy of Static Pressure | ±3 mmHg |
| Accuracy of Pulse Rate | ±4% of reading |
This device has been tested to meet the electrical and safety requirements of: IEC/EN 60601- 1, IEC/EN 60601-1-2, IEC/EN 61010-1, IEC/EN 61010-2-101, IEC/EN 61326-2-6, EN 301 489-17, EN 300 328.
Reference to Standards:
- EN 1060-1 / EN 1060-3, NIBP-requirements
- IEC 60601-1 General requirement for safety
- IEC 60601-1-2 Requirements for EMC
- EN 1060-4, NIBP clinical investigation
- AAMI/ANSI /IEC 80601-2-30, ANSI/AAMI/ISO 81060-2, NIBP requirements
Warning: Medical electrical equipment needs special precautions regarding EMC and needs to be installed according to the EMC information provided. Careful consideration of this information is essential when stacking or collocating equipment and when routing cables and accessories.
Warning: RF mobile communications equipment can affect medical electrical equipment.
| Manufacturer’s declaration-Electromagnetic emissions | ||
| The FORA D40 is intended for use in the electromagnetic environment (for home healthcare and professional healthcare) specified below. The customer or the user of the FORA D40 should assure that it is used in such an environment. | ||
| Emission test | Compliance | Electromagnetic environment-guidance (for home healthcare and professional healthcare) |
| RF emissions CISPR 11 | Group 1 | The FORA D40 uses RF energy only for internal use. Therefore, its RF emissions are very low and are not likely to cause any interference from nearby electronic equipment. |
| RF emissions CISPR 11 | Class B | The FORA D40 is suitable for use in all establishments, including domestic establishments and those directly connected to the public low- voltage power supply network that supplies buildings used for domestic purposes. |
| Harmonic emissions IEC 61000-3-2 | Not applicable | |
| Voltage fluctuations / flicker emissions IEC 61000-3-3 | Not applicable | |
| Manufacturer’s declaration-electromagnetic immunity | |||
| The FORA D40 is intended for use in the electromagnetic environment (for home healthcare and professional healthcare) specified below. The customer or the user of the FORA D40 should assure that it is used in the environment specified below. | |||
| Immunity test | IEC 60601 test level | Compliance level | Electromagnetic environment-guidance (for home healthcare and professional healthcare environment) |
| Electrostatic discharge (ESD) IEC 61000-4-2 | Contact:±8 kV Air±2 kV,±4 kV,±8 kV,±15 kV | Contact:±8 kV Air±2 kV,±4 kV,±8 kV,±15 kV | Floors should be wood, concrete or ceramic tile. If floors are covered with synthetic material, the relative humidity should be at least 30%. |
| Electrical fast transient/ burst IEC 61000-4-4 | ±2kV for power supply lines ±1kV for input/output lines | Not applicable Not applicable | Mains power quality should be that of a typical home healthcare and professional healthcare environment. |
| Surge IEC 61000-4-5 | ± 0.5kV, ±1kV line(s) to line(s) ±0.5kV, ±1kV, ±2kV line(s) to earth | Not applicable Not applicable | Mains power quality should be that of a typical home healthcare and professional healthcare environment. |
| Voltage Dips, short interruptions and voltage variations on power supply input lines IEC 61000-4-11 | Voltage dips: 0 % UT; 0,5 cycle 0 % UT; 1 cycle 70 % UT; 25/30 cycles Voltage interruptions: 0 % UT; 250/300 cycle | Voltage dips: Not applicable Not applicable Not applicable Voltage interruptions: Not applicable | Mains power quality should be that of a typical home healthcare and professional healthcare environment. If the user of the FORA D40 requires continued operation during power mains interruptions, it is recommended that the FORA D40 be powered from an uninterruptible power supply or a battery. |
| Power frequency(50, 60 Hz) magnetic field IEC 61000-4-8 | 30 A/m 50 Hz or 60 Hz | 30 A/m 50 Hz and 60 Hz | The FORA D40 power frequency magnetic fields should be at levels characteristic of a typical location in a typical home healthcare and professional healthcare environment. |
| NOTE UT is the a.c. mains voltage prior to application of the test level. | |||
| Manufacturer’s declaration-electromagnetic immunity | |||
| The FORA D40 is intended for use in the electromagnetic environment (for home healthcare and professional healthcare) specified below. The customer or the user of the FORA D40 should assure that it is used in the environment specified below. | |||
| Immunity test | IEC 60601 test level | Compliance level | Electromagnetic environment-guidance (for home healthcare and professional healthcare environment) |
| Conducted RF IEC 61000-4-6 Radiated RF IEC 61000-4-3 | 3 Vrms: 0,15 MHz – 80 MHz 6 Vrms: in ISM and amateur radio bands between 0,15 MHz and 80 MHz 80 % AM at 1 kHz
10 V/m 80 MHz – 2,7 GHz 80 % AM at 1 kHz | Not applicable Not applicable 10 V/m 80 MHz – 2,7 GHz 80 % AM at 1 kHz | Portable and mobile RF communications equipment must not be used close to any parts of the FORA D40 including cables, other than the recommended separation distance calculated from the equation applicable to the frequency of tRecommended separation distance: d = 1,2 √P d = 1,2 √P 80MHz to 800 MHz d = 2,3 √P 800MHz to 2,7 GHz Where P is the maximum output power rating of the transmitter in watts (W) according to the transmitter manufacturer and d is the recommended separation distance in meters (m). Field strengths from fixed RF transmitters, as determined by an electromagnetic site survey, a should be less than the compliance level in each frequency range.b Interference may occur in the vicinity of equipment marked with the following symbol: |
| NOTE1 At 80 MHz and 800 MHz, the higher frequency range applies. NOTE2 These guidelines may not apply to all situations. Electromagnetic propagation is affected by absorption and reflection from structures, objects and people. | |||
| a Field strengths from fixed transmitters, such as base stations for radio (cellular/cordless) telephones and land mobile radios, amateur radio, AM and FM radio broadcast and TV broadcast cannot be predicted theoretically with accuracy. To assess the electromagnetic environment due to fixed RF transmitters, an electromagnetic site survey should be considered. If the measured field strength in the location in which the FORA D40 is used exceeds the applicable RF compliance level above, the FORA D40 should be observed to verify normal operation. If abnormal performance is observed, additional measures may be necessary, such as re-orienting or relocating the FORA D40. b Over the frequency range 150 kHz to 80 MHz, field strengths should be less than 3 V/m. | |||
| Recommended separation distance between portable and mobile RF communications equipment and the FORA D40 | |||
| The FORA D40 is intended for use in an electromagnetic environment (for home healthcare and professional healthcare) in which radiated RF disturbances are controlled. The customer or the user of the FORA D40 can help prevent electromagnetic interference by maintaining a minimum distance between the portable and mobile RF communications equipment (transmitters) and the FORA D40 as recommended below, depending on the maximum output power of the communications equipment. | |||
| Rated maximum output power of transmitter W | Separation distance according to frequency of transmitter m | ||
| 150 kHz to 80 MHz d =1,2√P | 80 MHz to 800 MHz d =1,2√P | 800 MHz to 2,7 GHz d=2,3√P | |
| 0,01 | N/A | 0,12 | 0,23 |
| 0,1 | N/A | 0,38 | 0,73 |
| 1 | N/A | 1,2 | 2,3 |
| 10 | N/A | 3,8 | 7,3 |
| 100 | N/A | 12 | 23 |
| For transmitters rated at a maximum output power not listed above, the recommended separation distance d in meters (m) can be estimated using the equation applicable to the frequency of the transmitter, where p is the maximum output power rating of the transmitter in watts (W) depending on the transmitter manufacturer. NOTE1 At 80 MHz and 800 MHz, the separation distance for the higher frequency range applies. NOTE2 These guidelines may not apply to all situations. Electromagnetic propagation is affected by absorption and reflection from structures, objects and people. | |||
| Manufacturer’s declaration-electromagnetic immunity Test specifications for ENCLOSURE PORT IMMUNITY to RF wireless communications equipment | |||||||
| The FORA D40 is intended for use in the electromagnetic environment (for home healthcare and professional healthcare) specified below. | |||||||
| Test frequency (MHz) | Band a) (MHz) | Service a) | Modulation b) | Maximum power (W) | Distance (m) | IMMUNITY TEST LEVEL (V/m) | Compliance LEVEL (V/m) (for home healthcare) |
| 385 | 380 –390 | TETRA 400 | Pulse modulation | 1,8 | 0,3 | 27 | 27 |
| 450 | 430 – 470 | GMRS 460, FRS 460 | FM c) ±5 kHz deviation 1 kHz sine | 2 | 0,3 | 28 |
28 |
| 710 | 704 – 787 | LTE Band 13, 17 | Pulse modulation b) 217 Hz | 0,2 | 0,3 | 9 |
9 |
| 745 | |||||||
| 780 | |||||||
| 810 | 800 – 960 | GSM 800/900, TETRA 800, iDEN 820, CDMA 850, LTE Band 5 | Pulse modulation b) 18 Hz |
2 | 0,3 | 28 |
28 |
| 870 | |||||||
| 930 | |||||||
| 1 720 |
1 700 – 1 990 | GSM 1800; CDMA 1900; GSM 1900; DECT; LTE Band 1, 3, 4, 25; UMTS | Pulse modulation b) 217 Hz | 2 | 0,3 | 28 |
28 |
| 1 845 | |||||||
| 1 970 | |||||||
| 2 450 | 2 400 – 2 570 | Bluetooth, WLAN, 802.11 b/g/n, RFID | Pulse modulation b) 217 Hz | 2 | 0,3 | 28 |
28 |
| 5 240 | 5 100 – 5 800 |
WLAN 802.11 a/n | Pulse modulation b) 217 Hz | 0,2 | 0,3 | 9 |
9 |
| 5500 | |||||||
| 5785 | |||||||
| NOTE To achieve the IMMUNITY TEST LEVEL, the distance between the transmitting antenna and the ME EQUIPMENT or ME SYSTEM may be reduced to 1 m. The 1 m test distance is permitted by IEC 61000-4-3. | |||||||
| |||||||
D40 DUO ultima
Blood Glucose Plus Blood Pressure Monitoring System
![]() ForaCare Suisse AG
ForaCare Suisse AG
Neugasse 55, CH9000, St. Gallen,
Switzerland
![]()
MedNet EC-REP GmbH
Borkstraβe 10,
48163 Mϋnster, Germany
![]() FORA D40b / FORA D40g
FORA D40b / FORA D40g
For self-tesing![]()
![]()
![]()
![]()


