
![]()
ITEM #5091971
1/2-IN 350-FT-LB
AIR RIGHT ANGLE
IMPACT WRENCH
MODEL #SGY-AIR290
KOBALT and logo design are trademarks or registered trademarks of LF, LLC.
All rights reserved.
ATTACH YOUR RECEIPT HERE
Serial Number ______________ Purchase Date _______________
 Questions, problems, missing parts? Before returning to your retailer, call our customer service department at 888-3KOBALT (888-356-2258), 8:00 a.m.-8:00 p.m., EST, Monday-Sunday.
You could also contact us at [email protected].
SS22212
COMPRESSOR REQUIREMENTS

IMPORTANT: To operate correctly, this tool requires airflow of at least 6.4 Standard Cubic Feet per Minute (SCFM) at 90 Pounds per Square Inch (PSI) at the tool. The air hose length could affect how much air pressure the tool is actually receiving. You may need to adjust the air pressure higher on the air regulator to achieve the working pressure of 90 PSI.
PRODUCT SPECIFICATIONS
| COMPONENT | SPECIFICATIONS |
| DRIVE | 1/2 IN. |
| FREE SPEED | 7,000 RPM |
| MAXIMUM TORQUE | 350 FT.-LBS. |
| AVERAGE AIR CONSUMPTION | 6.4 SCFM |
| AIR INLET | 1/4 IN. NPT |
| AIR HOSE | 3/8 IN. |
| WORKING PRESSURE | 90 PSI |
 SAFETY INFORMATION
Please read and understand this entire manual before attempting to assemble, operate or install the product. If you have any questions regarding the product, please call customer service at 888-3KOBALT (888-356-2258), 8:00 a.m.-8:00 p.m., EST, Monday-Sunday. You could also contact us at [email protected].
![]()
Improper operation or maintenance of this tool could result in serious injury and property damage. Read and understand all warnings and operation instructions before using this tool. When using any tool, basic safety precautions should always be followed to reduce the risk of personal injury. Use each tool for its intended function only. Do not use this product in unsafe work conditions. It is always recommended to keep a fire extinguisher and first aid kit near work areas.
FAILURE TO OBSERVE AND FOLLOW SAFETY INSTRUCTIONS COULD RESULT IN INJURY OR DEATH.
![]()
To reduce your exposure to chemicals, work in a well-ventilated area and work with approved safety equipment, such as a respirator or dust masks which are specially designed to filter microscopic particles.
Some dust created by power sanding, sawing, grinding, drilling, and other construction activities contains chemicals known to the state of California to cause cancer, birth defects, or other reproductive harm. Some examples of these chemicals are:
- Lead from lead-based paints
- Crystalline silica from bricks, cement, and other masonry products
- Arsenic and chromium from chemically-treated lumber
WHAT COULD HAPPEN | HOW TO PREVENT IT |
|
|
|
|
|
|
WHAT COULD HAPPEN | HOW TO PREVENT IT |
|
|
WHAT COULD HAPPEN | HOW TO PREVENT IT |
|
|
| WHAT COULD HAPPEN | HOW TO PREVENT IT |
|
|
WHAT COULD HAPPEN | HOW TO PREVENT IT |
|
|
WHAT COULD HAPPEN | HOW TO PREVENT IT |
|
|
|
|
WHAT COULD HAPPEN | HOW TO PREVENT IT |
|
|
|
|
|
|
|
|
|
|
|
|
|
|
|
|
|
|
|
|
PACKAGE CONTENTS
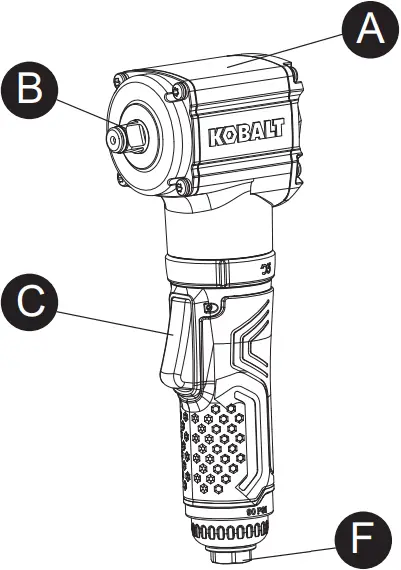
PART | DESCRIPTION | QUANTITY |
| A | 1/2 in. Impact Wrench | 1 |
B | Anvil | 1 |
| C | Trigger | 1 |
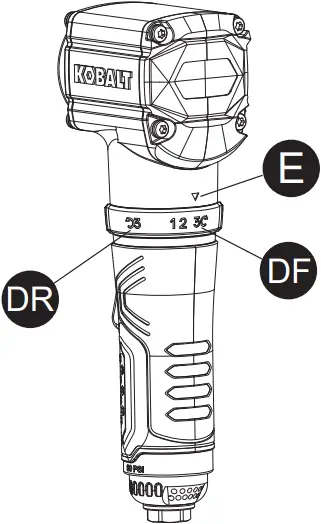
DR | Reverse Rotary | 1 |
| DF | Forward Rotary | 1 |
E | Torgue and Direction Indicator | 1 |
| F | Air Inlet | 1 |
PREPARATION
Before assembling this tool, make sure all parts are present. Compare parts with package contents list. If any part is missing or damaged, do not attempt to assemble the tool.
Estimated Assembly Time: 1 – 3 minutes
Tools and Materials Required for Assembly (not included):
- 9/16 in. (14 mm) or adjustable wrench
- Thread sealant tape
- Tool oil
- Male plug
ASSEMBLY INSTRUCTIONS
1. Remove plastic air inlet protective cap from air inlet (F) (See Figure 1).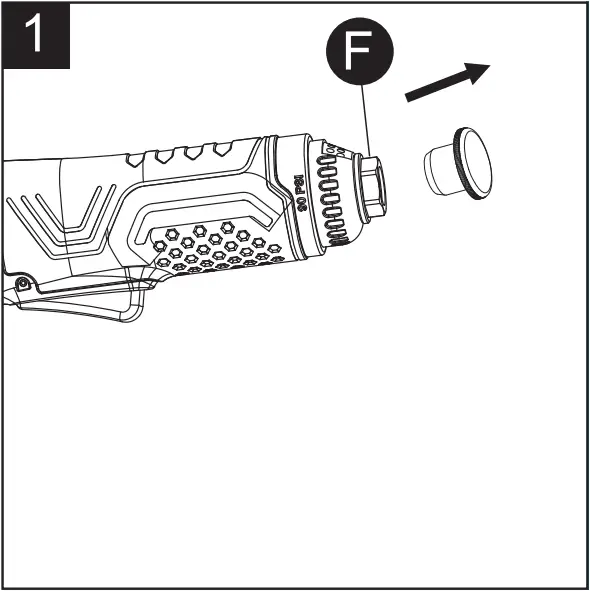
2. Insert the male plug into the air inlet (F). Tighten the male plug by turning it clockwise using a 9/16 in. (14 mm) wrench (not included) for an air tight connection. DO NOT OVERTIGHTEN.
NOTE: Use threaded sealant tape (not included) on the threading of the male plug.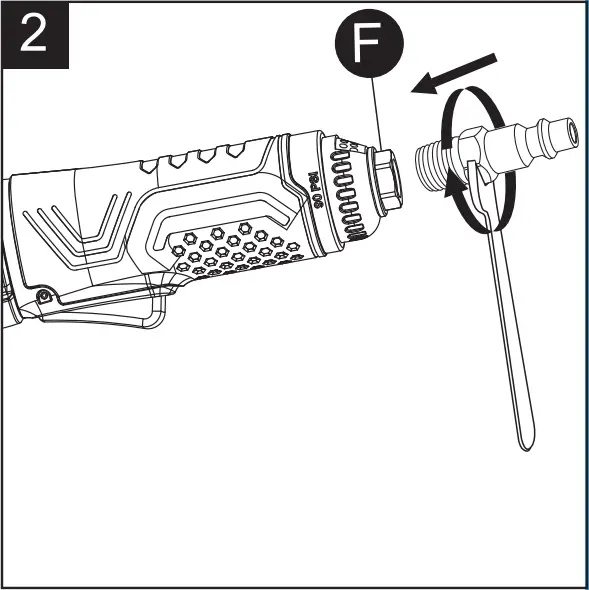
3. Place 2 – 3 drops of air tool oil (not included) into the opening of the male air plug before each use (See Figure 3).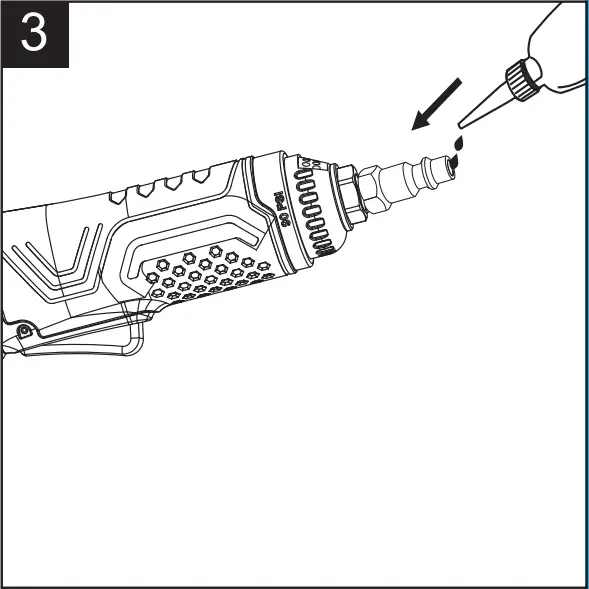
4. Select the correct impact socket (not included) and push it onto the anvil (B) until it snaps into place (See Figure 4).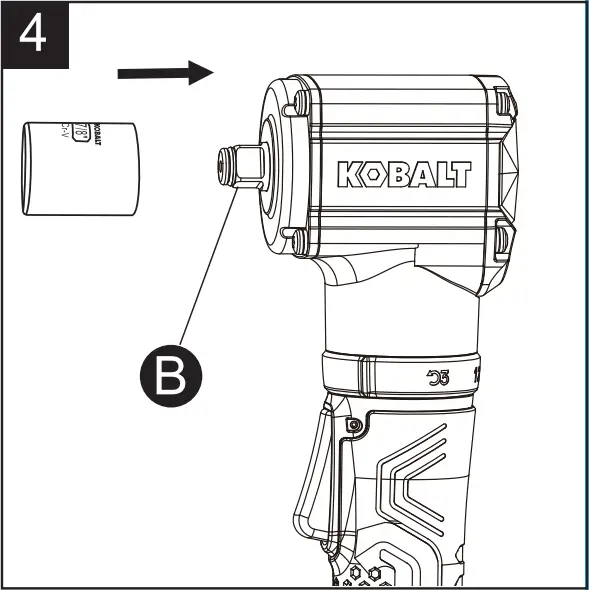
![]()
Use only adapters and sockets with a torque rating equal to or greater than the tool itself. Always make sure adapters and sockets are properly mounted and secure before using the tool. Loose attachments can break or fly off, causing serious injury to the operator or bystanders in the work area. Always follow all manufacturers’ specifications for proper attachment and use.
5. For a longer reach, mount the socket onto the end of an extension bar (not provided) and then push the extension bar onto the anvil (See Figure 5).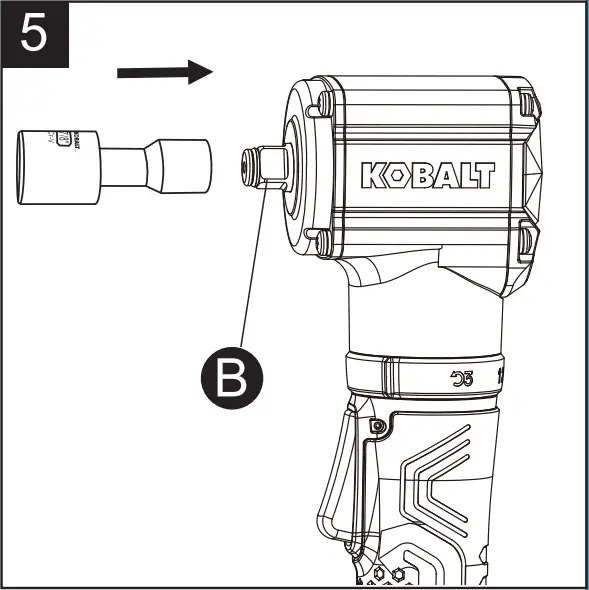
NOTE: Make sure the socket and extension bar are securely fastened before operating the tool.
6. Connect the air supply hose to the male air plug (See Figure 6), making sure it is completely seated and secure. Set the working pressure at 90 PSI for best tool performance.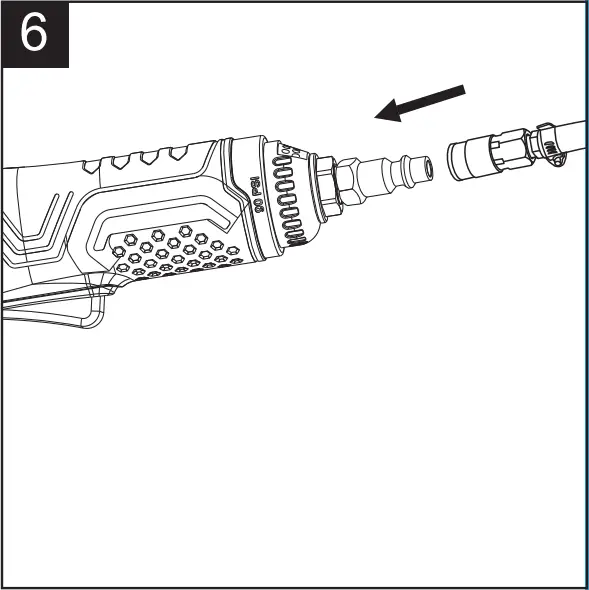
NOTE: Working pressure is the amount of air pressure the tool sees when spinning freely.
OPERATING INSTRUCTIONS
1. See Figure 1.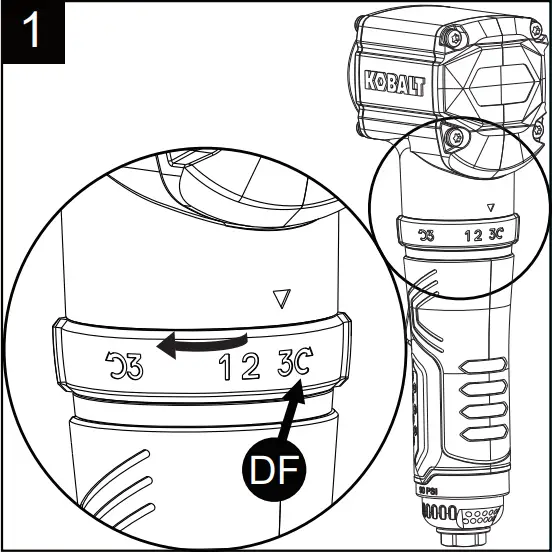
NOTE: This tool has 3 forward and 1 reverse torque settings with the maximum torque being in the reverse direction.
2. To select a torque setting in the forward direction, rotate the collar to where the torque setting 1, 2 or 3 is aligned with the indicator (E) (See Figure 2).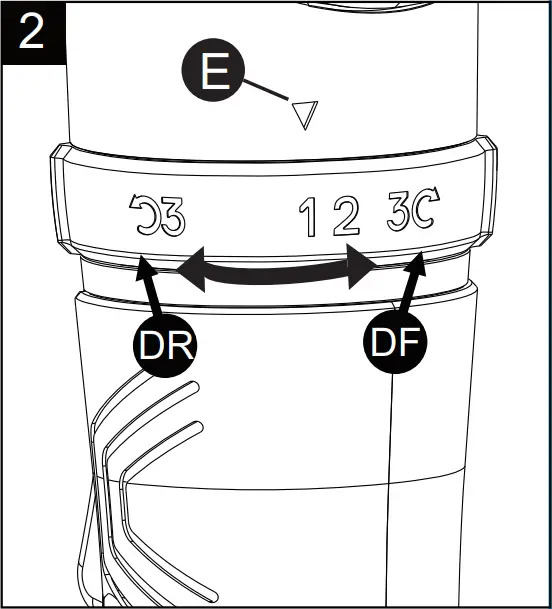
NOTE: Highest torque setting in Forward is setting 3 and the lowest is setting 1.
3. To operate the tool in the reverse direction, rotate the collar towards (DR) and it is aligned with the torque and directional indicator (E) (See Figure 3).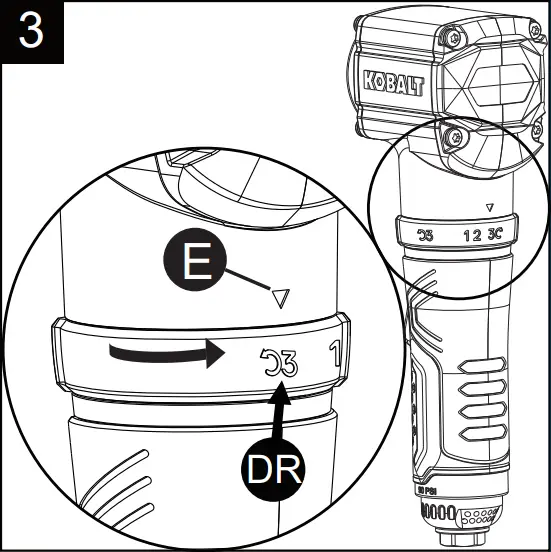
CARE AND MAINTENANCE
ALWAYS DISCONNECT TOOL FROM THE AIR SUPPLY BEFORE PERFORMING ANY MAINTENANCE ON THE TOOL.
Always make sure the tool is properly lubricated during operation. Proper lubrication is shown in this instruction manual.
An in-line oiler (not included) is recommended to help increase tool life and keep the tool properly lubricated. The in-line oiler should be regularly checked and filled with air tool oil as needed. Proper adjustment of the in-line oiler can be performed by placing a sheet of paper next to the tool’s exhaust ports while holding the throttle completely open for 30 seconds. When a light stain of oil collects on the paper, the oiler is properly adjusted. Excessive amounts of oil should be avoided.
Clean the entire tool with a cotton rag and lubricate the tool after each use. If storing the tool for an extended period, run for approximately 30 seconds to ensure oil has been evenly distributed throughout the tool. Always store tools in a clean, dry environment away from the reach of children.
Recommended lubricants: air tool oil or any other high grade turbine oil containing moisture absorbent, rust inhibitors, metal wetting agents and an EP (Extreme Pressure) additive. Consult your local retailer for further assistance in selecting air tool oil best suited for proper lubrication.
STORING:
- Tool must be well cleaned and lightly lubricated before storing.
- Store tool in a dry, safe place out of the reach of children.
TROUBLESHOOTING
If the tool runs slowly or will not operate, check these possible problems and take the required corrective action:
POSSIBLE PROBLEM | SOLUTION |
|
|
|
|
|
|
|
|
|
|
|
|
|
|
WARRANTY
This tool is warranted by the manufacturer to the original purchaser from the original purchase date for three (3) years subject to the warranty coverage described herein.
This tool is warranted to the original user to be free from defect in material and workmanship. If you believe that a tool is defective, return the tool with proper proof of purchase to the point of purchase. If it is determined that the tool is defective and covered by this warranty, the distributor will replace the tool or refund the purchase price.
This warranty is void if: defects in materials or workmanship or damages result from repairs or alterations which have been made or attempted by others or the unauthorized use of nonconforming parts; the damage is due to normal wear, damage is due to abuse (including overloading of the tool beyond capacity), improper maintenance, neglect or accident; or the damage is due to the use of the tool after partial failure or use with improper accessories or unauthorized repair or alteration.
This warranty gives you specific legal rights, and you may also have other rights that vary from state to state.
For warranty questions, call our customer service department at 1-888-3KOBALT (888-356-2258), 8:00 a.m.-8:00 p.m., EST, Monday-Sunday. You could also contact us at [email protected].
Printed in China
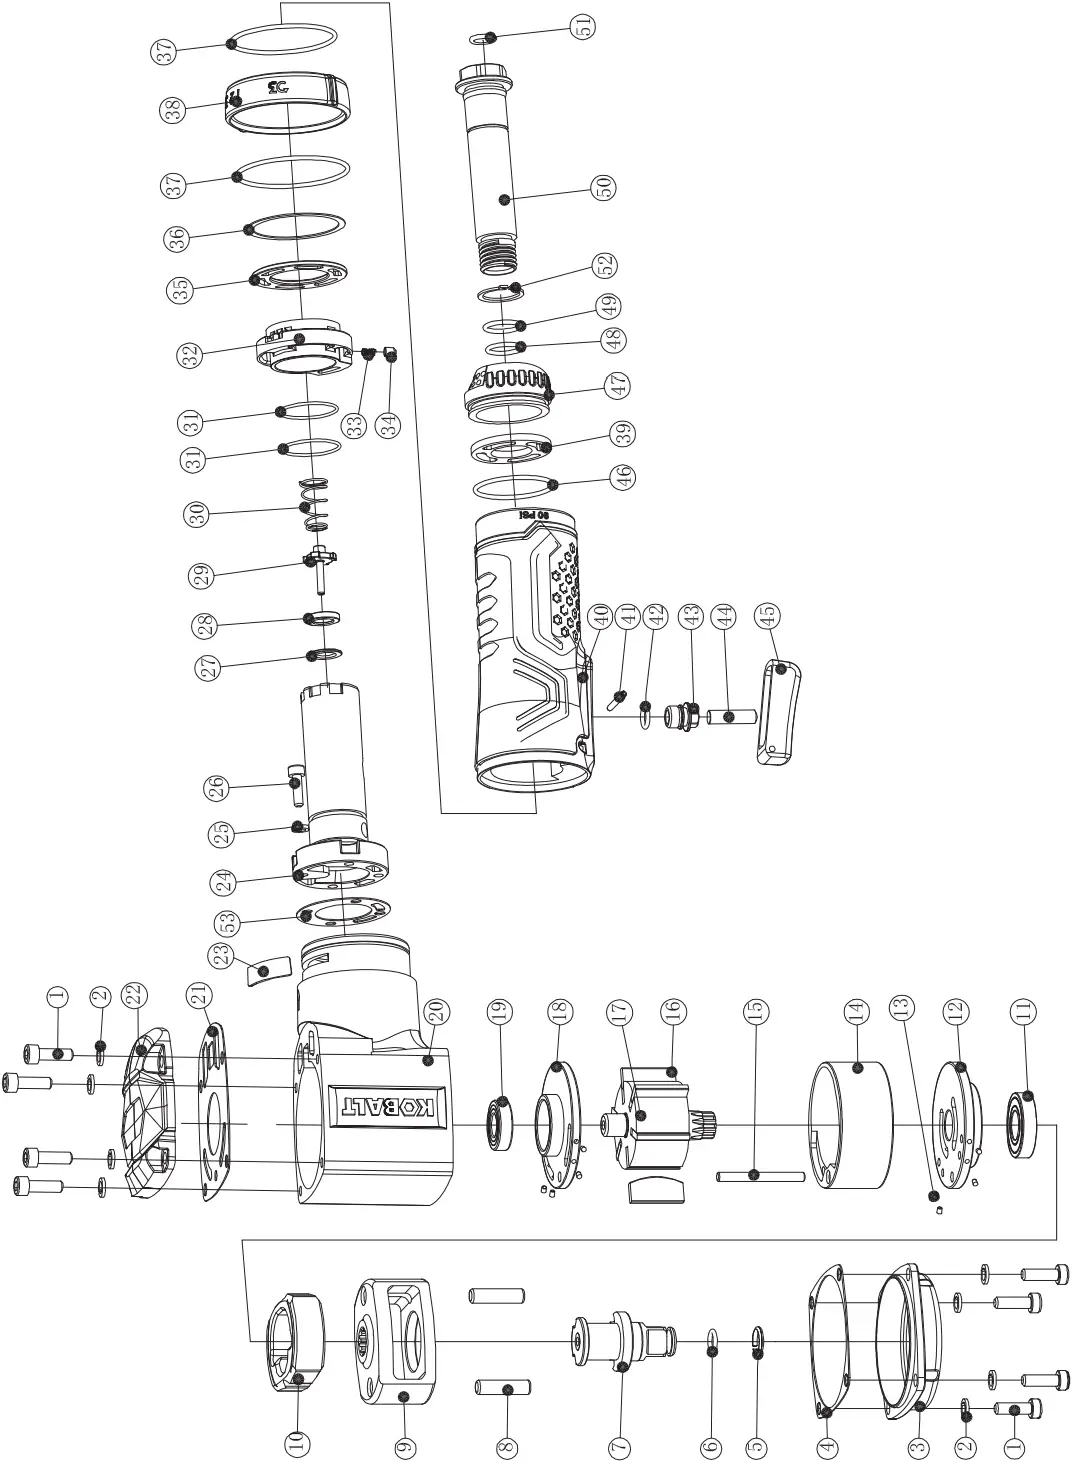
REPLACEMENT PARTS LIST
PART | DESCRIPTION | QTY |
1 | Hex screw | 8 |
2 | Gasket | 8 |
3 | Hammer Case | 1 |
4 | Gasket | 1 |
5 | Circlip | 1 |
6 | O ring | 1 |
7 | Anvil | 1 |
8 | Hammer Pin | 2 |
9 | Hammer Cage | 1 |
10 | Hammer | 1 |
11 | Bearing | 1 |
12 | Front end Plate | 1 |
13 | Plug | 8 |
14 | Cylinder | 1 |
15 | Pin | 1 |
16 | Vane | 6 |
17 | Rotor | 1 |
18 | Rear end Plate | 1 |
19 | Bearing | 1 |
20 | Handle | 1 |
21 | Gasket | 1 |
22 | Back Cover | 1 |
23 | Reversing Switch | 1 |
24 | Valve Bushing | 1 |
25 | Gasket | 4 |
26 | Hex Screw | 4 |
27 | Inlet Gasket | 1 |
28 | Rubber Gasket | 1 |
29 | Inlet Valve | 1 |
30 | Inlet Spring | 1 |
31 | O-ring | 2 |
32 | Intake Knob | 1 |
33 | Spring | 1 |
34 | Plug | 1 |
35 | Retaining Ring | 1 |
36 | Paper Pad | 1 |
37 | O-ring | 1 |
38 | Stall Knob | 1 |
39 | O-ring | 1 |
40 | Hand Handle | 1 |
41 | Pin | 1 |
42 | O-ring | 1 |
43 | Copper Sleeve | 1 |
44 | Trigger Pin | 1 |
45 | Trigger | 1 |
46 | O-ring | 1 |
47 | Rear Air Cover | 1 |
48 | O-ring | 1 |
49 | O-ring | 1 |
50 | Air Inlet | 1 |
51 | Air Inlet Screen | 1 |
52 | Circlip | 1 |
53 | Gasket | 1 |


