EMX INDUSTRIES OWL Microwave Motion and Infrared Presence Sensor
Instruction Manual
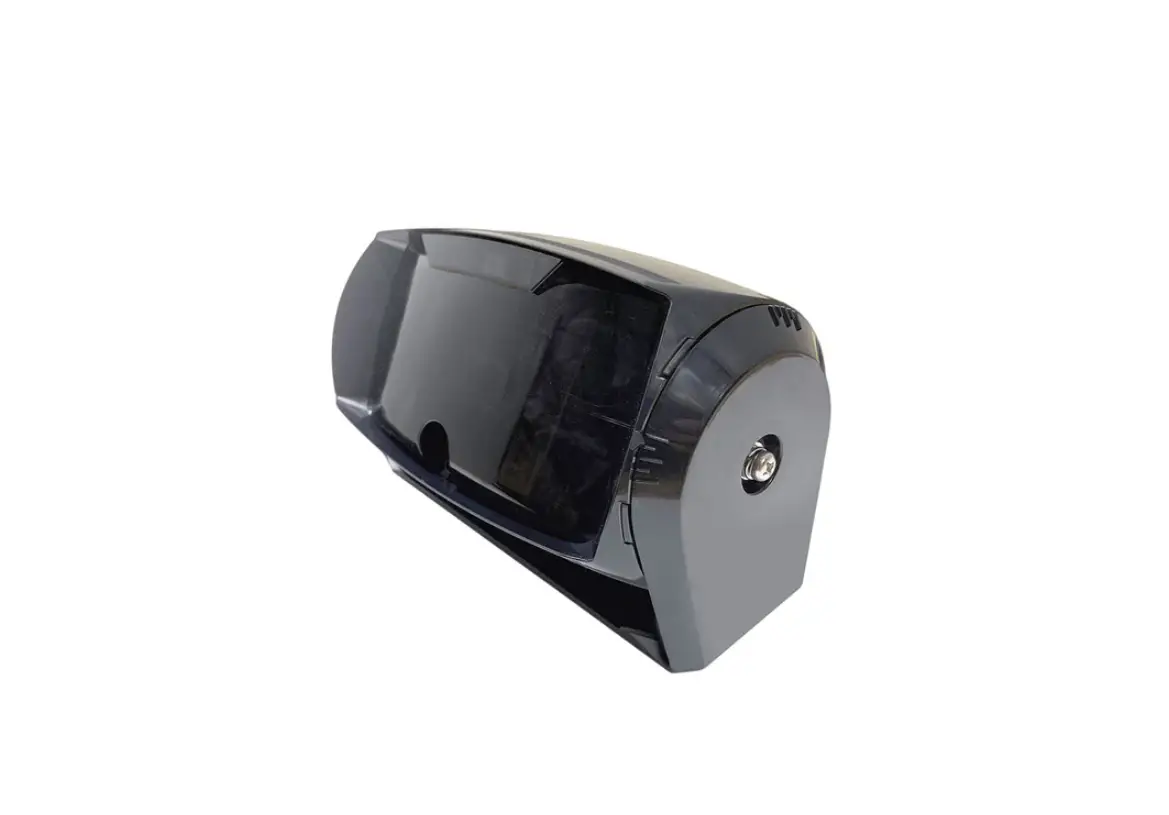
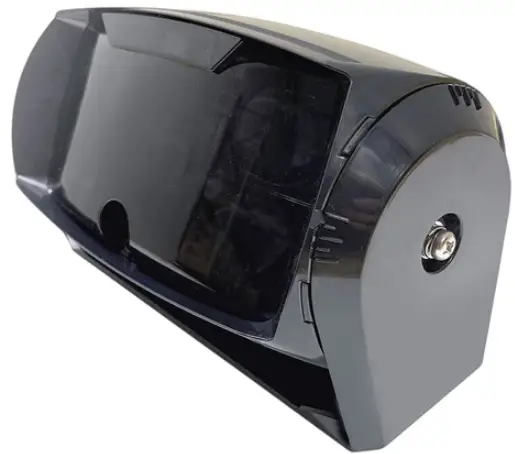
The OWL is a vehicle motion and presence sensor that utilizes microwave and infrared technology to activate automatic doors and industrial gates. The OWL’s microwave sensor detects moving vehicles, while the infrared presence sensor can detect vehicles and pedestrians. The sensor features two relay outputs, one for vehicle motion detection, and the other for presence detection. The OWL features settings for fine-tuning the presence detection area, direction detection, hold time, and more.
The OWL-RC remote control is required for programming and servicing the OWL.
Cautions and Warnings
Install the OWL according to instructions from the door operator manufacturer. Comply with all applicable codes and safety regulations.
When drilling, ensure no damage can be caused in desired mounting location, e.g. hidden wires, waterlines, etc.
Specifications
| Mounting Height | 11.5-21.3 ft (3.5-6.5 m) |
| Supply Voltage | 12-24 VDC/AC |
| Max Current Draw | 150 mA @ 12 VDC |
| Operating Temperature | -4 to 140ºF (-20 to 60ºC) |
| Operating Humidity | Below 80% |
| Dimensions | 9” (229 mm) x 5” (127 mm) x 5” (127 mm) |
| Connection | 32 ft (10 m) 8 conductor cable directly from sensor |
| Weight | 2.87 lbs (1.3 kg) |
| Environmental Rating | IP65 |
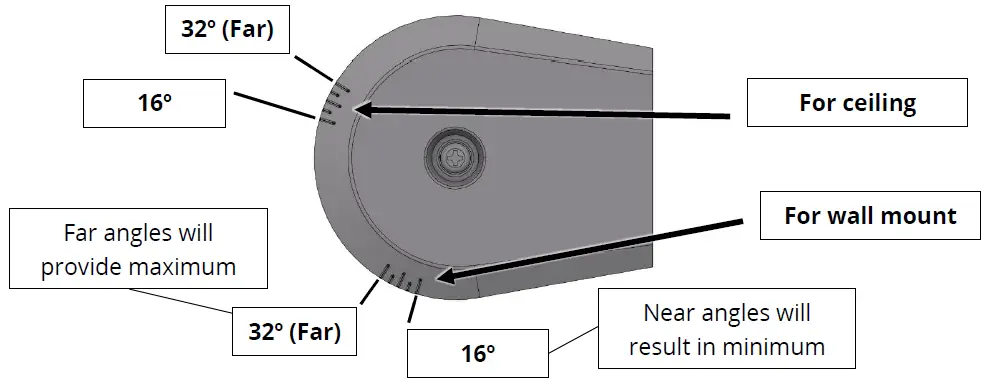
| Vertical Directionality | 16-32º wall or ceiling mount |
| Horizontal Directionality | ±10º |
| Microwave (Vehicle Motion) | Infrared (Presence) | |
| Operating Frequency | 24.150 GHz | |
| Detection Range | Depends on sensor height and housing angle Max. Range: 23 ft (7 m) Max. Width: 19.7 ft (6 m) | Depends on sensor height and housing angle Max. Range: 18 ft (5.5 m) Max. Width: 26.2 ft (8 m) |
| Relay Output | NO or NC (adjustable) | NO or NC (adjustable) |
| Relay Contact Rating | Max. 48 VDC Max. 300 mA | Max. 48 VDC Max. 300 mA |
| Relay Hold Time | Typ. 500 ms | Presence (30 sec to Infinite, adjustable) |
| Adjustable Tilt Angle | -10 to 25º |
Ordering Information
- OWL Vehicle Motion and Presence Sensor, includes 32 ft (10 m) of cable and two mounting screws
- OWL-RC Remote control, required for programming the OWL
Components and Indicators
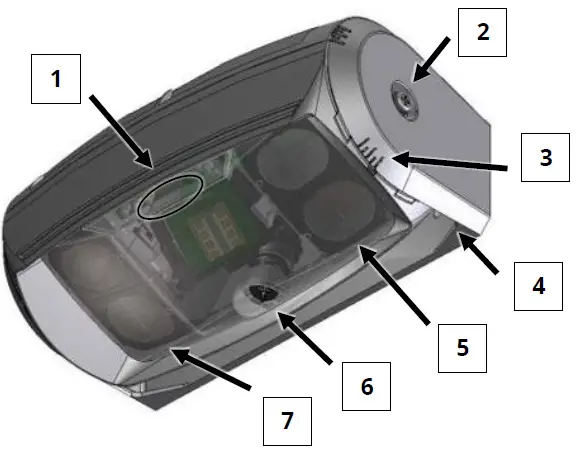
OWL
- Indicator LEDs
- Hinge Screw
- Angle Indicator
- Mounting Bracket
- Right Infrared Array
- Microwave Tilt Adjustment Screw
- Left Infrared Array
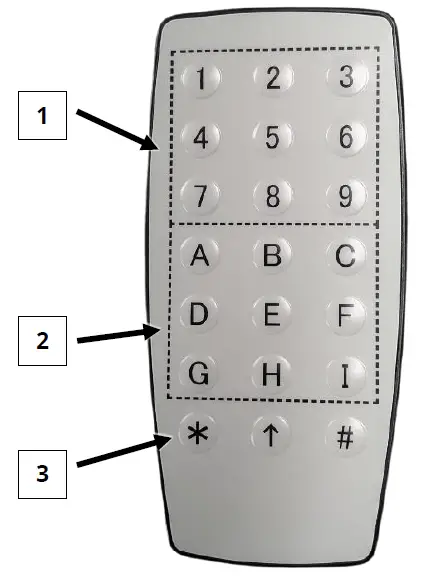
OWL-RC
- Setting Select Buttons (
 thru
thru  )
) - Function Select Buttons (
 thru
thru  )
) - Command Buttons (

Installation
- Unscrew the Philips-head hinge screws from the left and right side. Remove the sensor from the mounting bracket.
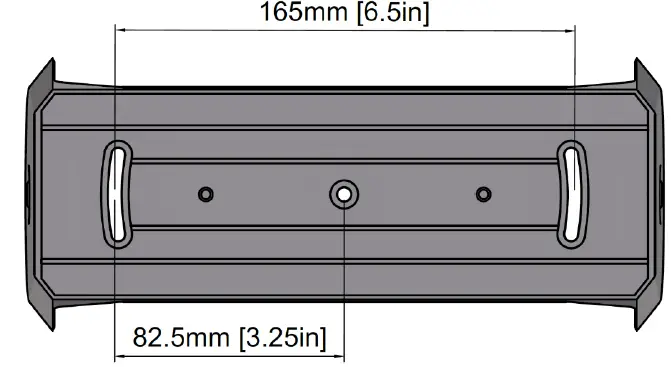
- In the desired location, install the mounting bracket at a height between 11.5 and 21.3 ft (3.5 and 6.5 m). Drill 1/8” (3.5 mm) mounting holes as shown in the diagram and attach with the provided screws.

- Re-attach the sensor to the mounting bracket using the Philips-head hinge screws from Step 1.
Adjust to the desired angle, and tighten the hinge screws until snug.
- Wire the OWL to the door operator per the wiring table below.
Wire Color Description Red Power input + (12 to 24 VDC/VAC) Black Power input – (12 to 24 VDC/VAC) White Presence relay Green Presence relay Yellow Vehicle motion relay Blue Vehicle motion relay Gray Do not connect Brown Do not connect - Apply power and allow 10 seconds for unit to stabilize. The green LED will be flashing during this time.
Once stabilized (solid green LED), the sensor is operating, and the settings can now be configured.LED Indicators Green flashing Sensor initialization Green on Standby Red on Presence output activated Red flashing Vehicle motion output activated Yellow Infrared sensor is detecting door movement
Green/Red flashing Internal sensor error
Vehicle Motion Detection
The OWL’s microwave sensor will only detect moving vehicles (cars, forklifts, etc.). When a moving vehicle is detected, it will activate the vehicle motion output relay. If the microwave sensor is detecting people, lower the microwave sensitivity.
The microwave sensor’s detection area may be changed by adjusting the angle of the sensor in the bracket, changing the tilt angle of the module inside the sensor, or configuring the microwave sensitivity setting (![]() ).
).
The microwave sensor can also be configured to ignore all cross traffic (vehicles moving parallel to the door) and departing vehicles (see Programmable Parameters on page 7).
Presence Detection
The OWL uses a pair of 6 x 5 infrared LED arrays to detect the presence of vehicles and people. When detection occurs, it will activate the presence output relay.
The presence output of the OWL is initially triggered by motion. The amount of motion required to trigger presence detection is controlled by the infrared sensitivity setting ( ![]() ). The higher the setting,
). The higher the setting,
the less motion required to activate the presence detection and output. Once triggered, the output will remain on until the object(s) being detected leave the detection area, or until the configurable presence timer has run out (at which time the presence sensor will relearn the environment).
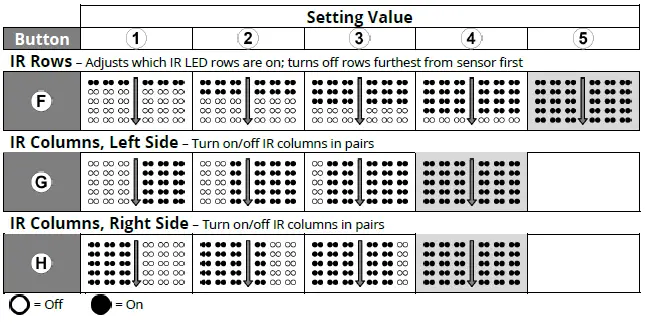
The detection area can be changed by adjusting the angle of the sensor in the bracket, or by configuring the infrared LED array settings. The farthest rows of the infrared LED array may be turned off sequentially. The outside columns of the infrared LED array may be turned off in pairs on the left and right side of the array.
The OWL’s infrared presence sensor can be set to detect vehicles only, ignoring pedestrian traffic ![]() . The sensor can distinguish between the two based on the amount of light diffused.
. The sensor can distinguish between the two based on the amount of light diffused.
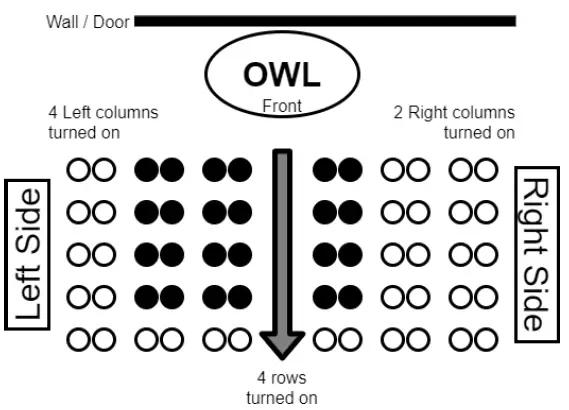
Top-down example of an OWL installation, demonstrating how turning off columns and rows affects the infrared
Programming the OWL
- If a security code has been programmed on the sensor, then it must be entered before settings can be changed. Unlock the sensor by pressing the button, then entering the four-digit security code, and press the enter button


- To change a setting, point the end of the remote at the sensor, and press the button of the functionto be changed. The green LED on the front of the sensor will turn off, and other LEDs on the front ofthe sensor will turn on.
- Press one of the possible setting value options (thru ). The green LED on the front of the sensor will flash the same number of times as the setting selected.
TIP: Not all functions usethruas a valid range of setting values. Please see page 7 for more information. - Press the enter button ( ). The green LED on the front of the sensor will flash four times.
TIP: Make sure there are no vehicles in the presence detection area when saving a setting. The sensor’s infrared sensor relearns the environment when a setting is saved. If there is a vehicle in the presence detection area while it relearns the environment, then the presence output will lock on when the vehicle moves.
- Wait for the sensor to save the setting and relearn the environment. Programming is now finished.


Programmable Parameters
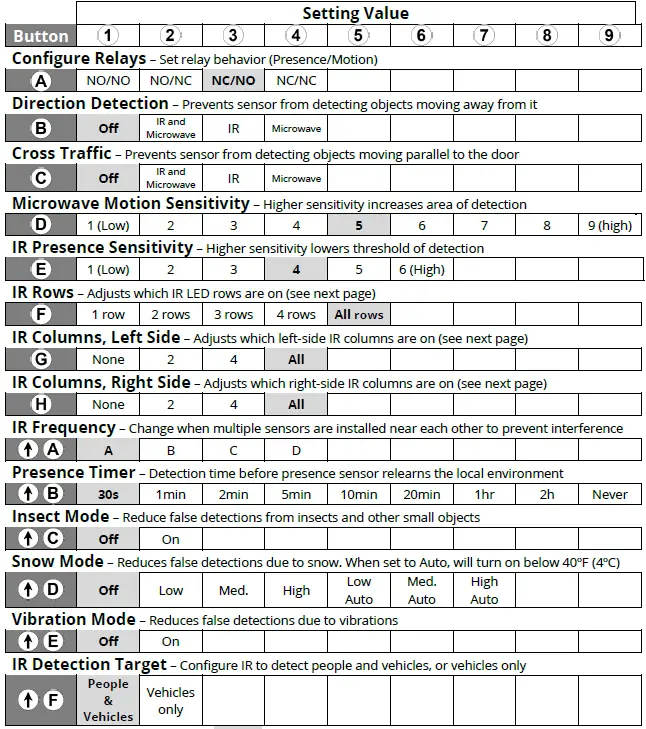
Default settings are bolded and colored in Direction Detection and Cross Traffic functions will not work if any IR rows or columns are turned off Left/Right columns are relative to the front of the sensor (see next page)
Additional Functions and Information
Details – IR Rows & Columns
Reading Settings

Maintenance Mode

Security Code

Note: When unlocked, settings may be changed for 60 seconds. The timer stops while a setting is being configured. The timer extends for 60 more seconds after a setting has been entered.
Note: To reset or delete the security code, power cycle the unit. The unit will not require a security code for 60 seconds after power-up. Use the “Delete Security Code” function above, then set a new security code.
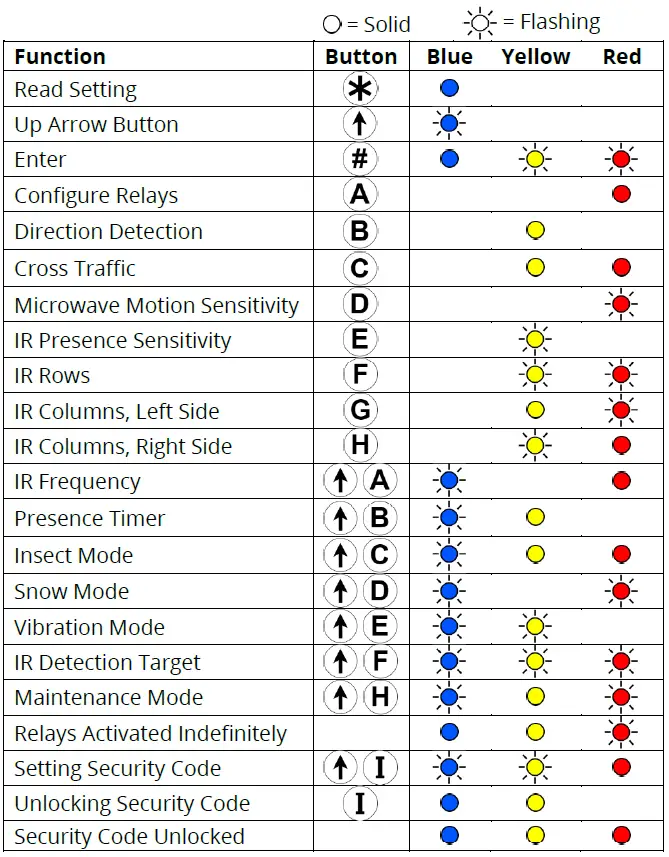
LED Indicators
While programming the sensor, the three indicator LEDs will turn on, off, or flash based on what function is being configured. Below is a table to show which functions correspond to the states of the three LEDs.
Troubleshooting
| Symptom | Possible Cause | Solution |
| No LEDs on | No power or faulty power connection | 1. Verify the voltage is between 12-24 VDC or 12-24 VAC using a digital multimeter. |
| 2. Verify wires are terminated properly. | ||
| 3. If voltage is present and there are still no LEDs on, the sensor is defective. | ||
| Door is detected | Sensor is angled toward door | 1. Adjust the sensor housing away from the door. |
| 2. Reduce the microwave and/or infrared sensitivity settings. | ||
| 3. Adjust the microwave tilt angle. | ||
| Vibrations | Turn on Vibration Mode. | |
| Remote control does not respond | Device is locked | Cycle power to the sensor. The sensor can now be configured without a code for 60 seconds. |
| Batteries are low | Replace batteries with two AAA batteries (in cold weather, battery life can be reduced). | |
| Person is mistaken for a vehicle | Microwave sensitivity is set too high | Lower the microwave sensitivity setting. |
| Sensor is mounted too low | Mount sensor higher, 11.5 to 21.3 ft (3.5 to 6.5 m) from the ground. | |
| Object is detected too late | Microwave or infrared sensitivity is set too low | Increase the microwave and/or infrared sensitivity setting. |
| Sensor aimed too low | Adjust the aim of the sensor | |
| Infrared rows turned off | Change the infrared rows setting | |
| False activation | Vibrations, water, metal, or non-stationary object in the sensor’s environment | 1. Decrease the microwave and/or infrared sensitivity setting. |
| 2. Remove the non-stationary object from the detection area | ||
| Rain | 3. Install something to prevent rain from interfering with the sensor | |
| Sensor not detecting | Sensor installed too high | Mount the sensor lower, 11.5 to 21.3 ft (3.5 to 6.5 m) from the ground. |
| Too cold | Sensor is not suitable for use in temperatures below -4ºF (-20ºC). |
Warranty
EMX Industries, Inc. products have a warranty against defects in materials and workmanship for a period of two years from date of sale to our customer.
EMX Industries, Inc.
OWL_Rev1.0_092220


