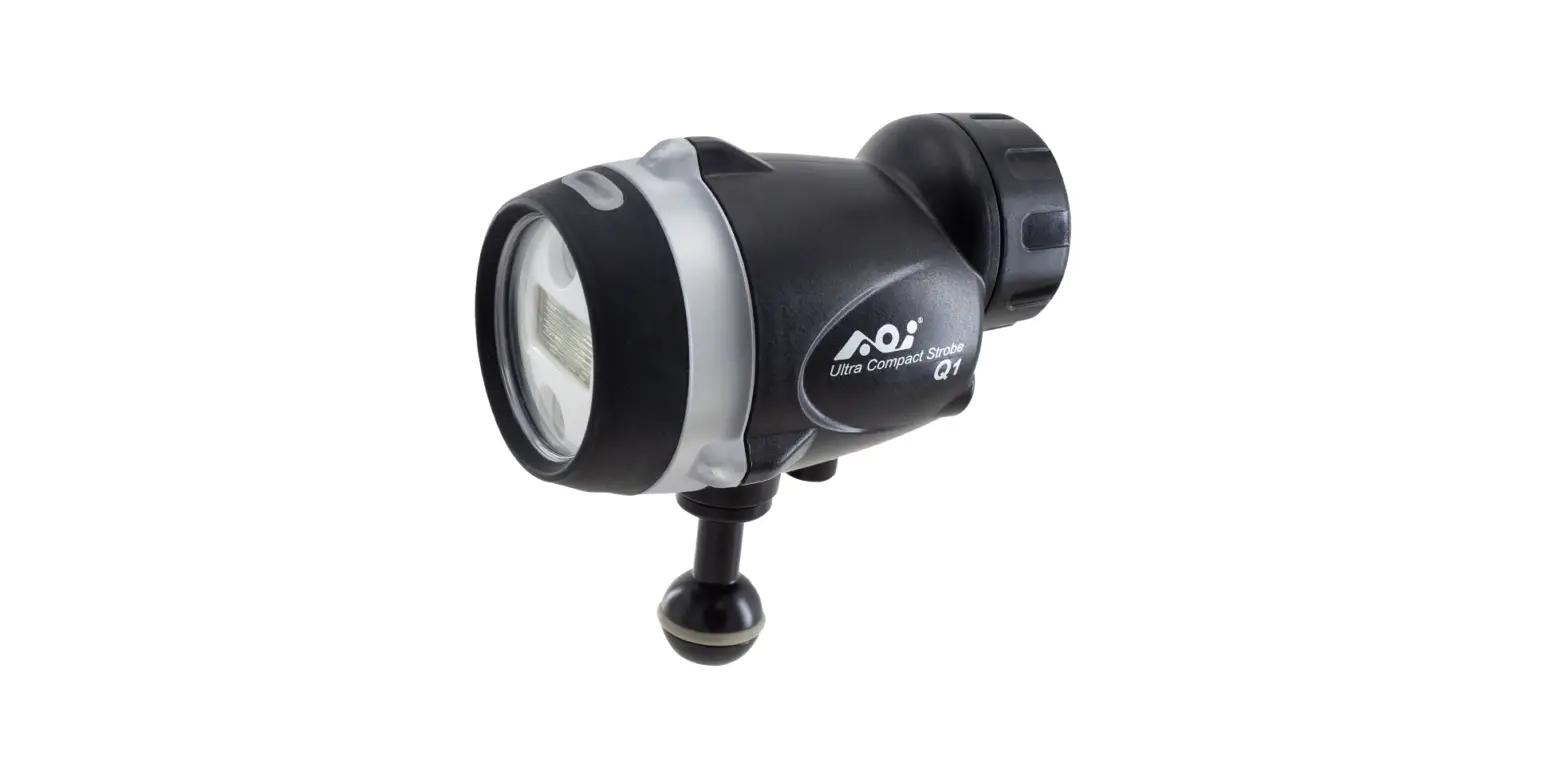
AOI UCS-Q1 Ultra Compact Strobe User Guide
Thank you for your purchase of AOI Ultra Compact Strobe Q1. Please read this Quick User Guide prior to use. It will provide an overview of how the UCS Q1 strobe can be used for optimal performance. For any additional information, please consult your local dealer or write to
Items Included in the package
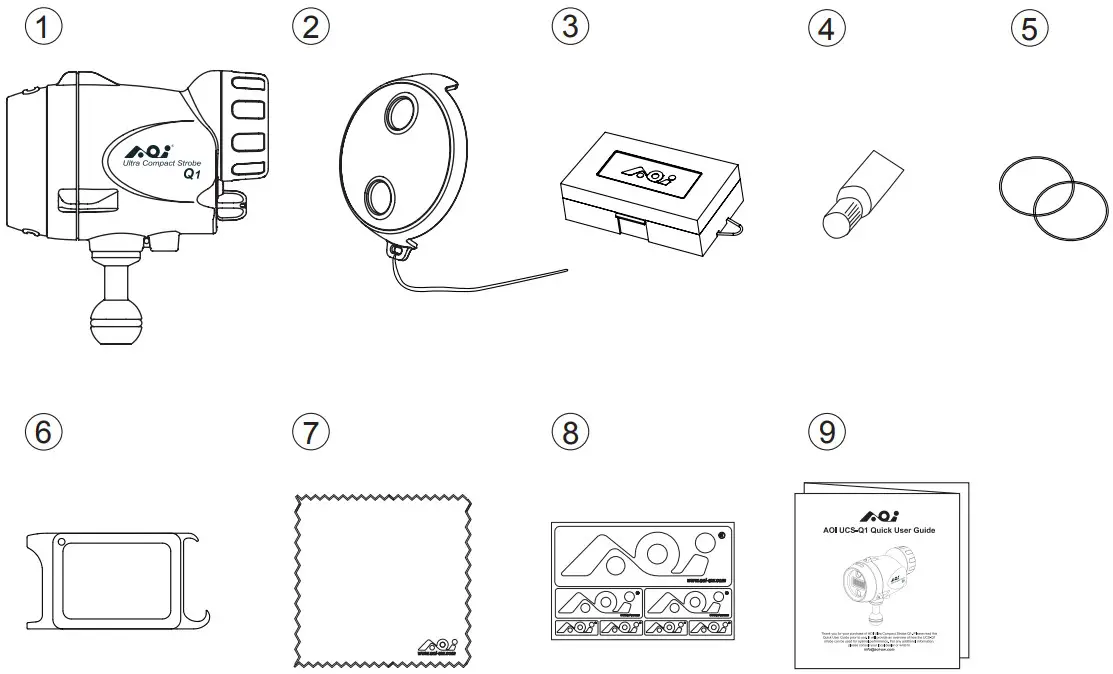
- UCS-Q1 Strobe
- Strobe Diffuser
- Battery Storage Case (Batteries Not Included)
- Silicone Grease (AOI SIGR-5)
- Spare O-Rings x 2pcs for Battery Compartment
- O-Ring Remover / White Balance Card (AOI ORR-01)
- Micro-Fiber Cleaning Cloth (AOI MC-01)
- AOI Logo Sticker
- Quick User Guide
Names of the Parts
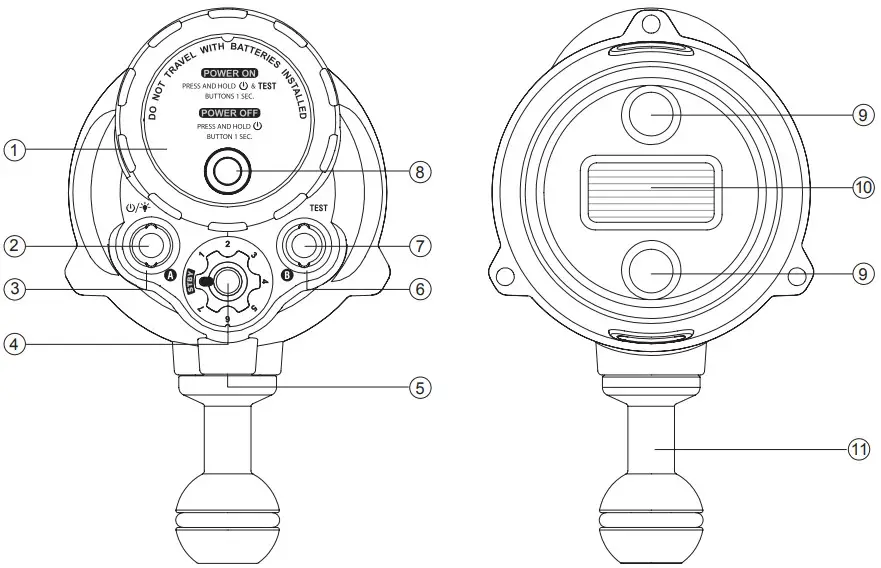
- Battery Cap
 Button
- Indicator A
- Strobe Power Control Knob
- Fiber Optic Cable Port
- Indicator B
- TEST Button
- Pressure Relief Valve
- LED Lights
- Strobe Light Emitting Window
- 1” Ball Mount
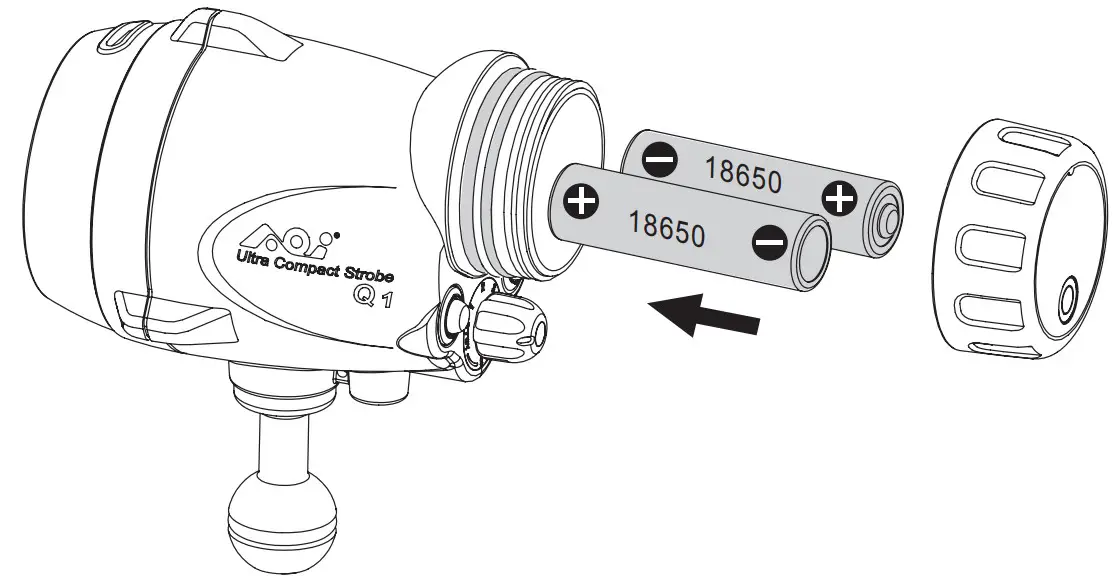
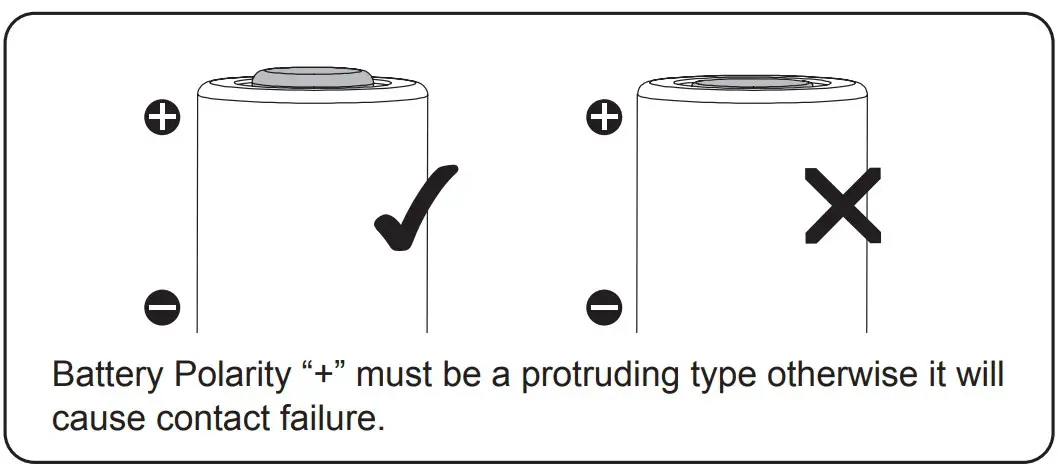
Battery Installation
Strobe Operation
a. Power ON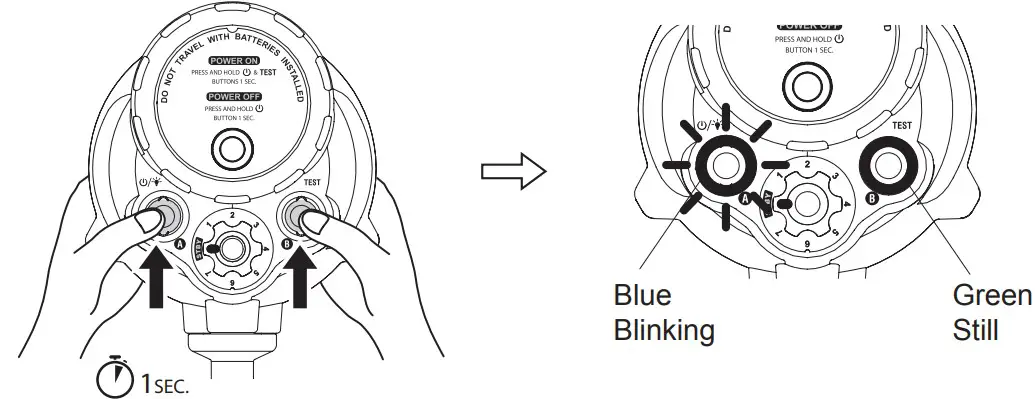
b. Power OFF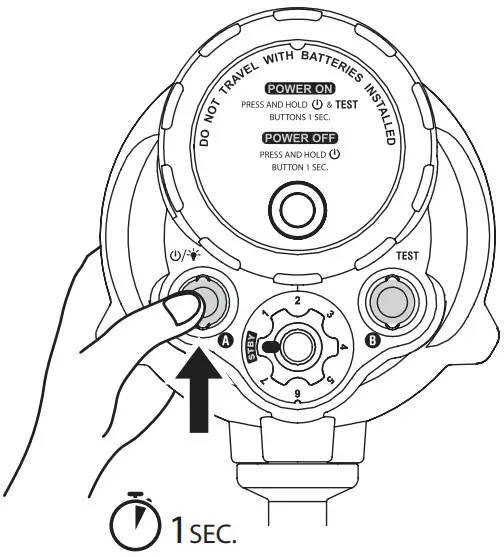
c. Standby Mode
When the Strobe Power Control Knob is at STBY position, the UCS-Q1 is in Standby Mode. Strobe charging is suspended and flash cannot be triggered. The LED lights can be operated.
d. Auto Standby
If the Strobe Power Control Knob is not at STBY position and the strobe has not been activated more than 15 minutes, UCS-Q1 will go into the Standby Mode automatically. Operating any button, knob or strobe trigger will reset UCS-Q1 from Standby Mode.
e. Auto Power OFF
If UCS-Q1 is not activated more than 2 hours, it will Power Off automatically. To turn the strobe back on, the process of Power ON need to be repeated.
f. LED Lights Control Button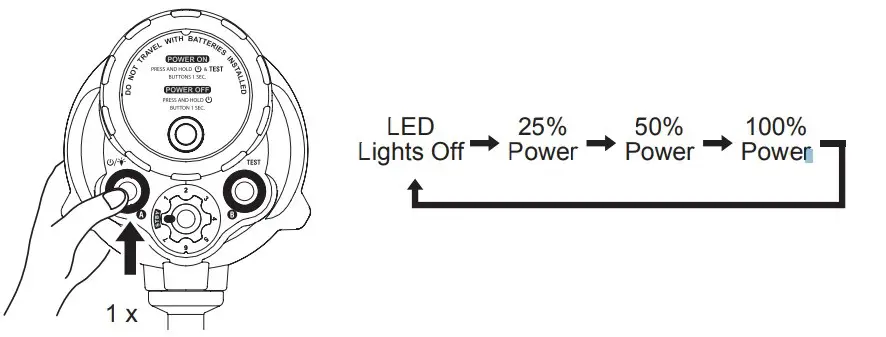
When UCS-Q1 is Power ON, press ![]() Button to switch through LED Lights modes.
Button to switch through LED Lights modes.
g. Strobe Power Control Knob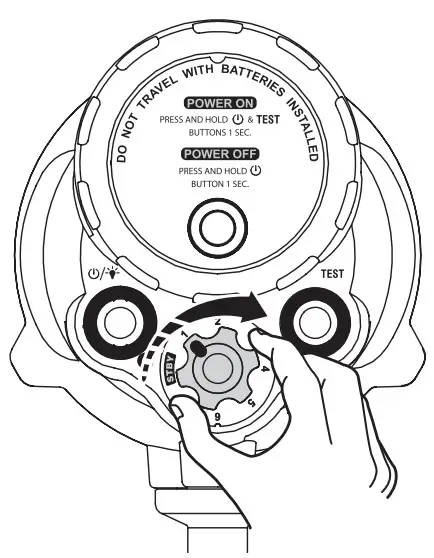
| Setting | STBY | 1 | 2 | 3 | 4 | 5 | 6 | 7 |
| Strobe Power | OFF | 1/64 | 1/32 | 1/16 | 1/8 | 1/4 | 1/2 | 1/1 |
h. Strobe Test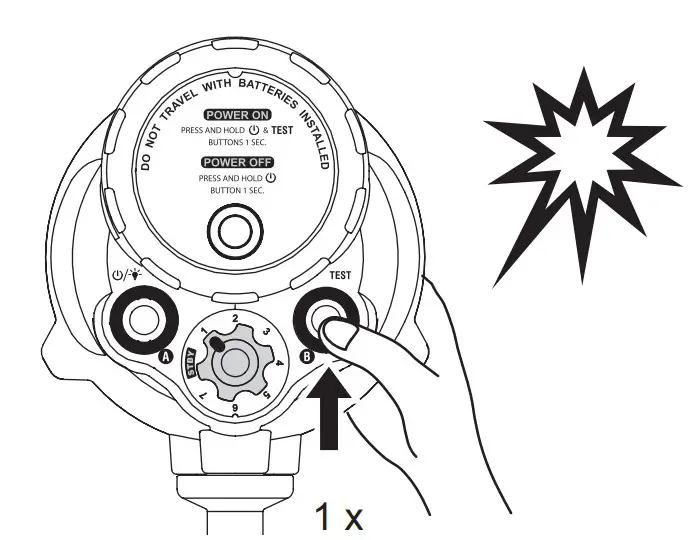
i. Modeling Flash
If shooting in extremely bright ambient light conditions, the LED light may not be bright enough for targeting purposes. Press and hold the button for 1 second and the strobe will emit a bright, high frequency stroboscopic pulse for about 2 seconds. This rapid firing of the strobe will help in targeting the subject in bright ambient light conditions.
When using the Snoot (AOI SNT-01, optional accessory sold separately), the Modeling Flash also serves as a target light.
j. Flash Synchronization
The UCS-Q1 will analyze your camera’s flash and automatically synchronize after the first test shot. First, power on the strobe and select any Strobe Power setting from 1-7 and take a single test shot. The UCS-Q1 will analyze the 1st test shot and memorize the Flash Synchronization setting for your camera. If you change cameras or flash settings on your camera, simply power off the UCS-Q1, power on and take another test shot to synchronize with your new camera or camera settings
k. Thermal Control
The UCS-Q1 is equipped with the overheat protection circuit. If the strobe has been in continuous use, the internal electronics temperature may increase, the recharging time / recycle time will slow down automatically.If the overheat protection circuit is activated and the Indicators A and B will blink Blue & Purple alternately (see Table 1, Page 9). The strobe will be suspended temporarily. After cooling down, the Indicators A and B will be back to normal and all the functions will be resumed.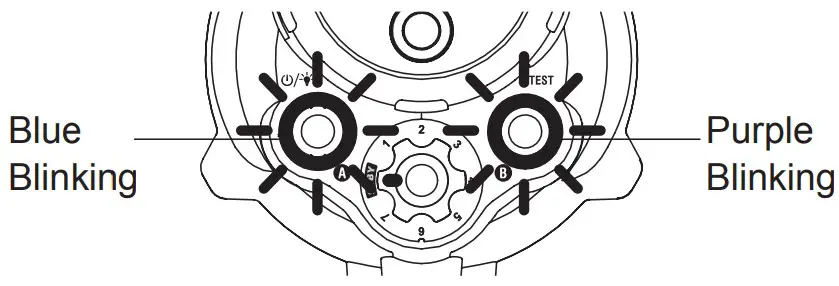
l. Indicators Summary
| Indicator | Indicator | Description |
| Blue Slow Blinking | Strobe Standby | |
| Blue Rapid Blinking | Flash Recharging | |
| Blue Still | Flash Ready | |
| – | Green Still | Battery Level 50% – 100% |
| – | Yellow Still | Battery Level 25% – 50% |
| – | Red Still | Battery Level 10% – 25% |
| – | Red Rapid Blinking | Battery Level below 10% |
| Blue and Purple Blinking Alternately | Strobe Over Heated | |
| Off | Purple Still | Electronics Failure |
![]() When Indicator B is Red Rapid Blinking (Battery Level below 10%), the strobe may
When Indicator B is Red Rapid Blinking (Battery Level below 10%), the strobe may
power down at any time.
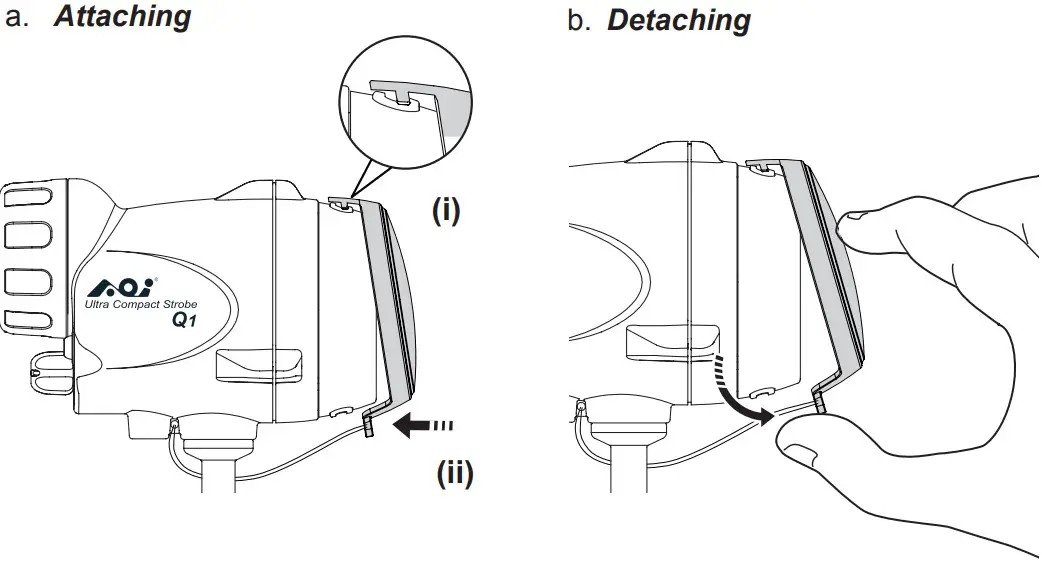
Diffuser Installation
Fiber Optic Cable Connection
Insert one end of the Fiber Optic Cable into UCS-Q1 Fiber Optic Cable Port and the other end to fiber optic port of the camera housing.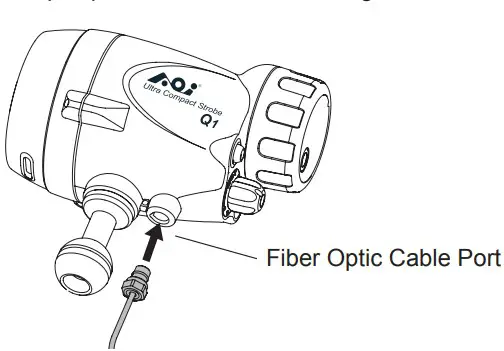
Care and Maintenance
- a. Rinse the strobe exterior thoroughly with running fresh water after every use.
Pushing buttons and rotating knobs repeatedly in fresh water to eliminate trapped salt water or debris. - b. Clean the O-rings and the O-ring grooves at a regular time, and apply a small amount of silicone grease (AOI SIR-5) to lubricate the O-rings.
- c. Dry well and remove the batteries prior to travel and storage.
IMPORTANT: Wipe the strobe dry and keep seawater away prior to opening the battery cap. Do not allow seawater to be in contact with the interior parts of the battery compartment, otherwise it may cause rust, corrosion or malfunction. If seawater leaks into the battery compartment, please turn off the power and remove the batteries immediately. Rinse the battery compartment with fresh water before bringing it back to your local dealer / service center for further assistance.
Specification
| Model Number | AOI UCS-Q1-BLK / WHT | |
| Description | Underwater Ultra Compact Strobe | |
| Main Body Material | Polycarbonate + Glass Fiber | |
| Waterproof Level | 60 Meters / 200 Ft. | |
| Strobe | Guide Number | 22 |
| Color Temperature | 5600K | |
| Beam Angles | Horizontal- 85°, Vertical- 85° (with Diffuser) | |
| Flash Recharge Time | 0.85 Second (Full Power) | |
| Number of Flashes | 1,800 Times Full Flash(with 3500mAh Li-Ion Batteries) | |
| Flash Synchonization | Self Learning during Power On Each Time | |
| LED Lights | Maximum Output | 700 Lumens |
| Color Temperature | 5600K | |
| Beam Angles | 45° | |
| Burn Time | 160 Minutes (Max. Brightness with 3500mAh Li-Ion Batteries) | |
| Battery Requirements | 18650 Li-Ion Rechargeable Battery x 2pcs, Min. Output Current: 5A,Min. Battery Length: 69mm(Batteries Not Included In Product) | |
| Strobe Mounting | 1” Ball Mount Only (Irreplaceable) | |
| Dimensions | 125.0mm (L) X 77.0mm (W) X 131.0mm (H) | |
| Weight | On Land : Approx. 550g (Batteries Included) | |
| Underwater : Approx. 90g (Batteries Included) | ||
| Accessories | Main Seal O-Rings x 2pcs,O-Ring Remover, Silicone Grease, Battery Storage Case (Batteries Not Included) | |
*Specifications and Appearances are subject to change without prior notice.