LUTRON 0302062 Maestro LED Dimmer Installation Guide
How-to videos


Install with confidence
Use included diagrams or visit our website for step-by-step instructions.
Find the right LED


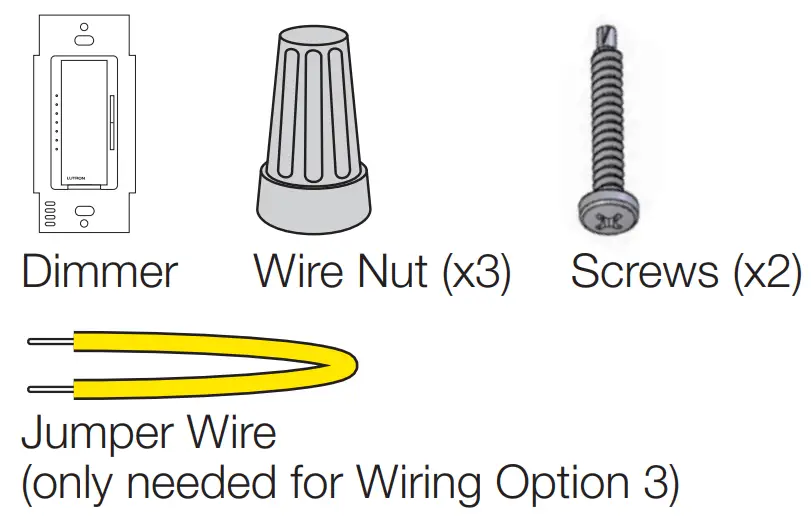
Included Parts
Ganging and Derating
Remove side sections if mounting two or more devices side by side (see chart for new wattage rating).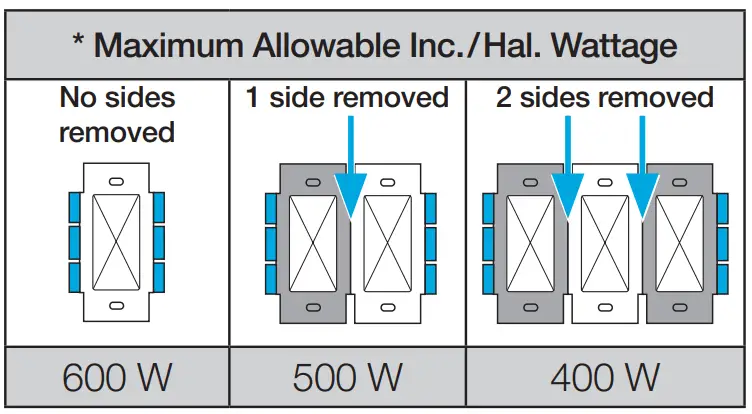
Note: Derating not necessary for LED/CFL loads.
Important Notes
- CAUTION: Use only with permanently installed fixtures with dimmable screw-in compact fluorescent, dimmable LED, halogen, or incandescent lamps. To avoid overheating and possible damage to other equipment, do not use to control receptacles, motordriven appliances, or transformer-supplied appliances.
- Install in accordance with all national and local electrical codes. When no “grounding means” exists in wallbox, the National Electrical Code (NEC®) allows a control to be installed as a replacement when a plastic faceplate with plastic fasteners is used, or the circuit is protected by a ground fault circuit interrupter (GFCI). Lutron wall plates meet this requirement. Cap or remove green wire before screwing control into wallbox.
- Protect the dimmer from dust and dirt when painting or spackling the wall.
- It is normal for the dimmer to feel warm to the touch during operation.
- Clean the dimmer with a soft damp cloth only. Do not use any chemical cleaners. For more information, please see lutron.com/cleaning
- For indoor use only
INSTALL WITH CONFIDENCE
![]() WARNING: SHOCK HAZARD.
WARNING: SHOCK HAZARD.
May result in serious injury or death. Turn off power at circuit breaker or fuse before installing.
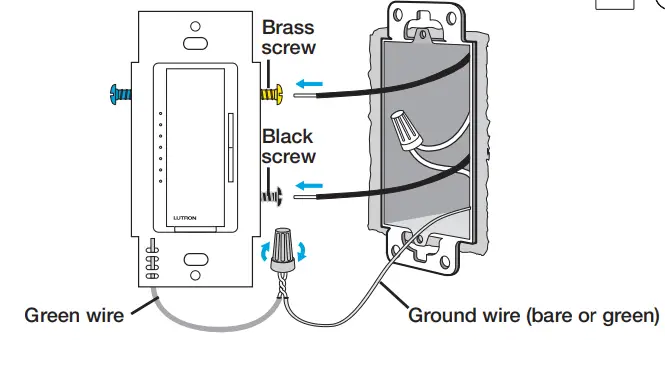
Wiring Option 1: Single Pole
For lights switched from one location:
NOTE: Black wires are interchangeable. ![]()
Wiring Option 2: 3-Way / 4-Way with Companion Dimmer(s)
For lights switched from two or more locations: See Maestro Companion Dimmer Installation Guide (Model MA-R or MSC-AD) for details![]()

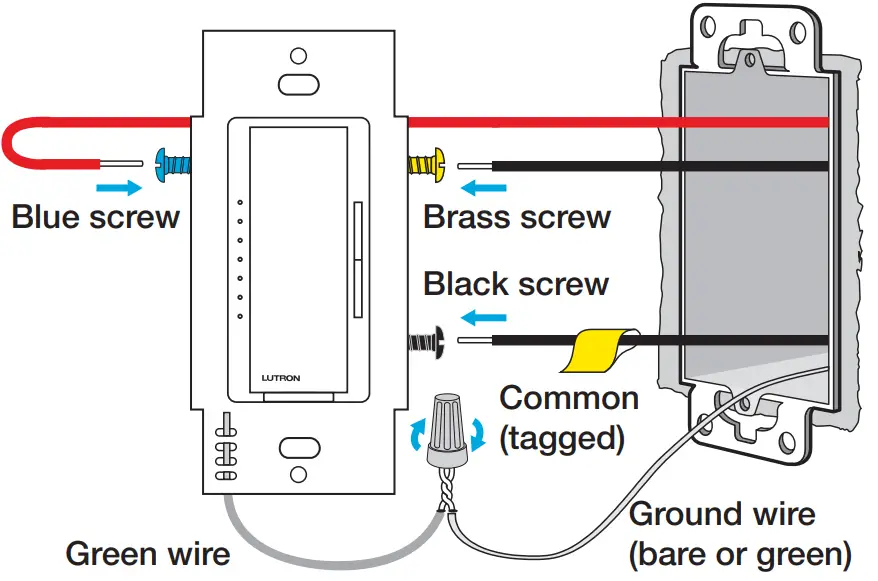
Wiring Option 3: 3-Way with an Existing Switch
For lights switched from two locations
IMPORTANT: Mark or tag the common wire on both switches before removing the old switch. We recommend visiting lutron.com/MACL to properly complete all three steps.
- Install the dimmer

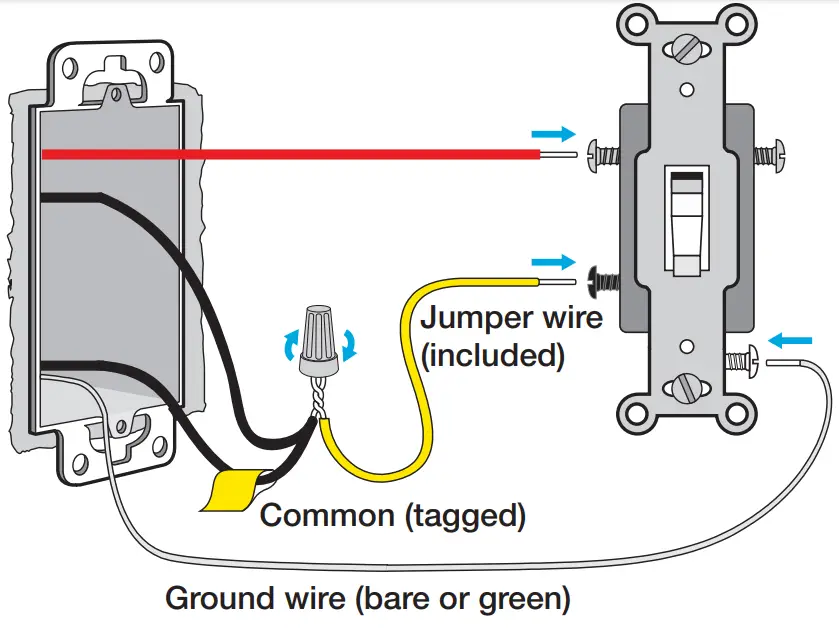
- Rewire the existing switch
Location 2
- Reprogram the dimmer
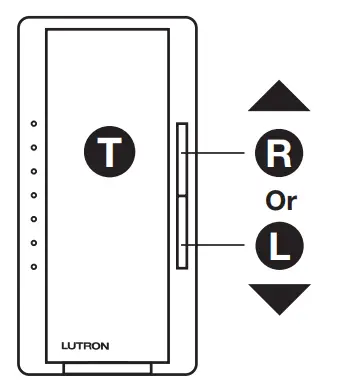
- Hold the Tapswitch ( T ) and the Raise button ( R ) until an indicator light starts blinking.
- Use the Lower button ( L ) to bring blinking LED to the bottom.
- Hit the Tapswitch ( T ) to save.
AFTER INSTALLATION: Adjust dimming range for LEDs and CFLs
- Hold T & L until an indicator light (IL) blinks on the MACL dimmer.

- Use or to improve lowest dimming level. Turn lights off and on at lowest level to confirm operation.
Adjust Settings
Visit
www.lutron.com/MACL

Operation
IF LIGHTS ARE OFF: Single tap T for preset. Double tap T for full brightness. IF LIGHTS ARE ON: Double tap T for full brightness. Single tap T to turn off. Press and hold T for delayed fade-to-off.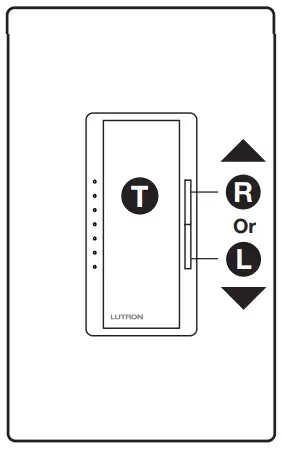
Troubleshooting
| Symptom | Possible Cause |
| Light have poor dimming performance | Adjust low-end trim Find best performing bulbs at www.lutron.com/LEDFinder |
For more information, please visit
www.lutron.com/MACL

Limited Warranty: www.lutron.com/TechnicalDocumentLibrary/369-119_Wallbox_Warranty.pdf ©2022 Lutron Electronics Co., Inc.
Lutron, Maestro, and LED+ are trademarks or registered trademarks of Lutron Electronics Co., Inc., in the U.S. and other countries. The YouTube icon is a trademark of Google LLC.
P/N 0302062 REV A
Receive an Extended Warranty: www.lutron.com/CLregistration
Customer Assistance: 1.844.LUTRON1 (USA/Canada) +1.888.235.2910 (Mexico)


