Therabody PROBDL-MP2-PKG-US RecoveryAir PRO Pneumatic Compression System User Guide
Your RecoveryAir PRO pneumatic compression system comes with a pump, a pair of compression boots, a blocker plug, a DC power adapter, and a carrying pouch for both the pump and boots.
Getting started
- To turn on the RecoveryAir PRO pump, press and hold the power button.
- To get started, put your boots on first before attaching them to the pump. This allows you to get into the most comfortable position and avoid any disruption in the air flow connection.
- Next, plug in the connector from the boots into the pump. Make sure you hear a “click” so that you know the RecoveryAir PRO is fully connected, is plugged in, and there is a proper seal.
- Once connected and comfortable, you are ready to customize your treatment.
Prepare your treatment
- To turn on the RecoveryAir PRO pump, press and hold the power button.
- Customize your treatment from the pump interface.
- Using the left & right arrows in the 4-way button, scroll through the 5 preset treatment options: Recover, Warm-up, Isolation, Interval, and PRO Mode (Custom).
- Once you have chosen your desired treatment preset, use the up & down arrows in the 4 way button to adjust the pressure setting.
- To create a custom routine, simply press the select button until a new screen appears.
- Then, use your select and arrow buttons to navigate the options such as Pressure, Time, Hold, Release, and Gradient, creating a fully personalized routine.
- Once you have selected the treatment options that are right for you, push play, relax, and you’ll be on your way to recovery in no time. You can also share your routines with other RecoveryAir users easily through the Therabody app
Feature Callouts
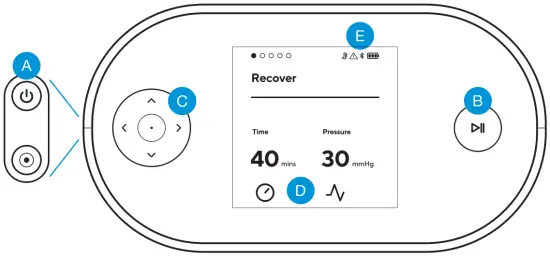
- A.
 Power Button
 - B.
 Start/Pause/Stop Button
 - C.
 4-way Buttons
 - D. Select Button
- E. Settings (Adjustable Range)
- F. Indicators
![]() Pressure Setting
Pressure Setting
Adjustable Pressure Range (20-100 mmHg) in increments of 5 mmHg. Adjustable
Pressure Range in increments of 1mmHg (Gradient Setting).
![]() Time Setting
Time Setting
10min-90min.
![]() Warning Indicator
Warning Indicator
Indicator lights up solid ON or blinking when a device malfunction is detected
![]() Bluetooth Indicator
Bluetooth Indicator
Indicator turns ON only when connected to the App
![]() Battery Indicator
Battery Indicator
3 LED lights to indicate battery life
Smart Features
The RecoveryAir PRO also connects to the Therabody app via Bluetooth, giving you total control of your RecoveryAir PRO session from the convenience of your smartphone.
Not only can you easily access options like individual chamber pressure, but you can create and share custom routines with your friends, clients, or patients directly from the app via text message or email.
Scan the QR code to get started.
Born in Los Angeles, CA.
Designed for everybody.![]()
@Therabody