![]() Instruction Manual
Instruction Manual
SEE608 © 2022 System Q Ltd
ZipDVR.com
Tools & Handy Extras
- Screwdriver
- Drill
- Hammer
- POW151 – 12V DC 500mA Plug-in PSU
- Drill bits
- BNC Crimp Tool & BNCs
- RG59 Coax Cable
- Digital Multi-Meter
- LCD400K – CCTV Test monitor
Connections
The camera is provided with a fly lead with a 2.1mm DC socket and standard BNC connector
It is recommended to use a power supply that is rated higher than the current consumption of the camera
The camera is polarity sensitive so connections must be made correctly
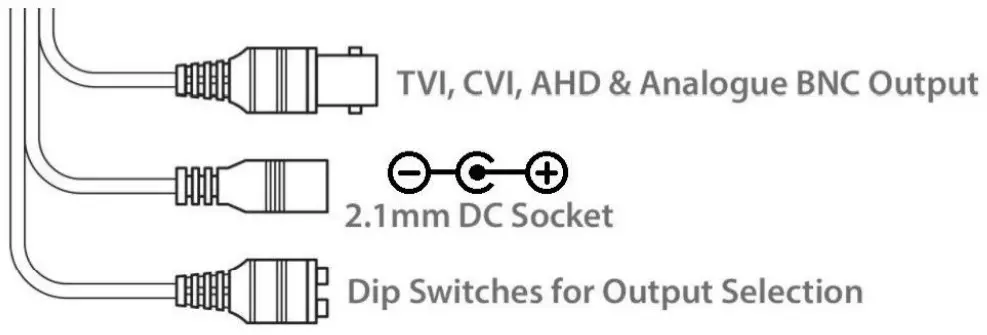
4-In-1 Technology
Selectable HD-TVI, HD-CVI, AHD and CVBS (Analogue) Output. The default is set to HDTVI however the output can be changed to AHD, CVI or CVBS if required.
This output can be changed either with the dip switches on the fly-lead of the camera. Please note the “Output Mode” in the menu of the DVR won’t change the format, as the dip switch overrides the output.
The dip switch configuration can be found below:-

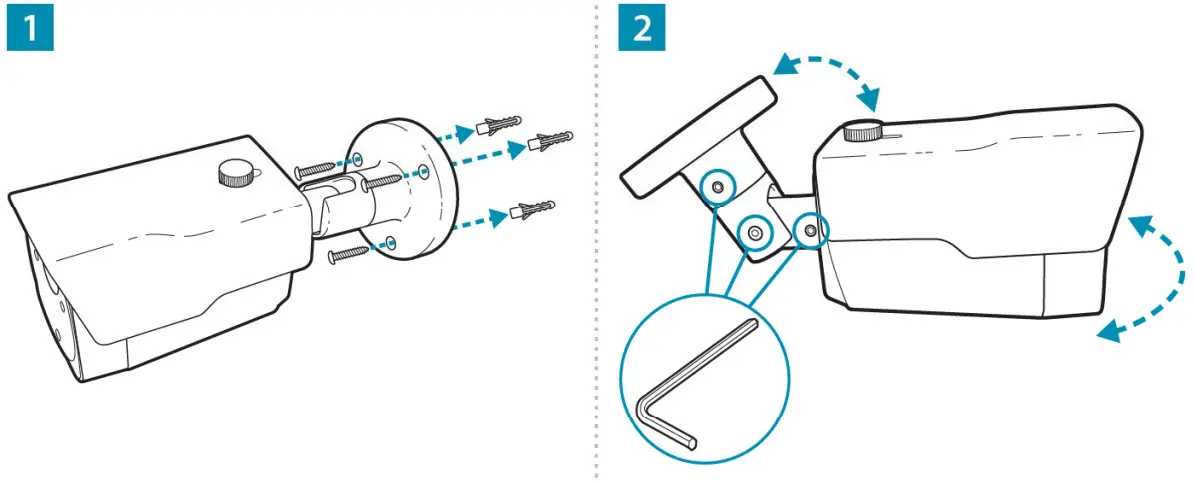
Mounting
4.1 All-in-one
Access to the camera menu is by Coaxitron. For the ZIP DVRs, ZIP Coaxitron is set as default.
To access the Cameras Menu via coaxitron:-
- Click on the image in Live view
- Click on the PTZ button at the bottom of the screen
- Click on the IRIS + button to display the menu
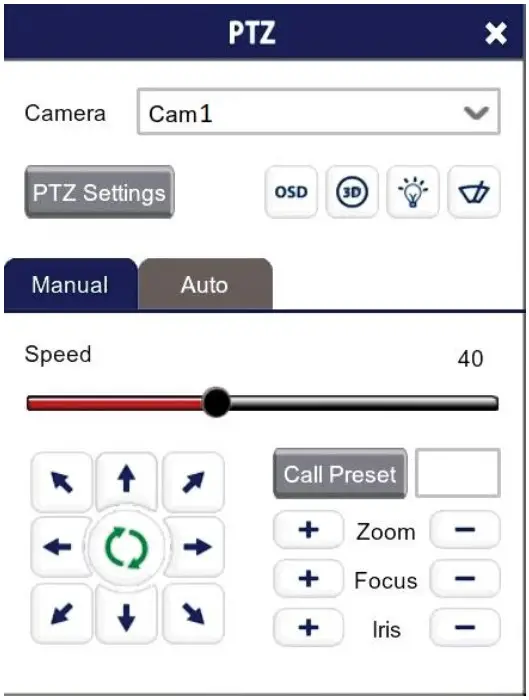
Use the directional arrows to move up and down through the menu.
Use the directional arrows left and right to change the option.
Use IRIS + to select & enter that menu option.
5.1 8MP OSD Menu
| LENS | MANUAL (No Adjustment) | |||
| EXPOSURE | SHUTTER | AUTO / FLK | ||
| AGC | 0 ~ 15 (Default 12) | |||
| BRIGHTNESS | 0 ~ 100 (Default 40) | |||
| D-WDR | OFF / AUTO | |||
| BACKLIGHT | OFF / BLC | |||
| BLC | LEVEL | LOW / MIDDLE/ HIGH | ||
| AREA | POSITION & SIZE | |||
| DEFAULT | (Defaults the above) | |||
| RETURN / SAVE & END | ||||
| RETURN / SAVE & END | ||||
| WHITE BAL | ATW | |||
| AWC SET | (Sets Automatic White Balance Control) | |||
| DAY & NIGHT | EXT | D – N (DELAY) | 0 ~ 15 (Default 0) | |
| N – D (DELAY) | 0 ~ 15 (Default 2) | |||
| RETURN / SAVE & END | ||||
| AUTO | D – N (AGC) | 0 ~ 216 (Default 220) | ||
| D – N (DELAY) | 0 ~ 15 (Default 0) | |||
| N – D (AGC) | 0 ~ 215 (Default 25) | |||
| N – D (DELAY) | 0 ~ 15 (Default 2) | |||
| RETURN / SAVE & END | ||||
| COLOR (Permanently in colour) | ||||
| B/W | IR SMART | ON / OFF | ||
| LEVEL | 0 ~ 15 (Default 0) | |||
| AREA | POSITION & SIZE | |||
| RETURN | ||||
| IR PWN | 0 ~ 100 (Default 100) | |||
| RETURN / SAVE & END | ||||
| ADJUS | NR | 2 DNR | LOW / MIDDLE / HIGH / OFF | |
| 3 DNR | LOW / MIDDLE / HIGH / OFF | |||
| RETURN / SAVE & END | ||||
| SHARPNESS | LOW / MIDDLE / HIGH | |||
| COLOR GAIN | BLUE GAIN | 0 ~ 10 (Default 6) | ||
| RED GAIN | 0 ~ 10 (Default 6) | |||
| RETURN / SAVE & END | ||||
| LSC | ON / OFF | |||
| MIRROR | OFF / MIRROR / V-FLIP / ROTATE | |||
| DPC | LIVE DPC | ON / OFF | ||
| RETURN / SAVE & END | ||||
| LANGUAGE | ENG / CHN 1 / CHN 2 / GER / FRA / ITA / SPA / POL / RUS / POR / NED / TUR / JPN | |||
| OUTPUT MODE | FORMAT*** | THD / CVBS / AHD / CHD | ||
| RESOLUTION | 8 MEGA | |||
| FRAMERATE | NRT | |||
| VIDEO. OUT | NTSC / PAL | |||
| APPLY SET | ||||
| RETURN / SAVE | ||||
| RETURN / SAVE & END | ||||
| Exit | SAVE & END | |||
| RESET | ||||
| NOT SAVE | ||||
5.2 Key Menu Settings
Exposure Mode – AUTO sets the required shutter speed for the current light level. The shutter speed will automatically detect the required length of time to keep the digital sensor exposed to light. FLK option sets the shutter speed to stop synchronisation with lighting so that pulsing effect is minimised.
White Balance – Colour adjustment of the camera to be set up so objects appear a natural colour. ATW (Automatic tracking white balance) continually tracks and adjusts the white balance, making it suitable for use in cameras in which the image content and lighting are subject to changes.
Day & Night – The camera can be set to colour or B&W mode or have it automatically switch External is set as default, the switch between colour and black & white is controlled by an external trigger In this a light dependent resistor. Delay can be set which will instruct the camera to wait for a set length of time before switching. This accommodates for any temporary drops in light
DNR (Noice Reduction) – Noise Reduction is the process of removing noise from the video signal by applying a digital filter. 2D noise reduction reduces noise in the foreground of the image where as 3D noise reduction reduces noise in both the foreground and the background of the image.
D-WDR – Digitally adjusts the exposure in areas of the frame to maintain optimum levels in both the dark and bright areas of an image.
Reset – Defaults the camera to factory settings. This setting helps when fault finding issues with the camera to ensure all settings are defaulted.
Troubleshooting
6.1 Camera Rebooting / Turning Off
A. Check the voltage of the camera (under load) if below 10.8V then move the power supply closer to the camera.
B. For 12V DC cameras only ever use regulated power supply rated at above 750mA, 1A would be recommended. So that the camera is always receiving the correct supply.
C. Use thicker gauge copper cabling to reduce the voltage drop.
6.2 Poor Quality Images
A. Check the fly-lead is set to the correct output – see 4-In-1 Technology![]()
B. If set to CVBS, then this is a low quality video output for legacy systems (Analogue), when using a 2 MegaPixel DVR or above then use another video format, like HD-TVI.
C. Reset the camera menu via Zip Coaxitron – OSD Menu![]()
D. Check if your recorder supports the resolution of the camera.
6.3 Image is Black & White
A. Check the video format your DVR supports, then set the camera to the relevant video format – see the 4-In-1 Technology![]()
B. Reset the camera menu via Zip Coaxitron OSD Menu![]()
C. Check the recorder supports the resolution of the camera.
6.4 NCD / No Image Displayed on Recorder
A. Test that the camera has the correct voltage supplying it, this must be done with the camera connected so that there is load on the PSU. A 12V DC camera should have at least 10.5V DC connectedtoit.
B. The camera can not function without the correct power supply. For 12V DC cameras only ever use regulated power supplies to ensure that the camera is always receiving the correct voltage.
C.EnsurethattheBNC–BNC lead that is connected between the camera and DVR has no shorts or open circuits.
General Maintenance
- Ensure that nothing is obscuring the field of view, position the camera to ensure the Lens can see clearly.
- Routinely clean the camera to prevent dust build up as this can effect the performance of the camera. We recommend a damp non-abrasive microfibre cloth.
- Check that the cameras are firmly attached.
- Check playback in the recorder to ensure the camera is recording properly.
Specifications
8.1 SEE608
| Resolution | 4K (8MP) |
| Lens Type | 2.8-12mm Varifocal |
| Image Output | 1 Volt Peak-Peak 75 ohm |
| Min.Illumination | 0 Lux IR On |
| Day/Night | Mechanical (True Day-Night) |
| InfraRed LEDs | 2 High Powered LEDs |
| IR Range | 60M |
| Input Voltage | 12V DC |
| Current Consumption | 500mA (IR On) |
| IP Rating | IP66 |
| Video Connection | BNC Socket |
| Power Connection | 2.1mm DC Socket |
| WDR | Yes |
| Bracket | Wall & Ceiling Available |
| Finish | White/ Black |
| Build | Metal |
| Dimensions | (H)88.5mm x (W)88mm x (D)141mm (ex bracket) |
9.1 General Company Disclaimer
All specifications are approximate. System Q Ltd reserves the right to change any product specifications or features without notice. Whilst every effort is made to ensure that these instructions are complete and accurate, System Q Ltd cannot be held responsible in any way for any losses, no matter how they arise, from errors or omissions in these instructions, or the performance or non-performance of the equipment that these instructions refer to.
9.2 WEEE Declaration![]() This symbol on the products and/or accompanying documents means that used electronic equipment must not be mixed with general household waste. For treatment, recovery and recycling please return this unit to your trade supplier or local designated WEE/CG0783SS collection point as defined by your local council.
This symbol on the products and/or accompanying documents means that used electronic equipment must not be mixed with general household waste. For treatment, recovery and recycling please return this unit to your trade supplier or local designated WEE/CG0783SS collection point as defined by your local council.
9.3 Copyright
© Copyright 2022
Zip is a registered trademark of System Q Ltd, Chesterfield. Derbyshire. S40 2WB
© 2022 System Q Ltd
ZipDVR.com


