![]() 73E-11215 RunCam Thumb Pro Camera
73E-11215 RunCam Thumb Pro Camera
Instruction Manual
Please read this manual carefully before use and keep it in a safe place
Function indication
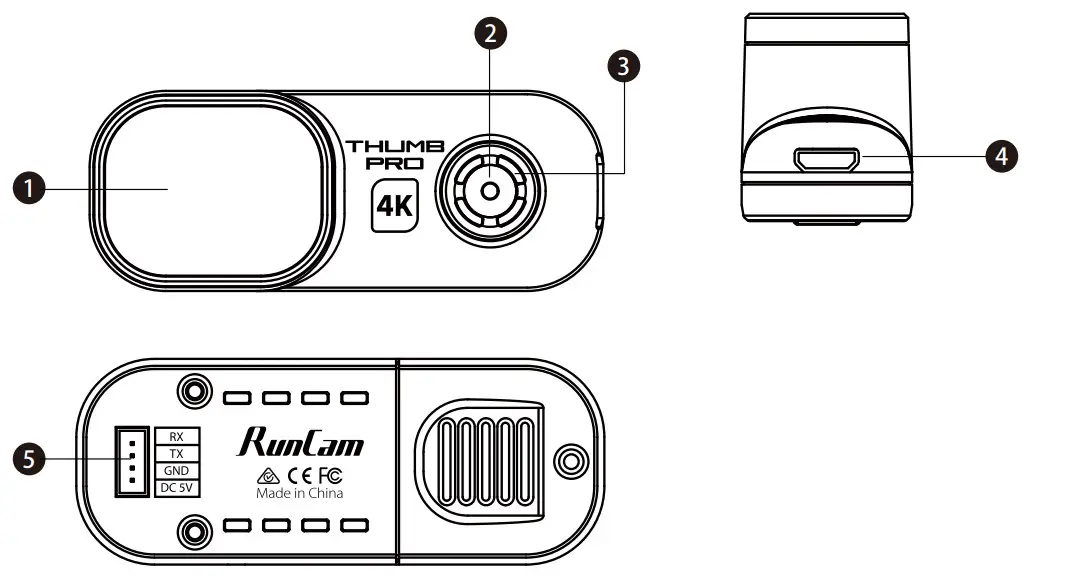
- Detachable lens protection cover
- Button (power/shutter button)
- Indicator light(Red/Green)
- MicroUSB
- 1.25mm 4P
Power supply connection and flight controller connection

Camera basic operations
| Power on/off | Automatically turn on when powered on, the red light is always on Cut the power or long press the button to power off |
| Start/Stop recording | Click the shutter button to start recording, the red light flashes slowly / Click the shutter button again to stop recording, the red light is always on |
| Mode switch | Double-click the shutter button quickly to switch between the recording mode (the red light is always on) and the parameter settings mode (the green light is always on) |
| Parameter settings mode | Scan the QR code in the Runcam APP to configure |
| Remote control mode | Thumb Pro Connect ThumbPro to flight controller for operations |
| SD card error | Red light keeps flashing fast |
Attention: SD card error includes card full, slow card speed, card damage and etc.
Micro SD Card
U3 card is recommended (4K@30FPS/2.7K@60FPS/1080P@120FPS requires U3 or above)
Supports up to 128G microSD card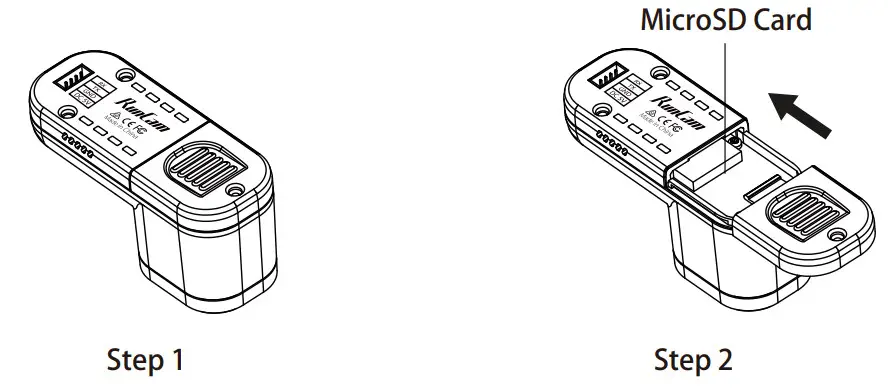
Note: Be careful when handling the microSD card, please avoid contact with liquids, dust and debris.
As a precaution, turn off the camera before inserting or removing a microSD card. Please refer to the microSD card manufacturer’s instructions for use within an acceptable temperature range.
Computer Connection
Connect the computer via Micro USB, it will be recognized as a U disk.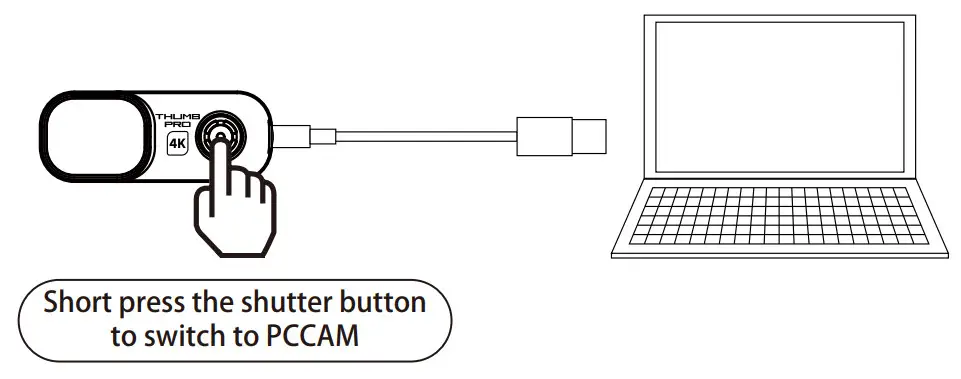
Note: If it cannot be recognized after connecting to the computer, please confirm that there is a microSD card inserted; if the microSD card cannot be read normally, please try to replace the USB cable or the computer USB interface.
Firmware Update
To ensure optimal performance of the camera, please use the latest firmware version.
Check the link below to update for reference:
https://www.runcam.com/download/ThumbPro
Firmware upgrade status (Red and green lights flashing fast; when the upgrade is completed, the camera automatically shuts down.)
Android and IOS APP
Search“RunCam”on Google play and Apple Store, or download on our website http://www.runcam.com/download
Technical Support
Please visit: https://support.runcam.com
Video Bitrate and Codec
| Video Quality | Codec | |||
| Resolution | High | Medium | Low | |
| 4K@30fps | 60Mbps | 50Mbps | 40Mbps | H 264 |
| 2.7K@60fps | 60Mbps | 50Mbps | 40Mbps | |
| 1440P@60fps | 40Mbps | 30Mbps | 20Mbps | |
| 1080P@120fps | 60Mbps | 50Mbps | 40Mbps | |
| 1080P@60fps | 45Mbps | 30Mbps | 22Mbps | |
Flight Controller UART Control
Preparation
- Firmware: BetaFlight Firmware (3.2.0),CleanFlight Firmware(2.1.0) , KISS Firmware (1.3-RC30) or INAV Firmware (1.7.3).
- Any available UART interface on the Flight Controller
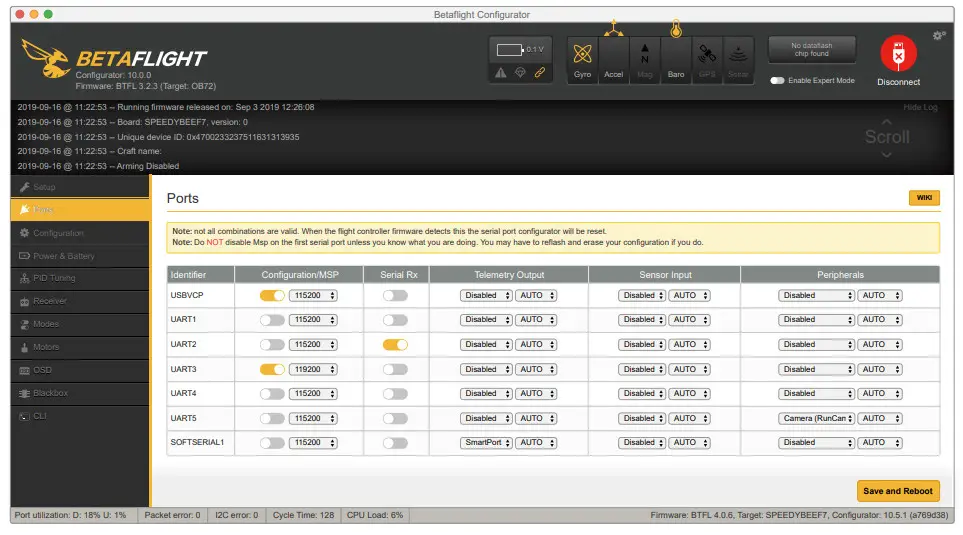
1. Connect the Runcam Thumb PRO with the UART interface of the Flight Controller
2. Make the Flight Controller recognize the Runcam Thumb PRO For example, we connect the Runcam Thumb PRO to the UART 5 interface on the Flight Controller: connect the Flight Controller to the computer, then open the configurator software of the Flight Controller. (Open up the configurator that matches the firmware you are running, Betaflight Configurator for Betaflight, Cleanflight Configurator for Cleanflight). In the Peripherals column of the line UART 5 (on the Ports tab), select Camera (RunCam Protocol) and click Save And Reboot. 3. Instructions of the functions of the camera and assigning transmitter channels to them In the Flight Controller Configurator, navigate to the Modes tab. There are new CAMERA WI-FI, CAMERA POWER and CAMERA CHANGE modes
 - CAMERA POWER: start/stop the video. When in the OSD of the camera, this is used to move to the next menu item.
- CAMERA CHANGE MODE: Switch between the recording mode and the QR code setting mode.
Assign any available channel to the function you need, for example: - Assign the AUX2 to the CAMERA POWER, range 1900-2100
- Assign the AUX3 to the CAMERA CHANGE MODE, range 1900-2100
 4. Assign the channel to the switch of the controller
Please choose your Model on the controller, then access to the MIXER interface and assign the channel to the switch of the controller. Take opentx 2.2.0 for example, assign the channels CH5, CH6 and CH7 to SA, SB and SD respectively 5. Test
Power the Flight Controller and the Runcam Thumb PRO - Set the SA to the bottom, the camera starts/stops the video
- Set the SD to the bottom, the camera switches among the two modes: video and OSD setting mode
 3. Instructions of the functions of the camera and assigning transmitter channels to them In the Flight Controller Configurator, navigate to the Modes tab. There are new CAMERA WI-FI, CAMERA POWER and CAMERA CHANGE modes
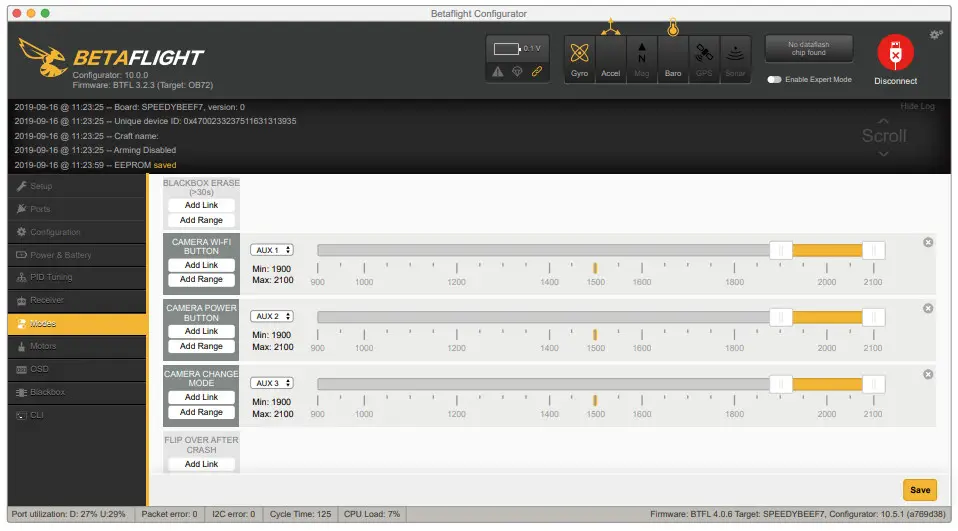 4. Assign the channel to the switch of the controller
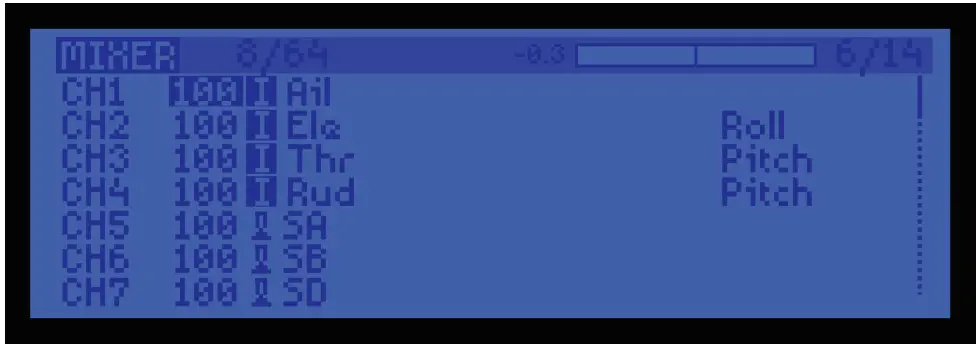 5. Test
Specifications
| Mode | Runcam Thumb Pro |
| Resolution | 4K@30fps \2.7K@60fps \1440P@60fps \ 1080P@120fps \1080P@60fps |
| Video Format | MP4 |
| Gyro | Bulit-in |
| Communication Interface | Micro USB |
| Micro SD Card Capacity | 256G Max |
| USB Power Input/ Terminal Power Supply | DC 5.0V |
| Remote Control | Uart |
| Power Consumption | 500mA@5V Max |
| Dimension | 54mm*25.5mm*21mm |
| Net Weight | 16g |


