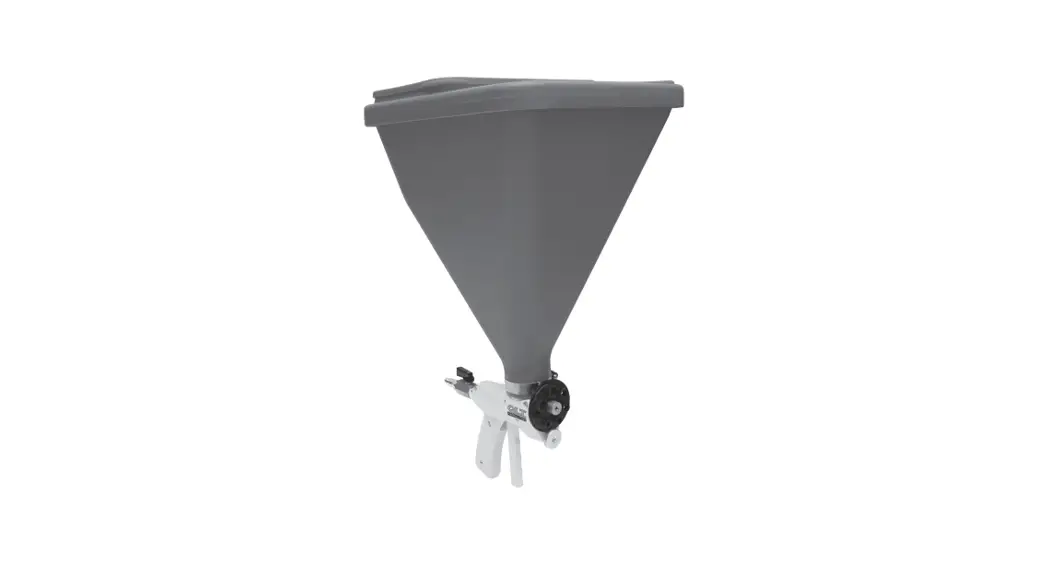
![]() SPRAYMATE™ DRYWALL HOPPER GUN
SPRAYMATE™ DRYWALL HOPPER GUN
Part# HG692 | EDI# 14582
104 S. 8th Ave. | Marshalltown, IA
Phone 800-888-0127 / 641-753-0127 | Fax 800-477-6341 / 641-753-6341
www.MARSHALLTOWN.com
WS1787RevA
HG692 Spraymate Drywall Hopper Gun
NO. HG692 DRYWALL HOPPER GUN OPERATING INSTRUCTIONS
The SprayMate™ Drywall Hopper Gun, together with an air compressor, will apply most any sprayable material that can feed by gravity through the hopper and that can fit through one of the holes in the orifice plate. The texture that results can be adjusted in four ways:
- Material Consistency
Follow the material manufacturer’s recommendations for mixing. It is important that the material be thoroughly mixed and be just thin enough to feed through the hopper. This enables the droplets of spray to stay on the wall/ceiling surface and form a good texture. Do not thin the mixture to achieve a finer texture, rather increase the air flow and select a smaller orifice. - Orifice Size
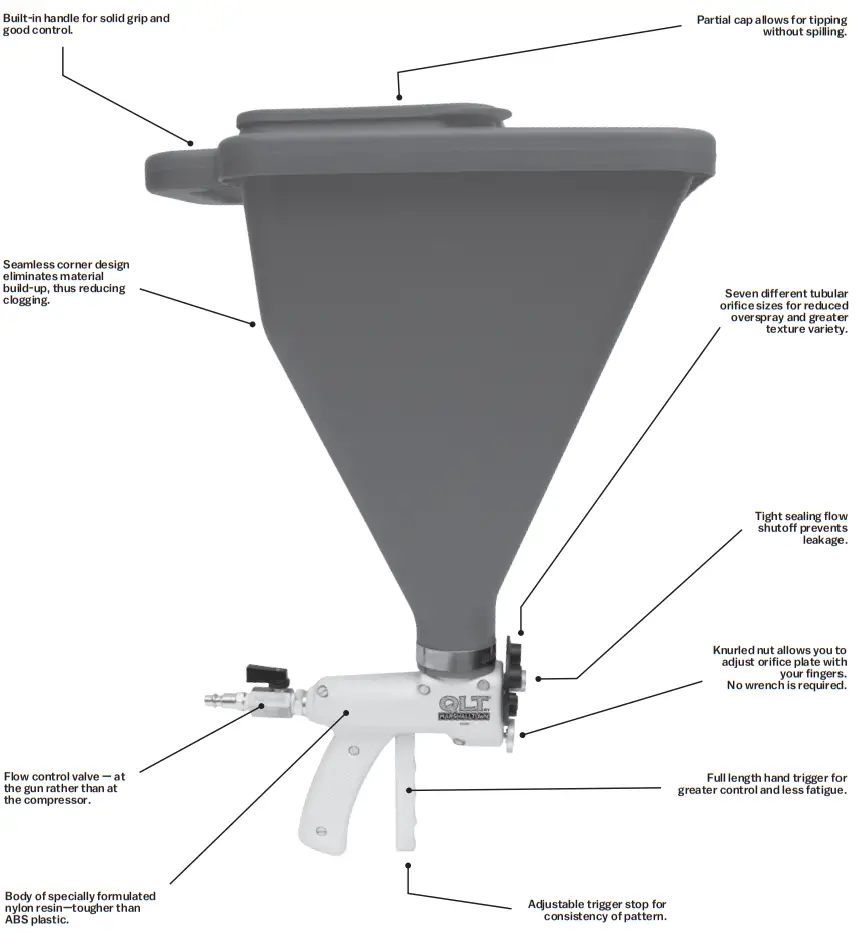
The circular orifice plate (2) on the front of the gun provides seven different orifice sizes. You should generally select an orifice of twice the diameter of the largest grain in the mixture. To change the orifice, loosen the knurled nut and center knob (3,4). Pull the trigger back and rotate the orifice plate to the desired size. As you release the trigger the orifice is centered. Finally, secure the orifice plate in position by first tightening the center knob and then the knurled nut. The special collar on the one orifice is effective in reducing drips and controlling the overspray. - Air Flow
For spraying most materials, a continuous air supply of at least 7 CFM at 25 psi is required. The air flow at the gun is adjusted by the ball valve-air line coupler (15). A reduced air flow will produce a coarser texture, a greater air flow will produce a finer texture. If the air flow is too great, however, the grains within the mixture can separate from the mixture and rebound off the walls. This can lead to waste and mess. - Trigger Setting
The position of the trigger controls the amount of material flow. As the trigger is pulled back, more material is allowed to feed through. Generally the distance between the air nozzle (23) and the mixture nozzle (5) should be slightly greater than the size of the selected orifice. When the desired texture is achieved, the trigger position can be set by tightening the wing-nut (16). This will ensure the trigger is pulled back the same distance each time so that the texture remains consistent. Releasing the trigger
stops the material flow.
It is recommended that you set your pattern on scrap sheetrock or cardboard before spraying your finished product. By experimenting with the various adjustments you should be able to obtain your desired texture.
MAINTENANCE
It is important to keep the gun and hopper clean. For best results, separate the gun and hopper and flush each with clean water. The front and rear bushings (12/27, 20/27) are permanently lubricated; re-oiling is normally not necessary.
REPLACEMENT PARTS
Refer to the illustration for part numbers and proper assembly. Replacement parts may be ordered individually, or are available in the No. 794A Repair Kit.
The No. 794A Repair Kit contains the orifice plate, knurled nut, center knob, mixture nozzle, and rubber boot.
When re-assembling the gun, use silicone sealant* between the housing halves to prevent the spray material from leaking to the trigger mechanism.
*Not included—Purchase separately.
APPLICATION
A few general statements should be noted:
- Always read and follow manufacturers’ mixing instructions. If not specified in those instructions, the compound should be thoroughly mixed, free of lumps, and be the consistency of pancake batter.
- Always set your pattern on scrap sheetrock before spraying your finished product. Note the compound consistency, orifice size, air pressure at the compressor, relative ball valve position, and trigger setting for future reference.
- The more open the trigger; the more material will be applied with a resulting coarser pattern.
- The higher the air pressure, the finer the pattern; the lower the air pressure, the coarser the pattern.
- The higher the air flow, the finer the pattern; the lower the air flow, the coarser the pattern.
- Larger orifice openings will produce a coarser pattern than will a smaller opening.
Of the three most popular patterns – orange peel, knockdown, and popcorn – orange peel and knockdown generally apply to walls while popcorn aggregate is a ceiling finish.
To apply orange peel: select the second smallest opening (#6) in the orifice plate, set the trigger so that the end of the air nozzle is approximately 1/4″ (6 mm) from the orifice plate. Air pressure should be at least 30 psi. Again,before spraying the finished product, check for the desired texture on a scrap piece of sheetrock.
To apply knockdown: also referred to as splatter, change the orifice plate to the middle opening (.315″/8.0 mm dia.) (#4), set the trigger fully open. The air pressure should be at least 20 psi. Again, before spraying finished product, check for the desired texture on a scrap piece of sheetrock.
To apply popcorn: ceiling texture, use one of the largest openings (#1, 2, or 3). Which one will depend on the size of the acoustic aggregate. The trigger setting should be fully open. The air pressure should be at least 20–25 psi.
NOTE: The textures described above are made using either a 3/8″ or 1/2″ I.D. hose. If you are using a 1/4″ I.D. hose, use greater air pressures than specified.
†No. 12 and 27 must be ordered as an assembly. Order 12/27 combination as R1748.
794A Repair Kit/EDI No. 16355
Includes all parts marked *in the quantities listed.
G725 Gun complete without hopper/EDI No. 14586
All parts can be ordered individually.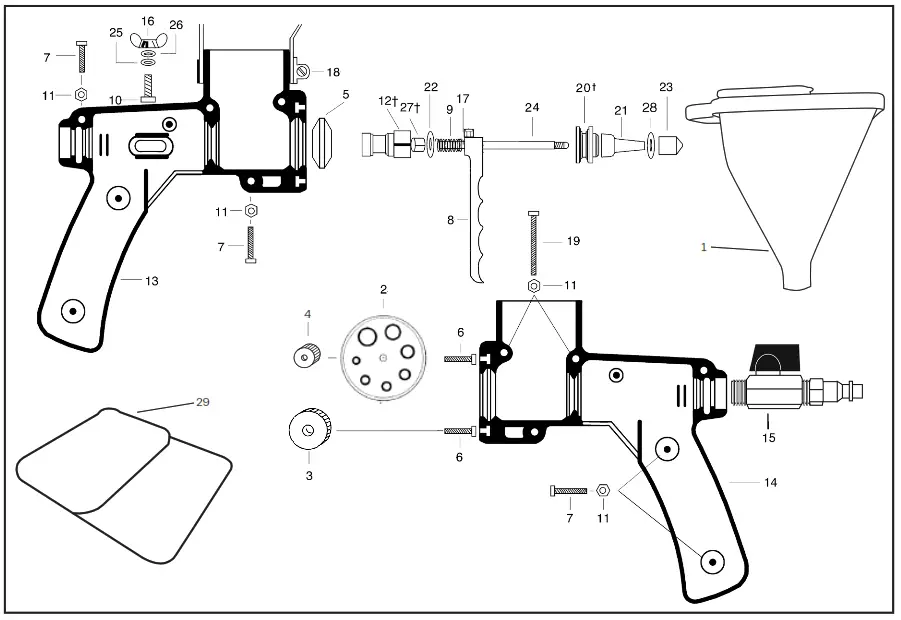
HG692 (EDI No. 14582) Drywall Hopper Gun — Parts List
| Item # | Description | Partn | Quantity |
| 1 | Hopper | H724/14585 | 1 |
| 2 | Orifice Plate | WT242 | 1* |
| 3 | Knurled Nut | R3974 | 1* |
| 4 | Center Knob | R3921 | 1* |
| 5 | Mixture Nozzle | WT236 | 1* |
| 6 | Screw M5 x 16 | WT303 | 2 |
| 7 | Screw AA4 x 18 | WT304 | 4 |
| 8 | Trigger | WL329 | 1 |
| 9 | Compression Spring | WT210 | 1 |
| 10 | Screw M6 x16 | WT211 | 1 |
| 11 | Nut M4 | VVT306 | 6 |
| 12t | Rear Bushing | R1748 | 1 |
| 13 | Handle Casting (Left) | WL330 | 1 |
| 14 | Handle Casting (Right) | WL331 | 1 |
| 15 | Ball Valve -Air Line Coupler | WT243 | 1 |
| 16 | Wing Nut M6 | W1217 | 1 |
| 17 | Screw M5 x 8 | WR189 | 1 |
| 18 | Hopper Clamp | WTZ19 | 1 |
| 19 | Screw M4 x 40 | WT307 | 2 |
| 20 | Front Bushing | R3871 | 1 |
| 21 | Rubber Boot | WT222 | 1* |
| 22 | Copper Ring | WT223 | 1 |
| 23 | Air Nozzle | R3872 | 1 |
| 24 | Air Tube | R3874 | 1 |
| 25 | Washer | WT228 | 1 |
| 26 | Curved Spring Washer | WT229 | 1 |
| 27t | Split Bushing | N/A | 1 |
| 28 | Nylon Ring | WT245 | 1 |
| 29 | Replacement Hopper Top and Lid | HL726 | 1 |
PRODUCT FEATURES
![]() 104 S. 8th Ave., Marshalltown, IA
104 S. 8th Ave., Marshalltown, IA
Phone 800-888-0127 / 641-753-0127
Fax 800-477-6341 / 64 1-753-6341
www.MARSHALLTOWN.com
WS1787RevA


