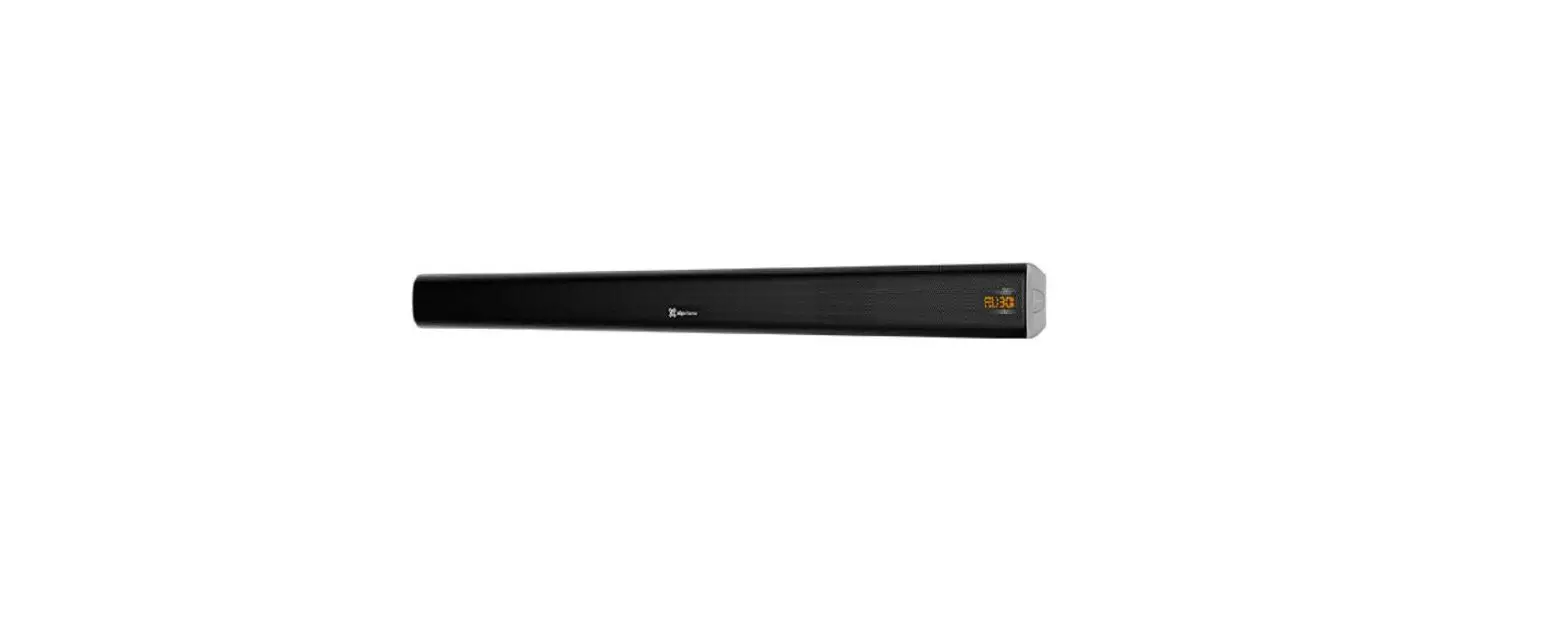
KlipXtreme KSB-00A Tunebar

Introduction
Congratulations on the purchase of your new KlipXtreme® Tunebar soundbar with Bluetooth® wireless technology. We invite you to visit us at www.klipxtreme.com for support and to find out more about this audio system and other new and exciting products.
Main features
- 31.5-inch, 2.0 channel soundbar with a stylish and space-saving design, which delivers high quality audio from wired or wireless devices
- 60 watts of total output power through two potent 2-inch full range drivers
- HDMI ARC interface for immersive sound with only one connection
- Optical digital and RCA inputs with cables included
- Bluetooth® v5.0-compatible and improved for a distance of up to 33 feet between sound source and speaker unit
- LED display to visualize the selected mode
- Desktop or wall mount design for versatile configuration
- Remote control with convenient preset EQ settings
Package content
To get the most of your new soundbar, please take a few minutes to read the following instructions and familiarize yourself with the operation of the unit. Before setting up the device, make sure that the following items are included in the box:
- Soundbar (1)
- RCA to 3.5mm Aux cable (1)
- Digital optical cable (1)
- Remote control (1)
- User’s guide (1)
- AAA batteries (2)
Unpack your unit carefully. We recommend that you save the box and all original packing materials, in case you wish to store the unit, or if you ever need to return it for service.
Product Overview
Side panel
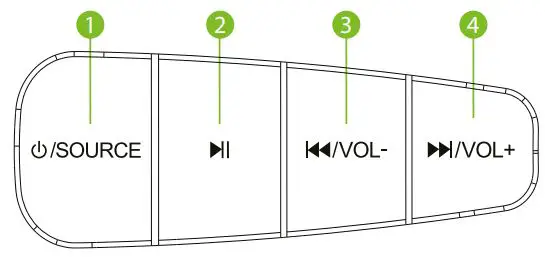
- Power on/source
- Play/pause
- Previous track/volume –
- Next track/volume +
| Control | Description |
| 1. Power on/source | Press this button to power on and press and hold to turn it off. Press this button to select the audio source. |
| 2. Play/pause | Press this button to play or pause audio playback. It doesn’t work in Auxiliary mode. |
| 3. Previous track/volume – | Press it to play the previous track. Press and hold this button to decrease the volume level. |
| 4. Next track/volume + | Press once to play the next track. Press and hold this button to increase the volume level. |
Back panel
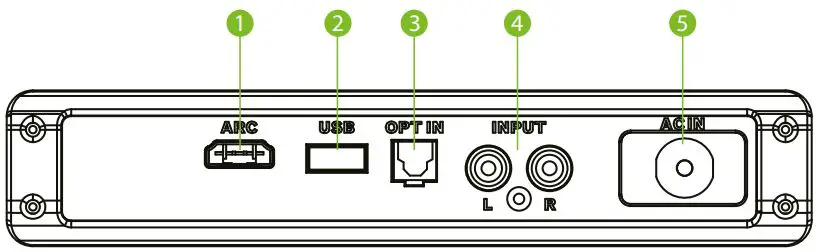
- HDMI ARC input
- USB port
- Optical input
- RCA input
- Power input
Remote control
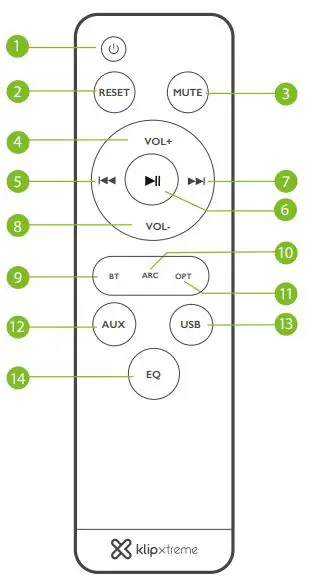
- An included infrared remote control allows additional functions for greater control over the soundbar.
Note: Install the supplied batteries in the remote control. For the remote to operate properly, make sure it is pointed toward the front of the soundbar.
| Buttons | Description |
| 1. | Press it to alternate between on and standby modes. |
| 2. RESET | Press it to change all settings to default mode. |
| 3. MUTE | Press it to silence the unit. Press it again to activate the sound. |
| 4. Vol. + | Press it to increase the volume level. |
| 5. | Press it to jump to the previous song. Note: This function does not work in Aux mode. |
| 6. | Press it to play and pause a track. |
| 7. | Press it to jump to the next song. Note: This function does not work in Aux mode. |
| 8. VOL- | Press it to decrease the volume level. |
| 9. BT | Shortcut to Bluetooth mode. |
| 10. ARC | Shortcut to HDMI ARC mode. |
| 11. OPT | Shortcut to digital optical mode. |
| 12. AUX | Shortcut to Auxiliary mode. |
| 13. USB | Shortcut to USB mode. |
| 14. EQ | Press this button to toggle through the following EQ settings: pop, classic, jazz, country, normal, rock. |
Preliminary steps
- The soundbar can be placed on a desktop or hanged on the wall.
- If you decide to mount the soundbar on the wall, determine the location and mark the holes on the surface.
- For gypsum or wooden walls, locate studs in the wall. You may use a stud finder to determine the center of each stud.
- Drill pilot holes and insert anchors if installing the unit on a concrete or brick wall.
- Drive the screws into the holes with a screwdriver, leaving some space between the head and the wall surface.
- Make all necessary cable connections before mounting the soundbar on the wall (Aux. or optical input cables).
- Once all connections have been completed, carefully slide the soundbar over the screws you just installed.
- By plugging the soundbar Ac cord into a wall outlet, the soundbar will be ready to use.
Optical digital and Auxiliary connections
- Insert one end of the supplied optical digital cable into the matching input jack on the back of the soundbar and the other end on the device you wish to play audio from.
- Turn on the soundbar by pressing the power button located on the right-side panel of the unit. You can also press the red power button on the remote control.
- Select the input mode by pressing the source button located on the right-side panel.
- Using the controls on the remote, you can manage and select your tracks, increase, or lower the volume, mute the sound bar audio, etc.
Advanced operation
Pairing the sound bar with your Bluetooth® device
Note: Before installing this product, please make sure your device is compatible with Bluetooth®.
- First, turn on the soundbar by pressing the power button on the side panel or on the remote control. Bluetooth® (BT) is the selected mode by default. You can also select the BT mode by pressing the mode selection button in the remote control. The BT indication will appear on the LED display.
- Place both devices not more than three feet away from each other.
- Enable the Bluetooth® function on your audio device and set it to discover the wireless soundbar.
- The BT icon will start blinking to indicate that the system has entered into pairing mode.
- Once the soundbar appears listed under the newly found Bluetooth® devices (KSB-00A), the pairing process will start.
- If pairing is successful, a tone will be heard.
- If after 60 seconds the pairing process fails, please repeat steps 1 through 6 described above.
Troubleshooting
| Problem | Suggested solution |
| The unit is not turning on. | Make sure the power cord is connected correctly to the power source. |
| There is no sound coming from the soundbar, or the sound is distorted. | Make sure the audio cable is connected correctly. Turn up the volume slowly. Press the mute button in case it was pressed accidentally muting the soundbar. |
| The remote control doesn’t work. | Install two AAA batteries in the remote. Replace the current batteries with new ones. Point the remote control toward the front of the soundbar and make sure it is within the operating range. |
| The buttons on the soundbar don’t work. | Unplug the soundbar, plug it to a power supply and turn it on again. |
Technical specifications
| MPN KSB-00A | |
| Device | |
| Type | 2.0 sound bar |
| Reference RMS rated | 2 x 30W = 60W |
| Standby | Yes, at 0.7W |
| AC input | 110-220V — 50/60Hz (auto-sensing) |
| Buttons in soundbar | Power/source, Play/pause, Previous track/volume -, Next track/volume + |
| Buttons in remote control | Power, Reset, Mute, Volume +, Volume -, play/pause, Next track, Previous track, BT, ARC, Opt, AUX, USB, EQ |
| Speaker | |
| Driver unit | 2x 2-inch full range drivers (4580) |
| Maximum power output (RMS) | 60W |
| Frequency | 140 Hz – 20k Hz |
| Impedance | 40 |
| Sensitivity | 980mV |
| Signal to noise ratio | ≥58 |
| Connectivity | |
| Connection type | Bluetooth® v5.0-compatible, USB input |
| Audio input ports | HDMI ARC, optical digital, RCA input |
| Wireless frequency | 2.4GHz |
| Wireless range | ≥33 ft |
| Additional information | |
| Display | Orange LED display |
| Equalizer | Preset settings: pop, classic, jazz, country, normal, rock |
| Product dimensions | 31.5 x 2.5 x 3.7 in |
| Product weight | 3.9 lb. |
| Cable length | Power cable: 5.2 ft, Aux/RCA cable: 3.9 ft, optical cable: 5.2 ft |
| Package content | Soundbar, auxiliary 3.5mm/RCA cable, digital optical cable, remote control, user’s guide, 2 AAA batteries |
KlipXtreme® is a registered trademark. All rights reserved. The Bluetooth® word mark is owned by Bluetooth SIG, Inc. The terms HDMI, HDMI High-Definition Multimedia Interface, HDMI Trade dress and the HDMI Logos are trademarks or registered trademarks of HDMI Licensing Administrator, Inc. Other trademarks and trade names are the property of their respective owners. Any mention of such is only intended for identification purposes, and therefore shall not be construed as a claim to any or all rights pertaining to those brands. Made in China.


