
![]() User
User
Manual Book
Built in Gas Hob
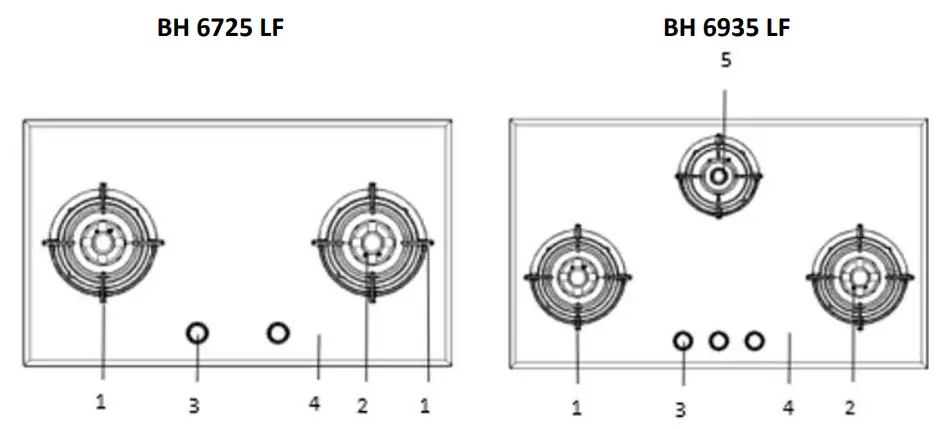
BH 6725 LF Built in Gas Hob
| BH 6725 LF | BH 2933 LL | BH 1645 |
| BH 6935 LF | BH 2723 LL | BH 1325 |
| BH 4934 | BH 2933 LJ | BH 1315 |
| BH 4724 | BH 2723 LJ | BH 1945 LA |
| BH 2937 | BH 7723 LLD | BH 1725 LG |
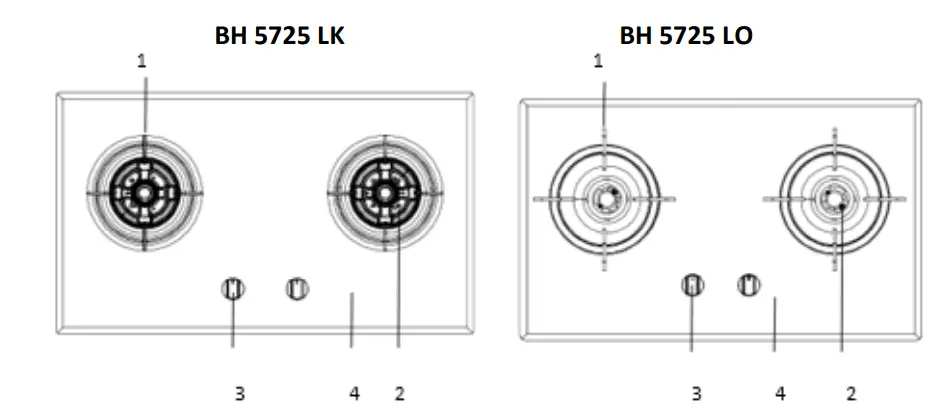
| BH 2727 | BH 1935 LA | BH 5725 LK |
| BH 4937 | BH 1935 LB | BH 5725 LO |
| BH 4727 | BH 1725 LA | BH 1728 |
| BH 2934 | BH 1725 LB | BH 1728 LA |
| BH 2724 | BH 1725 LA MASSA | BH 1728 LB |
| BH 2725 | BH 1945 | BH 1725 LAT |
| BH 2935 | BH 1935 | BH 1725 LBT |
| BH 0935 | BH 1735 | BH 1725 MIMA |
| BH 0725 | BH 1725 | BH 1725 LG |
| BH 0325 | BH 1725 W |
This guide book explains everything you need to know about your new product.
Please contact our Customer Care should you need further assistance through www.modena.com
PART 1: SAFETY WARNINGS
If you do Not understand about the procedure installation of gas cooker, you should contact MODENA Service Center to perform the installation.
Prepare the support equipment required for installation like:.
- LPG gas cylinder.
- Gas hose with a safety standard for lack.
- Clamp.
- Gas regulator clamp / hose clamp with a lowpressure type.
- Matches / gas lighter.
Room air ventilation
The air in the room that will be put gas appliances must have good ventilation so that air can flow / move smoothly (there is circulation), if the air in the room can Not flow then the air in the room will contain more combustion of the gas compared to oxygen. It will cause the flame on the stove / burner is Not perfect (a yellow flame because lack of oxygen). Therefore, the room that will be put gas appliances should have good ventilation.
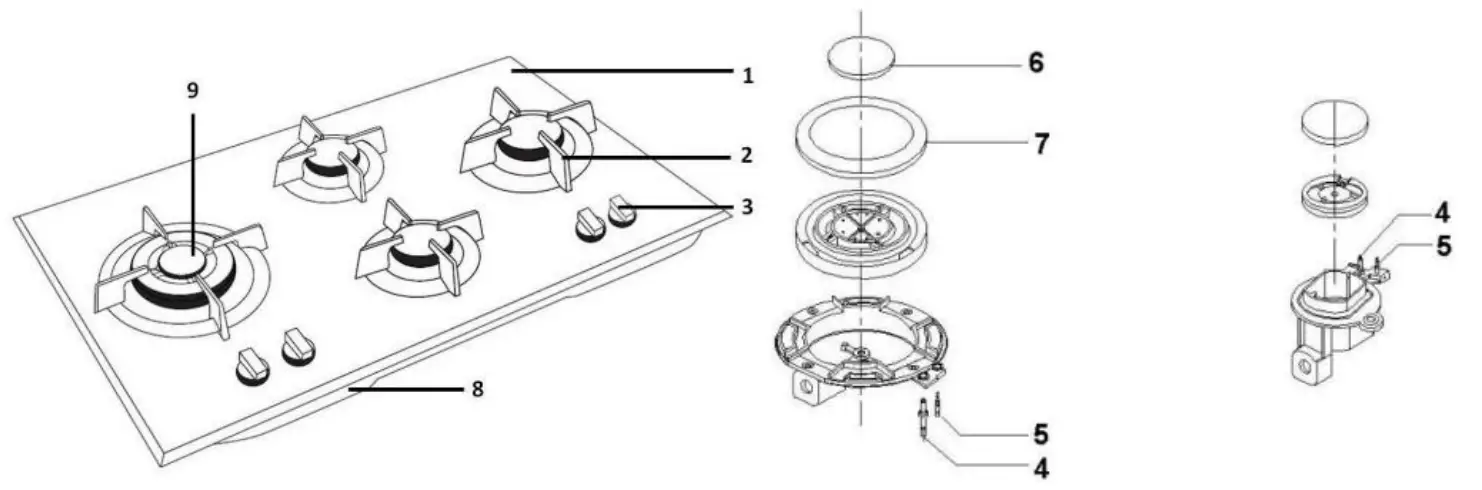
PART 2: NAME OF PARTS
- Grid
- Burner
- Knob
- Tempered Glass
- Grid
- Burner
- Knob
- Tempered Glass
- Semi-rapid Burner
BH Series
- Upper Plate
- Grid
- Control Knob
- Lighter Plugs
- Gas Safety Sensor
- Small Fire Pit
- Large Fire Pit
- Bottom Plate
- Burner
BH 7723 LLD
- Grid
- Burner
- Control Panel
- Tempered glass
- Image is a general overview and is not necessarily the same as the product you receive.
- The features and product specifications depend on the product type
PART 3: INSTALLATION
Adjusting the Stove on Kitchen Table
- Stove can be installed on the kitchen table as long as the table is resistant to heat. To make a hole at the kitchen table use cardboard templates to customize the size. Make a hole should be proportional not too wide or too small.
- To ensure the final result in accordance with the installation plan, before making the planting hole check the distance between the bottom plate to the top plate.
- Check if the size of the hole on the kitchen table is appropriate to put the stove.
- If the stove with a top plate of glass will be installed parallel to the tile, to install make a distance of at least 2 mm for expansion.
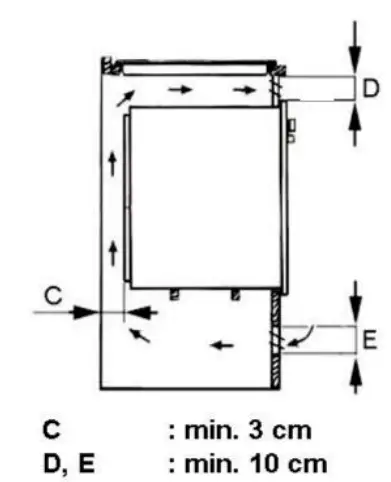
- Free area under the stove must be more than 40 cm, and the distance to objects on the stove should be more than 100 cm.
- It is recommended to use a cabinet / counter with a width of more than 55 cm, make a hole at the front of the open air circulation cabinets / counter.
- The size of the hole to put the stove on the kitchen table is as follows.
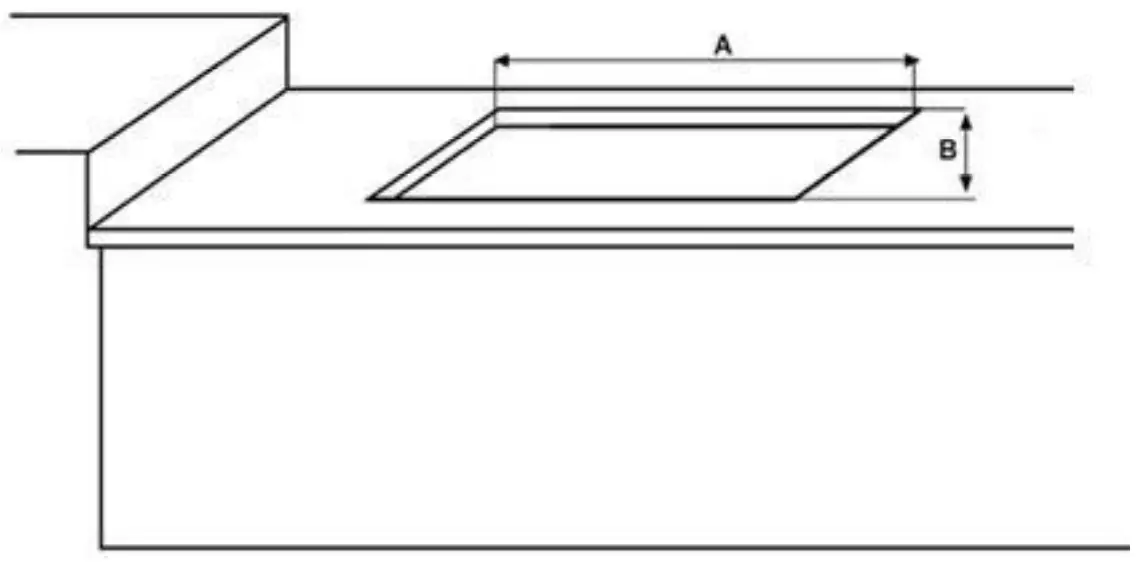
| Type | A(mm) | B(mm) | Type | A(mm) | B(mm) |
| BH 5725 LK BH 5725 LO | 635 | 350 | BH 0325 BH 1315 BH 1325 | 268 | 480 |
| BH 2723 LL | 722 | 428 | BH 7723 LLD | 703 | 403 |
| BH 6935 LF | 820 | 475 | BH 1725 LG | 670 | 370 |
| BH 6725 LF | 685 | 400 | BH 0725 BH 1725 BH 1725 W BH 1725 LA BH 1725 LB BH 1725 LA MASSA BH 1725 LA FIRENZE BH 1725 LA CECINA BH 2724 BH 2725 BH 4724 BH 1735 BH 4727 BH 2727 BH 1728 BH 1728 LA BH 1728 LB BH 1725 LAT BH 1725 LBT BH 1725 MIMA BH 2723 LJ | 660 | 360 |
| BH 1645 | 552 | 472 | |||
| BH 0935 BH 1935 BH 1935 LA BH 1935 LB BH 2935 BH 4934 BH 1945 BH 1945 LA BH 2934 BH 2933 LL BH 2933 LJ BH 2937 BH 4937 | 827 | 470 |
ATTENTION!
If the stove is installed with oven under heat, separator panel must be placed under the stove and frame underneath with a minimum distance of 10 cm.
NOTE
For the size of the hole a few other models that are Not contained In the above illustration can be seen in the table of specifications or can be consulted to MODENA Service Center
Installing The Stove On The Kitchen Table Hole
To install the stove in your kitchen table hole, do the followings:
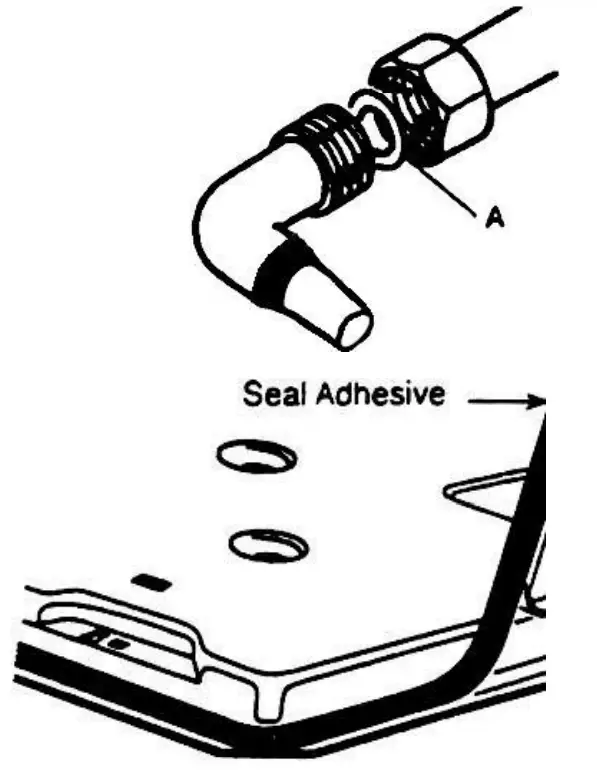
- Connect the hose that connecting the gas pipe, and tighten using a wrench
- Before installing the pipe that connecting the gas hose, check and make sure whether the gasket / seal (A) has already installed.

- Perform installation properly Elbow, where the main pipe with Elbow should us e a seal, to avoid gas leakage.

- Use of two pass key 22 & 24 (adjusted) at the time of going to Elbow perform installation, test connections with soapy water, make sure there are no leaks.
- Installation should be performed by experienced technicians, all forms of loss and adverse effects due to improper installation or MODENA technician, then it is not be the responsibility of MODENA.
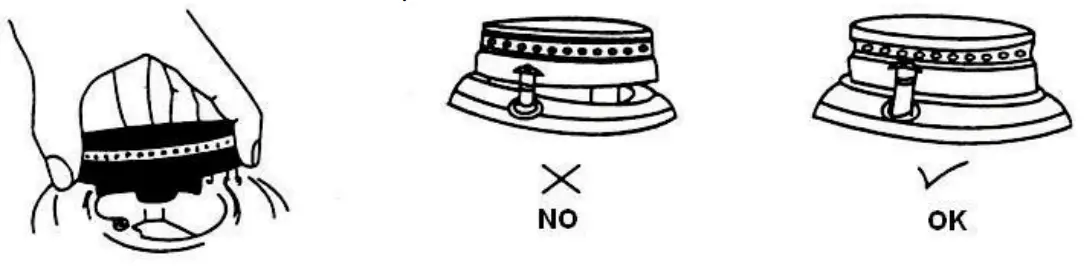
- Embed Seal Adhesive (glue) along the bottom edge of the stove. It is necessary to keep the moisture on the bottom of the stove.
- Connect the gas hose to the stove, and tighten the connection with the hose clam p. Then do leak test on the gas hose connection with your stove.
- Put the stove on the kitchen table hole, then to tighten use a hook which has been available on stove packaged equipment.
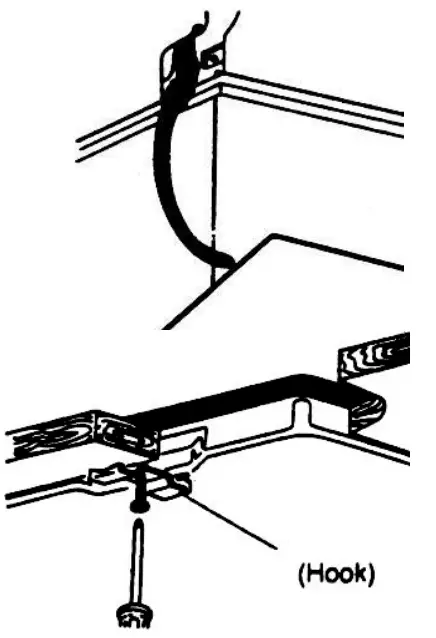
CATATAN
For some products with certain models does not include clip (hook)
- Install the Burner set on its position

- Install the regulator on gas tube and stove is already use
ATTENTION:
- To avoid gas leakage, please use gas standard hose with gas safety device.
- Use the hose and regulator are perfect to avoid gas leaks can cause explosions.
- Do not use a high pressure regulator.
PART 4: HOW TO USE
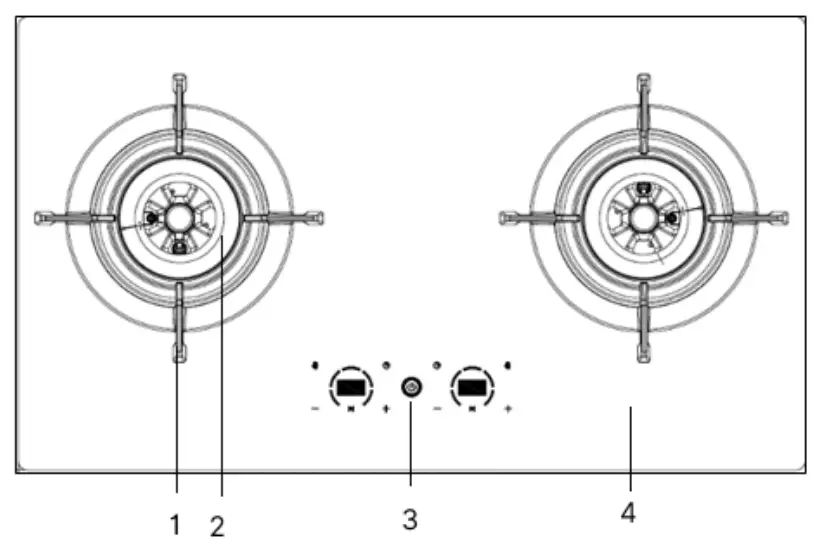
Control Knob
The amount of gas flow in the furnace / burner can be set on the knob as shown in the figure below:
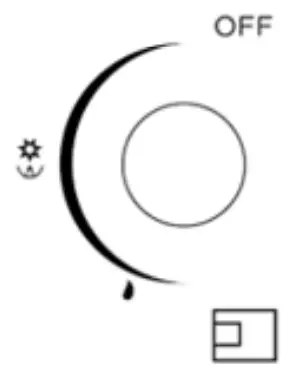 | •/OFF | Off |
| Maximum Gas Flow | ||
| Minimum Gas Flow | ||
| Burner Position |
Lighting The Burner
To ignite the flame easily, light the burner before placing the cooking utensil on the pan support.
For the model with electric ignition switch united with the knob.
To turn on the burner, push the knob and then turn to counterclockwise until the maximum fire symbol. By pressing the knob, it ignites automatically.
For the model using safety valve:
some of built-in gas-cooker models are included with safety valve that functioned to automatically cut off the gas flow if the burner doesn’t turn on. To turn on the burner, turn the knob to the maximum gas, then push for 3-5 second. Released the knob if the fire has turned on and adjusts the fire by turning the knob to the desired position.
At the first time there are times when the cigarette lighter does not run smoothly, do the lighter several times. If the process fails or long lighters could be because the battery has run out / damaged.
For model without electric ignition :
To light the burner with the condition doesn’t have electric power, turn on the fire using matches and approach the fire to the upper side of burner than push the knob and turn counter clockwise until the maximum fire symbol condition.
- To decrease / increase the fire on turned on burner :
Turn the knob to position the maximum fire sign or direction of the position of the minimum fire sign. - To use the minimum fire: Turn the knob to gas flow – Minimum
 .
. - To turn off the fire on burner : Turn the knob to “OFF” symbols.
ATTENTION
In the event of a gas leak, do not turn on electronic equipment, turn on the fan or testing by fire. Close the gas valve as soon as possible and open the whole window / vent.
Other BH Series
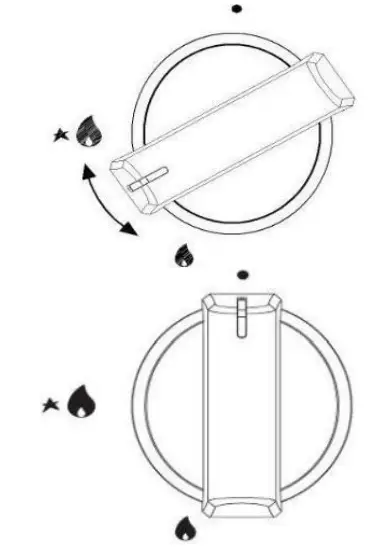
Control Knob
The symbols on the control knobs mean the following:
| No gas flow / OFF | |
| Maximum gas flow | |
| Minimum gas flow | |
| Automatic Ignition |
![]()
Lighting the Burner
To acquire the flame easily, light the burner before placing the cooking utensil on the pan support.
For the model with electric ignition switch united with the knob.
This model as sign with symbol ![]() beside of symbol
beside of symbol![]() (maximum gas stream).
(maximum gas stream).
To turn on the burner, push the knob and then turn to counter clockwise until the maximum fire symbol. By pressing the knob, automatically its turn on the ignition.
For the model using safety valve :
Some of built-in gas-cooker models are included with safety valve that functioned to automatically cut off the gas flow if the burner doesn’t turn on. To turn on the burner, turn the knob to the maximum gas, then push for 4-5 second. Released the knob if the fire has turned on and adjusts the fire by turning the knob to the desired position For model without electric ignition:
To light the burner without automatic ignition plug, or light the burner at the condition does n’t have electric power, turn on the fire using matches and approach the fire to the upper side of burner than push the knob and turn counter clockwise until the maximum fire symbol condition.
To decrease / increase the fire on turned on burner:
Turn the knob to the maximum fire symbols or the minimum fire symbols
To turn off the fire on burner:
Turn the knob to “OFF” symbol
NOTE
Checked whether the flame is smooth and blue. If the color is red/yellow and generates a thundering sound from the burner, turn off the flame and repeat this until the flame is smooth and blue color
Touch Control BH 7723 LLD
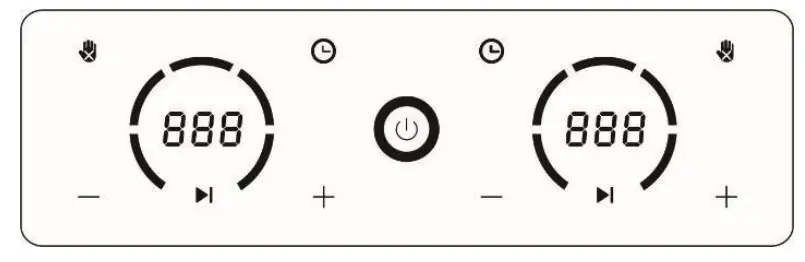
![]() Power Button
Power Button
Press this button once to turn off the appliance, LED display will light up and the appliance will enter standby mode. To turn off the appliance, press this button once again and display will be turned off.![]() Ignition Button
Ignition Button
In standby state, press the ignition button of the desired burner once to light up the flame.
+ Plus Button
When the fire had been lit up, press this key to increase the flame. Each press of the button increases one stage of flame.
– Minus Button
Press this button to reduce the flame. Each press of the button reduces one stage of flame.![]() Timer Button
Timer Button
Long press the button to enter timer setting mode. Adjust the timer by pressing the + and – button, and press the button once again to start the timer. Long press the button to cancel the ongoing timing process.![]() Overheat Indicator
Overheat Indicator
After shutting the cooker off, if the temperature on the surface still exceeds 50℃, the panel will show this indicator until the temperature decreases.
Ignition and fire control
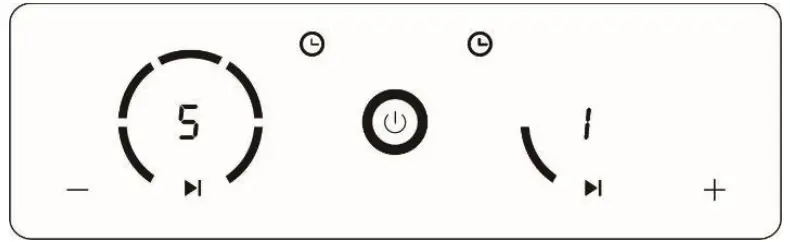
Press ignition button to ignite the flame, the flame will burn in the biggest stage, and LED display will show the number 5.
Stages according to the usage:
- Stage 1: Reheating and heat-preserving
- Stage 2: Cooking soup and stews
- Stage 3: Steaming
- Stage 4: Frying/Deep Frying
- Stage 5: Stir-frying
Setting the Timer
- When the burner has been lit, long press timer button
 to enter timer setting mode. The LED display will light up.
 - Press + and – button to adjust the time that shows up in the LED display.
- Press the timer button again to start the timer. The display will show the stage of the burner and the timer alternately. When timer ends, flame will be put out automatically and the buzzer will ring.
NOTE
The timer can be set between 1-199 minutes
Overheat reminder
After the appliance is turned off, if the glass surface exceeds 50℃, the overheat indicator will light up until the temperature is safe to touch. Pay attention to avoid touching the glass panel if the indicator is on.
Auto-cutoff protection
If in the middle of cooking process there is a strong wind blowing that puts out the fire, or spilled food that causes the fire to burn abnormally, the protective device in the cooker will automatically cut off the gas flow to prevent further combustion.
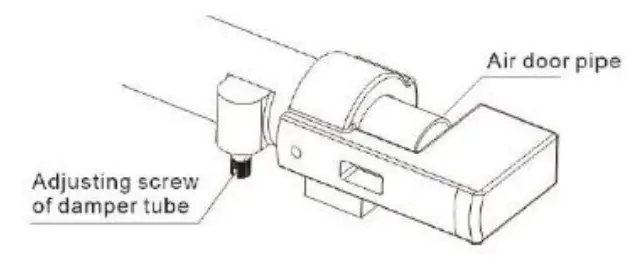
Air adjusting device
This appliance is equipped with an air-adjusting damper to adjust the air inside the burner for burning process. If the fire is abnormal (i.e. red, yellow, or unstable), adjust the damper with a screwdriver until the fire turns back to normal.
BH 1725 LAT & BH 1725 LBT
Timer controls on left burners. When the timer is set, it will count backwards. “0”, display shows “OFF”. All burners turn off, warning “BEE” will sound.
TIMER control
![]()
- “–”, default setting. Connect the power, it sounds “Bee” once and display show “- -”. 5 second later, display turn off automatically.
- Pressing the TIMER button to control timer ON and OFF.,
- Press timer button, display shows “ON”. Then set the desired cooking time by pressing “-” and “+” buttons. This timer can be set from 1min to 120mins. Once time is set and no future operation, it will start to count backward automatically.
- Once set time count backwards to zero, display shows “0”. Warning “BEE” will sounds until user press any button and turn all burner control knobs to OFF.
- If Timer is counting backwards, but all burners turn off by burner control knob, the timer will keep count backwards to zero, then display shows “ON”..
How to Use the Burner
To use the burner properly, compare the burner diameter with cooking equipment diameter. Cooking equipment diameter must be proportional to the power of burner so we can save the gas usage and fasten the cooking process.
| Burner | Recommended Pot Diameter (cm) |
| Small | 12–14 |
| Medium | 14-20 |
| Large | 18-26 |
| Double Ring | 18-28 |
| Triple Ring | 18-28 |
![]()
Diameter of cooking equipment does not exceed the maximum recommended size based on the above table.
If the diameter exceeds the size of the cooking equipment that has been recommended, then the hot stove/burner cannot circulate properly, this can cause the glass top plate broken.
Maximum load of cooking equipment and food ingredients are 10 kg.
PART 5: MAINTENANCE
MODENA gas cooker are designed specifically for long-term use of time so it does not require complex treatment. However, there are some things that are encouraged to care for your gas cooker quality.
Enameled Part
Clean enameled layer with sponge and warm soap water. Do Not use the abrasive detergent. Dry after washing process
Stainless Steel Part
Clean stainless steel part with a wet towel or special detergent for stainless material. After that, dry it with soft towel.
Grid
Part of enameled grid can be wash or put into the dishwasher
Burner Burner can be removed and cleaned using soapy water. After cleaning, dry the burner completely and reinstall it with the right position.
Ignition Plug and Gas Safety Device
Clean the ignition plug and gas safety device after cooking, especially if there are drops or spills from the pan during cooking
PART 6: TROUBLESHOOTING
| Problem | Possible Cause | Recommended Action |
| Ignition does not work | •Battery runs out. •Control knob is not in maximum fire position. | •Make sure that the battery is installed correctly. •Ensure the battery is still charged electricity. •Ensure knob has been pressed and rotated toward the star symbol. |
| Gas Leakage | •Knob is not in OFF position. •Gas leakage due to improper gas hose and regulator installation. | •Ensure all knobs are in the OFF position. •Check whether the gas hose and regulator have been installed properly. •Perform a gas leak test at the gas hose, regulators, and cylinders, especially on the connectors. •If you still able to smell the gas, disconnect the regulator from the cylinder immediately, do not light a fire. •Contact MODENA Call Center for service. |
| Fire is not normal (Red / small / unstable) | •Gas supply obstructed/interfered. | •Make sure that the holes in the burner is not clogged with spillovers. •Clean the burner, including the fire holes. |
| •Insufficient gas amount. | •Check the gas amount on the regulator’s gas indicator. Make sure the gas amount is still sufficient. | |
| •Lack of oxygen supply due to improper air circulation. | •Make sure that the room’s air circulation is convenient for gas use. |
PART 7: PRECAUTION
- Always lower the heat or turn off the fire before lifting pan from the burner.
- During cooking process, fat or oil must be carefully treated because this material can be burn if its reach certain temperature.
- When you smell gas, immediately release the regulator from the gas tank, do not light a fire and immediately contact MODENA Service Center.
- Frequently check the gas hose, to make sure that gas hose is far from hot surface, and Not in bent position. Make sure the outer surface of hose isn’t cracked so that can be a leakage.
- Always remember that territory around the gas stove can be hot for the long time (around 30 minutes) after you turn off the gas stove.
- Do the routine service on your built-in hob every 3 (three) month, because if the is something wrong on your Built-in hob, you can immediately detect and repair
PART 8: SPECIFICATION
| TYPE | BH 6725 LF | BH 6935 LF | BH 5725 LK | BH 5725 LO |
| Numbers of Burner | 2 | 3 | 2 | 2 |
| Burners Composition | 2 Triple Rings | 2 Triple Rings + 1 Semi-rapid | 2 Triple Rings | 2 Triple Rings |
| Gas Safety Device | Yes | Yes | Yes | Yes |
| Ignition Source | Battery | Battery | Battery | Battery |
| Material | Glass | Glass | Glass | Glass |
| Pan Support | Yes | Yes | Yes | Yes |
| Wok Adaptor | No | No | No | No |
| Product Dimension (L x W x H) mm | 780 x 450 x 120 | 820 x 520 x 120 | 780 x 450 x 120 | 730 x 420 x 120 |
| Cut-out dimension (L x W) mm | 685 x 400 | 820 x 475 | 635 x 350 | 635 x 350 |
| TYPE | BH 2733 LL | BH 2933 LL | BH 2723 U | BH 2933 U | BH 7723 LLD |
| Numbers of Burner | 2 | 3 | 2 | 3 | 2 |
| Burners Composition | 2 Double Rings | 2 Double Rings + 1 Semi-rapid | 2 Double Rings | 2 Double Rings + 1 Semi-rapid | 2 Double Rings |
| Gas Safety Device | Yes | Yes | Yes | Yes | Yes |
| Ignition Source | Battery | Battery | Battery | Battery | AC Power |
| Material | Glass | Glass | Glass | Glass | Glass |
| Pan Support | Yes | Yes | Yes | Yes | Yes |
| Wok Adaptor | No | No | No | No | No |
| Product Dimension (L x W x H) mm | 780 x 480 x 100 | 865 x 510 x 100 | 780 x 480 x 100 | 865 x 510 x 100 | 780 x 450 x 100 |
| Cut-out dimension (L x W) mm | 722 x 428 | 827 x 470 | 660 X 360 | 827 x 470 | 703 x 403 |
| TYPE | BH 4724 | BH 4934 | BH 4727 | BH 4937 |
| Numbers of Burner | 2 | 3 | 2 | 3 |
| Burners Composition | 2 Double Rings | 2 Double Rings + 1Medium Burner | 2 Double Rings | 2 Double Rings + 1Medium Burner |
| Gas Safety Device | Yes | Yes | Yes | Yes |
| Ignition Source | Battery | Battery | Battery | Battery |
| Material | Glass | Glass | Glass | Glass |
| Pan Support | Yes | Yes | Yes | Yes |
| Wok Adaptor | No | No | No | No |
| Product Dimension (L xW x H) mm | 780x450x100 | 865x510x100 | 780x450x100 | 865x510x120 |
| Cut-out dimension (L xW) mm | 660 x 360 | 827×470 | 660 x 360 | 827×470 |
| TYPE | BH 1725 LA | BH 1725 LB | BH 1935 LA | BH 1935 LB |
| Numbers of Burner | 2 | 2 | 3 | 3 |
| Burners Composition | 2 Triple Rings | 2 Triple Rings | 2 Triple Rings + 1 Medium Burner | 2 Triple Rings + 1 Medium Burner |
| Gas Safety Device | Yes | Yes | Yes | Yes |
| Ignition Source | Battery | Battery | Battery | Battery |
| Material | Glass | Glass | Glass | Glass |
| Pan Support | Yes | Yes | Yes | Yes |
| Wok Adaptor | Yes | Yes | Yes | Yes |
| Product Dimension (L x W x H) mm | 730x420x120 | 730x420x120 | 865x510x100 | 865x510x100 |
| Cut-out dimension (L x W) mm | 660×360 | 660×360 | 827×470 | 827×470 |
| TYPE | BH 2724 | BH 2934 | BH 2727 | BH 2937 |
| Numbers of Burner | 2 | 3 | 2 | 3 |
| Burners Composition | 2 Triple Rings | 2 Triple Rings + 1 Medium Burner | 2 Triple Rings | 2 Triple Rings + 1 Medium Burner |
| Gas Safety Device | Yes | Yes | Yes | Yes |
| Ignition Source | Battery | Battery | Battery | Battery |
| Material | Glass | Glass | Glass | Glass |
| Pan Support | Yes | Yes | Yes | Yes |
| Wok Adaptor | Yes | Yes | No | No |
| Product Dimension (L x W x H) mm | 730x420x120 | 865x510x120 | 730x420x120 | 865x510x120 |
| Cut-out dimension (L x W) mm | 660X360 | 827×470 | 660X360 | 827×470 |
| TYPE | BH 1725 LA MASSA / LA FIRENZE / LA CECINA / BH 1725 MIMA | BH 2725 | BH 2935 | BH 1725 LG |
| Numbers of Burner | 2 | 2 | 3 | 2 |
| Burners Composition | 2 Triple Rings | 2 Triple Rings | 2 Triple Rings + 1 Medium Burner | 2 Triple Rings |
| Gas Safety Device | Yes | Yes | Yes | Yes |
| Ignition Source | Battery | Battery | Battery | Battery |
| Material | Glass | Glass | Glass | Glass |
| Pan Support | Yes | Yes | Yes | Yes |
| Wok Adaptor | Yes | Yes | Yes | Yes |
| Product Dimension (L x W x H) mm | 730x420x120 | 730x420x120 | 865x510x100 | 760×450 |
| Cut-out dimension (L x W) mm | 660×360 | 660×360 | 827×470 | 670 X 370 |
| TIPE | BH 1728 | BH 1728 LA | BH 1728 LB | BH 1725 LAT | BH 1725 LBT |
| Numbers of Burner | 2 | 2 | 2 | 2 | 2 |
| Burners Composition | 2 Triple Rings | 2 Triple Rings | 2 Triple Rings | 2 Triple Rings | 2 Triple Rings |
| Gas Safety Device | Yes | Yes | Yes | Yes | Yes |
| Ignition Source | Battery | Battery | Battery | AC Power | AC Power |
| Material | Glass | Glass | Glass | Glass | Glass |
| Pan Support | Yes | Yes | Yes | Yes | Yes |
| Wok Adaptor | Yes | Yes | Yes | Yes | Yes |
| Product Dimension (L x W x H) mm | 730x420x120 | 730x420x120 | 865x510x100 | 730x420x120 | 730x420x120 |
| Cut-out dimension (L x W) mm | 660×360 | 660×360 | 827×470 | 660×360 | 660×360 |
| TYPE | BH 1945 | BH 1935 | BH 1735 | BH 1725 |
| Numbers of Burner | 4 Gas | 3 Gas | 3 Gas | 2 Gas |
| Burners Composition | 1 Triple Rings, 1 large, 1 medium, 1 small | 2 Triple Rings + 1 Medium Burner | 1 Triple Rings + 1 Large + 1 Medium | 2 Triple Rings |
| Gas Safety Device | Yes | Yes | Yes | Yes |
| Ignition Source | Battery | Battery | Battery | Battery |
| Material | Glass | Glass | Glass | Glass |
| Pan Support | Yes | Yes | Yes | Yes |
| Wok Adaptor | Yes | Yes | Yes | Yes |
| Product Dimension (L x W x H) mm | 865x510x120 | 865x510x120 | 730x420x120 | 730x420x120 |
| Cut-out dimension (L x W) mm | 827×470 | 827×470 | 660X360 | 660×360 |
| TYPE | BH 1725 W | BH 1645 | BH 1315 | BH 1945 LA |
| Numbers of Burner | 2 Gas | 4 Gas | 1 Gas | 4 Gas |
| Burners Composition | 2 Triple Rings | 1 Triple Rings, 1 large, 1 medium, 1 small | 1 Triple Rings | 1 Triple Rings, 1 large, 1 medium, 1 small |
| Gas Safety Device | Yes | Yes | Yes | Yes |
| Ignition Source | Battery | Battery | Battery | Battery |
| Material | Glass | Glass | Glass | Glass |
| Pan Support | Yes | Yes | Yes | Yes |
| Wok Adaptor | Yes | Yes | Yes | Yes |
| Product Dimension (L x W x H) mm | 730x420x120 | 600x510x100 | 295x510x100 | 865x510x120 |
| Cut-out dimension (L x W) mm | 660×360 | 555×473 | 266×478 | 827×470 |
| TYPE | BH 1325 | BH 1325 LA | BH 0935 | BH 0325 | BH 0725 |
| Numbers of Burner | 2 | 2 | 3 | 2 | 2 |
| Burners Composition | 1 Triple Rings + 1 Medium Burner | 1 Triple Rings +1 Medium Burner | 2 Triple Rings + 1 Medium Burner | 1 Triple Rings+ 1 Medium | 2 Triple Rings |
| Gas Safety Device | Yes | Yes | No | No | No |
| Ignition Source | Battery | Battery | Battery | Battery | Battery |
| Material | Glass | Glass | Glass | Glass | Glass |
| Pan Support | Yes | Yes | Yes | Yes | Yes |
| Wok Adaptor | Yes | Yes | Yes | Yes | Yes |
| Product Dimension (L x W x H) mm | 295 x 510 x 100 | 295 x 510 x 100 | 865x510x120 | 295x510x100 | 730x420x120 |
| Dimensi Lubang(L x W) mm | 266 x 473 | 266 x 473 | 827×470 | 266×478 | 660×360 |
The specifications of this product can be changed without notice to improve product quality
The images in this manual are general descriptions and may not match the actual product. The values listed on the label or in the documentation contained there in are obtained from laboratories that comply with the relevant standards.
Depending on the environmental and operating conditions of the device
Ciao ! MODENA
NATIONWIDE CALL CENTER![]() 15 00715
15 00715![]() 08151.15.007.15
08151.15.007.15
.www.modena.com
PT MODENA INDONESIA
Jl. Industri Raya I Blok D-8,
Jatiuwung, Tangerang 15135


